回顾RHCE——邮件收发实验
邮件收发实验
- 一、Linux本地邮件收发实验
- 二、启用域名邮件收发实验
- 三、群发邮件实验
- 四、启用用户认证收发实验
一、Linux本地邮件收发实验
- 安装相关软件包
[root@localhost ~]# dnf install postfix mailx -y
- 启服务
[root@localhost ~]# systemctl start postfix
- 添加用户并查看
[root@localhost ~]# useradd redhat
[root@localhost ~]# id redhat
uid=1000(redhat) gid=1000(redhat) groups=1000(redhat)
- 发邮件
#发邮件给redhat用户
[root@localhost ~]# mail redhat
Subject: test014^H
- 切换用户并查收邮件
[root@localhost ~]# su - redhat
[redhat@localhost ~]$ mail
Heirloom Mail version 12.5 7/5/10.  Type ? for help.
"/var/spool/mail/redhat": 1 message 1 new
>N  1 root                  Wed Dec  8 12:35  18/639   "test01"
&
(略)
二、启用域名邮件收发实验
- 编辑postfix服务的主配置文件
94 myhostname = mail.baidu.com
95 #myhostname = host.domain.tld
96 #myhostname = virtual.domain.tld
97
98 # The mydomain parameter specifies the local internet domain name.
99 # The default is to use $myhostname minus the first component.
100 # $mydomain is used as a default value for many other configuration
101 # parameters.
102 mydomain = baidu.com
119 myorigin = $mydomain
120 #myorigin = $myhostname
129 #
130 inet_interfaces = all
135注释掉
186 #
187 mydestination = m y h o s t n a m e , l o c a l h o s t . myhostname, localhost. myhostname,localhost.mydomain, localhost,$mydomain
188 #mydestination = m y h o s t n a m e , l o c a l h o s t . myhostname, localhost. myhostname,localhost.mydomain, localhost, $mydomain
283 mynetworks = 192.168.100.0/24, 127.0.0.0/8
316 relay_domains = $mydestination
- 重启服务
[root@localhost ~]# systemctl restart postfix
- 向redhat用户发邮件
[root@localhost ~]# mail [email protected]
Subject: testyuming
yumingyoujian
EOT
- 切换用户并查收文件
[root@localhost ~]# su - redhat
Last login: Wed Dec  8 13:50:46 EST 2021 on pts/0
[redhat@localhost ~]$ mail
Heirloom Mail version 12.5 7/5/10.  Type ? for help.
"/var/spool/mail/redhat": 4 messages
>   1 root                  Wed Dec  8 12:35  19/650   "test01"
    2 root                  Wed Dec  8 13:18  19/571   "ssss"
    3 Mail Delivery System  Wed Dec  8 13:33  78/2474  "Undelivered Mail Returned to Sender"
    4 root                  Wed Dec  8 13:50  19/571   "testyuming"
三、群发邮件实验
- 编辑文件vim /etc/aliases
加入以下内容:
workgroup:redhat,pp
workgroup1:redhat,pp,hh - 使用postalias命令将别名文件转换成数据库
[root@localhost ~]# postalias /etc/aliases
- 发邮件
[root@localhost ~]# mail [email protected]
Subject: groupceshi
11111
EOT
四、启用用户认证收发实验
- 安装相关软件
[root@localhost ~]# dnf install cyrus-sasl dovecot *sasl* -y
- postfix主配置文件添加以下内容
vim /etc/postfix/main.cf
#启用SASL对客户端进行认证
broken_sasl_auth_clients = yes
#启用SASL认证
smtpd_sasl_auth_enable = yes
#禁用匿名用户
smtpd_sasl_security_options = noanonymous
#定义收件人限定
smtpd_recipient_restrictions =
permit_sasl_authenticated,permit_mynetworks,reject_unauth_destination
- 修改dovecot配置文件
①vim /etc/dovecot/dovecot.conf
24 #protocols = imap pop3 lmtp submission
25 protocols = imap pop3 lmtp
49 #login_trusted_networks =
50 login_trusted_networks = 192.168.100.0/24
②vim /etc/dovecot/conf.d/10-mail.conf
30 #mail_location =
31 mail_location = mbox:~/mail:INBOX=/var/mail/%u
- 重启服务
[root@localhost ~]# systemctl restart postfix
[root@localhost ~]# systemctl restart saslauthd
[root@localhost ~]# systemctl restart dovecot
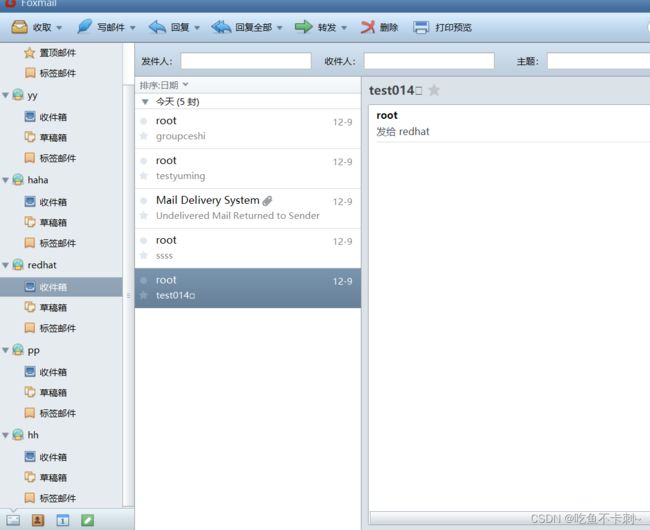
可以看到账号的收件箱存在之前收到的邮件。至此,这个实验完成。


