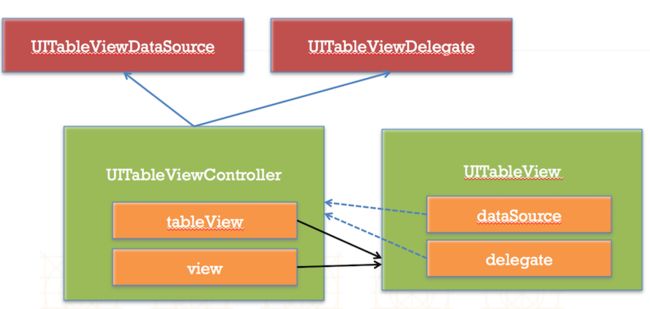
1.概念
它是基于UIScrollView的列表互动类。使用UITableView可以在屏幕上显示单元格的列表,每个单元格中还可以包含多项信息,在使用表格视图时,我们还可以将这些单元格划分为多个分区(section),以便将信息分为若干组,总而言之就是表格视图非常有用。使用它比较简单,通常4个步骤:创建UITableView的对象、绑定数据源和委托、获得数据模型、编写回调方法。当然,还可以通过继承或直接使用UITableViewController的方式来显示表格视图,但是我个人比较推荐的方式是根据需要直接创建UITableView的对象,通过委托及数据源对UITableView对象进行定制,再将定制好的UITableViewCell作为表格视图的单元格置于表格视图中。UITableView的设计严格遵循了MVC模式,通过数据源提供的模型来生成与表格内容有关的信息,数据源委托相当于控制器,当用户想要选择或编辑表格内容时,应用程序通过委托来响应这些变化,操作成功后还能够刷新数据模型以反映用户所做的修改。
2.结构
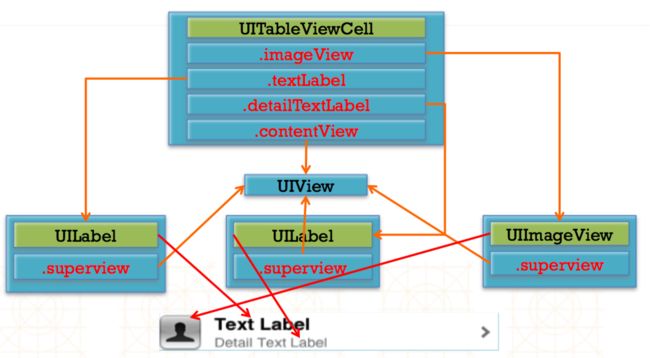
tableView层次结构
contentView下默认有3个子视图
2个是UILabel(textLabel、detailTextLabel)
1个UIImageView(imageView)
UITableViewCellStyle属性:
用于决定使用contentView的哪些子视图,以及这些子视图在contentView中的位置

3.cell简单认识
1.cell的结构
2.cell重用原理
1.当滚动列表时,部分UITableViewCell会移出窗口,UITableView会将窗口外的UITableViewCell放入一个对象池中,等待重用。2.当UITableView要求dataSource返回UITableViewCell时,dataSource会先查看这个对象池,如果池中有未使用的UITableViewCell,dataSource会用新的数据配置这个UITableViewCell,然后返回给UITableView,重新显示到窗口中,从而避免创建新对象
3.不同类型的Cell重用
解决方案:指定不同类型对应的重用标识来区分
1.UITableViewCell有个NSString*reuseIdentifier属性,可以在初始化UITableViewCell的时候传入一个特定的字符串标识来设置reuseIdentifier(一般用UITableViewCell的类名)。2.当UITableView要求dataSource返回UITableViewCell时,先通过一个字符串标识到对象池中查找对应类型的UITableViewCell对象,如果有,就重用,如果没有,就传入这个字符串标识来初始化一个UITableViewCell对象
4.注册cell
1.用类名注册[self.tableView registerClass:[TagCellclass]forCellReuseIdentifier:@"tgID"];2.通过xib / storyboard画的,注册 如下两张图:

屏幕快照 2016-08-26 下午4.57.46.png
后面复用

屏幕快照 2016-08-26 下午4.58.17.png
5.iOS8 , 自动计算Cell高度
// 告诉tableView的真实高度是自动计算的,根据你的约束来计算self.tableView.rowHeight =UITableViewAutomaticDimension;// 告诉tableView所有cell的估计行高self.tableView.estimatedRowHeight =44// 返回估算告诉,作用:在tablView显示时候,先根据估算高度得到整个tablView高,而不必知道每个cell的高度,从而达到高度方法的懒加载调用
4. 常用属性
// 1.UITableView的两种样式UITableViewStylePlain/UITableViewStyleGrouped// 2.设置背景颜色self.tableView.backgroundColor = [UIColorpurpleColor];// 3.设置索引条内部文字颜色self.tableView.sectionIndexColor = [UIColorcolorWithRed:1green:1blue:1alpha:1];// 4.设置索引条背景颜色self.tableView.sectionIndexBackgroundColor = [UIColorcolorWithRed:0green:0blue:0alpha:1];//5. 修改tableView的行高self.tableView.rowHeight =100;// 6.组头组尾的高self.tableView.sectionHeaderHeight =55;self.tableView.sectionFooterHeight =22;// 7.设置整个tablView的头部/尾部视图self.tableView.tableHeaderView = [[UISwitchalloc] init];self.tableView.tableFooterView = [UIButtonbuttonWithType:UIButtonTypeInfoDark];// 8.设置我们分割线颜色(clearColor相当于取消系统分割线)self.tableView.separatorColor = [UIColorclearColor];// 9.设置分割线样式(此为不要分割线None)self.tableView.separatorStyle =UITableViewCellSeparatorStyleNone;// 10.cell不让选中[cell setSelectionStyle:UITableViewCellSelectionStyleNone]; 或者:cell.selectionStyle =UITableViewCellSelectionStyleNone;
5.常用方法
#pragma mark - 数据源方法// 返回行数- (NSInteger)tableView:(nonnullUITableView*)tableView numberOfRowsInSection:(NSInteger)section{}// 设置cell- (UITableViewCell*)tableView:(nonnullUITableView*)tableView cellForRowAtIndexPath:(nonnullNSIndexPath*)indexPath{}#pragma mark - 代理方法// 设置行高- (CGFloat)tableView:(nonnullUITableView*)tableView heightForRowAtIndexPath:(nonnullNSIndexPath*)indexPath{return100;}// 添加每组的组头- (UIView*)tableView:(nonnullUITableView*)tableView viewForHeaderInSection:(NSInteger)section{ }// 返回每组的组尾- (UIView*)tableView:(nonnullUITableView*)tableView viewForFooterInSection:(NSInteger)section{ }// 选中某行cell时会调用- (void)tableView:(nonnullUITableView*)tableView didSelectRowAtIndexPath:(nonnullNSIndexPath*)indexPath{NSLog(@"选中didSelectRowAtIndexPath row = %ld", indexPath.row);}// 取消选中某行cell会调用 (当我选中第0行的时候,如果现在要改为选中第1行 - 》会先取消选中第0行,然后调用选中第1行的操作)- (void)tableView:(nonnullUITableView*)tableView didDeselectRowAtIndexPath:(nonnullNSIndexPath*)indexPath{NSLog(@"取消选中 didDeselectRowAtIndexPath row = %ld ", indexPath.row);}// 设置UITableView的索引条,返回数组字符串集- (nullableNSArray *)sectionIndexTitlesForTableView:(UITableView*)tableView;
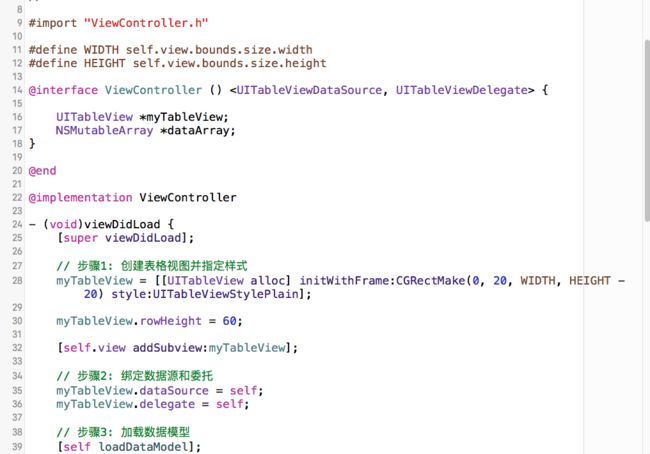
6.创建UITableView大致过程总结
1.表格的样式:iPhone上的表格分为普通样式和分组样式。在默认情况下,普通样式的背景是白色,上面会有透明的单元格。如果希望改变表格样式,需要在初始化时进行指定,一旦初始化完毕是不能够更改表格样式的。
2.设置数据源:设置UITableView的dataSource属性,该属性对应的指针指向的对象必须遵循UITableViewDataSource协议,并实现协议中的相关方法。通过该数据源除了获得单元格的数据之外,还可以指定表格中的分区数,每个分区的单元格数量,分区的头尾的标题,分区的索引等内容。
3.指定单元格:可以通过NSIndexPath变量来确定一个单元格,NSIndexPath结构体有两个成员,一个是section,一个是row,分别表示单元格所在的分区和分区中的第几行。
4.注册单元格:创建表格视图时,应该及早注册表格中使用的单元格,注册之后应该尽可能复用注册好的单元格而不是重复创建新的单元格,这种复用对节省内存是极好的。在注册的时候可以使用一个字符串作为标识符,稍后可以通过这个标识符获得可复用单元格。
5.设置委托:可以通过UITableView对象的delegate属性来对用户操作做出响应,可以响应表格滚动,用户编辑或者选中某行等事件。该属性代表的指针会指向一个遵循UITableViewDelegate协议的对象,由该对象负责实现事件发生时的回调方法。
7.常用功能讲解
7.1代码自定义不等高cell
1.新建一个继承自UITableViewCell的类2.重写initWithStyle:reuseIdentifier:方法 1).添加所有需要显示的子控件(不需要设置子控件的数据和fram,子 控件要添加到contentView中) 2).进行子控件一次性的属性设置(有些属性只需要设置一次, 比如字体\固定的图片)3.提供2个模型 1).数据模型: 存放文字数据\图片数据 2).frame模型: 存放数据模型\所有子控件的frame\cell的高度4.cell拥有一个frame模型(不要直接拥有数据模型)5.重写frame模型属性的setter方法: 在这个方法中设置子控件的显示数据和frame6.frame模型数据的初始化已经采取懒加载的方式(每一个cell对应的frame模型数据只加载一次)
7.2全局刷新、局部刷新
1).全局刷新
[self.tableView reloadData];
2).局部刷新
(1)局部section刷新
NSIndexSet* nd=[[NSIndexSetalloc]initWithIndex:1];//刷新第二个section[tableView reloadSections:nd withRowAnimation:UITableViewRowAnimationAutomatic];另外写法:[tableView reloadSections:[NSIndexSetindexSetWithIndex:1] withRowAnimation:UITableViewRowAnimationAutomatic];
(2)局部cell刷新
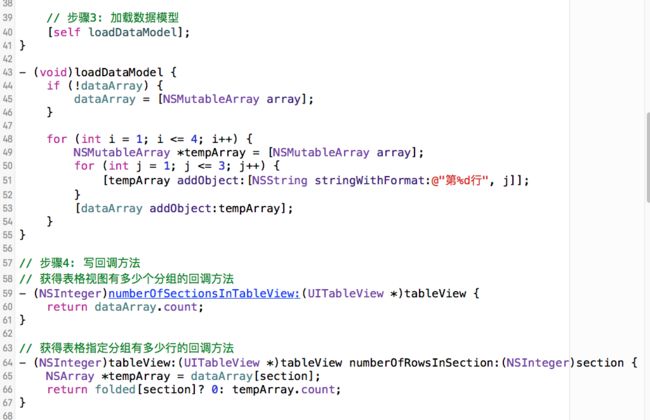
reloadRowsAtIndexPaths
例如:
NSIndexPath*te=[NSIndexPathindexPathForRow:2inSection:0];//刷新第一个section的第二行[tableView reloadRowsAtIndexPaths:[NSArrayarrayWithObjects:te,nil] withRowAnimation:UITableViewRowAnimationMiddle];另外写法:[tableView reloadRowsAtIndexPaths:@[[NSIndexPathindexPathForRow:2inSection:0]] withRowAnimation:UITableViewRowAnimationAutomatic];
修改Cell的模型数据可以使用reloadRowsAtIndexPaths...进行局部刷新
该方法使用的前提是模型数据的个数不变,因为修改并未修改模型数据的个数,所以可以使用该方法进行局部刷新
[self.tableView reloadRowsAtIndexPaths:@[indexPath] withRowAnimation:UITableViewRowAnimationBottom];
删除局部刷新,删除调用deleteRowsAtIndexPaths...方法
注意:这里注意,和添加操作一样我们不能使用UITableView提供的reloadRowsAtIndexPaths...方法 -> 使用的前提是模型数据数量不变
[self.tableView deleteRowsAtIndexPaths:@[[NSIndexPathindexPathForRow:0inSection:0]] withRowAnimation:UITableViewRowAnimationMiddle];
7.3tableView的编辑
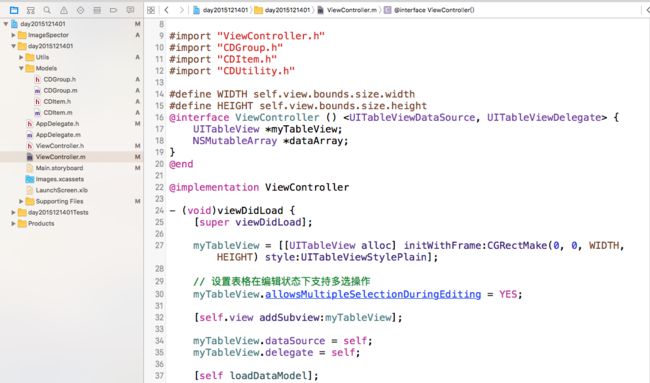
UITableView有一个名为editing的属性,如果将其设置为YES,UITableView就会进入编辑模式。UITableView在编辑模式下,用户可以管理UITableView中的表格行,例如添加、删除和移动等操作,但是编辑模式没有修改行的功能。
切换编辑模式:setEditing:animated:
增加行:insertRowsAtIndexPaths:withRowAnimation:
删除行:deleteRowsAtIndexPaths:withRowAnimation:
移动行:moveRowAtIndexPath:toIndexPath:
开始/结束更新:beginUpdates/endUpdates
刷新表格数据:reloadData
刷新指定位置数据:reloadRowsAtIndexPaths:withRowAnimation:
刷新指定区段数据:reloadSections:withRowAnimation:
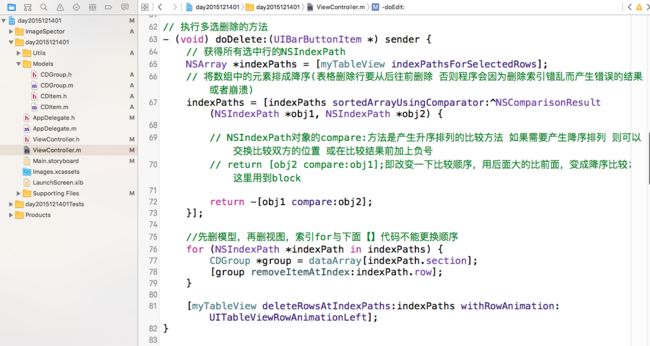
左滑功能

1、 让UITableView进入编辑状态,会出现左滑效果
// self.tableView.editing = YES;// self.tableView.editing = !self.tableView.editing; [self.tableView setEditing:!self.tableView.editing animated:YES];
2、 代理方法处理左滑效果时编辑事件处理
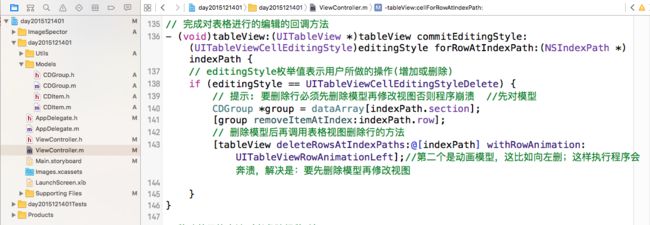
// 只要实现了这个方法,左滑出现删除按钮的功能就有了点击了左滑出现的“删除”按钮就会调用typedefNS_ENUM(NSInteger,UITableViewCellEditingStyle) {UITableViewCellEditingStyleNone,UITableViewCellEditingStyleDelete,UITableViewCellEditingStyleInsert}; - (void)tableView:(UITableView*)tableView commitEditingStyle:(UITableViewCellEditingStyle)editingStyle forRowAtIndexPath:(NSIndexPath*)indexPath
3、返回左滑右边执行删除操作按钮文字
- (NSString*)tableView:(nonnullUITableView*)tableViewtitleForDeleteConfirmationButtonForRowAtIndexPath:(nonnullNSIndexPath*)indexPath;
4.设置左滑显示对应按钮及其处理事件
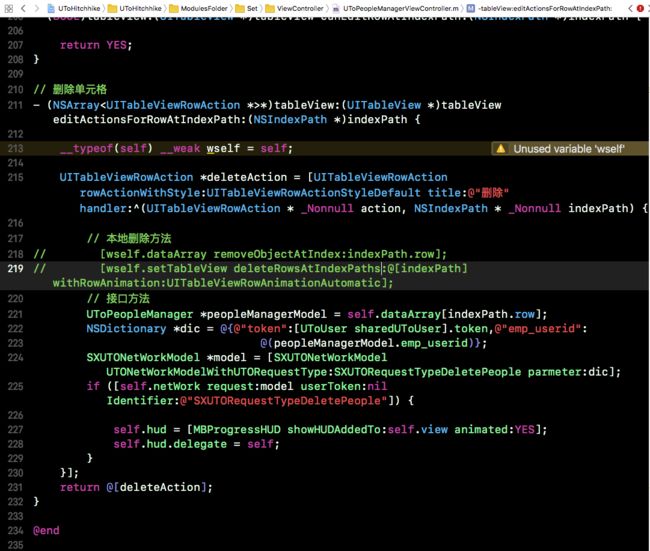
- (nullableNSArray *)tableView:(UITableView*)tableView editActionsForRowAtIndexPath:(NSIndexPath*)indexPathNS_AVAILABLE_IOS(8_0);
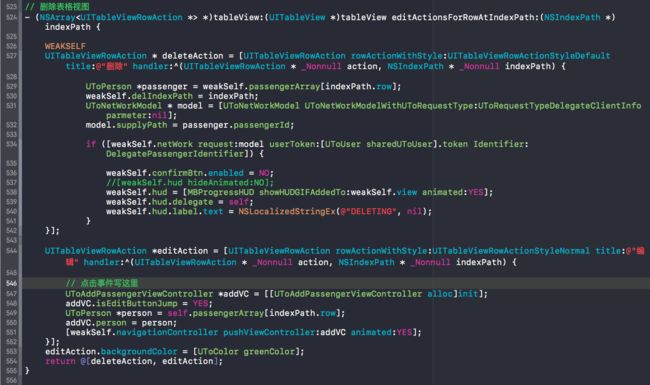
项目中的左滑删除功能代码(扫码上车):
selectPassengerList:这个是可变数组,装cell的数据

屏幕快照 2017-05-15 下午4.09.09.png

屏幕快照 2017-05-15 下午4.04.58.png
补充1:左滑显示多个按钮(自定义)
例子:左滑显示编辑和删除按钮

屏幕快照 2017-10-16 下午4.26.43.png
屏幕快照 2017-10-16 下午4.28.24.png

屏幕快照 2017-10-16 下午4.29.42.png
补充2:实现左滑调接口删除
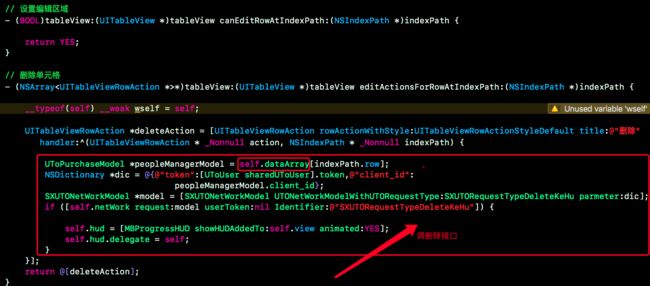
删除部分代码
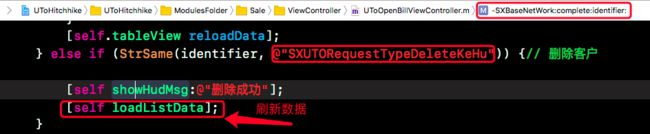
删除成功的回调
其他例子图片:
屏幕快照 2018-11-07 下午5.05.32.png
https://zhidao.baidu.com/question/754485262492780924.html
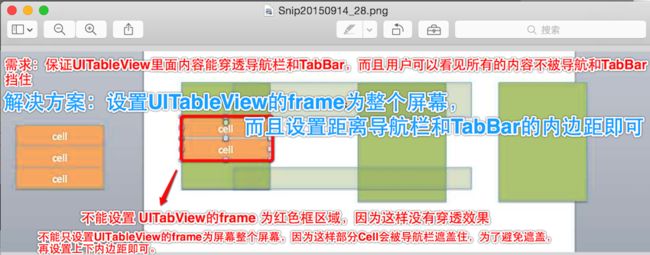
7.4tableView的内容能穿透导航栏与TabBar,而且内容都不被它们挡住

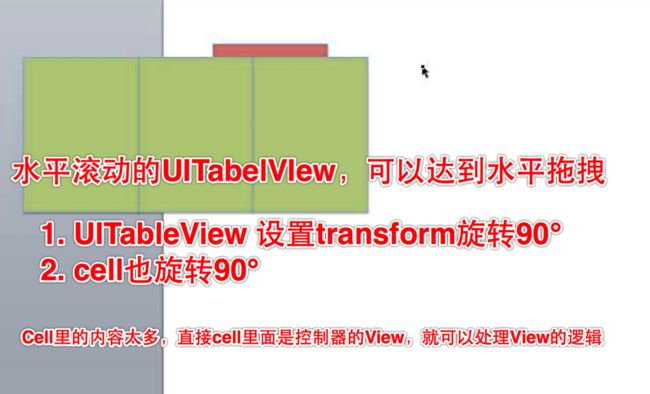
7.4如何实现水平滚动的UITableView
8.普通型表格视图~~~代码
屏幕快照 2016-08-05 上午11.17.01.png

屏幕快照 2016-08-05 上午11.17.34.png
#pragma mark UITableViewDelegate相关回调方法// 选中单元格的回调方法- (void)tableView:(UITableView*)tableView didSelectRowAtIndexPath:(NSIndexPath*)indexPath {}
运行结果如下图:
屏幕快照 2016-08-05 上午11.19.17.png
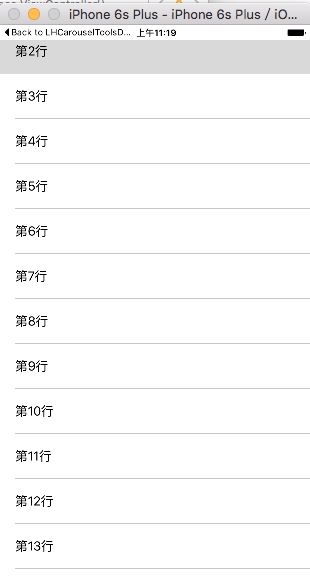
9.分组类表格视图~~~代码
可以将表格的内容分为若干个分区,事实上保存表格数据模型的数组中的元素也是数组,那么每个数组就是一个分区,数组中的元素对应着分区中的行。可以为分区建立索引以方便的切换到分区,也可以对分区的头尾进行定制,这些也是通过表格视图的数据源和委托来实现的。下面的例子演示了如何创建有若干个分区的表格视图。
1).普通的分组类型代码如下
屏幕快照 2016-08-07 上午1.18.32.png
屏幕快照 2016-08-07 上午1.18.49.png

屏幕快照 2016-08-07 上午1.19.03.png

屏幕快照 2016-08-07 上午1.19.36.png
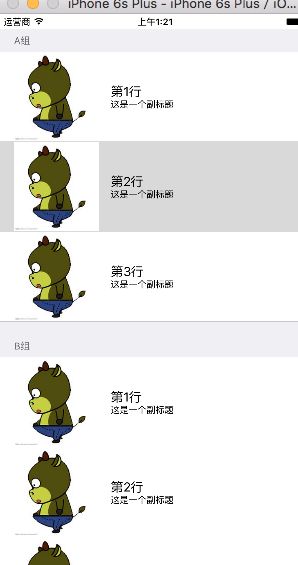
屏幕快照 2016-08-07 上午1.21.15.png
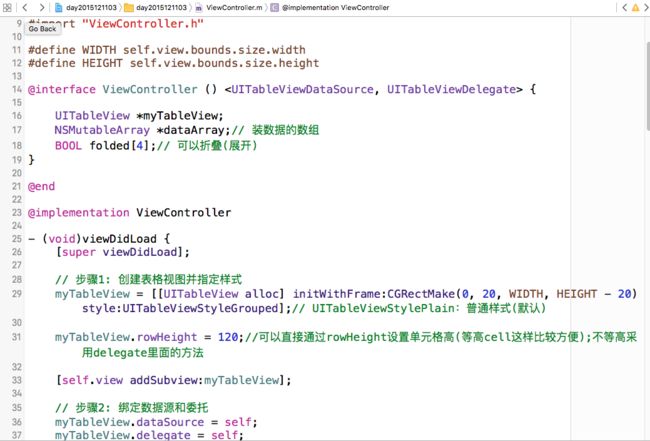
2).自己稍微定制一下(头部用按钮,可以展开)
// //获得分组标题名称的回调方法//- (NSString *)tableView:(UITableView *)tableView titleForHeaderInSection:(NSInteger)section {// static NSArray *titles = nil;// if (!titles) {// titles = @[@"A组", @"B组", @"C组", @"D组"];// }// return titles[section];//}将这段代码换成"按钮"的- (UIView*)tableView:(UITableView*)tableView viewForHeaderInSection:(NSInteger)section {staticNSArray*titles =nil;if(!titles) { titles = @[@"A组",@"B组",@"C组",@"D组"]; }UIButton*headerButton = [UIButtonbuttonWithType:UIButtonTypeCustom]; headerButton.frame =CGRectMake(0,0, WIDTH,30); [headerButton setTitle:titles[section] forState:UIControlStateNormal]; headerButton.titleLabel.font = [UIFontsystemFontOfSize:22]; [headerButton setTitleColor:[UIColoryellowColor] forState:UIControlStateNormal]; [headerButton setBackgroundColor:[UIColorblueColor]]; headerButton.tag = section +200; [headerButton addTarget:selfaction:@selector(headerButtonClicked:) forControlEvents:UIControlEventTouchUpInside];returnheaderButton;}- (void)headerButtonClicked:(UIButton*) sender { folded[sender.tag -200] = !folded[sender.tag -200];// 刷新表格[myTableView reloadData];}备注:索引的方法//获得索引的回调方法- (NSArray*)sectionIndexTitlesForTableView:(UITableView*)tableView {return@[@"金",@"木",@"水",@"火",@"土"];}
创建表格时指定样式为分组的结果
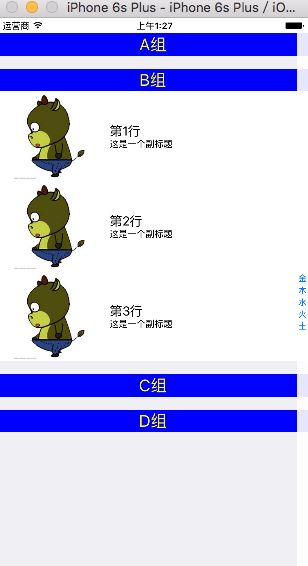
屏幕快照 2016-08-07 上午1.27.15.png
指定样式为普通时的结果

屏幕快照 2016-08-07 上午1.28.32.png
10.表格视图的编辑操作
工具类
.h+ (UIColor*) randomLightColor;.m+ (UIColor*) randomLightColor {CGFloatred = (arc4random() %128+128) /255.0;CGFloatgreen = (arc4random() %128+128) /255.0;CGFloatblue = (arc4random() %128+128) /255.0;return[UIColorcolorWithRed:red green:green blue:blue alpha:1];}
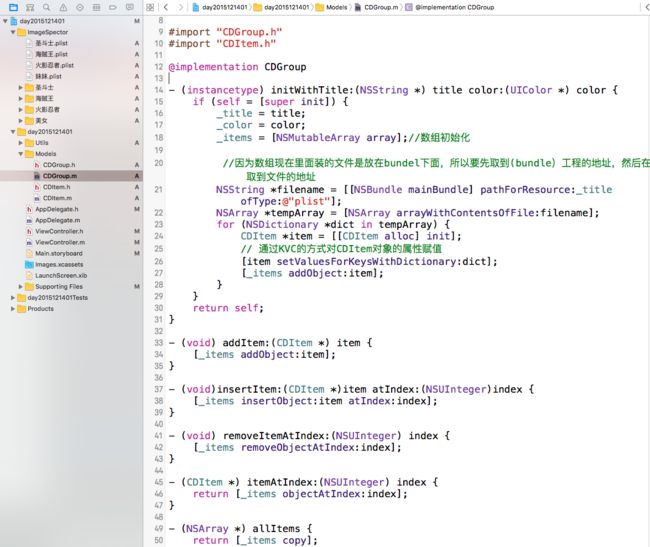
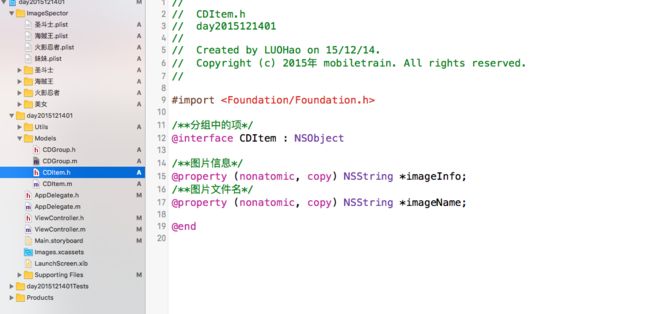
模型

屏幕快照 2016-08-29 上午11.21.04.png
屏幕快照 2016-08-29 上午11.21.41.png

屏幕快照 2016-08-29 上午11.21.54.png
屏幕快照 2016-08-29 上午11.22.12.png
(这个的.m为空)
控制器
屏幕快照 2016-08-27 下午5.07.28.png

屏幕快照 2016-08-27 下午5.08.00.png
屏幕快照 2016-08-27 下午5.08.25.png

屏幕快照 2016-08-27 下午5.08.43.png

屏幕快照 2016-08-27 下午5.09.09.png
屏幕快照 2016-08-27 下午5.09.23.png

屏幕快照 2016-08-27 下午5.09.42.png

屏幕快照 2016-08-27 下午5.10.18.png
效果

屏幕快照 2016-08-27 下午5.06.12.png

屏幕快照 2016-08-27 下午5.06.40.png
11.如何在一个视图控制器里添加多个UITableview?
效果图:
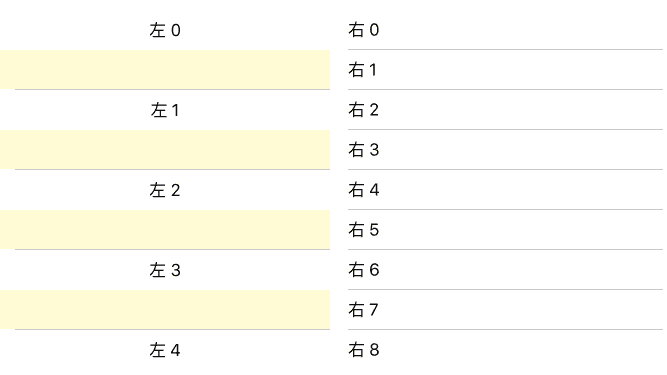
1388997-400a1c03a88645d6-1.png
代码如下:
#import"ViewController.h"#import"MyTableViewCell.h"@interfaceViewController(){NSMutableArray*dataArray1;NSMutableArray*dataArray2;UITableView*mytableViewLeft;UITableView*mytableViewRight;}@end@implementationViewController- (void)viewDidLoad { [superviewDidLoad];// Do any additional setup after loading the view, typically from a nib.mytableViewLeft = [[UITableViewalloc] initWithFrame:CGRectMake(0,10,330,350) style:UITableViewStylePlain]; [self.view addSubview:mytableViewLeft]; mytableViewLeft.delegate =self; mytableViewLeft.dataSource =self;// 定制单元格[mytableViewLeft registerNib:[UINibnibWithNibName:@"MyTableViewCell"bundle:[NSBundlemainBundle]] forCellReuseIdentifier:@"CELL"]; mytableViewRight = [[UITableViewalloc] initWithFrame:CGRectMake(333,10,330,350) style:UITableViewStylePlain]; [self.view addSubview:mytableViewRight]; mytableViewRight.delegate =self; mytableViewRight.dataSource =self; [selfloadData];}- (NSInteger)tableView:(UITableView*)tableView numberOfRowsInSection:(NSInteger)section{if(tableView == mytableViewLeft) {returndataArray1.count; }else{returndataArray2.count; }}- (CGFloat)tableView:(UITableView*)tableView heightForRowAtIndexPath:(NSIndexPath*)indexPath{if(tableView == mytableViewLeft) {return80; }else{return40; }}- (UITableViewCell*)tableView:(UITableView*)tableView cellForRowAtIndexPath:(NSIndexPath*)indexPath{if(tableView == mytableViewLeft) { MyTableViewCell *cell = [tableView dequeueReusableCellWithIdentifier:@"CELL"forIndexPath:indexPath]; cell.titleLabel.text = dataArray1[indexPath.row];returncell; }else{UITableViewCell*cell = [tableView dequeueReusableCellWithIdentifier:@"cell2"];if(!cell) { cell = [[UITableViewCellalloc] initWithStyle:UITableViewCellStyleDefaultreuseIdentifier:@"cell2"]; } cell.textLabel.text = dataArray2[indexPath.row];returncell; }}// 获取数据- (void) loadData{if(!dataArray1) { dataArray1 = [NSMutableArrayarray]; }for(inti=0; i<10; i++) {NSString*str = [NSStringstringWithFormat:@"左 %d",i]; [dataArray1 addObject:str]; }if(!dataArray2) { dataArray2 = [NSMutableArrayarray]; }for(inti=0; i<15; i++) {NSString*str = [NSStringstringWithFormat:@"右 %d",i]; [dataArray2 addObject:str]; }}- (void)tableView:(UITableView*)tableView didSelectRowAtIndexPath:(NSIndexPath*)indexPath{if(tableView == mytableViewLeft) {NSLog(@"%@",[NSStringstringWithFormat:@"左边 第 %ld 行",indexPath.row +1]); }else{NSLog(@"%@",[NSStringstringWithFormat:@"右边 第 %ld 行",indexPath.row +1]); }}@end
12.去掉tableview顶端粘滞效果
- (void)scrollViewDidScroll:(UIScrollView*)scrollView {CGFloatsectionHeaderHeight =30;if(scrollView.contentOffset.y <= sectionHeaderHeight && scrollView.contentOffset.y >=0) { scrollView.contentInset =UIEdgeInsetsMake(-scrollView.contentOffset.y,0,0,0); }elseif(scrollView.contentOffset.y >= sectionHeaderHeight) { scrollView.contentInset =UIEdgeInsetsMake(-sectionHeaderHeight,0,0,0); }}
补充相关内容
表格视图实现单选与复选:
http://m.blog.csdn.net/article/details?id=51375476
作者:_啊祥同学
链接:https://www.jianshu.com/p/e43228201a8b
来源:
著作权归作者所有,任何形式的转载都请联系作者获得授权并注明出处。