spring boot内嵌tomcat优雅的开启apr模式
文章目录
-
- 简介
- Win下开启APR
- Linux下开启APR
- 把lib打进jar包
简介
环境: jdk8、spring boot 2.3.4.RELEASE、centOS7.3、win7
在spring boot启动的时候常常会看到这样的ERROR日志,说是本地的Tomcat Native library版本太低,这里就来解决这个问题
2020-10-29 14:22:54.229 ERROR 11152 --- [           main] o.a.catalina.core.AprLifecycleListener   : An incompatible version [1.2.12] of the Apache Tomcat Native library is installed, while Tomcat requires version [1.2.14]
2020-10-29 14:22:54.415 ERROR 11152 --- [           main] o.a.catalina.core.AprLifecycleListener   : An incompatible version [1.2.12] of the Apache Tomcat Native library is installed, while Tomcat requires version [1.2.14]
2020-10-29 14:22:54.526  INFO 11152 --- [           main] o.s.b.w.embedded.tomcat.TomcatWebServer  : Tomcat initialized with port(s): 11120 (http)
2020-10-29 14:22:54.539 ERROR 11152 --- [           main] o.a.catalina.core.AprLifecycleListener   : An incompatible version [1.2.12] of the Apache Tomcat Native library is installed, while Tomcat requires version [1.2.14]
在Springboot中内嵌的Tomcat默认启动开启的是NIO模式,可以通过log看到Connector使用的是哪一种运行模式,线程名叫http-nio-8080-exec-1之类的,表示用的nio模式,关于nio和bio的区别这里就不多说了,这里重点是apr模式。
APR(Apache Portable Runtime/Apache 可移植运行库),它是用 C 语言实现的,其目的是向上层应用程序提供一个跨平台的操作系统接口库。Tomcat可以用它来处理包括文件和网络 I/O,从而提升性能。Tomcat 支持的连接器有 NIO、NIO.2 和 APR。跟NioEndpoint 一样,AprEndpoint 也实现了非阻塞 I/O,它们的区别是:NioEndpoint 通过调用 Java 的NIO API 来实现非阻塞 I/O,而 AprEndpoint 是通过 JNI 调用 APR 本地库而实现非阻塞 I/O 的
那同样是非阻塞 I/O,为什么 Tomcat 会提示使用 APR 本地库的性能会更好呢?这是因为在某些场景下,比如需要频繁与操作系统进行交互,Socket 网络通信就是这样一个场景,特别是如果你的 Web 应用使用了 TLS 来加密传输,我们知道 TLS 协议在握手过程中有多次网络交互,在这种情况下 Java 跟 C 语言程序相比还是有一定的差距,而这正是 APR 的强项。
参考:https://time.geekbang.org/column/article/101201
简单来说就是推荐使用apr模式,能够提升性能,接下来分别在win和linux下开启spring boot内嵌tomcat的apr模式,并进行打包优化
Win下开启APR
开启apr需要去下载动态链接库文件
http://archive.apache.org/dist/tomcat/tomcat-connectors/native/
在里面选择一个新点的版本下下来,比如我选的1.2.25版本
http://archive.apache.org/dist/tomcat/tomcat-connectors/native/1.2.25/binaries/tomcat-native-1.2.25-openssl-1.1.1g-win32-bin.zip

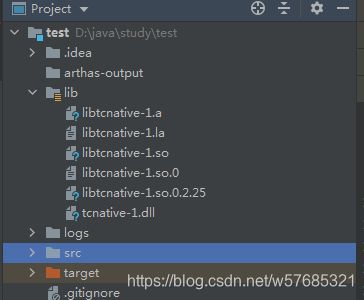
解压后在bin/x64目录下找到64位的动态链接库文件
关于动态链接库放的位置:
1、把这个tcnative-1.dll文件放入java.library.path所指向的目录,如果不清楚直接输出System.getProperty(“java.library.path”)看一下,比如一个常见的就是jdk的bin目录下,相当于安装了这个库
2、放入项目里的文件夹,然后jvm启动参数设置-Djava.library.path=./lib

3、使用程序动态修改library.path并加载链接库文件,这个方法在后面打jar包那节会详细介绍
配置spring boot内嵌的tomcat
import org.springframework.boot.web.embedded.tomcat.TomcatServletWebServerFactory;
import org.springframework.boot.web.server.WebServerFactory;
import org.springframework.boot.web.server.WebServerFactoryCustomizer;
import org.springframework.context.annotation.Configuration;

@Configuration
public class PortalTomcatWebServerCustomizer implements WebServerFactoryCustomizer<WebServerFactory> {

    @Override
    public void customize(WebServerFactory factory) {
        TomcatServletWebServerFactory containerFactory = (TomcatServletWebServerFactory) factory;
        containerFactory.setProtocol("org.apache.coyote.http11.Http11AprProtocol");
    }
}
最后启动程序看日志,看到下面的http-apr-11120-exec-3,表示已经开启了apr模式,也没有之前的ERROR报错了
16:06:46.062 [main] INFO  o.s.b.w.e.tomcat.TomcatWebServer - Tomcat initialized with port(s): 11120 (http)
16:06:46.073 [main] INFO  o.a.coyote.http11.Http11AprProtocol - Initializing ProtocolHandler ["http-apr-11120"]
16:06:46.074 [main] INFO  o.a.catalina.core.StandardService - Starting service [Tomcat]
16:06:46.075 [main] INFO  o.a.catalina.core.StandardEngine - Starting Servlet engine: [Apache Tomcat/9.0.38]
16:06:46.077 [main] INFO  o.a.c.core.AprLifecycleListener - Loaded Apache Tomcat Native library [1.2.25] using APR version [1.7.0].
16:06:46.078 [main] INFO  o.a.c.core.AprLifecycleListener - APR capabilities: IPv6 [true], sendfile [true], accept filters [false], random [true].
16:06:46.078 [main] INFO  o.a.c.core.AprLifecycleListener - APR/OpenSSL configuration: useAprConnector [false], useOpenSSL [true]
16:06:46.083 [main] INFO  o.a.c.core.AprLifecycleListener - OpenSSL successfully initialized [OpenSSL 1.1.1g  21 Apr 2020]
16:06:46.229 [main] INFO  o.a.c.c.C.[Tomcat].[localhost].[/] - Initializing Spring embedded WebApplicationContext
16:06:46.230 [main] INFO  o.s.b.w.s.c.ServletWebServerApplicationContext - Root WebApplicationContext: initialization completed in 1686 ms
16:06:46.483 [main] INFO  o.s.s.c.ThreadPoolTaskExecutor - Initializing ExecutorService 'applicationTaskExecutor'
16:06:46.572 [main] INFO  o.s.b.a.w.s.WelcomePageHandlerMapping - Adding welcome page: class path resource [static/index.html]
16:06:46.897 [main] INFO  o.s.s.c.ThreadPoolTaskScheduler - Initializing ExecutorService 'taskScheduler'
16:06:46.957 [main] INFO  o.a.coyote.http11.Http11AprProtocol - Starting ProtocolHandler ["http-apr-11120"]
16:06:46.984 [main] INFO  o.s.b.w.e.tomcat.TomcatWebServer - Tomcat started on port(s): 11120 (http) with context path ''
16:06:47.036 [main] INFO  com.example.demo.DemoApplication - Started DemoApplication in 3.374 seconds (JVM running for 4.862)
16:08:16.572 [http-apr-11120-exec-3] INFO  o.a.c.c.C.[Tomcat].[localhost].[/] - Initializing Spring DispatcherServlet 'dispatcherServlet'
16:08:16.572 [http-apr-11120-exec-3] INFO  o.s.web.servlet.DispatcherServlet - Initializing Servlet 'dispatcherServlet'
16:08:16.580 [http-apr-11120-exec-3] INFO  o.s.web.servlet.DispatcherServlet - Completed initialization in 8 ms
Linux下开启APR
首先去下载源码,然后拷贝进linux虚拟机
https://tomcat.apache.org/download-native.cgi
cd native
./configure && make -j 8
sudo make install
然后编译安装,安装完成后把上一节的工程跑起来即可,就启用的apr模式

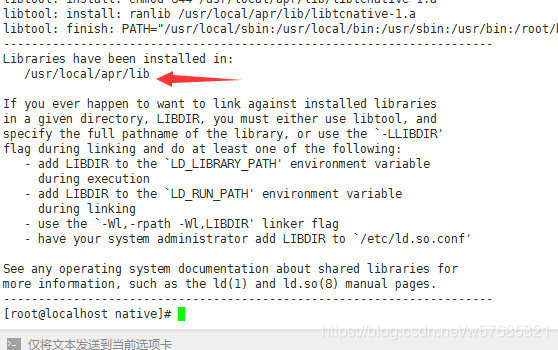
安装完成后得知静态库安装在这个目录里,就把这个目录的文件拷贝出来,就是我们需要的动态链接库文件,有了动态链接库文件后在线上主机就不需要去编译安装了(由于线上主机权限原因也不能去操作关键的目录),只需要libtcnative-1.so这个文件就行,把这个文件放入library路径让其load进去即可,下一节将使用动态修改library.path的方法去简洁流程。
编译好的动态链接库文件:https://download.csdn.net/download/w57685321/13072717
把lib打进jar包
部署上线的时候一般会把spring boot打成jar包运行,如果项目依赖了一些动态链接库文件,比如libtcnative-1.so之类的,像我以前的一篇博文使用javacv给报表图片去白边并打包上线,就需要一些动态链接库文件,以前把这些文件放到了一个目录下,然后通过-Djava.library.path来设置的lib目录。
现在想把lib也打入jar包集中管理,然后解压jar包这些文件,再通过System.setProperty去动态设置library位置,这样打包流程方便一些,只要一个jar包就可以运行了
1、首先将lib目录打入jar包
首先配置pom把项目里的lib目录打进jar包,在jar包内的路径就是demo-0.0.1-SNAPSHOT.jar\BOOT-INF\classes\lib
<resource>
    <directory>libdirectory>
    <targetPath>/lib/targetPath>
    <includes>
        <include>**/**include>
    includes>
resource>
2、写入自定义配置
## 动态链接库 @see NativeLibLoader
# lib释放的路径
libPath: /home/service/lib/
# 需要加载的lib
lib: libtcnative-1.so
libPath:释放、加载的lib路径
lib:需要加载的native文件名,想引入哪个链接库文件直接逗号追加即可
3、编写解压处理类
import lombok.extern.slf4j.Slf4j;
import org.springframework.util.ResourceUtils;

import java.io.*;
import java.util.ArrayList;
import java.util.Enumeration;
import java.util.List;
import java.util.jar.JarEntry;
import java.util.jar.JarFile;

/**
 * 解压jar包中的资源到指定位置,并设置library路径
 * 目前解压的有:
 * /lib : tomcat apr
 *
 * @author Created by zkk on 2020/9/11
 **/
@Slf4j
public class ResourceUnzip {

    private volatile static ResourceUnzip instance;

    public static ResourceUnzip getResourceUnzip(String libPath) {
        if(instance == null) {
            synchronized (ResourceUnzip.class) {
                if(instance == null) {
                    instance = new ResourceUnzip(libPath);
                }
            }
        }
        return instance;
    }

    /* ********* 解压路径 ********* */
    /**
     * 链接库临时解压位置
     */
    private final String libPath;

    private ResourceUnzip(String libPath) {
        this.libPath = libPath;
    }

    /* ********* jar包路径 ********* */

    /**
     * jar包里的lib库路径,这个路径是在pom里的resource设置的
     * 将项目目录/lib -> jar/BOOT-INF/classes/lib/
     */
    private static final String JAR_LIB_PATH = "BOOT-INF/classes/lib/";

    /* ********* constant ********* */

    private final static String ROOT_PATH = "/";
    private static final int BUFFER_SIZE = 8192;

    public void process() {
        // 判断从jar包运行还是IDE运行
        String urlProtocol = ResourceUnzip.class.getResource("").getProtocol();
        // 判断jar包解压
        if (ResourceUtils.URL_PROTOCOL_JAR.equals(urlProtocol)) {
            /* ** 解压lib库 ** */
            List<String> filePaths = getFileName(JAR_LIB_PATH);
            for (String jarFilePath : filePaths) {
                copyToTempFromJar(jarFilePath, libPath, jarFilePath.substring(jarFilePath.lastIndexOf("/") + 1), getClass());
            }
            /* ** 还可以解压其他文件... ** */
        }
    }


    /**
     * 获取jar包中指定lib文件夹下面的所有文件名
     *
     * @param scanPath 需要扫描的路径
     * @return 目录下的文件路径
     */
    public List<String> getFileName(String scanPath) {
        JarFile jFile = null;
        try {
            jFile = new JarFile(System.getProperty("java.class.path"));
        } catch (IOException e) {
            log.error("jar包无法解析,请检查", e);
            System.exit(0);
        }
        Enumeration<JarEntry> jarEntryEnumeration = jFile.entries();
        List<String> ret = new ArrayList<>();
        while (jarEntryEnumeration.hasMoreElements()) {
            JarEntry entry = jarEntryEnumeration.nextElement();
            String name = entry.getName();
            if (name.startsWith(scanPath) && name.length() > scanPath.length()) {
                ret.add("/" + name);
                log.debug("扫描到: {}", name);
            }
        }
        return ret;
    }

    /**
     * 从jar包拷贝文件到指定目录
     * 这些拷贝出来的文件,在程序关闭时会自动删除
     * @param path         在jar包中文件的路径
     * @param saveFilePath 要保存文件的路径
     * @param saveFileName 要保存文件的名称
     * @param loadClass    class that provide {@link ClassLoader} to load library file by input stream,if null, current class instead.
     */
    public synchronized File copyToTempFromJar(String path, String saveFilePath, String saveFileName, Class<?> loadClass) {
        if (null == path || !path.startsWith(ROOT_PATH)) {
            throw new IllegalArgumentException("The path has to be absolute (start with '/').");
        }

        // Prepare temporary file
        File temporaryDir = new File(saveFilePath);
        if (!temporaryDir.exists()) {
            if (!temporaryDir.mkdirs()) {
                log.error("Failed to create temp directory : {}", temporaryDir.getName());
            }
            temporaryDir.deleteOnExit();
        }

        File temp = new File(temporaryDir, saveFileName);
        Class<?> clazz = loadClass == null ? getClass() : loadClass;
        try (InputStream is = clazz.getResourceAsStream(path)) {
            long fileSize = copy(is, temp);
            log.debug("file:{}, copySize: {}", saveFileName, fileSize);
            temp.deleteOnExit();
            return temp;
        } catch (IOException e) {
            boolean ret = temp.delete();
            log.error("file {}, deleteRet: {}", path,ret, e);
        } catch (NullPointerException e) {
            boolean ret = temp.delete();
            log.error("File {} was not found inside JAR. deleteRet: {}", path, ret, e);
        }
        return null;
    }

    private long copy(InputStream in, File target) throws IOException {
        target.delete();
        File parent = target.getParentFile();
        if (parent != null) {
            parent.mkdirs();
        }
        // do the copy
        try (OutputStream out = new FileOutputStream(target)) {
            return copy(in, out);
        }
    }

    /**
     * Reads all bytes from an input stream and writes them to an output stream.
     */
    private long copy(InputStream source, OutputStream dest)
            throws IOException {
        long readCount = 0L;
        byte[] buf = new byte[BUFFER_SIZE];
        int n;
        while ((n = source.read(buf)) > 0) {
            dest.write(buf, 0, n);
            readCount += n;
        }
        return readCount;
    }
}
说明大多都在注释上了,这个类传入一个解压临时路径,然后执行后就会把相应的文件解压到我们设置的临时目录里了
这里解压的目录就是动态链接库的目录,当然,可以解压其他的目录,比如一些配置文件什么的
4、编写native加载类
import lombok.extern.slf4j.Slf4j;
import org.springframework.util.ResourceUtils;
import org.springframework.util.StringUtils;

import java.io.File;
import java.lang.reflect.Field;

/**
 * 统一动态链接库加载
 * 有了它,打成jar包后启动就不需要关心java.library.path的事情了,这里自动完成了这一步
 * @see com.example.demo.apr.ResourceUnzip
 * @author Created by zkk on 2020/7/13
 * Updated on 2020/9/9
 **/
@Slf4j
public class NativeLibLoader {

    private volatile static NativeLibLoader instance;

    public static NativeLibLoader getResourceUnzip(String libPath, String lib) {
        if(instance == null) {
            synchronized (NativeLibLoader.class) {
                if(instance == null) {
                    instance = new NativeLibLoader(libPath, lib);
                }
            }
        }
        return instance;
    }

    /**
     * 链接库临时解压位置
     */
    private final String libPath;
    private final String lib;

    public NativeLibLoader(String libPath, String lib) {
        this.libPath = libPath;
        this.lib = lib;
    }

    /**
     * 打包的时候,pom里将lib目录拷贝到了jar包的lib目录,运行jar时,需要将lib解压出来,然后System.load加载链接库
     */
    public void process() {
        // 动态设置library路径,指向解压的目录
        System.setProperty("java.library.path",
                System.getProperty("java.library.path") + File.pathSeparator + libPath);
        /*
         * 这里有个小操作,上面动态修改library.path后是不生效的,因为它只在jvm启动时读取一次,后面读取的都是缓存值
         * 这里可以通过反射获取到sys_paths变量,将其设置null,使classLoader的loadLibrary方法重新获取usr_paths
         * @see java.lang.ClassLoader loadLibrary
         * jdk11中,这种方式是非法反射操作,会抛出警告,在jdk以后的版本非法反射操作会被禁止
         */
        Field fieldSysPath;
        try {
            fieldSysPath = ClassLoader.class.getDeclaredField("sys_paths");
            fieldSysPath.setAccessible(true);
            fieldSysPath.set(null, null);
        } catch (Exception e) {
            log.error("设置library.path失败", e);
        }

        String urlProtocol = ResourceUnzip.class.getResource("").getProtocol();
        /*
         * dev环境就直接将lib导入IDE构建路径或使用-Djava.library.path就行了
         * 如果运行的是jar包,那么运行jar包时自动解压加载lib
         */
        if(ResourceUtils.URL_PROTOCOL_JAR.equals(urlProtocol)) {
            if (!StringUtils.isEmpty(libPath)) {
                // 然后去解压的libPath正常加载lib
                String[] libs = lib.split(",");
                for (String lib : libs) {
                    if(!StringUtils.isEmpty(lib)) {
                        System.load((libPath + lib.trim()).trim());
                    }
                }
            } else {
                log.error("没有检测到动态链接库临时目录配置,请在yml配置文件中配置libPath");
            }
        }
    }
}
这个类传入一个加载目录和需要加载的文件名,然后就会遍历lib文件名,去load它们
5、编写入口
我们需要在spring boot启动的时候运行上面的解压、加载逻辑,并且需要尽可能的优先启动
最开始用的CommandLineRunner方法,然而它要在spring boot启动完成后才会执行到这里,而Http11AprProtocol - Initializing ProtocolHandler [“http-apr-5050”]这一步是很早的,这时候使用CommandLineRunner就太晚了,tomcat先被执行。
1、这里想到在spring boot main方法之前就去解压,但是就需要自己去读取yml文件了
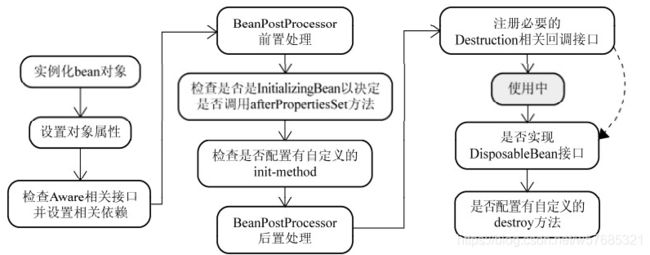
2、看输出日志和后置处理器debug,在ServletWebServerFactoryAutoConfiguration之前如果能做一些操作就可以了,我使用了BeanPostProcessor后置处理器去到这一步拦截处理

/**
 * 程序初始化需要执行的特殊操作
 * 使用BeanPostProcessor在tomcat之前执行,保证高优先级
 *
 * @author Created by zkk on 2020/9/18
 **/
@Component
public class StartUpBeanPostProcessor implements BeanPostProcessor {

    @Value("${lib}")
    private String lib;
    @Value("${libPath}")
    private String libPath;

    /**
     * 由于ServletWebServerFactoryConfiguration是非public的,这里使用名称的方式去判断bean
     * ServletWebServerFactoryConfiguration是web容器工厂类的配置类,支持tomcat、jetty、undertow三种web容器
     */
    private final static String WEB_SERVER_FACTORY_CLASS_NAME = "ServletWebServerFactoryConfiguration";

    @Override
    public Object postProcessBeforeInitialization(Object bean, String beanName) throws BeansException {
        // 判断bean,保证在tomcat初始化之前执行必要的操作
        if (beanName.contains(WEB_SERVER_FACTORY_CLASS_NAME)) {
            // step1: 解压文件
            ResourceUnzip.getResourceUnzip(libPath).process();
            // step2: 加载链接库
            NativeLibLoader.getResourceUnzip(libPath, lib).process();
        }
        return bean;
    }
}
这样处理过程就显得清晰多了
6、打包测试
在win下打包,先把配置改成dll
## 动态链接库 @see NativeLibLoader
# lib释放的路径
lib: tcnative-1.dll
# 需要加载的lib
libPath: D:/java/SMS/ai-mms/target/lib/

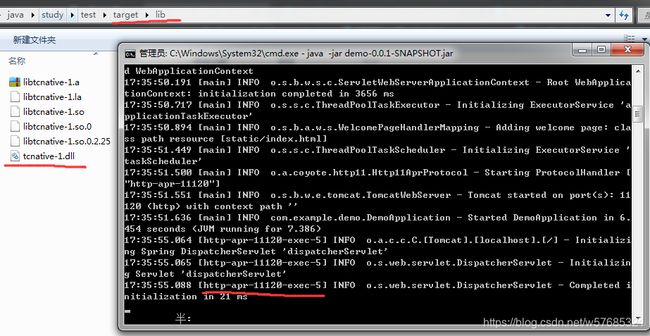
打包后不配置其他的东西,直接java -jar启动,发现lib已经被解压到同级目录下,然后也被加载进来成功开启了APR模式。