Qt读写Excel--QXlsx设置字体格式、样式8

Qt读写Excel–QXlsx设置字体格式、样式8

文章目录

  • Qt读写Excel--QXlsx设置字体格式、样式8
    • @[toc]
    • 1、概述
    • 2、准备工作
    • 3、函数说明
    • 4、示例代码
      • 4.1 .h文件
      • 4.2 .cpp文件
    • 5、实现效果
    • 6、源代码

更多精彩内容
个人内容分类汇总

1、概述

  • QXlsx是一个可以读写Excel文件的库。不依赖office以及wps组件,可以在Qt5支持的任何平台上使用;

  • 使用方式

    1. QXlsx可以编译为动态库使用(使用动态库不用每次的编译,也可以让项目代码量更少,不用一打开工程就几十个文件);
    2. 直接将QXlsx.pri加入代码中使用(我比较推荐直接使用源码,因为QXlsx的注释信息基本在cpp文件中,可以通过阅读源码和注释来学习QXlsx的功能,当然,如果你已经熟悉了QXlsx的使用方式那编译成库使用会更方便,可以使工程的代码量变少);
  • 本文中实现的功能:

    1. 通过索引号设置数字格式
    2. 设置自定义数字格式
    3. 设置字体样式(包括:字体大小、斜体、删除线、颜色、加粗、上下标、下划线、轮廓、字体类型)

2、准备工作

Qt读写Excel–QXlsx基本使用1
Qt读写Excel–QXlsx编译为静态库2

3、函数说明

注意:执行了操作要保存才生效。⛔

  • void Format::setNumberFormatIndex(int format)
    • 功能说明: 通过索引号设置数字格式(目前好像只支持到81)。
    • 参数format: 数字格式索引;
  • int Format::numberFormatIndex() const
    • 功能说明: 获取单元格的数字格式索引;
    • 返回值: 数字格式索引;
  • void Format::setNumberFormat(const QString &format)
    • 功能说明: 以字符串传入自定义数字格式,例如“# ?/?”、“[Red][<=100];[Green][>100]”;
    • 参数format: 自定义数字格式;
  • void Format::setFontSize(int size)
    • 功能说明: 设置单元格字体字号大小;
    • 参数size: 字号大小;
  • int Format::fontSize() const
    • 功能说明: 获取单元格字体字号大小;
    • 返回值: 字号大小;
  • void Format::setFontItalic(bool italic)
    • 功能说明: 将单元格字体设置为斜体;
    • 参数italic: true:斜体 false:正常;
  • bool Format::fontItalic() const
    • 功能说明: 返回单元格字体是否为斜体;
    • 返回值: true:斜体 false:正常;
  • void Format::setFontStrikeOut(bool strikeOut)
    • 功能说明: 设置单元格字体是否有删除线;
    • 参数strikeOut: true:有删除线 false:无删除线;
  • bool Format::fontStrikeOut() const
    • 功能说明: 获取单元格字体是否有删除线;
    • 返回值: true:有删除线 false:无删除线;
  • void Format::setFontColor(const QColor &color)
    • 功能说明: 设置单元格字体颜色;
    • 参数color: 字体颜色;
  • QColor Format::fontColor() const
    • 功能说明: 获取单元格字体颜色;
    • 返回值: 字体颜色;
  • void Format::setFontBold(bool bold)
    • 功能说明: 设置单元格字体加粗;
    • 参数bold: true:加粗 false:正常;
  • bool Format::fontBold() const
    • 功能说明: 返回字体是否为粗体。;
    • 返回值: true:加粗 false:正常;
  • void Format::setFontScript(FontScript script)
    • 功能说明: 设置单元格字体脚本样式(上下标);
    • 参数script:Format::FontScript枚举定义,FontScriptSuper:上标、FontScriptSub:下标;
  • Format::FontScript Format::fontScript() const
    • 功能说明: 返回字体的脚本样式;
    • 返回值:Format::FontScript枚举定义;
  • void Format::setFontUnderline(FontUnderline underline)
    • 功能说明: 设置单元格字体下划线;
    • 参数underline:Format::FontUnderline枚举定义;
  • Format::FontUnderline Format::fontUnderline() const
    • 功能说明: 返回单元格字体下划线样式;
    • 返回值:Format::FontUnderline枚举定义;
  • void Format::setFontOutline(bool outline)
    • 功能说明: 设置单元格字体轮廓;
    • 参数outline: true:设置字体轮廓 false:正常;
  • bool Format::fontOutline() const
    • 功能说明: 返回单元格字体是否使用字体轮廓;
    • 返回值: true:设置字体轮廓 false:正常;
  • void Format::setFontName(const QString &name)
    • 功能说明: 设置单元格字体类型;
    • 参数name: 字体类型(例如:黑体、宋体);
  • QString Format::fontName() const
    • 功能说明: 返回单元格字体类型;
    • 返回值: 字体类型;

4、示例代码

4.1 .h文件

/******************************************************************************
 * @文件名     test7.h
 * @功能       1、通过索引号设置数字格式
 *            2、设置自定义数字格式
 *            3、设置字体样式
 *
 * @开发者     mhf
 * @邮箱       [email protected]
 * @时间       2022/07/11
 * @备注
 *****************************************************************************/
#ifndef TEST7_H
#define TEST7_H

#include 
#include "Interface.h"

namespace Ui {
class Test7;
}

class Test7 : public InterFace
{
    Q_OBJECT

public:
    explicit Test7(QWidget *parent = nullptr);
    ~Test7();

    QString getExcelName() override;

private slots:
    void on_pushButton_clicked();

    void on_pushButton_2_clicked();

    void on_pushButton_3_clicked();

private:
    Ui::Test7 *ui;
};

#endif // TEST7_H

4.2 .cpp文件

#include "test7.h"
#include "ui_test7.h"
#include 
#include 
QXLSX_USE_NAMESPACE

#define EXCEL_NAME "test7.xlsx"         // 本Demo使用的Excel文件名

Test7::Test7(QWidget *parent) :
    InterFace(parent),
    ui(new Ui::Test7)
{
    ui->setupUi(this);
    this->setWindowTitle("QXlsx设置字体格式、样式");
    this->setToolTip(this->windowTitle());
}

Test7::~Test7()
{
    delete ui;
}

QString Test7::getExcelName()
{
    return EXCEL_NAME;
}

/**
 * @brief 通过索引号设置数字格式
 */
void Test7::on_pushButton_clicked()
{
    Document xlsx;

    Format format;
    for(int i = 1; i < 100; i++)
    {
        format.setNumberFormatIndex(i);
        xlsx.write(i, 1, 1234, format);
        xlsx.write(i, 3, 1234.321, format);
        qDebug() << xlsx.cellAt(i, 1)->format().numberFormatIndex();  // 获取当前单元格的数字格式
    }

    if(xlsx.saveAs(EXCEL_NAME))
    {
        qInfo() << "Excel保存成功!";
    }
    else
    {
        qWarning() << "Excel保存失败!";
    }
}

/**
 * @brief 设置自定义数字格式
 */
void Test7::on_pushButton_2_clicked()
{
    Document xlsx;

    Format format;
    format.setNumberFormat("# ?/?");
    xlsx.write(1, 1, 1234.321, format);
    format.setNumberFormat("[Red][<=100];[Green][>100]");
    xlsx.write(2, 1, 14.321, format);

    if(xlsx.saveAs(EXCEL_NAME))
    {
        qInfo() << "Excel保存成功!";
    }
    else
    {
        qWarning() << "Excel保存失败!";
    }
}

/**
 * @brief 设置字体样式
 */
void Test7::on_pushButton_3_clicked()
{
    Document xlsx;

    xlsx.write(1, 1, "默认样式");

    // 设置字体大小
    Format format;
    format.setFontSize(15);
    xlsx.write(1, 2, "字体大小15", format);
    qDebug() << xlsx.cellAt(1, 2)->format().fontSize();  // 获取当前单元格的字体大小

    // 设置字体斜体
    Format format1;
    format1.setFontItalic(true);
    xlsx.write(1, 3, "斜体", format1);
    qDebug() << xlsx.cellAt(1, 3)->format().fontItalic();  // 获取当前单元格的字体是否为 斜体

    // 设置字体删除线
    Format format2;
    format2.setFontStrikeOut(true);
    xlsx.write(1, 4, "删除线", format2);
    qDebug() << xlsx.cellAt(1, 4)->format().fontStrikeOut();  // 获取当前单元格的字体是否有 删除线

    // 设置字体颜色
    Format format3;
    format3.setFontColor(Qt::red);
    xlsx.write(1, 5, "字体颜色", format3);
    qDebug() << xlsx.cellAt(1, 5)->format().fontColor();  // 获取当前单元格的字体颜色

    // 设置字体加粗
    Format format4;
    format4.setFontBold(true);
    xlsx.write(1, 6, "字体加粗", format4);
    qDebug() << xlsx.cellAt(1, 6)->format().fontBold();  // 获取当前单元格的字体是否加粗

    // 设置字体特殊格式(上、下标)
    Format format5;
    format5.setFontScript(Format::FontScriptSub);   // 设置下标
    xlsx.write(1, 7, "字体下标", format5);
    format5.setFontScript(Format::FontScriptSuper); // 设置上标
    xlsx.write(1, 8, "字体上标", format5);
    qDebug() << xlsx.cellAt(1, 7)->format().fontScript();  // 获取当前单元格的字体的特殊格式

    // 设置下划线
    Format format6;
    format6.setFontUnderline(Format::FontUnderlineNone);
    xlsx.write(1, 9, "无下划线", format6);
    format6.setFontUnderline(Format::FontUnderlineSingle);
    xlsx.write(1, 10, "单下划线", format6);
    format6.setFontUnderline(Format::FontUnderlineDouble);
    xlsx.write(1, 11, "双下划线", format6);
    format6.setFontUnderline(Format::FontUnderlineSingleAccounting);
    xlsx.write(1, 12, "会计用单下划线", format6);
    format6.setFontUnderline(Format::FontUnderlineDoubleAccounting);
    xlsx.write(1, 13, "会计用双下划线", format6);
    qDebug() << xlsx.cellAt(1, 9)->format().fontUnderline();  // 获取当前单元格文本下划线格式

    // 设置字体轮廓
    Format format7;
    format7.setFontOutline(true);
    xlsx.write(1, 14, "字体轮廓", format7);
    qDebug() << xlsx.cellAt(1, 14)->format().fontOutline();  // 获取当前单元格是否打开字体轮廓

    // 设置字体类型
    Format format8;
    format8.setFontName("黑体");
    xlsx.write(1, 15, "字体类型", format8);
    qDebug() << xlsx.cellAt(1, 15)->format().fontName();  // 获取当前单元格字体类型

    if(xlsx.saveAs(EXCEL_NAME))
    {
        qInfo() << "Excel保存成功!";
    }
    else
    {
        qWarning() << "Excel保存失败!";
    }
}

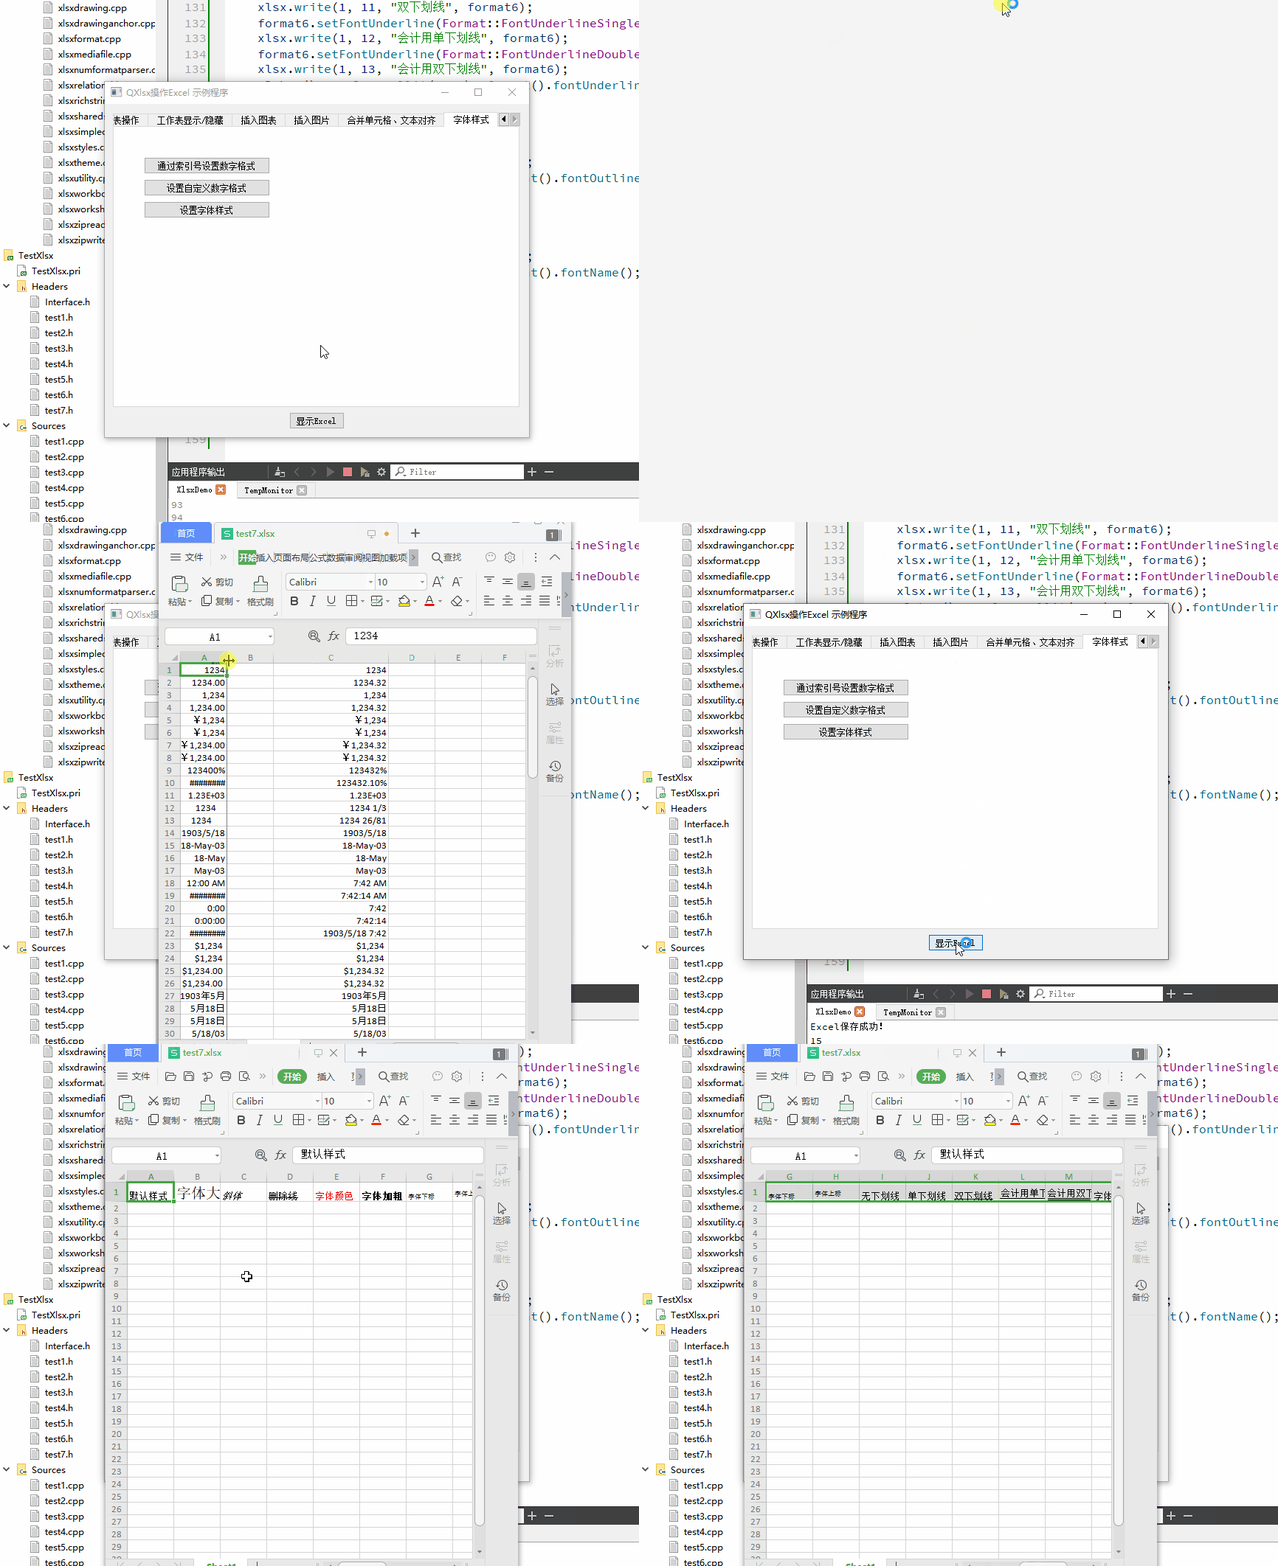
5、实现效果

Qt读写Excel--QXlsx设置字体格式、样式8_第1张图片

6、源代码

gitee
github

你可能感兴趣的:(QT,#,QXlsx,qt,QXlsx,Excel,Qt读写Excel,字体样式)