使用vue写一个picker插件,使用3d滚轮的原理
一. Picker组件:
- {{item}}
注意: 反正切计算出来的角度要乘以2
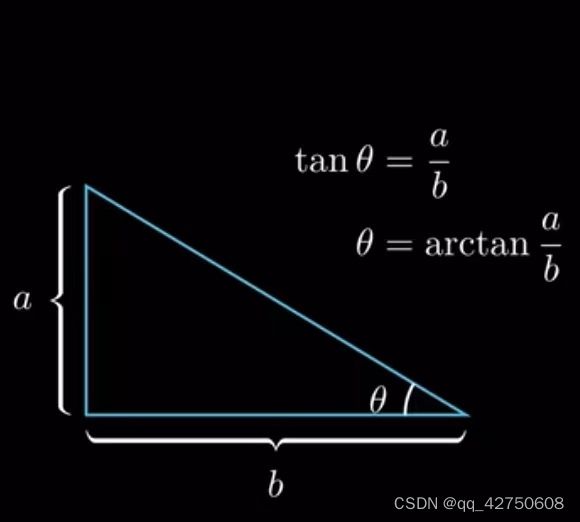

所以通过反正切方法得到弧度再转换为度数, 这个度数是单行文字所占有的, 公式如下。
let singleDeg = 2 * ((Math.atan((lineHeight/2)/radius) * 180)/ Math.PI);
1-1. singleDeg实现原理: 反正切函数arctan
arctan是反正切函数,它的输入为一个正切值,输出的值在(-π/2, π/2)之间, 因此还需要将输出的值 * 180 / π, 从而得到对应的角度大小。
为什么是*180?
因为π对应的角度是180度
推导流程:
如图, 半径是OA之间的线段, line-height是TT'之间的线段, ª夹角 = arctan(AT之间的距离 / 半径) * 180 / π
而AT之间的距离是line-height数值的1/2
而我们实际需要的是TOT'之间的角度, 所以得到ª角度角度后要 * 2
把picker先看成一个球形

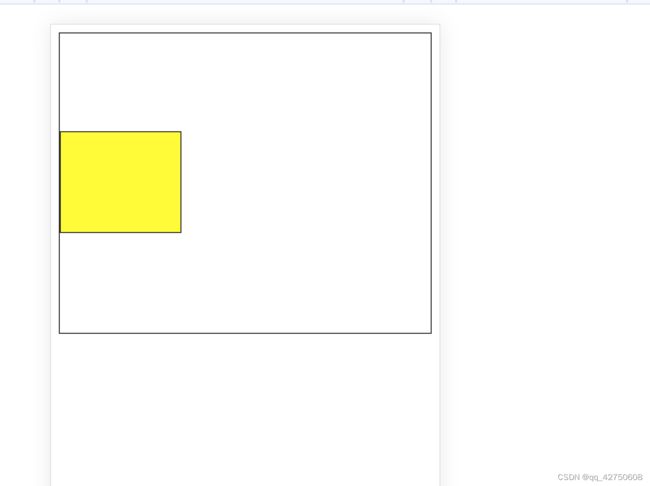
translateY实现垂直居中:
比如:
当从上往下平移时:
.father {
border: 1px solid #333;
height: 300px;
}
.box {
width: 100px;
height: 100px;
border: 1px solid #333;
background-color: yellow;
transform: translateY(calc(150px - 50px));
/* 1/2father的height - 1/2自身高度*/
}
或者
.father {
border: 1px solid #333;
height: 300px;
position: relative;
}
.box {
position: absolute;
width: 100px;
height: 100px;
border: 1px solid #333;
background-color: yellow;
top: calc(150px - 50px);
/* 1/2father的height - 1/2自身高度*/
}
当从下往上平移时
.father {
position: relative;
border: 1px solid #333;
height: 300px;
}
.box {
position: absolute;
bottom: 0;
width: 120px;
height: 100px;
border: 1px solid #333;
background-color: yellow;
transform: translateY(calc(0px - (150px - 50px))); /* - (1/2father的height - 1/2自身高度)*/
}
而scss的.picker-container写了
position: fixed;
bottom: 0;
那么子元素垂直居中就要transform: translateY(1/2father的height - 1/2自身高度);
反过来写: transform: translateY(-(1/2自身高度 - 1/2father的height));
代码eg:
Document
效果图如下(黄色块垂直居中):

所以.col-wrapper的style样式:
// class为col-wrapper的style样式: 滚轮的外包装理想样式--展示半径的内容可见,另外的半径隐藏
const getWrapperStyle = computed(() => ({
    height: pxToRem(2 * radius),
    // 居中: 1/2直径 - 1/2父页面高度
    transform: `translateY(-${pxToRem(radius - SCROLL_CONTENT_HEIGHT / 2)})`
}));
.col-wrapper的子元素们:
// 当父元素(class为col-wrapper), 定位是relative, 高度是直径: 2 * radius, 子页面想要居中, top: (1/2直径)-(1/2*一行文字高度)
const circleTop = pxToRem(radius - (LINE_HEIGHT / 2)); // 很重要!!!
// col-wrapper的子元素 => 3d滚轮的内容区域样式--ref=wheel的元素样式
const getListTop = computed(() => ({
top: circleTop,
height: pxToRem(LINE_HEIGHT)
}))
// col-wrapper的子元素 => 参照一般居中的做法,[50%*父页面的高度(整个圆的最大高度是直径)]-居中内容块(文本的行高)的一半高度
const getCoverStyle = computed(() => {
return {
backgroundSize: `100% ${circleTop}`,
}
})
// col-wrapper的子元素 => 应该也是参照居中的做法(注意减去两条边框线)
const getDividerStyle = computed(() => ({
top: circleTop,
height: pxToRem(LINE_HEIGHT),
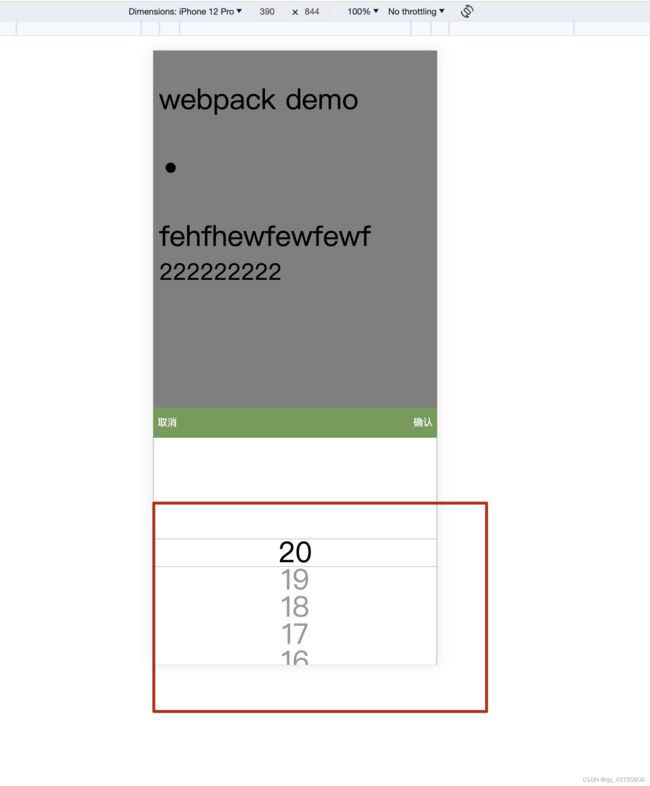
}))做到这些, 效果图如下:

文字糊作一团了, 因为z轴方向是正对着我们的, 应该是z轴不平移的话就离我们太远了
给.wheel-item加个边框线, 改变translateZ的值, 看看效果:
沿z轴平移0时:

沿z轴平移半径的一半时:

当然沿z轴平移半径的距离时, 页面就正常了, 一般越往z轴正方向移动, 我们眼中的物体越大, 从下方的这个网上找来的图也能看出这个结论:

沿z轴平移:translateZ
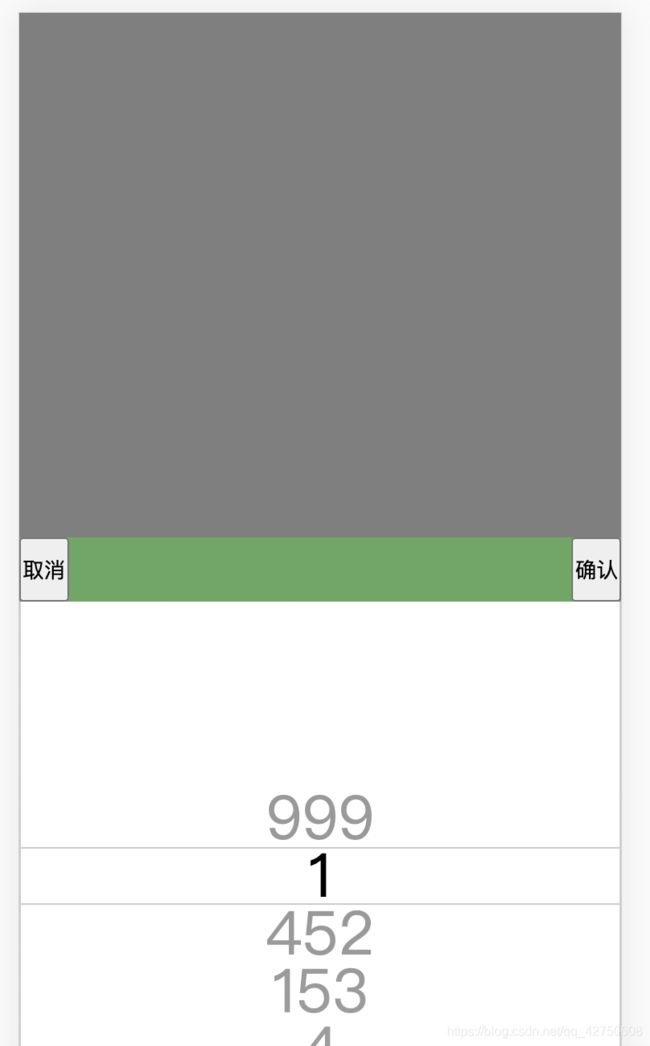
Z轴方向平移半径的距离: 让picker把父页面传过来的picker数组数据依次展示
如果平移(负半径)的距离, 数据就是相反的, 如下图所示:
按要求设置translateZ(${radiusRem})后, 发现文字还是糊作一团

沿x轴旋转: rotateX
x轴是我们常说的从左往右的方向;
每行文字都沿着x轴旋转, 旋转的角度按下标和默认一行文字旋转角度singleDeg一起判断
// 初始化时需要让picker滑到父页面传的当前选中的下标cuIdx处, 其他的文字按顺序排列
// 因为是从下往上滑, 所以得到 -(index - cuIdx) , 再乘以单行文字的角度, 就是每行文字旋转的角度
const indexNum = -1 * index + Number(cuIdx);
// 滑动的角度: 该行文字下标 * 一行文字对应的角度
const wheelItemDeg = indexNum * singleDeg
最后picker才能正常显示:
/**
 * 1、translate3d
在浏览器中,y轴正方向垂直向下,x轴正方向水平向右,z轴正方向指向外面。
z轴越大离我们越近,即看到的物体越大。z轴说物体到屏幕的距离。
 *
 */
function getInitWheelItemTransform(indexNum) {// 初始化时转到父页面传递的下标所对应的选中的值
    // 滑动的角度: 该行文字下标 * 一行文字对应的角度
    const rotate3dValue = getMoveWheelItemTransform(indexNum * LINE_HEIGHT);
    return `${rotate3dValue} translateZ(calc(${radiusRem} / 1))`
}
function getMoveWheelItemTransform(move) {// 初始化时转到父页面传递的下标所对应的选中的值
    const indexNum = Math.round(move / LINE_HEIGHT);
    // 滑动的角度: 该行文字下标 * 一行文字对应的角度
    const wheelItemDeg = indexNum * singleDeg

    return `rotateX(${wheelItemDeg}deg)`
}
页面布局的部分代码:
html文件(检查transform效果)
菜鸟教程(runoob.com)
注意: 不要使用box-shadow代替border, box-shadow很消耗浏览器性能, 时间长的话动画效果将不能执行!!!
使用html文件查看效果(未转换为rem, 还是使用px计算的, 不过逻辑都差不多
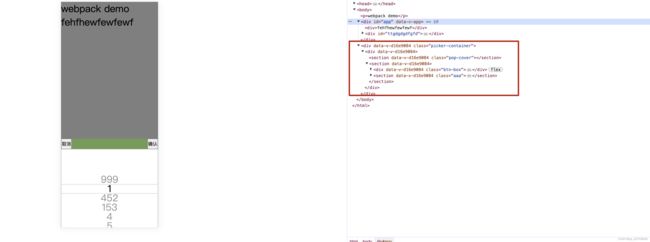
效果图:

vue文件部分:
-
{{ item }}
Picker.scss文件:
@import "./common.scss";

.picker-container {
  position: fixed;
  bottom: 0;
  left: 0;
  right: 0;

  // transition动画部分
  .myOpacity-enter,
  .myOpacity-leave-to {
    opacity: 0;
  }

  .myOpacity-enter-active,
  .myOpacity-leave-active {
    transition: all 0.5s ease;
  }

  .myPopup-enter,
  .myPopup-leave-to {
    transform: translateY(100px);
  }

  .myPopup-enter-active,
  .myPopup-leave-active {
    transition: all 0.5s ease;
  }

  // 透明遮罩
  .pop-cover {
    position: fixed;
    top: 0;
    left: 0;
    right: 0;
    height: 100vh;
    background: rgba(0, 0, 0, 0.5);
    z-index: -1;
  }

  // 确认 取消按钮box
  .btn-box {
    height: pxToRem(40px);
    background: rgb(112, 167, 99);
    display: flex;
    justify-content: space-between;
    font-size: pxToRem(16px);

    & button {
      background-color: rgba(0, 0, 0, 0);
      border: none;
      color: #fff;
    }
  }

  .col-wrapper-father {
    overflow: hidden;
  }

  //overflow: hidden=>截掉多余的部分,显示弹窗内容部分
  ul,
  li {
    list-style: none;
    padding: 0;
    margin: 0;
  }

  // 为了方便掌握重点样式,简单的就直接一行展示,其他的换行展示,方便理解
  .col-wrapper {
    position: relative;
    border: 1px solid #ccc;
    text-align: center;
    background: #fff;

    &>.wheel-list {
      position: absolute;
      width: 100%;
      transform-style: preserve-3d;
      transform: rotate3d(1, 0, 0, 0deg);

      .wheel-item {
        backface-visibility: hidden;
        position: absolute;
        left: 0;
        top: 0;
        width: 100%;
        font-size: pxToRem(16px);
      }
    }

    &>.cover {
      position: absolute;
      left: 0;
      top: 0;
      right: 0;
      bottom: 0;
      background: linear-gradient(0deg, rgba(white, 0.6), rgba(white, 0.6)), linear-gradient(0deg,
          rgba(white, 0.6),
          rgba(white, 0.6));
      background-position: top, bottom;
      background-repeat: no-repeat;
    }

    &>.divider {
      position: absolute;
      width: 100%;
      left: 0;
      border-top: 1px solid #cccccc;
      border-bottom: 1px solid #cccccc;
    }
  }
}
common.scss文件:
@import './variables.scss';

@function pxToRem($px) {
    $item: $pxToRemItem;
    @return $px/$item+rem;
}
variables.scss文件:
$pxToRemItem: 37px;1-2 touch事件
1-2-1. 开始滑动的时候:
1) 获取并保存手指点击的位置
finger.startY = ev.targetTouches[0].pageY; // 获取手指开始点击的位置
2) 保存手指上一次的滑动距离
finger.prevMove = finger.currentMove; // 保存手指上一次的滑动距离
3) 保存手指开始滑动的时间
finger.startTime = Date.now(); // 保存手指开始滑动的时间
function listenerTouchStart(ev) {
    ev.stopPropagation();
    isInertial.value = false; // 初始状态没有惯性滚动
    finger.startY = ev.targetTouches[0].pageY; // 获取手指开始点击的位置
    finger.prevMove = finger.currentMove; // 保存手指上一次的滑动距离
    finger.startTime = Date.now(); // 保存手指开始滑动的时间
}
1-2-2. 滑动过程中:
1) 获取当前手指的位置
const nowStartY = ev.targetTouches[0].pageY;
2) 计算此次滑动的距离:
s1 = finger.startY - nowStartY
3) 指滑动总距离s:
finger.currentMove = s1 + 前一次滑动的距离
4) 使用getMoveWheelItemTransform函数获取transform
let wheelDom = wheel.value || document.getElementsByClassName('wheel-list')[0]
if (wheelDom) {
wheelDom.style.transform = getMoveWheelItemTransform(finger.currentMove);
}
function listenerTouchMove(ev) {
    ev.stopPropagation();
    // startY: 开始滑动的touch目标的pageY: ev.targetTouches[0].pageY减去
    const nowStartY = ev.targetTouches[0].pageY; // 获取当前手指的位置
    // finger.startY - nowStart为此次滑动的距离, 再加上上一次滑动的距离finger.prevMove, 路程总长: (finger.startY - nowStartY) + finger.prevMove
    finger.currentMove = (finger.startY - nowStartY) + finger.prevMove;
    let wheelDom = wheel.value || document.getElementsByClassName('wheel-list')[0]
    if (wheelDom) {
        wheelDom.style.transform = getMoveWheelItemTransform(finger.currentMove);
    }
}
1-2-3. 结束滑动时
1) 获取结束时手指的位置
const _endY = ev.changedTouches[0].pageY; // 获取结束时手指的位置
2) 获取结束时间
const _entTime = Date.now(); // 获取结束时间
3) 通过v = (s初始-s结束) / t公式, 求速度v
// 速度v可能是正数, 也可能是负数
const v = (finger.startY - _endY) / (_entTime - finger.startTime);// 滚动完毕求移动速度 v = (s初始-s结束) / t
const absV = Math.abs(v); // 正数的速度
4) 调用xx函数inertia
// Math.round(absV / v) => 值为+1或者-1
// absV为正数的速度
// target: 为0表示停止滑动
inertia({ start: absV, position: Math.round(absV / v), target: 0 });
function listenerTouchEnd(ev) {
    ev.stopPropagation();
    const _endY = ev.changedTouches[0].pageY; // 获取结束时手指的位置
    const _entTime = Date.now(); // 获取结束时间
    const v = (finger.startY - _endY) / (_entTime - finger.startTime);// 滚动完毕求移动速度 v = (s初始-s结束) / t
    const absV = Math.abs(v);
    isInertial.value = true;// 最好惯性滚动,才不会死板
    animate.start(() => inertia({ start: absV, position: Math.round(absV / v), target: 0 }));// Math.round(absV / v)=>+/-1
}
1-3. inertia函数分析:
1-3-1. 获取这段事件走的位移
公式: S = (+/-)vt + 1/2at^2 + s1
const move = (position * start * FRESH_TIME) + (0.5 * a * Math.pow(FRESH_TIME, 2)) + finger.currentMove;
1-3-2. 求末速度
公式: v末 = (+/-)v初 + at
const newStart = (position * start) + (a * FRESH_TIME);
1-3-3. 用新变量保存最后的移动距离(并进行数据边界处理)
let actualMove = move; // 最后的滚动距离
使用actualMove的目的是后面"数据边界滑动控制"需要使用move判断(所以move值不能随意重新赋值), actualMove就能够根据实际情况重新赋值
// 已经到达目标
    // 当滑到第一个或者最后一个picker数据的时候, 不要滑出边界
    // 因为在开始的时候加了父页面传递的下标,这里需要减去才能够正常使用
    const minIdx = 0 - cuIdx;
    const maxIdx = values.length - 1 - cuIdx;
    if (Math.abs(newStart) >= Math.abs(target)) {
        if (Math.round(move / LINE_HEIGHT) < minIdx) {
            // 让滚动在文字区域内,超出区域的滚回到边缘的第一个文本处
            actualMove = minIdx * LINE_HEIGHT;
        }
        else if (Math.round(move / LINE_HEIGHT) >= maxIdx) {
            // 让滚动在文字区域内,超出区域的滚回到边缘的最后一个文本处
            actualMove = maxIdx * LINE_HEIGHT;
        }
        if (wheelDom) wheelDom.style.transition = 'transform 700ms cubic-bezier(0.19, 1, 0.22, 1)';
    }
1-3-4. finger.currentMove保存最后的actualMove的值
// 为了touch事件(开始滑动的时候使用)
finger.currentMove = actualMove;
1-3-5. 使用css3的transition和transform实现动画效果
1) transition部分:
wheelDom.style.transition = 'transform 700ms cubic-bezier(0.19, 1, 0.22, 1)';
2) transform部分
wheelDom.style.transform = getMoveWheelItemTransform(actualMove);
1-3-6. animate.stop(), 滑动结束
animate.stop(); // 不写也行, animate做了防抖处理
1) Animate的原理
核心是requestAnimationFrame和cancelAnimationFrame, 用法类似setTimeout或者clearTimeout
开始: this.timer = requestAnimationFrame(fn);
结束:
cancelAnimationFrame(this.timer);
this.timer = null; // 注意重置this.timer为null
function Animate () {
  return this.timer;
}

Animate.prototype.start = function (fn) {
  if (!fn) {
    throw new Error('需要执行函数');
  }
  if (this.timer) {
    this.stop();
  }
  this.timer = requestAnimationFrame(fn);
}

Animate.prototype.stop = function () {
  if (!this.timer) {
    return;
  }
  cancelAnimationFrame(this.timer);
  this.timer = null;
}

export default Animate;
2) Animatede优点:
性能优于定时器, 且做了防抖处理
防抖和节流的区别?
1. 防抖: n秒后再次执行该事件, 若n秒内被重复触发, 则重新计时
2. 节流: n秒内只运行一次, 若在n秒内重新触发, 只有一次生效
3. 一般会用到闭包函数
比如利用setTimeout和闭包函数封装成防抖和节流函数, 代码如下:
function debounce(fn, delay) { // 防抖
    let timer = null;
    return function() {
        if(timer) clearTimeout(timer);
        timer = setTimeout(() => {
            fn.call(this);
        }, delay);
    }
}

function throttle(fn, delay) { // 节流
    let flag = true;
    return function() {
        if(flag) {
            setTimeout(() => {
                fn.call(this);
                flag = true;
            }, delay);
        }
        flag = false;
    }
}
1-4. inertia函数可优化的几点:
1) 数据边界滑动控制
当滑到第一个数据之外, 要强制滑到第一个, 不要超出边界;
当滑到最后一个数据之外, 要强制滑回到最后一个数据那里;
代码同[ 1-3-3. 用新变量保存最后的移动距离(并进行数据边界处理) ]
// 已经到达目标
    // 当滑到第一个或者最后一个picker数据的时候, 不要滑出边界
    // 因为在开始的时候加了父页面传递的下标,这里需要减去才能够正常使用
    const minIdx = 0 - cuIdx;
    const maxIdx = values.length - 1 - cuIdx;
    if (Math.abs(newStart) >= Math.abs(target)) {
        if (Math.round(move / LINE_HEIGHT) < minIdx) {
            // 让滚动在文字区域内,超出区域的滚回到边缘的第一个文本处
            actualMove = minIdx * LINE_HEIGHT;
        }
        else if (Math.round(move / LINE_HEIGHT) >= maxIdx) {
            // 让滚动在文字区域内,超出区域的滚回到边缘的最后一个文本处
            actualMove = maxIdx * LINE_HEIGHT;
        }
        if (wheelDom) wheelDom.style.transition = 'transform 700ms cubic-bezier(0.19, 1, 0.22, 1)';
    }
2) 尽量成对使用animate.start和animate.stop()
虽然animate做了防抖处理, 但是为了代码的阅读性, 明确开始和结束的代码要展示出来
1-5 inertia函数的代码:
/**用户结束滑动,应该慢慢放慢,最终停止。从而需要 a(加速度)
 * @param start 开始速度(注意是正数) @param position 速度方向,值: 正负1--向上是+1,向下是-1 @param target 结束速度
 */
function inertia({ start, position, target }) {
    if (start <= target || !isInertial.value) {
        animate.stop();
        finger.prevMove = finger.currentMove;
        getSelectValue(finger.currentMove);// 得到选中的当前下标
        return;
    }
    // 因为在开始的时候加了父页面传递的下标,这里需要减去才能够正常使用
    const minIdx = 0 - cuIdx;
    const maxIdx = values.length - 1 - cuIdx;

    // 这段时间走的位移 S = vt + 1/2at^2 + s1;
    const move = (position * start * FRESH_TIME) + (0.5 * a * Math.pow(FRESH_TIME, 2)) + finger.currentMove;
    const newStart = (position * start) + (a * FRESH_TIME);// 根据求末速度公式: v末 = (+/-)v初 + at
    let actualMove = move; // 最后的滚动距离
    let wheelDom = wheel.value || document.getElementsByClassName('wheel-list')[0]
    if (wheelDom) {
        wheelDom.style.transition = '';
    }
    // 已经到达目标
    // 当滑到第一个或者最后一个picker数据的时候, 不要滑出边界
    if (Math.abs(newStart) >= Math.abs(target)) {
        if (Math.round(move / LINE_HEIGHT) < minIdx) {
            // 让滚动在文字区域内,超出区域的滚回到边缘的第一个文本处
            actualMove = minIdx * LINE_HEIGHT;
        }
        else if (Math.round(move / LINE_HEIGHT) >= maxIdx) {
            // 让滚动在文字区域内,超出区域的滚回到边缘的最后一个文本处
            actualMove = maxIdx * LINE_HEIGHT;
        }
        if (wheelDom) wheelDom.style.transition = 'transform 700ms cubic-bezier(0.19, 1, 0.22, 1)';
    }
    // finger.currentMove赋值是为了点击确认的时候可以使用=>获取选中的值
    finger.currentMove = actualMove;
    if (wheelDom) wheelDom.style.transform = getMoveWheelItemTransform(actualMove);

    animate.stop(); // 结束触发, 不写的话叶没有太大问题, 因为animate有做防抖处理
}
二. 使用picker组件页面
-
{{selected}}
三. 使用requestAnimationFrame让动画更流畅
因为是浏览器方法, 比setInterval或者setTimeout效果更好
anmate.js
export default class Animate {
  constructor() {
    this.timer = null;
  }
  start = (fn) => {
    if (!fn) {
      throw new Error('需要执行函数');
    }
    if (this.timer) {
      this.stop();
    }
    this.timer = requestAnimationFrame(fn);
  };
  stop = () => {
    if (!this.timer) {
      return;
    }
    cancelAnimationFrame(this.timer);
    this.timer = null;
  };
}
四. 扩展: 使用vue3语法:
1. 在shims-vue.d.ts中declare:
declare module '*.vue' {
  import { ComponentOptions, DefineComponent } from 'vue'
  const component: ComponentOptions<{},{},any> | DefineComponent<{},{},any>
  export default component
}
2.
-
{{ item }}
- {{ item }}
注意事项: 此种方式写的逻辑最全, 当props没有拿到父页面更新后的传参, 使用计算属性获取:
// props的value只有第一次渲染才传数据过来了, 其他时候没有实时更新, 使用计算属性获取一下, 此变量能够控制组件的显示与隐藏, 以及消失时transition的动画
const isShow = computed(()=> props.value);
父页面调用:
-
{{ selected }}
3. 若是
效果和上面的一样