Java版 WebSocket实现消息推送【保姆来了!】
Java版 WebSocket实现消息推送
使用Java实现WebSocket一对一 ,一对多消息推送 亲测有效!!!!!!!
一. 准备工具
前端:一张HTML页面
后端: SpringBoot
管理工具: Maven
这三个都是Java开发的必备技能,不多做解释了, 直接发车
二. 项目准备工作
- 后端创建SpringBoot工程,过程略…
- 前端创建HTML页面二张
现在本人前端开发多用Vue,但是都是用的原生的JavaScript,所以用什么框架无所谓…
- 前端书写代码
这里主要实现功能,就不写样式什么的了,但是原理一致
<!DOCTYPE html>
<html lang="en">
<head>
    <meta charset="UTF-8">
    <title>Title</title>
</head>
<body>

</body>
<script>
    let webSocket = null;   // 创建一个变量
    if ('WebSocket' in window){  // 判断当前的浏览器是否支持WebSocket
        // 如果支持则创建一个WebSocket赋值给刚才创建的变量
        // 后面的路径实际上就是一次请求,但是这里用的是WebSocket协议
        // 记住这个地方后面详细讲到怎么写
        webSocket = new WebSocket('ws://localhost:8080/webSocket');
    }else{  // 如果不兼容则弹框,该浏览器不支持
        alert('该浏览器不支持')
    }

    /**
     * 当WebSocket创建连接(初始化)会触发该方法
     */
    webSocket.onopen = function (event){
        console.log('建立连接') // 这个代表在浏览器打印日志,跟Java的System.out.println()意思一致
    }

    /**
     * 当WebSocket关闭时候会触发该方法
     */
    webSocket.onclose = function (event){
        console.log('关闭连接') // 同上
    }

     /**
     * 当WebSocket接受消息会触发该方法
     */
    webSocket.onmessage = function (event){
        console.log('收到消息:'+event.data)
    }

    /**
     * 当WebSocket连接出错触发该方法
     */
    webSocket.onerror = function (event){
        console.log('websocket发生错误');
    }

    /**
     * 页面关闭,WebSocket关闭
     */
    window.onbeforeunload = function (){
        webSocket.close();
    }
</script>
</html>
- 接下来书写后端Java代码
引入WebSocket的依赖,这里给予SpringBoot,所以直接引入SpringBoot-Start的依赖
	org.springframework.boot
	spring-boot-starter-websocket
书写配置类,其实就是实例化一个Bean
@Component
public class WebSocketConfig {
    @Bean
    public ServerEndpointExporter serverEndpointExporter(){
        return new ServerEndpointExporter();
    }
}
一般的请求都会写到Controller里面,咱们的WebSocket写到Service方便多次调用
一对一还是一对多,方法的区别在这里,接下来先说群发消息的那种(就是所有加入到WebSocket的用户都会收到该消息)
@Component  // 交给IOC容器
@ServerEndpoint("/webSocket")   // 这里的路径跟上面Js创建的WebSocket路径一致
public class WebSocketService {
     // 定义属性
    private Session session;
    //创建一个set用来存储用户
    private static CopyOnWriteArraySet<WebSocketService> websockets = new CopyOnWriteArraySet<>();

    /**
     * 当有用户创建连接时候调用该方法
     */
    @OnOpen
    public void onOpen(Session session) {
        // 给当前的Session赋值
        this.session = session;
        // 将当前对象添加到CopyOnWriteArraySet 中
        websockets.add(this);
        // 可以获取该session,但是其实也是一个内存地址
        System.err.println("【建立连接】 用户为:" + this.session);
        // 获取总数,这个不难理解,实际上这个集合的总数,就是WebSocket连接的总数
        System.err.println("【建立连接】 总数为:" + websockets.size());
    }

    /**
     * 有用户连接断开时候触发该方法
     */
    @OnClose
    public void onClose() {
        websockets.remove(this); // 将当前的对象从集合中删除
        System.err.println("【连接断开】 用户为:" + this.session);
        System.err.println("【连接断开】 总数为:" + websockets.size());
    }

    /**
     * 这个方法是客户端给服务端发送消息触发该方法
     * @param message : 消息内容
     */
    @OnMessage
    public void onMessage(String message) {
        System.err.println("【收到客户端发的消息】:" + message);
    }

    /**
     * 发送消息的方法,方便后期别的service调用
     *
     * @param message 消息内容
     */
    public void sendMessage(String message) {
        for (WebSocketService websocket : websockets) {   // 遍历该Set集合
            System.err.println("广播消息 【给用户】 :" + websocket + "发送消息" + "【" + message + "】"); // 获取一个,在控制台打印一句话
            try {
                websocket.session.getBasicRemote().sendText(message); // 发送消息的方法
            } catch (IOException e) {
                e.getMessage();
            }
        }
    }
}
为了方便测试,在写一个接口,用来发送消息
@RestController
@RequestMapping("/hello")
public class Controller {

    @Autowired
    private WebSocketService webSocketService;

    @GetMapping("h1")
    public void h1() {
        webSocketService.sendMessage("您有新的消息"); // 调用Service的发送消息的方法
    }
}
接下来就是测试
后端SpringBoot项目启动…
两张页面分别去访问,我直接用两个浏览器方便看清
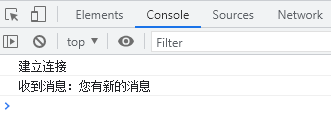
当页面进去的时候,打开F12可以看到建立连接,则证明与后端WebSocket连接成功
接下来用PostMan等等接口测试工具或者浏览器url都行,去请求刚才写的接口,也就是localhost:8080/hello/h1
请求一次则页面会提示收到消息 就成功了
接下来很多人就会问一对一怎么发,我不想群发
那么接下来就改造一下WebSocketService就好了,跟上步伐 冲冲冲
思路: 看黑板!!!!!!!!!
实际上对于刚才所有的Session都是用的Set存储的,我这里可以使用一个Map存储,将Session作为Value,而key就用用户的唯一标识,比如用户ID等等…
接下来,换曲:
<script>
    let webSocket = null;
    if ('WebSocket' in window){
        webSocket = new WebSocket('ws://localhost:8080/webSocket/2');  // 这里后面拼接一个Id,我这里测试所以就写1和2模拟两个用户
    }else{
        alert('该浏览器不支持')
    }

    webSocket.onopen = function (event){
        console.log('建立连接')
    }

    webSocket.onclose = function (event){
        console.log('关闭连接')
    }

    webSocket.onmessage = function (event){
        console.log('收到消息:'+event.data)
    }

    webSocket.onerror = function (event){
        console.log('websocket发生错误');
    }

    window.onbeforeunload = function (){
        webSocket.close();
    }
</script>
@Component
@ServerEndpoint("/webSocket/{id}")  // 这里建立连接后面跟上一个ID
public class WebSocketService {
    private Session session;
	// 这里用ConcurrentHashMap 因为他是一个线程安全的Map
    private static ConcurrentHashMap<Long, WebSocketService> websockets = new ConcurrentHashMap<>();

    @OnOpen
    public void onOpen(@PathParam("id") Long id, Session session) {  // 接收到前端传来的用户ID
        this.session = session;
        websockets.put(id, this);  //将ID作为key,当前的对象作为Value
        System.err.println("【建立连接】 用户为:" + this.session);
        System.err.println("【建立连接】 用户Id为:" + id);
        System.err.println("【建立连接】 总数为:" + websockets.size());
    }

    /**
     * 发送消息方法  【为了方便大家理解,我这里直接不封装了】
     *
     * @param message 消息
     * @param userId  用户ID
     */
    public void sendMessage(String message, Long userId) {
        if (userId == null) {  // 如果等于null则证明是群发
             // 获取当前Map的一个迭代器,遍历Map的方式有很多种,看着来
            Iterator<Map.Entry<Long, WebSocketService>> iterator = websockets.entrySet().iterator();
            // 这个就是遍历这个集合的过程....
            while (iterator.hasNext()) {
                // 获取每一个Entry实例
                Map.Entry<Long, WebSocketService> entry = iterator.next();
                // 获取每一个Value,而这个Value就是WebSocket的实例
                WebSocketService webSocket = entry.getValue();
                // 接下来就是遍历群发
                System.err.println("广播消息 【给用户】 :" + webSocket + "发送消息" + "【" + message + "】");
                try {
                    webSocket.session.getBasicRemote().sendText(message); // 发送!!!!!!!!!
                } catch (IOException e) {
                    throw new RuntimeException(e);
                }
            }
        } else {  // 如果不是群发,则判断ID,其余步骤一致
            // 获取当前Map的一个迭代器,遍历Map的方式有很多种,看着来
            Iterator<Map.Entry<Long, WebSocketService>> iterator2 = websockets.entrySet().iterator();
             // 这个就是遍历这个集合的过程....
            while (iterator2.hasNext()) {
                 // 获取每一个Entry实例
                Map.Entry<Long, WebSocketService> entry = iterator2.next();
                 // 获取每一个Value,而这个Value就是WebSocket的实例
                WebSocketService webSocket = entry.getValue();
                // 获取每一个Key,这个Key就是用户ID
                Long key = entry.getKey();
                // 判断用户ID与当前的Key相等
                if (userId == key) {
                    System.err.println("广播消息 【给用户】 :" + key + "发送消息" + "【" + message + "】"); // 打印
                    try {
                        webSocket.session.getBasicRemote().sendText(message);  // 则发送给当前的用户即可
                    } catch (IOException e) {
                        throw new RuntimeException(e);
                    }
                }
                return;
            }
        }
    }

