2.1 第一个Spring Boot项目:helloworld
第2章 开始 Spring Boot 之旅
2.1 第一个Spring Boot项目:helloworld
2.2 单元测试
2.3 开发环境热部署
2.1 第一个Spring Boot项目:helloworld
2.1.1 创建Spring Boot项目
1、使用Spring官网提供的构建页面
(1)访问Spring官网(https://start.spring.io/)。
(2)选择构建工具为Maven Project,编程语言选择Java,Spring Boot 版本为 2.7.6,填写项目基本信息,添加相关依赖(按需添加)。
(3)单击Generate创建并下载项目压缩包。
(4)解压后,使用IDEA打开项目,选择 File -> Open File or Project,选择解压后的文件夹,单击OK按钮,项目即可创建完成。 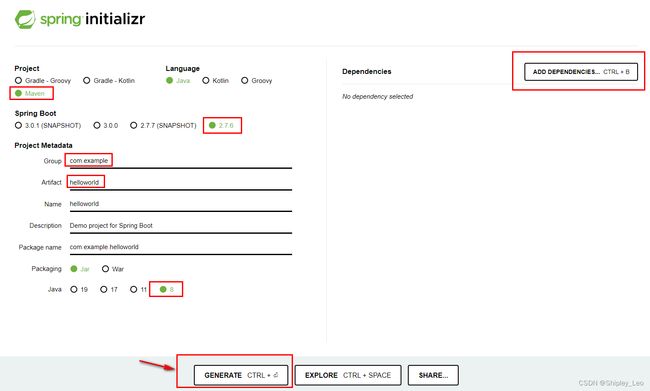
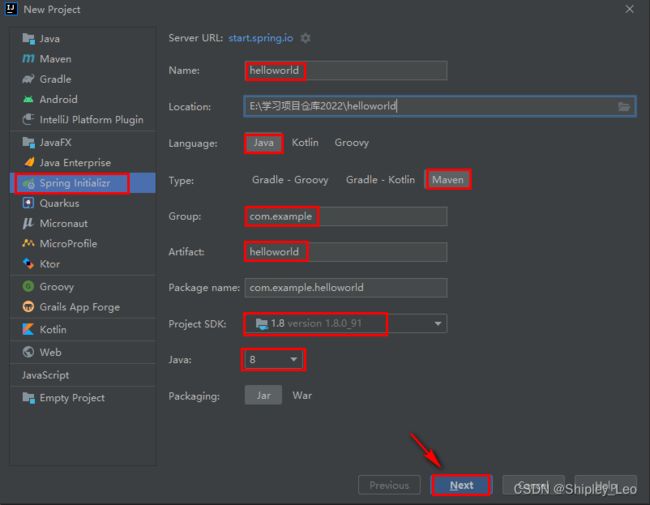
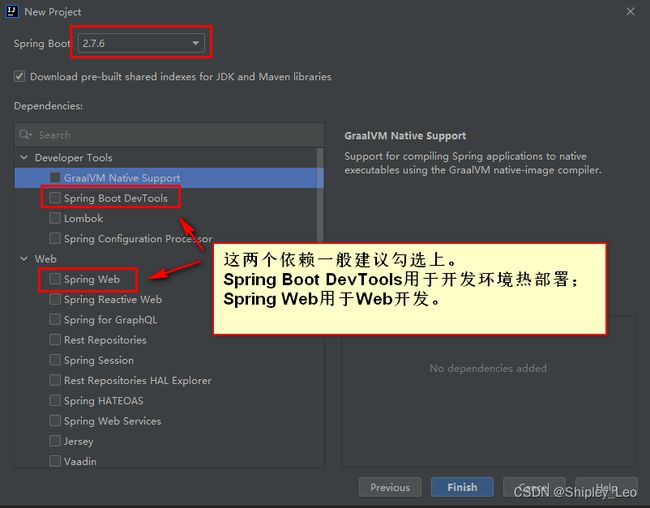
2、使用IDEA构建
(1)选择 File -> New -> Project 命令,弹出新建项目的对话框。
(2)选择 Spring Initializr,出现配置界面,IDEA已经帮助做了集成。IDEA界面中的Group、Artifact等输入框就对应着项目的pom.xml中的groupId、artifactId等配置项。
2.1.2 Spring Boot项目结构
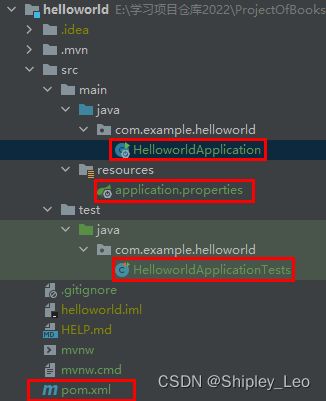
Spring Boot的基础结构共有3个主要目录和一个pom.xml文件。
- src/main/java:程序开发以及主程序目录。
- src/main/resources:配置文件和资源文件目录。
- src/test/java:测试程序目录
新建的helloworld项目只有java、resources、test三个基础结构目录。完整的项目包括前台页面、model实体、数据库访问、公共基础类等非常多的文件和目录,Spring Boot 建议的目录结构如下:
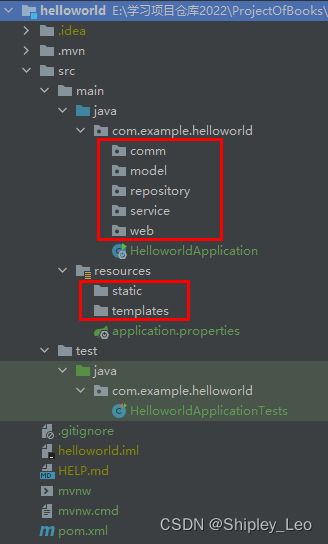
(1)Java目录(src/main/java):程序开发以及主程序目录。java目录下的com.example.helloworld为后台java文件的根目录,包括:
- Application.java:位于java文件的根目录下,是项目的启动类。注意Spring Boot项目只能有一个main()方法入口。
- comm:建议放置公共的类,如全局的配置文件、工具类等。
- model:主要用于实体(Entity)。
- repository:主要是数据库访问层代码。
- service:主要是业务类代码
- web:负责前台页面访问的Controller路由。
(2)resources目录(src/main/resources):配置文件和资源文件目录。包括:
- static:存放Web访问的静态资源,如JS、CSS、图片等。
- templates:存放页面模板。
- application.properties:存放项目的配置信息。
(3)test目录(src/test/java):测试程序目录。存放单元测试的代码。
(4)pom.xml:位于项目根目录下,用于配置项目依赖包以及其他配置。
附录:
项目启动类(HelloworldApplication.java)
package com.example.helloworld;

import org.springframework.boot.SpringApplication;
import org.springframework.boot.autoconfigure.SpringBootApplication;

@SpringBootApplication
public class HelloworldApplication {

    public static void main(String[] args) {
        SpringApplication.run(HelloworldApplication.class, args);
    }

}
单元测试类(HelloworldApplicationTests.java)
package com.example.helloworld;

import org.junit.jupiter.api.Test;
import org.springframework.boot.test.context.SpringBootTest;

@SpringBootTest
class HelloworldApplicationTests {

    @Test
    void contextLoads() {
    }

}
2.1.3 pom.xml详解
<project xmlns="http://maven.apache.org/POM/4.0.0" xmlns:xsi="http://www.w3.org/2001/XMLSchema-instance"
         xsi:schemaLocation="http://maven.apache.org/POM/4.0.0 https://maven.apache.org/xsd/maven-4.0.0.xsd">
    <modelVersion>4.0.0modelVersion>


    <groupId>com.examplegroupId>
    <artifactId>helloworldartifactId>
    <version>0.0.1-SNAPSHOTversion>
    <packaging>jarpackaging>
    <name>helloworldname>
    <description>helloworlddescription>


    <properties>
        <project.build.sourceEncoding>UTF-8project.build.sourceEncoding>
        <project.reporting.outputEncoding>UTF-8project.reporting.outputEncoding>
        <java.version>1.8java.version>
    properties>


    <parent>
        <groupId>org.springframework.bootgroupId>
        <artifactId>spring-boot-starter-parentartifactId>
        <version>2.7.5version>
        <relativePath/>
    parent>
    <dependencies>
        <dependency>
            <groupId>org.springframework.bootgroupId>
            <artifactId>spring-boot-starter-webartifactId>
        dependency>
        <dependency>
            <groupId>org.springframework.bootgroupId>
            <artifactId>spring-boot-devtoolsartifactId>
            <scope>runtimescope>
            <optional>trueoptional>
        dependency>
        <dependency>
            <groupId>org.springframework.bootgroupId>
            <artifactId>spring-boot-starter-testartifactId>
            <scope>testscope>
        dependency>
    dependencies>


    <build>
        <plugins>
            <plugin>
                <groupId>org.springframework.bootgroupId>
                <artifactId>spring-boot-maven-pluginartifactId>
            plugin>
        plugins>
    build>

project>
2.1.4 第一个helloworld程序
(1)创建第一个helloworld接口程序
package com.example.helloworld.controller;

import org.springframework.web.bind.annotation.RequestMapping;
import org.springframework.web.bind.annotation.RestController;

@RestController
public class HelloController {
    @RequestMapping("/hello")
    public String hello() {
        return "Hello @ Spring Boot!!!";
    }
}
(2)运行helloworld程序
右击项目中的“Run ‘HelloworldApplication’”命令就可以启动项目。
(3)访问接口,查看页面返回结果
打开浏览器,访问 http://localhost:8080/hello 地址,查看页面返回的结果。
访问/hello地址后,后台成功接收到页面请求并返回“Hello @ Spring Boot!!!”,说明我们的第一个 Spring Boot 项目运行成功。
总结
本节从简单的helloworld程序开始介绍创建 Spring Boot 项目的方法和流程,以及 Spring Boot 项目结构,最后介绍项目中非常重要的pom.xml文件。
来源:《Spring Boot 从入门到实战》学习笔记