学-vue、element-ui入门笔记
学-vue、element-ui入门笔记
文章目录
- 学-vue、element-ui入门笔记
-
- 前言
- 一、vue-cli 脚手架
-
- 1.常见问题
-
- (1)在PowerShell用npm : 无法加载文件 \npm\npm.ps1,因为在此系统上禁止运行脚本。
- (2)vue ui无反应
- 二、Chrome浏览器插件 vue-devtools安装
-
- 1.下载源码
- 2.安装
- 三、源码调试
- 四、打包发布
-
- 1.使用静态服务器工具打包
- 2.使用tomcat发布
- 3.使用nginx发布(推荐)
- 五、vuex
- 六、常用操作
-
- 1.父子组件同步属性值
- 2.vue-element-admin关闭当前标签页
- 3.动态表格(自适应列宽)
- 4.表单下拉列表宽度自适应
- 5.调用子组件method校验表单
- 6.可编辑表格
- 七、常见问题
-
- 1.vue路由this.$router.push跳转当前页面不刷新问题
- 2.vue复选框点击无法选中/取消选中
前言
文档
element-ui官方文档
一、vue-cli 脚手架
vue init webpack demo
cd demo
npm install
npm run dev
webpack 为模板名 demo为项目名
百度网盘资源:
尚硅谷Vue核心技术实战教程全套完整版(vue.js初学者快速入门到精通) 提取码:r7vb
1.常见问题
(1)在PowerShell用npm : 无法加载文件 \npm\npm.ps1,因为在此系统上禁止运行脚本。
- 描述
在PowerShell用npm : 无法加载文件 \npm\npm.ps1,因为在此系统上禁止运行脚本。
- 临时解决办法
使用
npm.cmd -v替代npm -v命令
- 永久解决办法
执行策略更改提示时,输入
A
get-ExecutionPolicy
set-ExecutionPolicy RemoteSigned
get-ExecutionPolicy
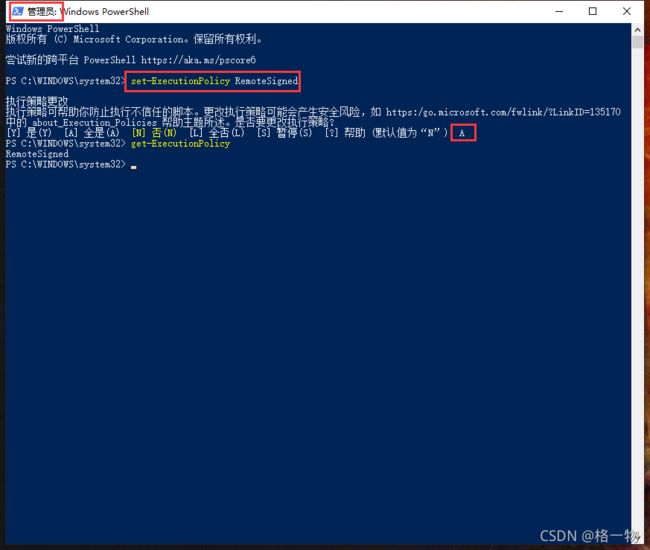
在PowerShell用npm : 无法加载文件 \npm\npm.ps1,因为在此系统上禁止运行脚本。 问题解决
(2)vue ui无反应
- 原因
版本低于3时没有ui功能
vue -V
vue -h
- 解决办法
npm uninstall vue-cli -g
npm install @vue/cli -g
vue ui
访问地址
http://localhost:8000

vue ui没反应
vue超详细讲解四(Vue CLI3)
二、Chrome浏览器插件 vue-devtools安装
1.下载源码
vue-devtools v5.3.4
2.安装
Make sure you are using Node 6+ and NPM 3+
Clone this repo
cd vue-devtools the newly created folder
run yarn install
then run yarn run build
Open the Chrome extension page (currently under Menu > More Tools > Extensions)
Check “developer mode” on the top-right corner
Click the “load unpacked” button on the left, and choose the folder: vue-devtools/packages/shell-chrome/
Alternatively to step 3, you can also use yarn dev:chrome to build & watch the unpacked extension
建议使用yarn安装;运行
yarn run build后,将vue-devtools-5.3.4\packages\shell-chrome\manifest.json中"persistent": false改为true
npm install -g yarn
yarn -v
yarn config set registry http://registry.npm.taobao.org
yarn config list
伸手党的福音vue-devtools v5.3.4 chrome插件包
nodejs环境配置
三、源码调试
浏览器Debug调试此处就不再详述了
webpack.config.js
const path = require('path')
module.exports = {
	mode: "development",  // 还可以是production
	entry: path.join(__dirname, "src/main.js"),
	output: {
		filename: "bundle.js",
		path: path.join(__dirname, "dist")
	},
	devtool: "cheap-module-eval-source-map"
}
vue.config.js
productionSourceMap: false
// All configuration item explanations can be find in https://cli.vuejs.org/config/
module.exports = {
  /**
   * You will need to set publicPath if you plan to deploy your site under a sub path,
   * for example GitHub Pages. If you plan to deploy your site to https://foo.github.io/bar/,
   * then publicPath should be set to "/bar/".
   * In most cases please use '/' !!!
   * Detail: https://cli.vuejs.org/config/#publicpath
   */
  publicPath: '/',
  outputDir: 'dist',
  assetsDir: 'static',
  lintOnSave: process.env.NODE_ENV === 'development',
  productionSourceMap: false,
  devServer: {
    port: port,
    open: true,
    overlay: {
      warnings: false,
      errors: true
    },
    proxy: {
      [process.env.VUE_APP_BASE_API]: {
        target: process.env.VUE_APP_BASE_API,
        changeOrigin: true,
        pathRewrite: {
          ['^' + process.env.VUE_APP_BASE_API]: ''
        }
      }
    }
    // before: require('./mock/mock-server.js')
  },
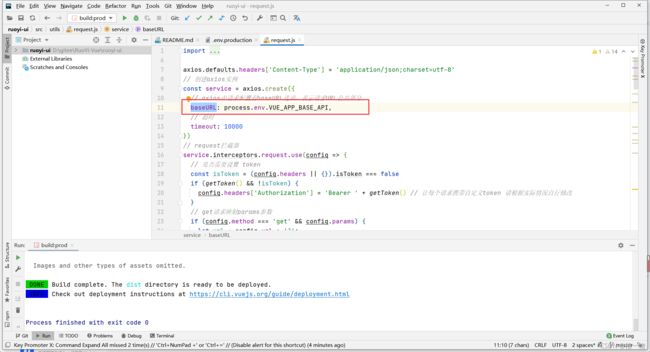
- 开发环境

- 线上环境
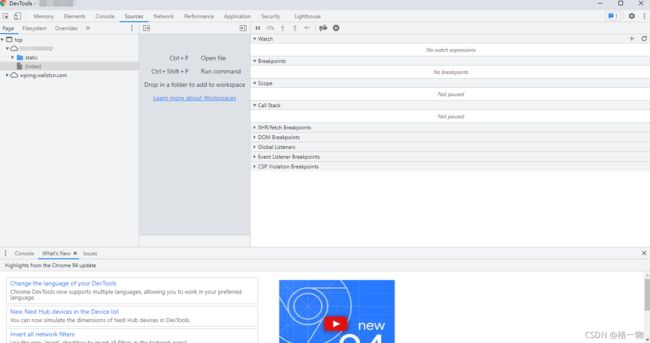
解决Chrome 本地调试vue,Sources下找不到源代码的问题
四、打包发布
1.使用静态服务器工具打包
npm install -g serve
serve dist
2.使用tomcat发布
①修改配置: webpack.prod.conf.js
output: {
publicPath: ‘/xxx/’ //打包文件夹的名称
}
②重新打包:
npm run build
③修改 dist 文件夹为项目名称: xxx
④将 xxx 拷贝到运行的 tomcat 的 webapps 目录下
访问: http://localhost:8080/xxx
3.使用nginx发布(推荐)

- nginx.conf
#user  nobody;
worker_processes  4;

error_log  logs/error.log;
#error_log  logs/error.log  notice;
#error_log  logs/error.log  info;

#pid        logs/nginx.pid;


events {
    worker_connections  1024;
}


http {
    include       mime.types;
    default_type  application/octet-stream;

    #log_format  main  '$remote_addr - $remote_user [$time_local] "$request" '
    #                  '$status $body_bytes_sent "$http_referer" '
    #                  '"$http_user_agent" "$http_x_forwarded_for"';

    #access_log  logs/access.log  main;

    sendfile        on;
    #tcp_nopush     on;

    #keepalive_timeout  0;
    keepalive_timeout  65;

    #gzip  on;

    server {
        listen       80;
        server_name  localhost;

        #charset koi8-r;

        #access_log  logs/host.access.log  main;

        #location / {
        #    root   html;
        #    index  index.html index.htm;
        #}

        location / {
            root   dist;
            try_files $uri $uri/ /index.html;
            index  index.html index.htm;

        }

        location /prod-api/ {
            proxy_set_header Host $http_host;
            proxy_set_header X-Real-IP $remote_addr;
            proxy_set_header REMOTE-HOST $remote_addr;
            proxy_set_header X-Forwarded-For $proxy_add_x_forwarded_for;
            proxy_pass http://localhost:8080/;
        }


        #error_page  404              /404.html;

        # redirect server error pages to the static page /50x.html
        #
        error_page   500 502 503 504  /50x.html;
        location = /50x.html {
            root   html;
        }

        # proxy the PHP scripts to Apache listening on 127.0.0.1:80
        #
        #location ~ \.php$ {
        #    proxy_pass   http://127.0.0.1;
        #}

        # pass the PHP scripts to FastCGI server listening on 127.0.0.1:9000
        #
        #location ~ \.php$ {
        #    root           html;
        #    fastcgi_pass   127.0.0.1:9000;
        #    fastcgi_index  index.php;
        #    fastcgi_param  SCRIPT_FILENAME  /scripts$fastcgi_script_name;
        #    include        fastcgi_params;
        #}

        # deny access to .htaccess files, if Apache's document root
        # concurs with nginx's one
        #
        #location ~ /\.ht {
        #    deny  all;
        #}
    }


    # another virtual host using mix of IP-, name-, and port-based configuration
    #
    #server {
    #    listen       8000;
    #    listen       somename:8080;
    #    server_name  somename  alias  another.alias;

    #    location / {
    #        root   html;
    #        index  index.html index.htm;
    #    }
    #}


    # HTTPS server
    #
    #server {
    #    listen       443 ssl;
    #    server_name  localhost;

    #    ssl_certificate      cert.pem;
    #    ssl_certificate_key  cert.key;

    #    ssl_session_cache    shared:SSL:1m;
    #    ssl_session_timeout  5m;

    #    ssl_ciphers  HIGH:!aNULL:!MD5;
    #    ssl_prefer_server_ciphers  on;

    #    location / {
    #        root   html;
    #        index  index.html index.htm;
    #    }
    #}

}
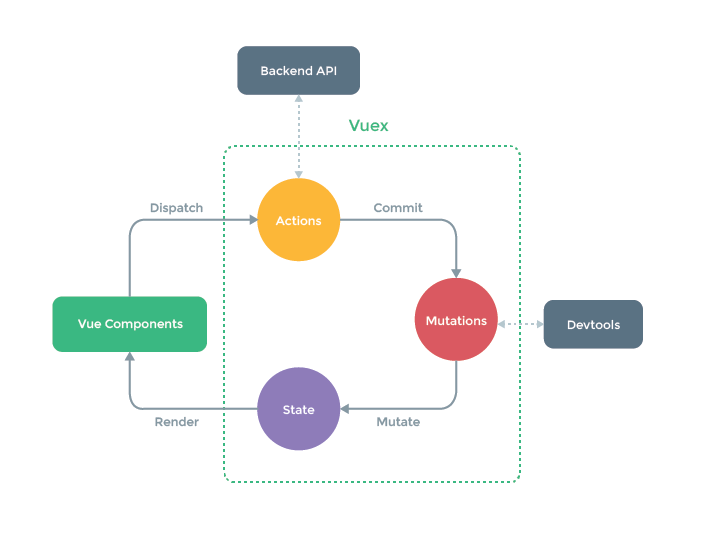
五、vuex
六、常用操作
1.父子组件同步属性值
父组件:
content.sync
子组件: 使用中间变量或computed(currentContent),触发事件this.$emit('update:content', val)
- 子组件
<template>
  <editor ref="codeEditor" v-model="currentContent" @init="editorInit" :lang="lang" :theme="codeStyle" :width="width" :height="height"/>
template>

<script>
import { mapState } from 'vuex'

export default {
  name: 'AceEditor',
  components: {
    editor: require('vue2-ace-editor')
  },
  props: {
    width: {
      type: String,
      default: '100%'
    },
    height: {
      type: String,
      default: '500px'
    },
    content: {
      type: String,
      required: true,
      default: () => null
    },
    lang: {
      type: String,
      default: 'java'
    },
    readOnly: {
      type: Boolean,
      default: false
    }
  },
  data() {
    return {

    }
  },
  computed: {
    ...mapState({
      codeStyle: state => state.settings.codeStyle,
      codeSize: state => state.settings.codeSize
    }),
    currentContent: {
      get() {
        return this.content
      },
      set(val) {
        this.$emit('update:content', val)
      }
    }
  },
  watch: {
    codeSize: {
      handler: function(value) {
        this.$refs.codeEditor.editor.setOptions({
          fontSize: value
        })
      },
      deep: true
    }
  },
  created() {

  },
  mounted() {

  },
  methods: {
    editorInit(editor) {
      require('brace/ext/language_tools')
      require('brace/mode/java')
      require('brace/mode/mysql')
      require('brace/theme/chrome')
      require('brace/theme/github')
      require('brace/theme/eclipse')
      require('brace/theme/dracula')
      require('brace/snippets/java')
      require('brace/snippets/mysql')
      editor.setOptions({
        autoScrollEditorIntoView: true,
        enableBasicAutocompletion: true,
        enableLiveAutocompletion: true,
        enableSnippets: false,
        // 只读
        readOnly: this.readOnly,
        // 显示打印边距线
        showPrintMargin: false,
        // 字体大小
        fontSize: this.$store.state.settings.codeSize
      })
    }
  }
}
script>

<style scoped>

style>
- 父组件
<AceEditor ref="sqlEditor" :content.sync="sqlText" lang="mysql" :read-only="false" width="100%" height="500px">AceEditor>
2.vue-element-admin关闭当前标签页
vuex 文件位置
src/store/modules/tagsView.js
    close() {
      this.$store.dispatch('tagsView/delView', this.$route)
      this.$router.go(-1)
    }
3.动态表格(自适应列宽)
- 动态表格
      <el-table
        :data="tableData"
        border
        stripe
        max-height="600px"
        style="width: 100%"
        >
        <af-table-column
          v-for="item in tableColumn"
          :key="item"
          :label="item">
          <template slot-scope="scope">
            <div>
              {{ scope.row[item] }}
            div>
          template>
        af-table-column>
      el-table>
      previewTableColumn: [],
      previewTableData: [],
- 自适应列宽
基于 element-ui 组件库的 af-table-column 组件, 支持自适应列宽功能。
npm install af-table-column --save
import AFTableColumn from 'af-table-column'
// 全局注册组件
Vue.use(AFTableColumn)
4.表单下拉列表宽度自适应
.el-form .el-select{
  width: 100%;
}
5.调用子组件method校验表单
- 子组件
    validate(callback) {
      this.$refs['form'].validate((valid, items) => {
        callback(valid, items)
      })
    }
- 父组件
 this.$refs.refComponent.validate((valid, items) => {
        if (valid) {
          save(params).then(response => {
            this.$message('保存成功!')
            this.close()
          })
        }
      })
    }
6.可编辑表格
不推荐通过
highlight-current-row及CSSdisplay来控制元素是否显示,经过测试该种方式在表格数据量大的情况下存在严重性能问题。
        <el-table-column
          prop="attributeDescribe"
          label="描述"
          align="center">
          <template slot-scope="scope">
            <div @click="changeEditable(scope.$index)" class="editor-container">
              <el-input v-if="editable[scope.$index]" size="small" v-model="scope.row.attributeDescribe">el-input>
              <span v-else>{{ scope.row.attributeDescribe }}span>
            div>
          template>
        el-table-column>
data() {
 return {
      editable: [],
}
// 省略部分代码
changeEditable(index) {
      if (this.showEdit) {
        for (let i = 0; i < this.tableData.length; i++) {
          if (i === index) {
            this.editable[i] = true
            this.$set(this.editable, i, true)
          } else {
            this.editable[i] = false
            this.$set(this.editable, i, false)
          }
        }
      }
    }
参考:
使用vue+element-ui实现子表格的单击可编辑
七、常见问题
1.vue路由this.$router.push跳转当前页面不刷新问题
  computed: {
    ...mapState({
      codeStyle: state => state.settings.codeStyle,
      codeSize: state => state.settings.codeSize
    })
  },
  watch: {
    codeSize: {
      handler: function(value) {
        this.$refs.codeEditor.editor.setOptions({
          fontSize: value
        })
      },
      deep: true
    },
    '$route': function(to, from) {
      this.params = this.$route.query.params
      this.query()
    }
  },
2.vue复选框点击无法选中/取消选中
- 原因
根据官方文档定义:如果在实例创建之后添加新的属性到实例上,它不会触发视图更新。
当你把一个普通的 JavaScript 对象传入 Vue 实例作为 data 选项,Vue 将遍历此对象所有的属性,并使用 Object.defineProperty 把这些属性全部转为 getter/setter。
受现代 JavaScript 的限制 (以及废弃 Object.observe),Vue 不能检测到对象属性的添加或删除。由于 Vue 会在初始化实例时对属性执行 getter/setter 转化过程,所以属性必须在 data 对象上存在才能让 Vue 转换它,这样才能让它是响应的。
- 解决办法
Vue 不允许在已经创建的实例上动态添加新的根级响应式属性 (root-level reactive property)。然而它可以使用 Vue.set(object, key, value) 方法将响应属性添加到嵌套的对象上:
方法1:使用Vue.set(object, key, value)添加响应属性到对象
this.$set(this.obj,'e',02)
方法2:创建新的对象替代原对象
this.obj= Object.assign({}, this.obj, { a: 1, e: 2 })
参考资料:
require module
Vue路由this.$router.push跳转页面不刷新
Vue-给对象新增属性