小程序-uni-app:将页面(html+css)生成图片/海报/名片,进行下载 保存到手机
一、需要描述
本文实现,uniapp微信小程序,把页面内容保存为图片,并且下载到手机上。
说实话网上找了很多资料,但是效果不理想,直到看了一个开源项目,我知道可以实现了。
本文以开源项目uniapp-wxml-to-canvas 为蓝本 记录集成的步骤,以供参考。
详细内容可以下载并启动 uniapp-wxml-to-canvas项目,详细学习。
GitHub - ThaneYang/uniapp-wxml-to-canvas
二、代码实现
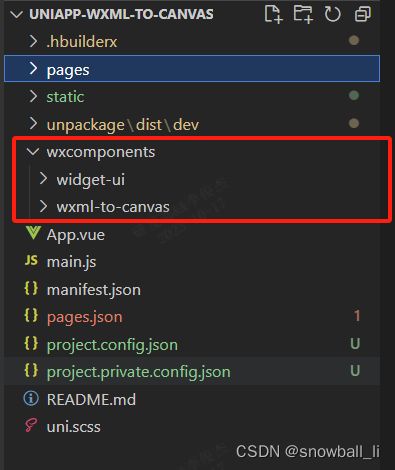
2.1、wxcomponents目录
将”开源项目“的这两个目录及包含的文件复制到自己项目的同名目录下。
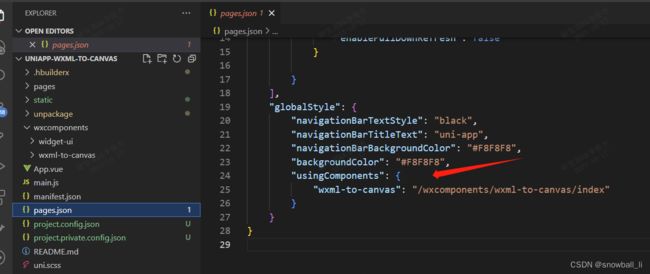
2.2、pages.json
在pages.json文件,globalStyle 配置 usingComponents
globalStyle: {
    "usingComponents": {
		"wxml-to-canvas": "/wxcomponents/wxml-to-canvas/index"
	}
}
2.3、utils/DomData.js
wxml 定义html
style 定义样式
/**
 *
 *
 * @param {*} number  第几位
 * @param {*} src 名片头像
 * @param {*} name 名片名字
 * @param {*} qrCodeUrl 小程序codeURL图片
 */
/**
下边的内容可以自己定义,这样就可以定制属于自己的海报了
*/
const wxml = (name, pic, c1, c2) =>`


	`+ name +`
	`+ c1 +`
	`+ c2 +`


		扫码一起加入学习吧


`

/**
 *
 *
 * @param {*} screenWidth 屏幕宽度
 * @param {*} canvasWidth  画布宽度
 * @param {*} canvasHeight  画布高度
 * @param {*} numberWidth  数字宽度,动态设置
 * @return {*}
 */
const style = (screenWidth, canvasWidth, canvasHeight) => {
  return {
    "container": {
      width: canvasWidth,
      height: canvasHeight,
      position: 'relative',
      overflow: 'hidden',
			backgroundColor: '#ffffff',
    },
    "name":{
      fontSize: 20,
      color: '#333',
      marginLeft: canvasWidth * 0.08,
      width: canvasWidth * 0.84,
      height: screenWidth * 0.18,
			textAlign: 'center',
    },
    "content": {
			fontSize: 14,
			color: '#333',
      width: canvasWidth * 0.84,
      height: screenWidth * 0.15,
			marginLeft: canvasWidth * 0.08,
    },
    "pic": {
      width: canvasWidth * 0.3,
      height: screenWidth * 0.28,
      marginTop: canvasWidth * 0.1,
      marginLeft: canvasWidth * 0.35,
			marginBottom: canvasWidth * 0.05,
			borderRadius: screenWidth * 0.14,
			overflow: 'hidden',
    },
    "bottom":{
      width: canvasWidth,
      height: screenWidth * 0.2,
      flexDirection: 'row',
      justifyContent: 'self-start',
      alignItems: 'center',
			backgroundColor: '#fafafa',
      position: 'absolute',
      bottom: 0,
      left: 0,
    },
		"qr": {
		  width: canvasWidth * 0.14,
		  height: screenWidth * 0.14,
		  marginLeft: canvasWidth * 0.04,
			marginRight: canvasWidth * 0.04,
		},
    "msg": {
      fontSize: 14,
      color: '#a1a1a1',
      width: canvasWidth * 0.74,
			height: 14,
			textAlign: 'left'
    },
  }
}

module.exports = {
  wxml,
  style
}
2.4、业务页面
{{msg}}
到此功能实现,集成步骤也比较简单,
三、过程记录
3.1、小程序 wxcomponents 目录干啥的
小程序的 wxcomponents 目录一般用来放置自定义组件或第三方组件。这些组件可以在小程序中多次使用,提高代码的复用性和开发效率。在这个目录下的组件包括两种类型:
1. 小程序官方提供的基础组件库,比如 button、 swiper 等;
2. 开发者自定义的组件,比如自定义图标、模板、模态框等。
这些组件可以通过 require 方法引入并使用,也可以在页面的 json 配置文件中进行全局注册,被所有页面调用。通过创建自定义组件,可以让开发者更加方便地完成复杂的交互效果和组件封装,从而提高小程序的可维护性和开发效率。
3.2、微信小程序selectComponent返回null的问题排查与分析
微信小程序selectComponent返回null的问题排查与分析-CSDN博客
四、欢迎交流指正
五、参考连接
微信小程序插件--wxml-to-canvas(生成图片)_微信小程序生成海报插件-CSDN博客
【微信小程序】解决canvas组件层级最高问题_微信小程序canvas层级_大大。的博客-CSDN博客
用小程序·云开发打造功能全面的博客小程序丨实战 - 知乎
wxa-plugin-canvas-语言吧
浅谈html2canvas实现浏览器截图的原理_invalid element provided as first argument-CSDN博客
GitHub - ThaneYang/uniapp-wxml-to-canvas
uniapp 微信小程序 实现 将base64图片保存相册和转发分享微信好友功能记录 直接cv就能用!!!!_uniapp分享图片到微信_柑橘乌云_的博客-CSDN博客
uni-app小程序生成海报wxml-to-canvas_西瓜霜的技术博客_51CTO博客
uniapp 、微信小程序使用canvas生成海报 - 知乎
uni.canvasToTempFilePath(object, component) | uni-app官网
uni-app 微信小程序如何把图片保存到本地相册? · 杂记 · 看云
html2canvas简单使用 - 简书
Painter: 小程序生成海报组件,非常好用,json配置,一下生成
微信小程序实现生成分享海报案例_微信小程序生成海报-CSDN博客
uniapp中使用html2canvas做H5端的海报生成功能 - 简书
uni-app 中使用 html2canvas 生成图片(支持多端)_uniapp html2canvas_不想搬砖。的博客-CSDN博客
uni-app APP、html引入html2canvas截图以及截长图_html2canvas npm-CSDN博客
uni-app 中使用 html2canvas 生成图片(支持多端)_uniapp html2canvas_不想搬砖。的博客-CSDN博客
小程序页面生成图片保存分享——笔记 - 简书

