百度开源分布式id生成器集成--真香警告
百度开源分布式id生成器集成–真香警告
文章目录
-
- @[toc]
- 1.为什么需要分布式id生成器?
- 2.常见id生成方案
-
- 2.1 数据库表主键自增
- 2.2 uuid
- 2.3 雪花算法
-
- 2.3.1 实现代码
- 2.3.2 缺点的解决方案
-
- 百度开源的分布式唯一ID生成器UidGenerator(本文重点讲解这个)
- Leaf--美团点评分布式ID生成系统
- 滴滴的tinyid
- 2.4 使用redis生成分布式id
-
- 2.4.1 因为Redis是单线的天生保证原子性,可以使用原子操作INCR和INCRBY来实现
- 2.4.2 使用redis执行lua脚本
- 2.5 使用ThreadLocal加时间和一个redis的一个自增的序列
- 3.百度开源uid-generator的集成
-
- 3.1 依赖
- 3.2 数据库执行sql脚本
- 3.3 nacos配置
- 3.4 代码
- 3.5 PostMan测试
- 4.总结
1.为什么需要分布式id生成器?
在复杂分布式系统中,往往需要对大量的数据和消息进行唯一标识。如在美团点评的金融、支付、餐饮、酒店、猫眼电影等产品的系统中,数据日渐增长,对数据分库分表后需要有一个唯一ID来标识一条数据或消息,数据库的自增ID显然不能满足需求;特别一点的如订单、骑手、优惠券也都需要有唯一ID做标识。此时一个能够生成全局唯一ID的系统是非常必要的。概括下来,那业务系统对ID号的要求有哪些呢?
- 全局唯一性:不能出现重复的ID号,既然是唯一标识,这是最基本的要求。
- 趋势递增:在MySQL InnoDB引擎中使用的是聚集索引,由于多数RDBMS使用B-tree的数据结构来存储索引数据,在主键的选择上面我们应该尽量使用有序的主键保证写入性能。
- 单调递增:保证下一个ID一定大于上一个ID,例如事务版本号、IM增量消息、排序等特殊需求。
- 信息安全:如果ID是连续的,恶意用户的扒取工作就非常容易做了,直接按照顺序下载指定URL即可;如果是订单号就更危险了,竞对可以直接知道我们一天的单量。所以在一些应用场景下,会需要ID无规则、不规则。
上述123对应三类不同的场景,3和4需求还是互斥的,无法使用同一个方案满足。
同时除了对ID号码自身的要求,业务还对ID号生成系统的可用性要求极高,想象一下,如果ID生成系统瘫痪,整个美团点评支付、优惠券发券、骑手派单等关键动作都无法执行,这就会带来一场灾难。
由此总结下一个ID生成系统应该做到如下几点:
1. 平均延迟和TP999延迟都要尽可能低;
2. 可用性5个9;
3. 高QPS。
2.常见id生成方案
2.1 数据库表主键自增
这个是数据库提供的能力,但是在数据量非常大的情况下,数据库表的id不够用了,那怎么办,凡是都会有一个尽头,物极必反都有一定的道理。
数据库自增主键实现原理:数据库自增id和replace into实现的
REPLACE INTO的含义是插入一条记录,如果表中唯一索引的值遇到冲突,则替换老数据
那数据库自增ID机制适合作分布式ID吗? 答案是不太适合
- 系统水平扩展比较困难,比如定义好了步长和机器台数之后,如果要添加机器该怎么做? 假设现在只有一台机器发号是1,2.3.4.5(步长是1),这个时候需要扩容机器一台。可以这样做,把第二台机器的初始值设置得比第一台超过很多,貌似还好,现在想象一下如果我们线上有100台机器,这个时候要扩容该怎么做? 简直是噩梦。所以系统水平扩展方案复杂难以实现。
- 数据库压力还是很大,每次获取ID都得读写一次数据库,非常影响性能,不符合分布式ID里面的延迟低和要高QPS的规则(在高并发下,如果都去数据库里面获取id,那是非常影响性能的)
2.2 uuid
UUID(Universally Unique Identifier)的标准型式包含32个16进制数字,以连字号分为五段,形式为8-4-4-4-12的36个字符,示例:550e8400-e29b-41d4-a716-446655440000,到目前为止业界一共有5种方式生成UUID,详情见IETF发布的UUID规范 A Universally Unique IDentifier (UUID) URN Namespace。
http://www.ietf.org/rfc/rfc4122.txt
优点:
- 性能非常高:本地生成,没有网络消耗。
缺点:
-
不易于存储:UUID太长,16字节128位,通常以36长度的字符串表示,很多场景不适用。
-
信息不安全:基于MAC地址生成UUID的算法可能会造成MAC地址泄露,这个漏洞曾被用于寻找梅丽莎病毒的制作者位置。
-
ID作为主键时在特定的环境会存在一些问题,比如做DB主键的场景下,UUID就非常不适用:
-
索引, B+树索引的分裂
既然分布式id是主键,然后主键是包含索引的,然后mysql的索引是通过b+树来实现的,每一次新的UUID数据的插入,为了查询的优化,都会对索引底层的b+树进行修改,因为UUID数据是无序的。
所以**每一次UUID数据的插入都会对主键地的b+树进行很大的修改,这一点很不好。**插入完全无序,不但会导致一些中间节点产生分裂,也会白白创造出很多不饱和的节点,这样大大降低了数据库插入的性能
① MySQL官方有明确的建议主键要尽量越短越好[4],36个字符长度的UUID不符合要求。
All indexes other than the clustered index are known as secondary indexes. In InnoDB, each record in a secondary index contains the primary key columns for the row, as well as the columns specified for the secondary index. InnoDB uses this primary key value to search for the row in the clustered index.*** If the primary key is long, the secondary indexes use more space, so it is advantageous to have a short primary key***.
② 对MySQL索引不利:如果作为数据库主键,在InnoDB引擎下,UUID的无序性可能会引起数据位置频繁变动,严重影响性能。
2.3 雪花算法
41-bit的时间可以表示(1L<<41)/(1000L360024*365)=69年的时间,10-bit机器可以分别表示1024台机器。如果我们对IDC划分有需求,还可以将10-bit分5-bit给IDC,分5-bit给工作机器。这样就可以表示32个IDC,每个IDC下可以有32台机器,可以根据自身需求定义。12个自增序列号可以表示2^12个ID,理论上snowflake方案的QPS约为409.6w/s,这种分配方式可以保证在任何一个IDC的任何一台机器在任意毫秒内生成的ID都是不同的。
这种方式的优缺点是:
优点:
- 毫秒数在高位,自增序列在低位,整个ID都是趋势递增的。
- 不依赖数据库等第三方系统,以服务的方式部署,稳定性更高,生成ID的性能也是非常高的。
- 可以根据自身业务特性分配bit位,非常灵活。
缺点:
- 强依赖机器时钟,如果机器上时钟回拨,会导致发号重复或者服务会处于不可用状态。
2.3.1 实现代码
snowflake
这个是github上的实现,可以学习和参考:
https://github.com/twitter-archive/snowflake
下面是我在网上找的代码实现,可以学习和参考:
/**
 * Twitter_Snowflake

 * SnowFlake的结构如下(每部分用-分开):

 * 0 - 0000000000 0000000000 0000000000 0000000000 0 - 00000 - 00000 - 000000000000

 * 1位标识,由于long基本类型在Java中是带符号的,最高位是符号位,正数是0,负数是1,所以id一般是正数,最高位是0

 * 41位时间截(毫秒级),注意,41位时间截不是存储当前时间的时间截,而是存储时间截的差值(当前时间截 - 开始时间截)
 * 得到的值),这里的的开始时间截,一般是我们的id生成器开始使用的时间,由我们程序来指定的(如下下面程序IdWorker类的startTime属性)。41位的时间截,可以使用69年,年T = (1L << 41) / (1000L * 60 * 60 * 24 * 365) = 69

 * 10位的数据机器位,可以部署在1024个节点,包括5位datacenterId和5位workerId

 * 12位序列,毫秒内的计数,12位的计数顺序号支持每个节点每毫秒(同一机器,同一时间截)产生4096个ID序号

 * 加起来刚好64位,为一个Long型。

 * SnowFlake的优点是,整体上按照时间自增排序,并且整个分布式系统内不会产生ID碰撞(由数据中心ID和机器ID作区分),并且效率较高,经测试,SnowFlake每秒能够产生26万ID左右。
 */
public class SnowflakeIdWorker {
    // ==============================Fields===========================================
    /** 开始时间截 (2020-08-28) */
    private final long twepoch = 1598598185157L;

    /** 机器id所占的位数 */
    private final long workerIdBits = 5L;

    /** 数据标识id所占的位数 */
    private final long datacenterIdBits = 5L;

    /** 支持的最大机器id,结果是31 (这个移位算法可以很快的计算出几位二进制数所能表示的最大十进制数) */
    private final long maxWorkerId = -1L ^ (-1L << workerIdBits);

    /** 支持的最大数据标识id,结果是31 */
    private final long maxDatacenterId = -1L ^ (-1L << datacenterIdBits);

    /** 序列在id中占的位数 */
    private final long sequenceBits = 12L;

    /** 机器ID向左移12位 */
    private final long workerIdShift = sequenceBits;

    /** 数据标识id向左移17位(12+5) */
    private final long datacenterIdShift = sequenceBits + workerIdBits;

    /** 时间截向左移22位(5+5+12) */
    private final long timestampLeftShift = sequenceBits + workerIdBits + datacenterIdBits;

    /** 生成序列的掩码,这里为4095 (0b111111111111=0xfff=4095) */
    private final long sequenceMask = -1L ^ (-1L << sequenceBits);

    /** 工作机器ID(0~31) */
    private long workerId;

    /** 数据中心ID(0~31) */
    private long datacenterId;

    /** 毫秒内序列(0~4095) */
    private long sequence = 0L;

    /** 上次生成ID的时间截 */
    private long lastTimestamp = -1L;

    //==============================Constructors=====================================
    /**
     * 构造函数
     * @param workerId 工作ID (0~31)
     * @param datacenterId 数据中心ID (0~31) 此方法是判断传入的机房号和机器号是否超过了最大值,即31,或者小于0
     */
    public SnowflakeIdWorker(long workerId, long datacenterId) {
        if (workerId > maxWorkerId || workerId < 0) {
            throw new IllegalArgumentException(String.format("worker Id can't be greater than %d or less than 0", maxWorkerId));
        }
        if (datacenterId > maxDatacenterId || datacenterId < 0) {
            throw new IllegalArgumentException(String.format("datacenter Id can't be greater than %d or less than 0", maxDatacenterId));
        }
        this.workerId = workerId;
        this.datacenterId = datacenterId;
    }

    // ==============================Methods==========================================
    /*
     * 核心方法
     * 获得下一个ID (该方法是线程安全的)
     * @return SnowflakeId
     */
    public synchronized long nextId() {
        //1.获取当前的系统时间
        long timestamp = timeGen();

        //如果当前时间小于上一次ID生成的时间戳,说明系统时钟回退过这个时候应当抛出异常
        if (timestamp < lastTimestamp) {
            throw new RuntimeException(
                    String.format("Clock moved backwards.  Refusing to generate id for %d milliseconds", lastTimestamp - timestamp));
        }

        //如果是同一时间生成的,则进行毫秒内序列
        if (lastTimestamp == timestamp) {
            // sequence 要增1, 但要预防sequence超过 最大值4095,所以要 与 SEQUENCE_MASK 按位求与
            // 即如果此时sequence等于4095,加1后为4096,再和4095按位与后,结果为0
            sequence = (sequence + 1) & sequenceMask;
            // 毫秒内序列溢出
            if (sequence == 0) {
                //阻塞到下一个毫秒,获得新的时间戳
                timestamp = tilNextMillis(lastTimestamp);
            }
        }
        //时间戳改变,毫秒内序列重置
        else {
            sequence = 0L;
        }

        //上次生成ID的时间截
        //把当前时间赋值给 lastTime, 以便下一次判断是否处在同一个毫秒内
        lastTimestamp = timestamp;

        //移位并通过或运算拼到一起组成64位的ID
         long id = ((timestamp - twepoch) << timestampLeftShift) // 时间戳减去默认时间 再左移22位 与运算
                | (datacenterId << datacenterIdShift) // 机房号 左移17位 与运算
                | (workerId << workerIdShift) // 机器号 左移12位 与运算
                | sequence; // 序列号无需左移 直接进行与运算
        return id;
    }

    /**
     * 阻塞到下一个毫秒,直到获得新的时间戳
     * @param lastTimestamp 上次生成ID的时间截
     * @return 当前时间戳
     */
    protected long tilNextMillis(long lastTimestamp) {
        long timestamp = timeGen();
        while (timestamp <= lastTimestamp) {
            timestamp = timeGen();
        }
        return timestamp;
    }

    /**
     * 返回以毫秒为单位的当前时间
     * @return 当前时间(毫秒)
     */
    protected long timeGen() {
        return System.currentTimeMillis();
    }

    //==============================Test=============================================
    /** 测试 */
    public static void main(String[] args) {
        SnowflakeIdWorker idWorker = new SnowflakeIdWorker(0, 0);
        for (int i = 0; i < 1000; i++) {
            long id = idWorker.nextId();
            System.out.println(id);
        }
    }
}
2.3.2 缺点的解决方案
可以参照以下两个来进行机器时钟的同步
-
百度开源的分布式唯一ID生成器UidGenerator(本文重点讲解这个)
uid-generator
https://github.com/baidu/uid-generator/blob/master/README.zh_cn.md关于UID比特分配的建议
对于并发数要求不高、期望长期使用的应用, 可增加timeBits位数, 减少seqBits位数. 例如节点采取用完即弃的WorkerIdAssigner策略, 重启频率为12次/天, 那么配置成{"workerBits":23,"timeBits":31,"seqBits":9}时, 可支持28个节点以整体并发量14400 UID/s的速度持续运行68年.
对于节点重启频率频繁、期望长期使用的应用, 可增加workerBits和timeBits位数, 减少seqBits位数. 例如节点采取用完即弃的WorkerIdAssigner策略, 重启频率为24*12次/天, 那么配置成{"workerBits":27,"timeBits":30,"seqBits":6}时, 可支持37个节点以整体并发量2400 UID/s的速度持续运行34年.
-
Leaf–美团点评分布式ID生成系统
There are no two identical leaves in the world.

世界上没有两片完全相同的树叶。

--莱布尼茨
Leaf——美团点评分布式ID生成系统
https://tech.meituan.com/2017/04/21/mt-leaf.htmLeaf:美团分布式ID生成服务开源
https://tech.meituan.com/2019/03/07/open-source-project-leaf.htmlLeaf
https://github.com/Meituan-Dianping/Leaf/blob/master/README_CN.mdLeaf有两种模式
1.号段模式
该模式依赖于数据库,所以受限于数据库的高可用和数据库的性能,数据库可能成为性能瓶颈。
2.Snowflake模式
该模式依赖于zk,所以受限于zk的高可用和跟zk的交互网络稳定性也是有一定的影响。
使用leaf-starter注解来启动leaf
https://github.com/Meituan-Dianping/Leaf/blob/feature/spring-boot-starter/README_CN.md#使用leaf-starter注解来启动leaf
这是官方提供的一个start启动器,可以方便的使用Leaf
参看官方文档使用起来也很简单。
-
滴滴的tinyid
tinyid
https://github.com/didi/tinyid/wiki
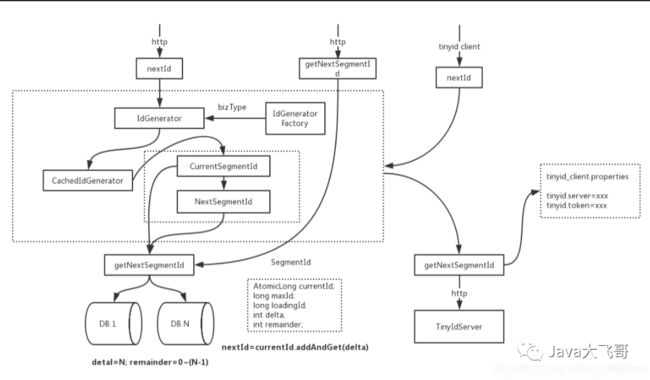
tinyid依赖于数据库,所以性能跟数据库有很大的关系,实现类似于美团的短号模式,是client-server模式架构,server提供id生成服务,client通过网络请求去请求server的id生成,所以也受网络稳定性的影响,如果使用不当会有数据库慢sql的问题。
上图是官方提供的架构图,架构可以参考如下的文章:
tinyid介绍 及架构分析
https://blog.csdn.net/qq_34687559/article/details/115932532
2.4 使用redis生成分布式id
2.4.1 因为Redis是单线的天生保证原子性,可以使用原子操作INCR和INCRBY来实现
注意:在Redis集群情况下,同样和MySQL一样需要设置不同的增长步长,同时key一定要设置有效期
可以使用Redis集群来获取更高的吞吐量。
假如一个集群中有5台Redis。可以初始化每台Redis的值分别是1,2,3,4,5,然后步长都是5。
各个Redis生成的ID为:
- A: 1,6,11,16,21
- B: 2,7,12,17,22
- C: 3,8,13,18,23
- D: 4,9,14,19,24
- E: 5,10,15,20,25
2.4.2 使用redis执行lua脚本
生成的id的格式如下:yyyyMMddxxxxxxxxxxx
年月日+一个自增的序列号,实现省略
2.5 使用ThreadLocal加时间和一个redis的一个自增的序列
生成的格式如下:yyyyMMddxxxxxxxxxxx
年月日+一个自增的序列号,这里的年月日是系统时间,后面的自增序列号是调用redis的NCR和INCRBY来实现,然后外加一个定时任务需要今天凌晨12点整去清除前一天的生成的序列号,每天都有一个key是存储这个redis的自增的序列号的,这种方式是我认为比较low的方式,只是一个思路,不建议使用。
3.百度开源uid-generator的集成
3.1 依赖
uid-generator-spring-boot-starter
https://github.com/wujun234/uid-generator-spring-boot-starter
 <properties>
    <maven.compiler.source>8maven.compiler.source>
    <maven.compiler.target>8maven.compiler.target>
    <project.build.sourceEncoding>UTF-8project.build.sourceEncoding>
    <uid-generator.version>1.0.3.RELEASEuid-generator.version>
properties>
<dependency>
        <groupId>com.github.wujun234groupId>
        <artifactId>uid-generator-spring-boot-starterartifactId>
          <version>${uid-generator.version}version>
          <exclusions>
            <exclusion>
            <groupId>org.mybatisgroupId>
          <artifactId>mybatisartifactId>
         exclusion>
    exclusions>
dependency>
这里如果项目中有使用mypatis-plus的依赖的话需要把这个mybatis的依赖排除,否则就会jar依赖冲突,项目启动不起来。
3.2 数据库执行sql脚本
DROP TABLE IF EXISTS WORKER_NODE;
CREATE TABLE WORKER_NODE
(
ID BIGINT NOT NULL AUTO_INCREMENT COMMENT 'auto increment id',
HOST_NAME VARCHAR(64) NOT NULL COMMENT 'host name',
PORT VARCHAR(64) NOT NULL COMMENT 'port',
TYPE INT NOT NULL COMMENT 'node type: CONTAINER(1), ACTUAL(2), FAKE(3)',
LAUNCH_DATE DATE NOT NULL COMMENT 'launch date',
MODIFIED TIMESTAMP NOT NULL COMMENT 'modified time',
CREATED TIMESTAMP NOT NULL COMMENT 'created time',
PRIMARY KEY(ID)
)
 COMMENT='DB WorkerID Assigner for UID Generator',ENGINE = INNODB;
项目启动后表里数据如下:
3.3 nacos配置
# UidGenerator
# 初始时间, 默认:"2019-02-20"
uid:
  epochStr: 2019-02-20
  # 时间位, 默认:30
  timeBits: 41
  # 机器位, 默认:16
  workerBits: 10
  # ***, 默认:7
  seqBits: 12
  # 是否容忍时钟回拨, 默认:true
  enableBackward: true
  # RingBuffer size扩容参数, 可提高UID生成的吞吐量, 默认:3
  CachedUidGenerator:
    boostPower: 3
    # 指定何时向RingBuffer中填充UID, 取值为百分比(0, 100), 默认为50
    paddingFactor: 50
3.4 代码
IdGenerator
package xxxx.utils;

import com.github.wujun234.uid.impl.CachedUidGenerator;
import org.springframework.beans.factory.annotation.Autowired;
import org.springframework.stereotype.Component;

@Component
public class IdGenerator {

    @Autowired
    private CachedUidGenerator cachedUidGenerator;

    /**
     * 获取uid
     *
     * @return
     */
    public long nextId() {
        return cachedUidGenerator.getUID();
    }

    /**
     * 格式化传入的uid,方便查看其实际含义
     *
     * @param uid
     * @return
     */
    public String parse(long uid) {
        return cachedUidGenerator.parseUID(uid);
    }

}
UidController
package xxxx.controller;

import xxx.utils.IdGenerator;
import org.springframework.beans.factory.annotation.Autowired;
import org.springframework.web.bind.annotation.GetMapping;
import org.springframework.web.bind.annotation.PathVariable;
import org.springframework.web.bind.annotation.RestController;

@RestController
public class UidController {

    @Autowired
    private IdGenerator idGenerator;

    @GetMapping("/testGet")
    public Long testGet() {
        return idGenerator.nextId();
    }

    @GetMapping("/testParse/{uid}")
    public String testParse(@PathVariable("uid") Long uid) {
        return idGenerator.parse(uid);
    }

}
3.5 PostMan测试
id生成接口:
id生成解析接口:
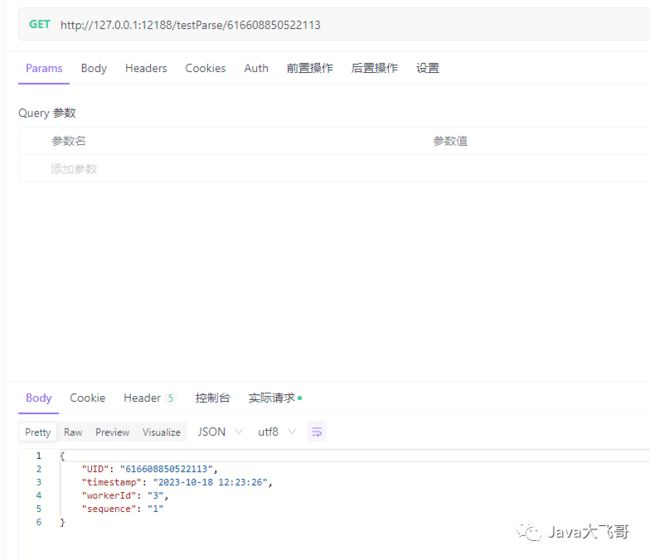
4.总结
通过本文的分享对分布式id生成的实现会有跟多的选择和思路,对开源的组件使用更加的娴熟,希望对你有帮助,请一键三连,么么么哒!


