重要函数&概念
- cv2.resize()的用法见:https://blog.csdn.net/qq_41339539/article/details/106551738
- cv2.warpAffine()的用法见:https://blog.csdn.net/qq_39507748/article/details/104449245
- cv2.waitkey()的用法见:https://blog.csdn.net/weixin_44049693/article/details/106271643
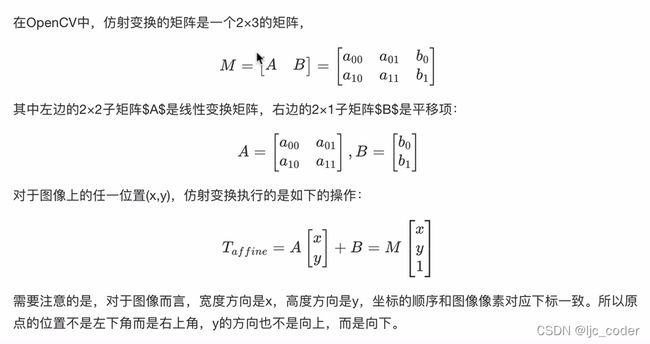
- 可以把仿射变换理解为一种坐标变换

- uint8类型是opencv专门用于存储各种图像的(包括RGB,灰度图像等),其范围是0–255
- np.zeros((a, b, c)) 函数讲解参考 https://blog.csdn.net/A13526_/article/details/120402699
代码
例程一
- 本例程会读取一张图片,并对图片进行仿射变换和在图片上画圆等操作,并一一用窗口显示出来,最后把图片保存
import cv2
import numpy as np
img = cv2.imread('1.ImageProcess.jpg')
img_hight, img_weight, img_channels = img.shape
cv2.imshow("win_1", img)
img1 = cv2.resize(img,(int(img_weight / 2), int(img_hight / 2)), interpolation = cv2.INTER_AREA)
img1_hight, img1_weight, img1_channels = img1.shape
cv2.imshow("win_2", img1)
Quit = 0
print('Press key "Q" to stop.')
while Quit == 0:
keycode = cv2.waitKey(3)
if (keycode == ord('Q')):
Quit = 1
Mat1 = np.array([[1.5, 0, -150],
[0, 1.5, -130]]
, dtype=np.float32)
img2 = cv2.warpAffine(img, Mat1, (img_weight, img_hight))
cv2.imshow("win_3", img2)
cv2.imwrite('win_3.jpg', img2)
theta = 30 * np.pi / 180
Mat2 = np.array([[1, np.tan(theta), 0],
[0, 1, 0]]
, dtype=np.float32)
img3 = cv2.warpAffine(img, Mat2, (img_weight, img_hight))
cv2.imshow("win_4", img3)
cv2.imwrite('win_4.jpg', img3)
Mat3 = np.array([[np.cos(theta), -np.sin(theta), 0],
[np.sin(theta), np.cos(theta),0]]
,dtype=np.float32)
img4 = cv2.warpAffine(img, Mat3, (img_weight, img_hight))
cv2.imshow("win_5", img4)
cv2.imwrite('win_5.jpg', img4)
cv2.line(img1, (300, 300), (500, 300), (255, 255, 0), 2)
cv2.circle(img1, (300, 300), 200, (0, 0, 255), 2)
cv2.rectangle(img1, (600, 600), (400, 200), (155, 0, 0), 3)
triangles = np.array([
[(200, 100), (145, 203), (255, 203)],
[(60, 140), (20, 197), (100, 197)]
])
cv2.fillPoly(img, triangles, (0, 255, 0))
cv2.putText(img1, 'hello,opencv', (1, 30), cv2.FONT_HERSHEY_SIMPLEX, 3, (0, 255, 0), 3)
cv2.imshow("win_6", img1)
print('Quitted!')
cv2.destroyAllWindows()
例程二
- 本例程将利用数组创建一个 三通道图像,对其像素点逐个进行赋值,还进行了截取指定区域图像的操作和 HSV、LAB 色域的转换
import cv2
import numpy as np
img_height=400
img_width=600
Quit = 1
print ('Press key "Q" to stop.')
while Quit :
keycode = cv2.waitKey(3)
if keycode & 0xFF == ord('q'):
Quit = 0
img = np.zeros((img_height, img_width, 3),dtype=np.uint8)+120
for col in range(img_width):
for row in range(img_height):
if col < 400 and col > 300:
img[row,col] = [255,0,0]
cv2.imshow('win1',img)
for col in range(img_width):
for row in range(img_height):
if row < 200 and row > 100:
img[row,col] = [0,255,0]
cv2.imshow('win2',img)
img_CutOff = img[50:300,350:500]
cv2.imshow('win3',img_CutOff )
img_hsv = cv2.cvtColor(img,cv2.COLOR_BGR2HSV)
cv2.imshow('img4',img_hsv)
img_lab = cv2.cvtColor(img, cv2.COLOR_BGR2LAB)
cv2.imshow("img5", img_lab)
print('Quitted!')
cv2.destroyAllWindows()
