使用Spring Cloud配置服务器控制配置
一、为什么需要将服务配置与服务代码分开?
在应用开发的过程中,许多开发人员会在应用程序中使用一个或多个常量类文件来将所有的配置集中在一个地方。将应用程序配置数据直接写入代码中通常是有问题的,因为每次对配置镜像更改时,应用程序都必须重新编译和重新部署。而使用配置文件将配置信息与应用程序代码进行分离,这样可以很容易在不进行重新编译的情况下对配置进行更改,且修改后重启应用即可使修改后的配置生效。
在开发时往往会采用YAML、JSON、XML或Properties等文件来存储应用的配置信息。这些属性文件存放在服务器上,通常包含数据库和中间价信息,以及驱动应用程序行为的相关元数据。通常我们会将配置文件放在源码控制器下,并将配置文件部署为应用程序的一部分。这种方法可能适用于少量的应用程序。但是在处理可能包含数百个微服务的基于云的应用程序时,其中每个微服务可能会运行多个服务实例。基于这样的场景,你会发现管理每个应用的配置突然就变成一件繁琐且重要的事情。将配置文件和应用程序部署的方案将迅速崩溃。
基于微服务开发和K8S(或云)部署时,需要强调以下几点:
(1)应用程序的配置与正在部署的实际代码完全分离。
(2)构建服务器、应用程序以及一个不可变的镜像,它们在各环境中进行升级时永远不会发生变化。
(3)在服务启动时通过环境变量注入应用程序的配置信息,或者在微服务启动时通过集中式存储库读取应用程序配置信息。
二、配置管理
对于在K8S(或云)中运行的微服务,管理应用程序配置是至关重要的,因为微服务实例需要以最少的人为干预快速启动。每当需要人为手动配置或者接触服务已实现部署时,都有可能出现错误。
建立应用程序配置管理需要遵循的4条原则。
(1)分离——我们希望将配置信息与服务的实际物理部署完全分开。应用程序配置不应该与服务实例一起部署。相反,配置信息应该作为环境变量传递给正在启动的服务,或者在服务启动时从集中式存储库中读取。
(2)抽象——将访问配置数据的功能抽象到一个服务接口中。应用程序使用基于REST的JSON服务来检索配置数据,而不是编写直接访问服务存储库的代码(也就是从文件或使用JDBC从数据库读取数据)。
(3)集中——因为基于K8S(或云)部署的应用程序可能会有数百个甚至更多的服务,所以最小化用于保存配置信息的不同存储库的数量至关重要。将应用程序配置集中在尽可能少的存储库中。
(4)稳定——因为应用程序的配置信息与部署的服务完全隔离并集中存放,所以不管采取用何种方案实现,至关重要的一点就是保证其高可用和冗余。
要记住一个关键点,将配置信息与实际代码分开后,开发人员将创建一个需要进行管理和版本控制的外部依赖项(比如使用Git)。因为管理不当的应用程序配置很容易滋生难以检测的BUG和计划外的中断。
三、构建Spring Cloud配置服务器
Spring Cloud配置服务器是基于REST的应用程序,它建立在Spring Boot之上。
首先我们先创建一个pom工程作为父工程。例如工程名称为microservice。其pom.xml信息如下(说明一下:当前的Spring Cloud配置服务只是使用部分依赖。其他依赖后续使用)。
    4.0.0

    org.jackson
    mircoservice
    pom
    1.0-SNAPSHOT


        confsvr


        UTF-8
        1.8
        1.8
        2.1.13.RELEASE
        Greenwich.SR6


                org.springframework.boot
                spring-boot-dependencies
                ${spring.boot.version}
                import
                pom


                org.springframework.cloud
                spring-cloud-dependencies
                ${spring.cloud.version}
                import
                pom


                org.springframework.cloud
                spring-cloud-starter-zuul
                1.4.7.RELEASE


                junit
                junit
                4.12
                test


                org.projectlombok
                lombok
                1.18.12


                mysql
                mysql-connector-java
                8.0.15


                org.apache.commons
                commons-lang3
                3.5


                    maven-clean-plugin
                    3.1.0


                    maven-resources-plugin
                    3.0.2


                    maven-compiler-plugin
                    3.8.0


                    maven-surefire-plugin
                    2.22.1


                    maven-jar-plugin
                    3.0.2


                    maven-install-plugin
                    2.5.2


                    maven-deploy-plugin
                    2.8.2


                    maven-site-plugin
                    3.7.1


                    maven-project-info-reports-plugin
                    3.0.0


                    org.springframework.boot
                    spring-boot-maven-plugin
                    ${spring.boot.version}
然后创建一个名为confsvr的module(如果是新手看到这里不清楚怎么玩或者不知道项目结构的请评论区留言)。该模块的pom.xml配置如下:
  4.0.0

    miroservice
    org.jackson
    1.0-SNAPSHOT


  org.jackson
  confsvr
  1.0-SNAPSHOT

  config server
  http://www.example.com


      junit
      junit


      org.springframework.cloud
      spring-cloud-starter-config


      org.springframework.cloud
      spring-cloud-config-server


        org.springframework.boot
        spring-boot-maven-plugin
工程创建和配置对应的依赖后,我们还需要一个核心配置让服务正常运行。这个文件是位于confsvr工程的src/main/resources目录中的application.yml文件。application.yml文件告诉Spring Cloud配置服务要侦听哪个端口以及在哪里可以找到提供配置数据的后端。
在Spring Cloud配置中,一切都是按照层次结构进行的。应用程序配置由应用程序的名称表示。应用程序配置文件的命名约定是“应用程序名称-环境名称.yml”。简单起见。我们为后面需要使用的licensingservice服务创建3个环境的配置属性:在本地运行服务时的默认环境、开发环境以及生产环境。对于的目录文件为confsvr工程的src/main/resources/licensingservice目录中的licensingservice.yml、licensingservice-dev.yml和licensingservice-prod.yml。三个文件配置信息如下(MySQL8.0版本):
spring:
  datasource:
    url: jdbc:mysql://localhost:30306/test?useSSL=false&serverTimezone=UTC
    password: root
    username: root
    driver-class-name: com.mysql.cj.jdbc.Driver
下图展示了如何创建和使用Spring Cloud配置服务。需要注意的是,在构建配置服务时。它将成为在环境中运行的另一个微服务。一旦服务建立,服务的内容就可以通过基于HTTP的REST端点进行访问。
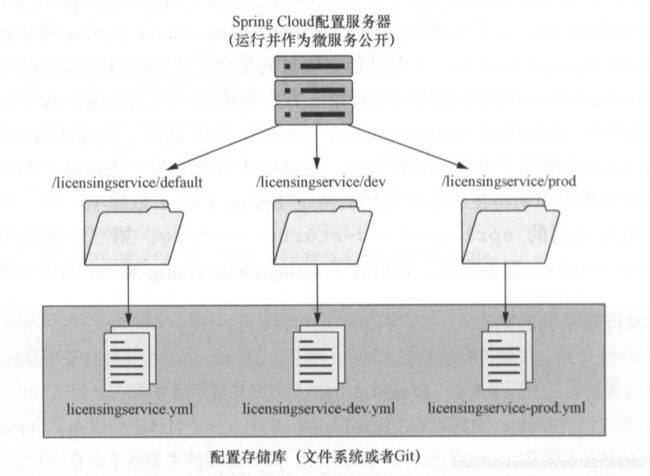
从上图可以看出,环境名称直接转换为可以浏览配置信息的URL。随后,在启动licensingservice服务的实例时,要运行哪个服务环境是在licensingservice服务中的application.yml(或者bootstrap.yml)(开发是使用较多)文件中配置指定或者是命令行服务启动时传入的Spring Boot的profile指定的(部署时使用)。没有使用上述两种方式进行配置或者传递profile,Spring Boot将始终默认加载应用程序打包的application.yml文件中的配置数据。
Spring Cloud服务需要一个用于启动该服务的引导类。这个引导类包含两样东西:作为服务启动入口点的Java main()方法,以及一组告诉启动的服务将要启动哪种类型的Spring Cloud行为的Spring Cloud注解。下面我们来创建Spring Cloud Config引导类。代码如下:
import org.springframework.boot.SpringApplication;
import org.springframework.boot.autoconfigure.SpringBootApplication;
import org.springframework.cloud.config.server.EnableConfigServer;

@SpringBootApplication
@EnableConfigServer
public class ConfigServerApplication {
    public static void main( String[] args ) {
        SpringApplication.run(ConfigServerApplication.class, args);
    }
}
其中Spring Cloud Config服务时Spring Boot应用程序,因此需要用@SpringBootApplication注解标记。@EnableConfigServer注解使该服务成为Spring Cloud Config服务。
3.1 使用带文件系统的Spring cloud配置服务器
Spring Cloud配置服务器使用confsvr/src/main/resources/application.yml文件中的配置指定保存应用程序配置数据的存储库。创建基于文件系统的存储库使实现这一目标的最简单方法。为此,我们需要将以下配置信息添加到配置服务器的application.yml文件中。代码清单如下:
server:
  port: 9090

spring:
  profiles:
    active: native
  cloud:
    config:
      server:
        native:
          search-locations: file:///Users/lukas/IdeaProjects/carnellj/confsvr/src/main/resources/licensingservice/
其中server.port: 9090告诉配置服务器,对于所有配置信息请求,应该监听哪个端口。本例中监听9090端口。
因为我们正在使用文件系统来存储应用程序配置信息。所以需要告诉Spring Cloud配置服务器以“native”profile运行:
spring.profiles.active: native。而application.yml文件的最后一部分为Spring Cloud配置提供了应用程序数据所在文件目录:
spring.cloud.config.server.native.search-locations: file:///Users/lukas/IdeaProjects/carnellj/confsvr/src/main/resources/licensingservice/配置信息中重要的参数是search-locations属性。这个属性为每一个应用程序提供了用逗号分隔的文件夹列表,这些文件夹内含有配置服务器管理的属性。
现在,我们已经完成了足够多的工作来启动配置服务器。接下来我们直接启动引导类的main函数或者使用mvn spring-boot:run命令启动配置服务器。如果使用浏览器访问:http://localhost:9090/licensingservice/default ,那么将会看到如下信息:
{"name":"licensingservice","profiles":["default"],"label":null,"version":null,"state":null,"propertySources":[{"name":"file:///Users/lukas/IdeaProjects/carnellj/confsvr/src/main/resources/licensingservice/licensingservice.yml","source":{"spring.datasource.url":"jdbc:mysql://localhost:30306/test?useSSL=false&serverTimezone=UTC","spring.datasource.password":"root","spring.datasource.username":"root","spring.datasource.driver-class-name":"com.mysql.cj.jdbc.Driver"}}]}如果想查看基于开发环境的配置信息,可以对 http://localhost:9090/licensingservice/dev 端点发起GET请求。响应结果如下:
{"name":"licensingservice","profiles":["dev"],"label":null,"version":null,"state":null,"propertySources":[{"name":"file:///Users/lukas/IdeaProjects/carnellj/confsvr/src/main/resources/licensingservice/licensingservice-dev.yml","source":{"spring.datasource.url":"jdbc:mysql://localhost:3306/test?useSSL=false&serverTimezone=UTC","spring.datasource.password":"root","spring.datasource.username":"root","spring.datasource.driver-class-name":"com.mysql.cj.jdbc.Driver"}},{"name":"file:///Users/lukas/IdeaProjects/carnellj/confsvr/src/main/resources/licensingservice/licensingservice.yml","source":{"spring.datasource.url":"jdbc:mysql://localhost:30306/test?useSSL=false&serverTimezone=UTC","spring.datasource.password":"root","spring.datasource.username":"root","spring.datasource.driver-class-name":"com.mysql.cj.jdbc.Driver"}}]}此时你可能会发现访问开发环境的端点是,将返回licensingservice的默认配置属性以及开发环境下的配置属性。Spring Clooud配置返回两组配置信息的原因是,Spring 框架实现了一种用于解析实现层次结构的机制。当Spring框架执行属性解析时,它将始终先查找默认配置文件中的属性,然后使用特定环境的值(如果存在)去覆盖默认属性。
具体来说,如果licensingservice.yml文件中定义了一个属性,并且不在任何其他环境配置文件中(如licensingservcie-dev.yml)中定义它,则Spring框架将使用这个默认值。
3.2 使用Spring Cloud配置服务器和Git
在前面我们使用文件系统作为Spring Cloud配置服务的后端存储库,对基于K8S(或云)部署的应用程序来说是不切实际的。因为开发团队必须搭建和管理所有挂载在配置服务器(即上面的confsvr应用)实例上的的共享文件系统。
Spring Cloud配置能够与不同饿后端存储库集成,这些存储库可以用于托管应用程序配置属性。通过使用Git,我们可以获得将配置管理属性置于源代码管理下的所有好处,并提供一种简单的机制来将属性文件的部署集成带构建和部署管道中。
要使用Git,需要将配置服务的application.yml文件使用如下代码进行替换:
server:
  port: 9090
spring:
  cloud:
    config:
      server:
        git:
          uri: https://github.com/leavescourt/carnellj-config-repo.git
          username: email address
          password: password
          search-paths: licensingservice, organizationservice, zuulservice
上述配子中关键部分是spring.cloud.config.server、spring.cloud.config.server.git.uri和spring.cloud.config.server.git.search-paths属性。spring.cloud.config.server属性告诉Spring Cloud配置服务器使用非基于文件系统的后端存储。
spring.cloud.config.server.git.uri属性提供要连接的存储库URL。最后,spring.cloud.config.server.git.search-paths属性告诉Spring Cloud Config服务器在服务启动是应该在Git存储库中搜索的相对路径。该属性是以逗号分隔的有配置服务托管的服务列表。
对于的文件信息和文件结果可以直接访问 https://github.com/leavescourt/carnellj-config-repo.git 进行查看。这里就不贴图片和代码了。配置成自己的Git仓库后依然访问地址:http://localhost:9090/licensingservice/default,其结果和之前的信息一样。有问题请留言反馈!
3.3 建立licensingservice服务对Spring Cloud Config服务的依赖
首先,创建licensing-service模块。其pom.xml信息如下:
  4.0.0


    org.jackson
    mircoservice
    1.0-SNAPSHOT


  org.jackson
  licensing-service
  1.0-SNAPSHOT

  licensing-service

  http://www.example.com


      junit
      junit


      mysql
      mysql-connector-java


      org.apache.commons
      commons-lang3


      org.projectlombok
      lombok


      org.springframework.boot
      spring-boot-starter-web


      org.springframework.boot
      spring-boot-actuator


      org.springframework.boot
      spring-boot-starter-data-jpa


      org.springframework.cloud
      spring-cloud-config-client
在Spring Boot服务中,配置信息可以bootstrap.yml和application.yml这两个配置文件之一中进行配置。但是在其他所有配置信息被使用之前,bootstrap.yml文件要先读取应用程序属性。一般来说,bootstrap.yml文件包含应用程序名称、应用程序profile和连接Spring Cloud Config服务的URL以及后面使用Eureka服务的配置信息等。
bootstrap.yml配置信息如下:
spring:
  application:
    name: licensingservice
  profiles:
    active: default
  cloud:
    config:
      uri: http://localhost:9090
上述配置中,spring.application.name是应用程序的名称(如licensingservice)并且必须直接映射到Spring Cloud Config配置服务器中的目录名称。对于许可证服务(licensingservice),需要在Spring Cloud Config配置服务器上有一个名为licensingservice的目录。
第二个属性 spring.profiles.active用于告诉Spring Boot应用程序应该运行哪个profile。profile是区分Spring Boot应用程序要使用哪个配置数据的机制。
第三个也是最后一个属性 spring.cloud.config.uri 是许可证服务(licensingservice)查找Spring Cloud Config配置服务器端点的位置。在默认情况下,licensingservcie服务将在http://localhost:8888上查找配置服务器。
application.yml的配置信息如下:
management:
  endpoint:
    refresh:
      enabled: true
    env:
      enabled: true

spring:
  jpa:
    show-sql: true
licensingservice服务的启动类如下:
@SpringBootApplication
public class LicensesApplication {
    public static void main( String[] args ) {
        SpringApplication.run(LicensesApplication.class, args);
    }
licenses的POJO类信息如下:
package org.huawei.licenses.model;

import com.fasterxml.jackson.annotation.JsonFormat;
import lombok.Getter;
import lombok.NoArgsConstructor;
import lombok.Setter;
import lombok.ToString;
import org.springframework.format.annotation.DateTimeFormat;

import javax.persistence.Column;
import javax.persistence.Entity;
import javax.persistence.Id;
import javax.persistence.Table;
import java.util.Date;

@Setter
@Getter
@ToString
@Entity
@Table(name = "licenses")
public class License {
    @Id
    @Column(name = "license_id", nullable = false)
    private String licenseId;
    @Column(name = "organization_id", nullable = false)
    private String organizationId;
    @Column(name = "product_name", nullable = false)
    private String productName;
    @Column(name = "license_type", nullable = false)
    private String licenseType;
    /**
     * license的数量
     */
    @Column(name = "license_max", nullable = false)
    private Integer licenseMax;
    /**
     * 已分配的license数量
     */
    @Column(name = "license_allocated", nullable = false)
    private Integer licenseAllocated;
    @Column(name = "comment", nullable = true)
    private String comment;
    @DateTimeFormat(pattern = "yyyy-MM-dd HH:mm:ss")
    @JsonFormat(pattern = "yyyy-MM-dd HH:mm:ss")
    @Column(name = "create_date", nullable = false)
    private Date createDate;
    @DateTimeFormat(pattern = "yyyy-MM-dd HH:mm:ss")
    @JsonFormat(pattern = "yyyy-MM-dd HH:mm:ss")
    @Column(name = "update_date", nullable = false)
    private Date updateDate;

    public License withLicenseId(String licenseId) {
        this.setLicenseId(licenseId);
        return this;
    }

    public License withOrganizationId(String organizationId) {
        this.setOrganizationId(organizationId);
        return this;
    }

    public License withProductName(String productName){
        this.setProductName(productName);
        return this;
    }

    public License withLicenseType(String licenseType) {
        this.setLicenseType(licenseType);
        return this;
    }

    public License withLicenseMax(Integer licenseMax) {
        this.setLicenseMax(licenseMax);
        return this;
    }

    public License withLicenseAllocated(Integer licenseAllocated){
        this.setLicenseAllocated(licenseAllocated);
        return this;
    }

    public License withComment(String comment) {
        this.setComment(comment);
        return this;
    }

    public License withCreateDate(Date createDate) {
        this.setCreateDate(createDate);
        return this;
    }

    public License withUpdateDate(Date updateDate) {
        this.setUpdateDate(updateDate);
        return this;
    }
}
controller代码如下:
@RestController
@RequestMapping(value = "/v1/organizations/{organizationId}/licenses")
public class LicenseServiceController {
    private static final Logger LOGGER = LogManager.getLogger(LicenseServiceController.class);
    @Autowired
    private LicenseService licenseService;

    @RequestMapping(value = "/newLicense", method = RequestMethod.POST)
    public License newLicense(@RequestBody License license) {
        return license == null ? null : licenseService.addLicense(license);
    }

    @RequestMapping(value = "/{licenseId}", method = RequestMethod.GET)
    public License queryLicenseByOrgIdAndLicenseId(@PathVariable(value = "organizationId") String organizationId,
                                                         @PathVariable(value = "licenseId") String licenseId) {
        if(StringUtils.isEmpty(licenseId) && StringUtils.isEmpty(organizationId)) {
            return null;
        }
        return licenseService.getByLicenseIdAndOrganizationId(licenseId, organizationId);
    }
}
service实现类代码如下:
@Service
public class LicenseServiceImpl implements LicenseService {
    private static final Logger LOGGER = LogManager.getLogger(LicenseService.class);
    @Autowired
    private LicenseRepository licenseRepository;


    @Override
    public License addLicense(License license) {
        if(license == null) {
            return null;
        }
        license.setLicenseId(UUID.randomUUID().toString());
        System.out.println(license.toString());
        return licenseRepository.save(license);
    }

    @Override
    public License getByLicenseIdAndOrganizationId(String licenseId, String organizationId) {
        if(StringUtils.isEmpty(licenseId) && StringUtils.isEmpty(organizationId)) {
            return null;
        }
        return licenseRepository.findByLicenseIdAndOrganizationId(licenseId, organizationId);
    }
}
repository(或dao层)层代码如下:
package org.huawei.licenses.repository;

import org.huawei.licenses.model.License;
import org.springframework.data.repository.CrudRepository;
import org.springframework.stereotype.Repository;

import java.util.List;
@Repository
public interface LicenseRepository extends CrudRepository {

    License save(License license);

    License findByLicenseIdAndOrganizationId(String licenseId, String organizationId);

    List findByOrganizationId(String organizationId);

}
license的的表结构定义如下(MySQL):
create table `licenses` (
	`license_id` varchar(64) comment '序列号',
    `organization_id` varchar(32) not null comment '组织编码',
    `product_name` varchar(128) not null comment '产品名称',
    `license_type` varchar(10) not null comment '序列类型',
    `license_max` int unsigned not null comment '最大序列数',
    `license_allocated` int unsigned not null comment '分配',
    `comment` varchar(255) comment '信息说明',
    `create_date` datetime not null comment '创建时间',
    `update_date` datetime not null comment '最后一次修改时间',
    primary key(`license_id`)
) engine InnoDB default charset=utf8;

INSERT INTO `licenses` (`license_id`,`organization_id`,`product_name`,`license_type`,`license_max`,`license_allocated`,`comment`,`create_date`,`update_date`) VALUES ('a996bded-9dc9-46fa-83b5-1d335e86d7da','10','MySQL Client','client',1000,0,'Hello MySQL Client','2020-06-25 00:04:17','2020-06-25 00:04:17');
INSERT INTO `licenses` (`license_id`,`organization_id`,`product_name`,`license_type`,`license_max`,`license_allocated`,`comment`,`create_date`,`update_date`) VALUES ('dc4a1462-20f0-49b2-8d2e-a9397ca10b5b','10','Oracle Client','client',1000,0,'Hello Oracle Client','2020-06-25 00:04:17','2020-06-25 00:04:17');
一切就绪后启动licensingservice服务。访问如下URL:
http://localhost:8080/v1/organizations/10/licenses/a996bded-9dc9-46fa-83b5-1d335e86d7da
响应结果如下:
{
  "licenseId": "a996bded-9dc9-46fa-83b5-1d335e86d7da",
  "organizationId": "10",
  "productName": "MySQL Client",
  "licenseType": "client",
  "licenseMax": 1000,
  "licenseAllocated": 0,
  "comment": "Hello MySQL Client",
  "createDate": "2020-06-25 00:04:17",
  "updateDate": "2020-06-25 00:04:17"
}
至此一个简单的Spring Cloud Config配置服务器和一个简单的使用配置服务器中的配置文件的licensingservice微服务构建完成。如若按照该博客进行构建的过程中有疑问或困难,欢迎留言反馈。后续持续输出Spring Cloud的其他组件。