Linux运维企业架构项目实战系列
Linux运维企业架构项目实战系列
目录
一、全网备份
(一)部署Rsync守护进程
1)服务端(backup)
2)客户端(web01/02/03 nfs01)
(二)编写脚本文件
1)客户端脚本编写
2)服务端
(三)配置邮件服务
1)服务端
(四)定时任务(实现自动完成全网数据备份)
1)服务端
2)客户端(web01/02/03 nfs01)
二、NFS存储共享服务
1)服务端
2)客户端(web01/02/03)
3)实现开机自动挂载
三、实时同步
(一)部署Rsync守护进程
1)服务端(backup)
2)客户端(nfs01)
(二)部署inotify监控服务
(三)部署sersync实时同步服务
四、web服务(LNMP架构)
(一)安装linux操作系统(略)
(二)安装配置Nginx服务
1)yum安装Nginx服务
2)配置Nginx服务
(三)安装配置PHP服务
(四)安装配置Mysql服务
(五)Nginx和PHP建立关系
(六)Nginx和Mysql建立关系
(七)部署搭建网站页面(代码上线)
1)安装wordpress服务
2)创建数据库和登录用户
五、Nginx负载均衡(反向代理)
(一)首先四台服务器预装Nginx服务(lb01 web01/02/03)
(二)web服务器编写测试文件(web01/02/03)
(三)配置负载均衡服务器
(四)测试
六、keepalived高可用
(一)部署keepalived高可用服务(lb01/02)
(二)keepalived脑裂问题(lb01/02)
1)脑裂问题产生的原因
2)如何解决脑裂问题?
(三)如何实现keepalived自动释放VIP地址资源(lb01/02)
(四)keepalived服务双主配置(lb0/02)
(五)keepalived服务安全访问配置(lb0/02)
七、ansible自动化管理服务
(一)部署ansible批量管理服务
(1)部署SSH基于密钥对的连接(m01)
(2)部署安装ansible服务
(二)ansible模块介绍
(1)command默认模块
(2)shell(万能模块)
(3)scripts模块(万能模块)
(4)copy文件类型模块
(5)file设置文件属性模块
(6)yum模块(批量安装和卸载软件包)
(7)service模块(管理服务的运行状态)
(8)cron模块(批量设置多个主机的定时任务信息)
(9)mount模块(批量进行挂载操作)
(10)user模块(批量创建用户并设置密码信息)
(三)剧本
(1)剧本的实现步骤
(2)一键化部署Rsync服务
(3) 一键化部署全网备份项目
(4) 一键化部署NFS服务
(5) 一键化部署实时同步服务
八、网站监控服务zabbix
(一)部署安装zabbix服务
(1)服务端(zabbix)
(2)客户端(其他服务器)
(二)实现zabbix自定义监控
(1)需求:监控Nginx服务是否启动
(2)复杂的自定义监控配置(多个服务状态)
(3)报警(邮件报警、微信报警、短信和电话)
总体架构介绍
| 序号 | 类型 | 名称 | 外网地址 | 内网地址 | 软件 |
| 01 | 防火墙服务器 | firewalld | 10.0.0.81 | 172.16.1.81 | firewalld |
| 02 | 负载均衡服务器 | lb01 | 10.0.0.5 | 172.16.1.5 | nginx keepalived |
| 03 | 负载均衡服务器 | lb02 | 10.0.0.6 | 172.16.1.6 | nginx keepalived |
| 04 | web服务器 | web01 | 10.0.0.7 | 172.16.1.7 | nginx |
| 05 | web服务器 | web02 | 10.0.0.8 | 172.16.1.8 | nginx |
| 06 | web服务器 | web03 | 10.0.0.9 | 172.16.1.9 | nginx |
| 07 | 数据库服务器 | db01 | 10.0.0.51 | 172.16.1.51 | mariadb mysql |
| 08 | 存储服务器 | nfs01 | 10.0.0.31 | 172.16.1.31 | nfs-utils rpcbind |
| 09 | 备份服务器 | backup | 10.0.0.41 | 172.16.1.41 | rsync |
| 10 | 批量管理服务器 | m01 | 10.0.0.61 | 172.16.1.61 | ansible |
| 11 | 跳板机服务器 | jumpserver | 10.0.0.71 | 172.16.1.71 | jumpserver |
| 12 | 监控服务器 | zabbix | 10.0.0.72 | 172.16.1.72 | zabbix |
| 13 | 缓存服务器 | redis |
一、全网备份
服务端:backup
客户端:web01 web02 web03 nfs01
要求:
每天晚上 00 点整在 Web 服务器上打包备份系统配置文件、网站程序目录及访问日志并通过 rsync 命令推送备份服务器 backup 上备份保留(备份思路可以是先在本地按日期打包,然后再推到备份服务器 backup 上) ,NFS 存储服务器同 Web 服务器,实际工作 中就是全部的服务器。
具体要求如下:
1)所有服务器的备份目录必须都为/backup。
2)要备份的系统配置文件包括但不限于:
a.定时任务服务的配置文件(/var/spool/cron/root)
b.开机自启动的配置文件(/etc/rc.local)
c.日常脚本的目录 (/server/scripts)。
d.防火墙 iptables 的配置文件(/etc/sysconfig/iptables)。
e.自己思考下还有什么需要备份呢?
3)Web 服务器站点目录(/var/html/www)。
4)Web 服务器 A 访问日志路径(/app/logs)
5)Web 服务器保留打包后的 7 天的备份数据即可(本地留存不能多于 7 天,因为太多硬盘会 满)
6)备份服务器上,保留每周一的所有数据副本,其它要保留 6 个月的数据副本。
7)备份服务器上要按照备份数据服务器的内网 IP 为目录保存备份,备份的文件按照时间名 字保存。
8)*需要确保备份的数据尽量完整正确,在备份服务器上对备份的数据进行检查,把备份的成功及失败结 果信息发给系统管理员邮箱中。
部署过程
(一)部署Rsync守护进程
1)服务端(backup)
第一步:下载安装Rsync
rpm -qa|grep rsync
yum install -y rsync
第二步:编写Rsync配置文件
[root@backup ~]# vim /etc/rsyncd.conf
##created by abin at 2020
###rsyncd.conf start##

uid = rsync
gid = rsync
port = 873
fake super = yes
use chroot = no
max connections =200
timeout = 300
pid file = /var/run/rsyncd.pid
lock file = /var/run/rsync.lock
log file = /var/log/rsyncd.log
ignore errors
read only = false
list = false
hosts allow = 172.16.1.0/24
hosts deny = 0.0.0.0/32
auth users = rsync_backup
secrets file = /etc/rsync.password
[backup]
comment = "backup dir by abin"

第三步:创建rsync服务的虚拟用户
useradd rsync -M -s /sbin/nologin

第四步:创建备份服务认证密码文件
echo "rsync_backup:123456" >/etc/rsync.password
chmod 600 /etc/rsync.password

第五步:创建备份目录并修改属主属组信息
mkdir /backup
chown rsync.rsync /backup/

第六步:启动备份服务
systemctl start rsyncd
systemctl enable rsyncd
systemctl status rsyncd
2)客户端(web01/02/03 nfs01)
第一步:创建密码认证文件
echo "123456" >/etc/rsync.password
chmod 600 /etc/rsync.password
第二步:进行交互式数据传输测试
rsync -avz /etc/hosts [email protected]::backup --password-file=/etc/rsync.password
(二)编写脚本文件
1)客户端脚本编写
web01/02/03服务器备份脚本:
mkdir -p /server/scripts
vim /server/scripts/backup.sh

#!/bin/bash

Backup_dir="/backup"
IP_info=$(hostname -i)

# create backup dir
mkdir -p $Backup_dir/$IP_info

# tar backup data
cd /
tar zchf /$Backup_dir/$IP_info/system_backup_$(date +%F_week%w -d -1day).tar.gz ./var/spool/cron/root ./etc/rc.local ./server/scripts ./etc/sysconfig/iptables
tar zchf /$Backup_dir/$IP_info/www_backup_$(date +%F_week%w).tar.gz  ./var/html/www
tar zchf /$Backup_dir/$IP_info/www_log_backup_$(date +%F_week%w).tar.gz  ./app/logs

# del 7 day ago data
find $Backup_dir -type f -mtime +7|xargs rm 2>/dev/null

# create finger file
find $Backup_dir/ -type f -mtime -1 ! -name "finger*"|xargs md5sum >/$Backup_dir/$IP_info/finger.txt

# backup push data info
rsync -az $Backup_dir/ [email protected]::backup --password-file=/etc/rsync.password

nfs01服务器备份脚本:
mkdir -p /server/scripts
vim /server/scripts/backup.sh

#!/bin/bash

Backup_dir="/backup"
IP_info=$(hostname -i)

# create backup dir
mkdir -p $Backup_dir/$IP_info

# tar backup data
cd /
tar zchf /$Backup_dir/$IP_info/system_backup_$(date +%F_week%w -d -1day).tar.gz ./var/spool/cron/root ./etc/rc.local ./server/scripts ./etc/sysconfig/iptables

# del 7 day ago data
find $Backup_dir -type f -mtime +7|xargs rm 2>/dev/null

# create finger file
find $Backup_dir/ -type f -mtime -1 ! -name "finger*"|xargs md5sum >/$Backup_dir/$IP_info/finger.txt

# backup push data info
rsync -az $Backup_dir/ [email protected]::backup --password-file=/etc/rsync.password
2)服务端
mkdir -p /server/scripts
vim /server/scripts/backup_server.sh

#!/bin/bash
# del 180 day ago data
find /backup/ -type f -mtime +180 ! -name "*week1.tar.gz"|xargs rm 2>/dev/null

# check backup data
find /backup/ -type f -name "finger.txt"|xargs md5sum -c >/tmp/check.txt

# send check mail
mail -s "check backup info for $(date +%F)" [email protected]
(三)配置邮件服务
1)服务端
第一步:浏览器登录163邮箱进行配置
打开163邮箱POP3/SMIP服务
复制授权密码

第二步:配置qq邮箱
打开qq邮箱POP3/SMIP服务

第三步:编写邮件服务配置文件(追加到最后面)
vim /etc/mail.rc

set [email protected] smtp=smtp.163.com
set [email protected] smtp-auth-password=授权密码(163邮箱) smtp-auth=login

重启邮箱服务
systemctl restart postfix.service

第四步:发送邮件测试
echo "邮件内容"|mail -s "邮件主题" [email protected]
mail -s "邮件测试" [email protected]
(四)定时任务(实现自动完成全网数据备份)
1)服务端
[root@backup ~]# crontab -e

# check backup data
0 5 * * *  /bin/sh /server/scripts/backup_server.sh &>/dev/null

ps:
crontab -l --查看已设定的定时任务
2)客户端(web01/02/03 nfs01)
crontab -e
# backup data
0 0 * * *  /bin/sh /server/scripts/backup.sh &>/dev/null
二、NFS存储共享服务
服务端:nfs01
客户端:web01/02/03
1)服务端
第一步:下载安装软件
rpm -qa|grep -E "nfs|rpc"
yum install -y nfs-utils rpcbind

第二步:编写nfs服务配置文件
vim /etc/exports
/data 172.16.1.0/24(rw,sync)

第三步:创建一个存储目录
mkdir /data
chown nfsnobody.nfsnobody /data

第四步:先启动rpc服务
systemctl start rpcbind.service
systemctl enable rpcbind.service
systemctl status rpcbind.service
再启动nfs服务
systemctl start nfs
systemctl enable nfs
systemctl status nfs
2)客户端(web01/02/03)
第一步:安装nfs服务
yum install -y nfs-utils

第二步:实现远程挂载共享目录
mount -t nfs 172.16.1.31:/data /mnt

ps:卸载设备
umount -lf /mnt
-l 不退出挂载点目录进行卸载
-f 强制进行卸载操作
3)实现开机自动挂载
方法一:利用rc.local开机自动加载脚本文件
echo "mount -t nfs 172.16.1.31:/data /mnt" >>/etc/rc.local
chmod a+x /etc/rc.d/rc.local

方法二:利用fstab配置文件
vim /etc/fstab
172.16.1.31:/data /mnt nfs defaults 0 0
补充:
1.NFS配置参数权限
rw -- 存储目录是否有读写权限
ro -- 存储目录是否时只读权限
sync -- 同步方式存储数据 直接将数据保存到磁盘(数据存储安全)
async -- 异步方式存储数据 直接将数据保存到内存(提高数据存储效率)
no_root_squash -- 不要将root用户身份进行转换
root_squash -- 将root用户身份进行转换
all_squash -- 将所有用户身份都进行转换
no_all_squash -- 不要将普通用户身份进行转换
2.mount命令参数
rw --- 实现挂载后挂载点目录可读可写 (默认)
ro --- 实现挂载后挂载点目录可读可写
suid --- 在共享目录中可以让setuid权限位生效 (默认)
nosuid --- 在共享目录中可以让setuid权限位失效 提高共享目录的安全性
exec --- 共享目录中的执行文件可以直接执行
noexec --- 共享目录中的执行文件可以无法直接执行 提供共享目录的安全性
auto --- 可以实现自动挂载 mount -a 实现加载fstab文件自动挂载
noauto --- 不可以实现自动挂载
nouser --- 禁止普通用户可以卸载挂载点
user --- 允许普通用户可以卸载挂载点
3.NFS服务挂载不上排查方法:
服务端进行排查:
1. 检查nfs进程信息是否注册
rpcinfo -p localhost/172.16.1.31
问题原因:
服务启动顺序不对,没有启动nfs服务
2. 检查有没有可用存储目录
showmount -e 172.16.1.31
问题原因:
配置文件编写有问题,重启nfs服务
3. 在服务端进行挂载测试
是否能够在存储目录中创建或删除数据
客户端测试:
网络问题
ping 172.16.1.31
telnet 172.16.1.31 111
三、实时同步
服务端:backup
客户端:nfs01
(一)部署Rsync守护进程
1)服务端(backup)
第一步:下载安装Rsync
rpm -qa|grep rsync
yum install -y rsync
第二步:编写Rsync配置文件
[root@backup ~]# vim /etc/rsyncd.conf
##created bu abin at 2020
###rsyncd.conf start##

uid = rsync
gid = rsync
port = 873
fake super = yes
use chroot = no
max connections =200
timeout = 300
pid file = /var/run/rsyncd.pid
lock file = /var/run/rsync.lock
log file = /var/log/rsyncd.log
ignore errors
read only = false
list = false
hosts allow = 172.16.1.0/24
hosts deny = 0.0.0.0/32
auth users = rsync_backup
secrets file = /etc/rsync.password
[backup]
comment = "backup dir by abin"

第三步:创建rsync服务的虚拟用户
useradd rsync -M -s /sbin/nologin

第四步:创建备份服务认证密码文件
echo "rsync_backup:123456" >/etc/rsync.password
chmod 600 /etc/rsync.password

第五步:创建备份目录并修改属主属组信息
mkdir /backup
chown rsync.rsync /backup/

第六步:启动备份服务
systemctl start rsyncd
systemctl enable rsyncd
systemctl status rsyncd
2)客户端(nfs01)
第一步:创建密码认证文件
echo "123456" >/etc/rsync.password
chmod 600 /etc/rsync.password
第二步:进行交互式数据传输测试
rsync -avz /etc/hosts [email protected]::backup --password-file=/etc/rsync.password
(二)部署inotify监控服务
客户端:nfs01
第一步:安装inotify-tools服务
yum install -y inotify-tools
(三)部署sersync实时同步服务
客户端:nfs01
第一步:下载sersync软件上传至nfs服务器
https://github.com/wsgzao/sersync
第二步:解压sersync软件包
unzip sersync_installdir_64bit.zip
mv sersync_installdir_64bit/* /usr/local/
第三步:修改配置文件
[root@nfs01 /usr/local/sersync]# vim conf/confxml.xml
24
25
四、web服务(LNMP架构)
(一)安装linux操作系统(略)
(二)安装配置Nginx服务
1)yum安装Nginx服务
第一个历程: 更新nginx官方yum源
vim /etc/yum.repos.d/nginx.repo
[nginx-stable]
name=nginx stable repo
baseurl=http://nginx.org/packages/centos/$releasever/$basearch/
gpgcheck=1
enabled=1
gpgkey=https://nginx.org/keys/nginx_signing.key

第二个历程: yum安装nginx软件
yum install -y nginx

第三个历程: 启动nginx服务,检查服务是否安装正确
systemctl start nginx
systemctl enable nginx
测试访问nginx服务![]()
2)配置Nginx服务
vim /etc/nginx/nginx.conf      	 --- 主配置文件
第一个部分: 配置文件主区域配置
user  www;               	 --- 定义worker进程管理的用户
worker_processes  2;        ---定义有几个worker进程  == CPU核数 / 核数的2倍
error_log  /var/log/nginx/error.log warn;   --- 定义错误日志路径信息
pid        /var/run/nginx.pid;              --- 定义pid文件路径信息

第二个部分: 配置文件事件区域
events {
    worker_connections  1024;   --- 一个worker进程可以同时接收1024访问请求
}

第三个部分: 配置http区域
http {
   include       /etc/nginx/mime.types;      --- 加载一个配置文件
   default_type  application/octet-stream;   --- 指定默认识别文件类型
   log_format  oldboy  '$remote_addr - $remote_user [$time_local] "$request" '
                  '$status $body_bytes_sent "$http_referer" '
                  '"$http_user_agent" "$http_x_forwarded_for"';
		          --- 定义日志的格式
   access_log  /var/log/nginx/access.log  oldboy;
		          --- 指定日志路径
   sendfile        on;   ???
   #tcp_nopush     on;   ???
   keepalive_timeout  65;   --- 超时时间
   #gzip  on;
   include /etc/nginx/conf.d/*.conf;        --- 加载一个配置文件
}

补充: nginx的进程
master process:  主进程		---管理服务是否能够正常运行   boss
worker process:  工作进程	---处理用户的访问请求         员工
(三)安装配置PHP服务
1.使用remi源安装php
yum remove -y epel-release.noarch     --(如果没有这个包可以不用卸载)
yum install -y epel-release
yum install -y https://mirrors.tuna.tsinghua.edu.cn/remi/enterprise/remi-release-7.rpm
yum --enablerepo=remi-php71 install -y php php-cli php-common php-devel php-embedded php-gd php-mbstring php-pdo php-xml php-fpm php-mysqlnd php-opcache php-mcrypt php-pecl-memcached php-pecl-mongodb php-pecl-redis
2.编写配置文件(24/26行)
vim /etc/php-fpm.d/www.conf
user = www
group = www
PS:创建一个www用户
3.启动php服务
systemctl start php-fpm.service
systemctl enable php-fpm.service
systemctl status php-fpm.service
(四)安装配置Mysql服务
安装数据库软件
[root@web01 ~]# yum install mariadb-server mariadb -y
启动数据库服务
[root@web01 ~]# systemctl start mariadb.service
[root@web01 ~]# systemctl enable mariadb.service
创建数据库的密码信息
[root@web01 ~]# mysqladmin -u root  password '123456'
[root@web01 ~]# mysql -u root -p123456   --密码登录
(五)Nginx和PHP建立关系
1.编写nginx文件
[root@web01 /etc/nginx/conf.d]# vim www.conf
server {
    listen        80;
    server_name   www.abins.cn;
    location   / {
    root  /html/www;
    index index.php index.html;
  }
    location ~ \.php$ {
    root /html/www;
    fastcgi_index index.php;
    fastcgi_param SCRIPT_FILENAME $document_root$fastcgi_script_name;
    fastcgi_pass  127.0.0.1:9000;
    include fastcgi_params;

  }
}
[root@web01 /etc/nginx/conf.d]# systemctl restart nginx

2.编写动态资源文件
[root@web01 /html/www]# vim test_php.php


3.配置本地DNS解析
在C:\Windows\System32\drivers\etc\hosts文件
后面追加
10.0.0.7            www.cxt.com

4.进行访问测试
www.cxt.com/test_php.php![]()
(六)Nginx和Mysql建立关系
1.编写php代码文件
[root@web02 /html/www]# vim test_mysql.php

2.进行访问测试![]()
(七)部署搭建网站页面(代码上线)
1)安装wordpress服务
第一个历程: 获取代码信息(git)---使用开源的网站代码
    www网站页面: http://www.dedecms.com/
    bbs网站页面: http://www.discuz.net/forum.php
    blog网站页面: https://cn.wordpress.org/
    wecenter网站页面: http://www.wecenter.com/?copyright

第二个历程: 将代码解压,将解压后信息放入到站点目录中
[root@web01 /html]# rz -E
rz waiting to receive.
[root@web01 /html]# ll
-rw-r--r-- 1 root root 11199196 Apr  7 20:40 wordpress-5.2.1.tar.gz
[root@web02 /html]# tar xf wordpress-5.2.1.tar.gz
[root@web01 /html]# ll
drwxr-xr-x 5 nobody 65534     4096 May 22  2019 wordpress
-rw-r--r-- 1 root   root  11199196 Apr  7 20:40 wordpress-5.2.1.tar.gz
drwxr-xr-x 2 www    www         48 May 24 15:17 www
[root@web01 /html]# mv wordpress/* www/

第三个历程: 修改站点目录权限
chown -R www.www www

第四个历程: 进行网站页面初始化操作
www.cxt.com/index.php![]()
2)创建数据库和登录用户
[root@web01 ~]# mysql -u root -p123456               --以root身份登录MySQL
MariaDB [(none)]> create database wordpress;         --创建wordpress数据库
Query OK, 1 row affected (0.09 sec)

MariaDB [(none)]> show databases;                    --检查wordpress数据库是否创建成功
+--------------------+
| Database           |
+--------------------+
| information_schema |
| mysql              |
| performance_schema |
| test               |
| wordpress          |
+--------------------+
5 rows in set (0.00 sec)
MariaDB [(none)]> grant all on wordpress.* to 'wordpress'@'localhost' identified by '123456';          --创建wordpress用户,密码为123456
MariaDB [(none)]> select user,host from mysql.user;  --查看数据库user表的用户信息和主机信息
+-----------+-----------+
| user      | host      |
+-----------+-----------+
| root      | 127.0.0.1 |
| root      | ::1       |
|           | localhost |
| root      | localhost |
| wordpress | localhost |
|           | web02     |
| root      | web02     |
+-----------+-----------+
7 rows in set (0.10 sec)
MariaDB [(none)]> flush privileges; --刷新数据库信息![]()
![]()
![]()
看到这个界面,那么恭喜你网站搭建成功啦!
五、Nginx负载均衡(反向代理)
服务端:lb01
客户端:web01/02/03
(一)首先四台服务器预装Nginx服务(lb01 web01/02/03)
vim /etc/yum.repos.d/nginx.repo         ##更新nginx的官方yum源
[nginx-stable]
name=nginx stable repo
baseurl=http://nginx.org/packages/centos/$releasever/$basearch/
gpgcheck=1
enabled=1
gpgkey=https://nginx.org/keys/nginx_signing.key
yum install -y nginx                    ##安装nginx服务
systemctl start nginx                   ##启动nginx服务
(二)web服务器编写测试文件(web01/02/03)
[root@web01 /html/www]# vim fzjh.html
Welcome to nginx!
Welcome to nginx! 10.0.0.7
(三)配置负载均衡服务器
[root@lb01 /etc/nginx]# vim nginx.conf
user www;

[root@lb01 /etc/nginx/conf.d]# vim www.conf
upstream cxt {
        server 10.0.0.7:80;
        server 10.0.0.8:80;
        server 10.0.0.9:80;
    }


    server {
        listen       80;
        server_name  www.cxt.com;
        location / {
            proxy_pass        http://cxt;
            client_max_body_size  100m;
        }
}

    server {
        listen       80;
        server_name  bbs.cxt.com;
        location / {
            proxy_pass        http://cxt;
            client_max_body_size  100m;
        }
}
(四)测试
打开浏览器输入www.cxt.com/fzjh.html
不断刷新,10.0.0.7/10.0.0.8/10.0.0.9交替出现时说明负载均衡配置成功

下面时通过抓包工具抓取的http记录
六、keepalived高可用
(一)部署keepalived高可用服务(lb01/02)
第一个历程: 准备两台服务器并且均配置好负载均衡服务 (lb01 lb02)
第二个历程: 安装部署keepalived软件 (lb01 lb02)
    yum install -y keepalived
第三个历程: 编写keepalived配置文件(lb01 lb02)
lb01配置信息:     --此处配置文件同ansible配置文件一样都需要注意格式,否则不会被执行
    [root@lb01 ~]# cat /etc/keepalived/keepalived.conf
! Configuration File for keepalived

    global_defs {
        router_id lb01
    }

    vrrp_instance yb {
        state MASTER
        interface eth0
        virtual_router_id 51
        priority 150
        advert_int 1
        authentication {
            auth_type PASS
            auth_pass 1111
        }
        virtual_ipaddress {
            10.0.0.3/24
        }
    }


    lb02配置信息:   --此处配置文件同ansible配置文件一样都需要注意格式,否则不会被执行
! Configuration File for keepalived

    global_defs {
       router_id lb02
    }

    vrrp_instance yb {
        state BACKUP
        interface eth0
        virtual_router_id 51
        priority 100
        advert_int 1
        authentication {
            auth_type PASS
            auth_pass 1111
        }
        virtual_ipaddress {
            10.0.0.3/24
        }
    }

第四个历程: 启动keepalived服务
    systemctl start keepalived
    systemctl enable keepalived
    systemctl status keepalived

第五个历程: 修改域名和IP地址解析关系
    windows修改hosts主机文件
    10.0.0.3  www.cxt.com

第六个历程:测试

    当lb01的keepalived服务停止运行时,lb02收不到来自lb01的组播信息会夺取vip地址信息10.0.0.3成为新的主,保证负载均衡正常运作。
(二)keepalived脑裂问题(lb01/02)
1)脑裂问题产生的原因
出现原因:
高可用备服务器接收不到主服务器发送的组播包,备服务器上会自动生成VIP地址
物理原因:
高可用集群之间通讯线路出现问题
逻辑原因:
有安全策略阻止(防火墙等)
2)如何解决脑裂问题?
01. 进行监控,发出告警
    备服务器出现VIP地址的原因:
    a 主服务器出现故障
    b 出现脑裂问题
    监控脑裂的shell脚本:
    [root@lb02 ~]# vim /server/scripts/naolie.sh
#!/bin/bash
ip a s eth0|grep "10.0.0.3" >/dev/null
if [ $? -eq 0 ]
then
  echo "keepalived服务出现异常,请进行检查"|mail -s 异常告警-keepalived  [email protected]
fi

    加入定时任务每隔一分钟执行一次
    corntab -e
    补充:shell脚本进行比较判断
    -eq  等于
    -ne  不等于
    -lt  小于
    -gt  大于
    -le  小于等于
    -ge  大于等于

02. 直接关闭一台服务器的keepalived服务
(三)如何实现keepalived自动释放VIP地址资源(lb01/02)
第一个历程: 编写监控nginx服务状态监控
    vim /server/scripts/check_web.sh
#!/bin/bash
num=`ps -ef|grep -c [n]ginx`
if [ $num -lt 2 ]
then
   systemctl stop keepalived
fi
ps:别忘了给脚本x权限
第二个历程: 测试监控脚本
    [root@lb01 scripts]# cat /etc/keepalived/keepalived.conf
    ! Configuration File for keepalived
     global_defs {
       router_id lb01
    }

    vrrp_script check_web {
     script "/server/scripts/check_web.sh"
     interval 3
     weight 2
    }

    vrrp_instance yb {
        state MASTER
        interface eth0
        virtual_router_id 51
        priority 150
        advert_int 1
        authentication {
            auth_type PASS
            auth_pass 1111
        }
        virtual_ipaddress {
         10.0.0.3/24
        }
       track_script {
             check_web
       }
    }
 第三个历程: 测试
    停掉nginx服务的同时keepailved服务也会自动停掉
    这样vip地址资源会释放给备,备会成为新的主,保证用户可以正常访问
    systemctl stop nginx
    systemctl status keepalived
(四)keepalived服务双主配置(lb0/02)
第一个历程: 编写lb01服务器keepalived配置文件
    [root@lb01 ~]# cat /etc/keepalived/keepalived.conf
    ! Configuration File for keepalived
     global_defs {
       router_id lb01
    }

    vrrp_instance yb {
        state MASTER
        interface eth0
        virtual_router_id 51
        priority 150
        advert_int 1
        authentication {
            auth_type PASS
            auth_pass 1111
        }
        virtual_ipaddress {
         10.0.0.3/24
        }
    }
    vrrp_instance cxt {
        state BACKUP
        interface eth0
        virtual_router_id 52
        priority 100
        advert_int 1
        authentication {
            auth_type PASS
            auth_pass 1111
        }
        virtual_ipaddress {
         10.0.0.4/24
        }
    }

第二个历程: 编写lb02服务器keepalived配置文件
    [root@lb02 ~]# cat /etc/keepalived/keepalived.conf
    ! Configuration File for keepalived
    global_defs {
       router_id lb02
    }

    vrrp_instance yb {
        state BACKUP
        interface eth0
        virtual_router_id 51
        priority 100
        advert_int 1
        authentication {
            auth_type PASS
            auth_pass 1111
        }
        virtual_ipaddress {
            10.0.0.3/24
        }
    }
    vrrp_instance cxt {
        state MASTER
        interface eth0
        virtual_router_id 52
        priority 150
        advert_int 1
        authentication {
            auth_type PASS
            auth_pass 1111
        }
        virtual_ipaddress {
            10.0.0.4/24
        }
    }

第三个历程: 进行抓包测试
    进行抓包查看:
    www.cxt.com/fzjh --- 10.0.0.3(10.0.0.5)
    10.0.0.1       --- 10.0.0.3
    10.0.0.5       --- 10.0.0.7
    10.0.0.7       --- 10.0.0.5
    10.0.0.3       --- 10.0.0.1

    bbs.test.com/fzjh --- 10.0.0.4(10.0.0.6)     --若访问bbs.cxt.com/fzjh.html出现404错误,可能是lb02的www.conf中没有配置bbs.cxt.com的负载均衡
    10.0.0.1       --- 10.0.0.4
    10.0.0.6       --- 10.0.0.7
    10.0.0.7       --- 10.0.0.6
    10.0.0.4       --- 10.0.0.1
(五)keepalived服务安全访问配置(lb0/02)
通过设置监听地址限制用户访问通道:
外网接口只开通10.0.0.3/10.0.0.4
第一个历程: 修改内核文件
    异常问题:
    01. 如何设置监听网卡上没有的地址
    解决: 需要修改内核信息
    echo 'net.ipv4.ip_nonlocal_bind = 1' >>/etc/sysctl.conf
    sysctl -p

第二个历程: 修改nginx负载均衡文件
    lb01/lb02
    vim /etc/nginx/conf.d/lb.conf
    upstream cxt {
       server 10.0.0.7:80;
       server 10.0.0.8:80;
       server 10.0.0.9:80;
    }
    server {
        listen       10.0.0.3:80;
        server_name  www.cxt.com;
        location / {
           proxy_pass http://cxt;
           proxy_set_header Host $host;
           proxy_set_header X-Forwarded-For $remote_addr;
           proxy_next_upstream error timeout http_404 http_502 http_403;
        }
    }
    server {
        listen       10.0.0.4:80;
        server_name  bbs.cxt.com;
        location / {
           proxy_pass http://cxt;
           proxy_set_header Host $host;
           proxy_set_header X-Forwarded-For $remote_addr;
        }
    }

第三个历程: 重启nginx负载均衡服务
    systemctl restart nginx   --涉及到ip地址的修改要用restart重启
七、ansible自动化管理服务
服务端:m01
客户端:其他服务器
PS:selinux需要关闭,不然ansible连接管理主机会报错
(一)部署ansible批量管理服务
(1)部署SSH基于密钥对的连接(m01)
第一步:管理端创建密钥对信息
[root@m01 ~]# ssh-keygen -t dsa    --默认一直回车

第二步:管理端需要将公钥进行分发
[root@m01 /server/scripts]# yum install -y sshpass
[root@m01 /server/scripts]# vim fenfa_pub_key.sh     --注意脚本x权限
#!/bin/bash
for ip in  7 31 41
do
  echo "============ host 172.16.1.$ip pub-key start fenfa============="
  sshpass -p123456 ssh-copy-id -i /root/.ssh/id_dsa.pub [email protected].$ip "-o StrictHostKeyChecking=no" &>/dev/null
  echo "host 172.16.1.$ip fenfa success."
  echo "============ host 172.16.1.$ip fenfa end============="
done
[root@m01 /server/scripts]# sh fenfa_pub_key.sh
============ host 172.16.1.5 pub-key start fenfa=============
host 172.16.1.5 fenfa success.
...

第三步:进行ssh远程连接测试
[root@m01 /server/scripts]# vim check_pub_key.sh      --注意脚本x权限
#!/bin/bash
CMD=$1    #--传参(执行脚本的时候后面可以写一些命令,不用去调整脚本)
for ip in {5,6,7,8,9,31,51}
do
  echo "==================== host 172.16.1.$ip check ==================== "
  ssh 172.16.1.$ip $CMD
  echo ""
done
[root@m01 /server/scripts]# sh check_pub_key.sh "hostname"
==================== host 172.16.1.5 check ====================
lb01
...
(2)部署安装ansible服务
第一步:安装ansible软件
[root@m01 ~]# yum install -y ansible     --- 需要依赖epel的yum源

第二步:编写主机清单文件
[root@m01 ~]# vim /etc/ansible/hosts
#定义可以管理的主机信息
172.16.1.5
172.16.1.6
172.16.1.7
172.16.1.8
172.16.1.9
172.16.1.31
172.16.1.51

第三步:测试是否可以管理多台主机
[root@m01 ~]# ansible all -a "hostname"
172.16.1.5 | CHANGED | rc=0 >>
lb01
...

ps:补充
/etc/ansible/ansible.cfg   --- ansible服务配置文件
/etc/ansible/hosts         --- 主机清单文件   定义可以管理的主机信息
/etc/ansible/roles         --- 角色目录
(二)ansible模块介绍
模块的应用语法格式:
ansible 主机名称/主机组名称/主机地址信息/all -m(指定应用的模块信息) 模块名称 -a(指定动作信息) "执行什么动作"
ansible软件输出颜色说明:
01. 绿色信息: 查看主机信息/对主机未做改动
02. 黄色信息: 对主机数据信息做了修改
03. 红色信息: 命令执行出错了
04. 粉色信息: 忠告信息
05. 蓝色信息: 显示ansible命令执行的过程
(1)command默认模块
command – Executes a command on a remote node
	      在一个远程主机上执行一个命令

简单用法:
[root@m01 ~]# ansible 172.16.1.7 -m command -a "hostname"
172.16.1.7 | CHANGED | rc=0 >>
web01

扩展用法:
1)chdir     Change into this directory before running the command.
             在执行命令之前对目录进行切换
ansible 172.16.1.7 -m command -a "chdir=/tmp/ touch test.txt"
2)creates   If it already exists, this step won't be run.
             如果文件存在,不执行命令操作
ansible 172.16.1.7 -m command -a "creates=/tmp/ touch test.txt"
skipped, since /tmp/ exists   --跳过,因为/tmp/中存在
3)removes    If it already exists, this step will be run.
              如果文件存在,继续执行
ansible 172.16.1.7 -m command -a "removes=/tmp/ touch test.txt"
4) free_form(required)
The command module takes a free form command to run.
There is no parameter actually named 'free form'. See the examples!
使用command模块的时候,-a参数后面必须写上一个合法linux命令信息

注意事项:
有些符号信息无法识别:  "<", ">", "|", ";" and "&"
(2)shell(万能模块)
shell   – Execute commands in nodes
	      在节点上执行操作

简单用法:
和command默认模块用法一致

实践应用:利用shell模块远程执行脚本
第一步:在管理主机编写脚本
[root@m01 /server/scripts]# vim yum.sh
#!/bin/bash
##yum
yum install -y htop

第二步:将脚本发送到远程主机
[root@m01 /server/scripts]# scp -rp ./yum.sh 172.16.1.7:/server/scripts
yum.sh                                      100%   39    37.0KB/s   00:00

第三步:使用file模块为脚本增加可执行权限
[root@m01 ~]# ansible 172.16.1.7 -m file -a "dest=/server/scripts/yum.sh mode=777"

第四步:使用ansible命令执行脚本
[root@m01 ~]# ansible 172.16.1.7 -m shell -a "chdir=/server/scripts sh yum.sh"
(3)scripts模块(万能模块)
PS:scripts模块参数功能和command模块类似
第一个步骤: 编写一个脚本
第二个步骤: 运行ansible命令执行脚本
(4)copy文件类型模块
copy – Copies files to remote locations
	   将数据信息进行批量分发

基本用法:
ansible 172.16.1.7 -m copy -a "src=/etc/hosts dest=/etc/"
将管理主机/etc目录中的hosts文件分发到远程主机的/etc目录中

172.16.1.7 | CHANGED => {       --- 对哪台主机进行操作
        "changed": true,             --- 是否对主机信息进行改变
        "checksum": "6ed7f68a1d6b4b36c1418338b2001e421eeba270",    --- 生成一个文件校验码==MD5数值
        "dest": "/etc/hosts",        --- 显示目标路径信息
        "gid": 0,                    --- 显示复制后文件gid信息
        "group": "root",             --- 显示复制后文件属组信息
        "md5sum": "7afd7b74854f0aaab646b3e932f427c0",              --- 生成一个文件校验码==MD5数值
        "mode": "0644",              --- 显示复制后文件权限信息
        "owner": "root",             --- 显示复制后文件属主信息
        "size": 401,                 --- 显示文件的大小信息
        "src": "/root/.ansible/tmp/ansible-tmp-1557804498.23-26487341925325/source",
        "state": "file",             --- 显示文件的类型信息
        "uid": 0                     --- 显示复制后文件uid信息
    }

扩展用法:
01. 在传输文件时修改文件的属主和属组信息
ansible 172.16.1.7 -m copy -a "src=/etc/ansible/file/rsync/rsync.password dest=/etc/ owner=rsync group=rsync"
02. 在传输文件时修改文件的权限信息
ansible 172.16.1.7 -m copy -a "src=/etc/ansible/file/rsync/rsync.password dest=/etc/ mode=1777"
03. 在传输数据文件信息时对远程主机源文件进行备份
ansible 172.16.1.7 -m copy -a "src=/etc/ansible/file/rsync/rsync.password dest=/etc/ backup=yes"
04. 创建一个文件并直接编辑文件的信息
ansible 172.16.1.7 -m copy -a "content='123456' dest=/etc/rsync.password"
content:文件内容
dest:远端文件路径

PS: ansible软件copy模块复制目录信息
ansible 172.16.1.7 -m copy -a "src=/tmp dest=/tmp"
src后面目录没有/: 将目录本身以及目录下面的内容都进行远程传输复制
ansible 172.16.1.7 -m copy -a "src=/tmp/ dest=/tmp"
src后面目录有/:   只将目录下面的内容都进行远程传输复制
(5)file设置文件属性模块
file – Sets attributes of files
	   设置文件属性信息

基本用法:
-dest 远端文件或目录路径
-owner 属主
-group 属组
-mode  权限
ansible 172.16.1.7 -m file -a "dest=/etc/hosts owner=www group=www mode=666"

扩展用法:
1. 可以利用模块创建数据信息 (文件 目录 链接文件)
state  参数
=absent    --- 缺席/删除数据信息
=directory --- 创建一个目录信息
=file      --- 检查创建的数据信息是否存在 绿色存在 红色不存在
=hard      --- 创建一个硬链接文件
=link      --- 创建一个软链接文件
=touch     --- 创建一个文件信息

创建目录信息:
ansible 172.16.1.7 -m file -a "dest=/test/ state=directory"
ansible 172.16.1.7 -m file -a "dest=/test/test01/test02/ state=directory"
创建文件信息:
ansible 172.16.1.7 -m file -a "dest=/test/test.txt state=touch"
创建链接文件信息:
ansible 172.16.1.7 -m file -a "src=/test/test.txt dest=/test/test_hard.txt state=hard"
ansible 172.16.1.7 -m file -a "src=/test/test.txt dest=/test/test_link.txt state=link"

2. 可以利用模块删除数据信息
ansible 172.16.1.7 -m file -a "dest=/test/test.txt state=absent"
ansible 172.16.1.7 -m file -a "dest=/test/  state=absent"

补充:
recurse	递归
Recursively set the specified file attributes on directory contents.
递归地对目录内容设置指定的文件属性。
This applies only when state is set to directory.
recurse=yes/no
仅当状态设置为“目录”时才适用。
[root@m01 ~]# ansible 172.16.1.41 -m file -a "dest=/backup owner=rsync recurse=yes"
(6)yum模块(批量安装和卸载软件包)
name  --- 指定安装软件名称
state --- 指定是否安装软件
	  installed   --- 安装软件
      present
      latest
      absent      --- 卸载软件
      removed
ansible 172.16.1.7 -m yum -a "name=iotop state=installed"
(7)service模块(管理服务的运行状态)
name:   --- 指定管理的服务名称
state:  --- 指定服务状态
	    started   启动
	    restarted 重启
		stopped   停止
enabled=yes/no --- 指定服务是否开机自启动
ansible 172.16.1.31 -m service -a "name=nfs state=started enabled=yes"
(8)cron模块(批量设置多个主机的定时任务信息)
crontab -e
	*   *  *  *  *  定时任务动作
	分 时 日 月 周

	minute:                # Minute when the job should run ( 0-59, *, */2, etc )
	                       设置分钟信息
	hour:                  # Hour when the job should run ( 0-23, *, */2, etc )
	                       设置小时信息
	day:                   # Day of the month the job should run ( 1-31, *, */2, etc )
                           设置日期信息
    month:                 # Month of the year the job should run ( 1-12, *, */2, etc )
	                       设置月份信息
	weekday:               # Day of the week that the job should run ( 0-6 for Sunday-Saturday, *, etc )
	                       设置周信息

	job                    用于定义定时任务需要干的事情

	基本用法:
	ansible 172.16.1.31 -m cron -a "minute=0 hour=2 job='/usr/sbin/ntpdate ntp1.aliyun.com >/dev/null 2>&1'"

	扩展用法:
	01. 给定时任务设置注释信息
	ansible 172.16.1.31 -m cron -a "name='time sync' minute=0 hour=2 job='/usr/sbin/ntpdate ntp1.aliyun.com >/dev/null 2>&1'"

    02. 如何删除指定定时任务
	ansible 172.16.1.31 -m cron -a "name='time sync01' state=absent"
	PS: ansible可以删除的定时任务,只能是ansible设置好的定时任务

	03. 如何批量注释定时任务
	ansible 172.16.1.31 -m cron -a "name='time sync' job='/usr/sbin/ntpdate ntp1.aliyun.com >/dev/null 2>&1' disabled=yes"
(9)mount模块(批量进行挂载操作)
mount: 批量进行挂载操作
	  src:  需要挂载的存储设备或文件信息
	  path: 指定目标挂载点目录
	  fstype: 指定挂载时的文件系统类型
	  state
	  present/mounted     --- 进行挂载
	  present: 不会实现立即挂载,修改fstab文件,实现开机自动挂载
	  mounted: 会实现立即挂载, 并且会修改fstab文件,实现开机自动挂载 *****

	  absent/unmounted    --- 进行卸载
	  absent:     会实现立即卸载, 并且会删除fstab文件信息,禁止开机自动挂载
	  unmounted:  会实现立即卸载, 但是不会会删除fstab文件信息  *****
(10)user模块(批量创建用户并设置密码信息)
基本用法:
	ansible 172.16.1.31 -m user -a "name=www"

	扩展用法:
	1) 指定用户uid信息
	ansible 172.16.1.31 -m user -a "name=www uid=6666"

	2) 指定用户组信息
	ansible 172.16.1.31 -m user -a "name=www group=www"

	3) 批量创建虚拟用户
	ansible 172.16.1.31 -m user -a "name=rsync create_home=no  shell=/sbin/nologin"

	4) 给指定用户创建密码
	PS: 利用ansible程序user模块设置用户密码信息,需要将密码明文信息转换为密文信息进行设置
	生成密文密码信息方法:
	方法一:
    ansible all -i localhost, -m debug -a "msg={{ '123456' | password_hash('sha512', 'www') }}"
    localhost | SUCCESS => {
      "msg": "$6$oldboy$MVd3DevkLcimrBLdMICrBY8HF82Wtau5cI8D2w4Zs6P1cCfMTcnnyAmmJc7mQaE9zuHxk8JFTRgYMGv9uKW7j1"
    }

	方法二:(忽略)
	mkpasswd --method=sha-512

	方法三:
    yum install -y python-pip
    pip install passlib
    python -c "from passlib.hash import sha512_crypt; import getpass; print(sha512_crypt.using(rounds=5000).hash(getpass.getpass()))"
    Password:
    $6$rJJeiIerQ8p2eR82$uE2701X7vY44voF4j4tIQuUawmTNHEZhs26nKOL0z39LWyvIvZrHPM52Ivu9FgExlTFgz1VTOCSG7KhxJ9Tqk.

	ansible 172.16.1.31 -m user -a 'name=oldboy08 password=$6$oldboy$MVd3DevkLcimrBLdMICrBY8HF82Wtau5cI8D2w4Zs6P1cCfMTcnnyAmmJc7mQaE9zuHxk8JFTRgYMGv9uKW7j1'
(三)剧本
(1)剧本的实现步骤
第一步:配置主机清单
    如何配置主机清单
    第一种方式: 分组配置主机信息
	[web]
    172.16.1.7
    172.16.1.8
    172.16.1.9

    [data]
    172.16.1.31
    172.16.1.41
	操作过程
    [root@m01 ansible-playbook]# ansible data -a "hostname"
    172.16.1.31 | CHANGED | rc=0 >>
    nfs01

    172.16.1.41 | CHANGED | rc=0 >>
    backup

    [root@m01 ansible-playbook]# ansible web -a "hostname"
    172.16.1.7 | CHANGED | rc=0 >>
    web01

	第二种方式: 主机名符号匹配配置
	[web]
    172.16.1.[7:9]
	[web]
    web[01:03]

	第三种方式: 跟上非标准远程端口
	[web]
    web01:52113
    172.16.1.7:52113

	第四种方式: 主机使用特殊的变量
    [web]
    172.16.1.7 ansible_ssh_port=52113 ansible_ssh_user=root ansible_ssh_pass=123456
    [web]
    web01 ansible_ssh_host=172.16.1.7 ansible_ssh_port=52113 ansible_ssh_user=root ansible_ssh_pass=123456

    第五种方式: 主机组名嵌入配置
	[rsync:children]    --- 嵌入子组信息
    rsync_server
    rsync_client

    [rsync_server]
    172.16.1.41

    [rsync_client]
    172.16.1.31
    172.16.1.7

	[root@m01 /etc/ansible]# ansible rsync -a "hostname"
    172.16.1.7 | CHANGED | rc=0 >>
    web01.com
    172.16.1.41 | CHANGED | rc=0 >>
    backup
    172.16.1.31 | CHANGED | rc=0 >>
    nfs01


	[web:vars]         --- 嵌入式变量信息
    ansible_ssh_host=172.16.1.7
    ansible_ssh_port=52113
    ansible_ssh_user=root
    ansible_ssh_pass=123456
    [web]
    web01

第二步:编写剧本
    剧本编写规范: pyyaml -- 三点要求
	1. 合理的信息缩进  两个空格表示一个缩进关系
	   标题一
	     标题二
	       标题三
	PS: 在ansible中一定不能用tab进行缩进

    2. 冒号的使用方法
	   hosts: 172.16.1.41
	   tasks:
	   yum: name=xx
	PS: 使用冒号时后面要有空格信息
	    以冒号结尾,冒号信息出现在注释说明中,后面不需要加上空格

    3. 短横线应用 -(列表功能)
	   - 张三
	     男
	       - 打游戏
		   - 运动

	   - 李四
	     女
	       学习
	          湖南
	   - 王五
	     男
	       运动
	          深圳
	PS: 使用短横线构成列表信息,短横线后面需要有空格

    剧本编写常见错误:
	01. 剧本语法规范是否符合(空格 冒号 短横线)
	02. 剧本中模块使用是否正确
	03. 剧本中一个name标识下面只能写一个模块任务信息
	04. 剧本中尽量不要大量使用shell模块


第三步:执行剧本
    如何执行剧本:
	第一个步骤: 检查剧本的语法格式
	ansible-playbook --syntax-check  rsync_server.yaml
    第二个步骤: 模拟执行剧本
	ansible-playbook -C rsync_server.yaml
	第三个步骤: 直接执行剧本
	ansible-playbook rsync_server.yaml
(2)一键化部署Rsync服务
1.命令实现
服务端的操作
	第一个历程安装软件:
	ansible 172.16.1.41 -m yum -a "name=rsync state=installed"

	第二个历程编写文件:
	ansible 172.16.1.41 -m copy -a "src=/etc/rsyncd.conf dest=/etc/"

	第三个历程创建用户
	ansible 172.16.1.41 -m user -a "name=rsync create_home=no shell=/sbin/nologin"

	第四个历程创建目录
	ansible 172.16.1.41 -m file -a "dest=/backup state=directory owner=rsync group=rsync"

	第五个历程创建密码文件
	ansible 172.16.1.41 -m copy -a "content='rsync_backup:123456' dest=/etc/rsync.password mode=600"

	第六个历程启动服务
	ansible 172.16.1.41 -m service -a "name=rsyncd state=started enabled=yes"

客户端的操作:
	第一个历程: 创建密码文件
	ansible 客户端地址 -m copy -a "content='rsync_backup:123456' dest=/etc/rsync.password mode=600"
2.剧本实现
[root@m01 ansible-playbook]# vim rsync_server.yaml
- hosts: rsync_server
  tasks:
    - name: 01-install rsync
      yum: name=rsync state=installed
    - name: 02-push conf file
      copy: src=/etc/ansible/server_file/rsync_server/rsyncd.conf dest=/etc/
    - name: 03-create user
      user: name=rsync create_home=no shell=/sbin/nologin
      #shell: useradd rsync -M -s /sbin/nologin
    - name: 04-create backup dir
      file: path=/backup state=directory owner=rsync group=rsync
    - name: 05-create password file
      copy: content=rsync_backup:123456 dest=/etc/rsync.password mode=600
    - name: 06-start rsync server
      service: name=rsyncd state=started enabled=yes

- hosts: rsync_clients
  tasks:
    - name: 01-install rsync
      yum: name=rsync state=installed
    - name: 02-create password file
      copy: content=123456 dest=/etc/rsync.password mode=600
    - name: 03-create test file
      file: dest=/tmp/test.txt  state=touch
    - name: 04-check test
      shell: rsync -avz /tmp/test.txt [email protected]::backup --password-file=/etc/rsync.password
(3) 一键化部署全网备份项目
(4) 一键化部署NFS服务
(5) 一键化部署实时同步服务
八、网站监控服务zabbix
服务端:zabbix
客户端:其他服务器
(一)部署安装zabbix服务
(1)服务端(zabbix)
第一步:配置zabbix仓库
[root@m01 ~]# rpm -ivh https://mirrors.tuna.tsinghua.edu.cn/zabbix/zabbix/4.0/rhel/7/x86_64/zabbix-release-4.0-1.el7.noarch.rpm
[root@m01 ~]# sed -i 's#repo.zabbix.com#mirrors.tuna.tsinghua.edu.cn/zabbix#g' /etc/yum.repos.d/zabbix.repo

第二步: 下载安装zabbix服务端相关软件
zabbix服务程序软件: zabbix-server-mysql
zabbix服务web软件: zabbix-web-mysql httpd php
数据库服务软件: mariadb-server
[root@m01 ~]# yum install -y zabbix-server-mysql zabbix-web-mysql httpd php mariadb-server
[root@m01 ~]# systemctl start mariadb.service && systemctl enable mariadb.service

第三步:软件配置
vim /etc/zabbix/zabbix_server.conf
126 DBPassword=zabbix
vim /etc/httpd/conf.d/zabbix.conf
21         php_value date.timezone Asia/Shanghai

第四步:编写配置数据库服务
systemctl start mariadb.service
systemctl status mariadb.service
mysql
create database zabbix character set utf8 collate utf8_bin;    --创建zabbix数据库--zabbix
grant all privileges on zabbix.* to zabbix@localhost identified by 'zabbix';    --创建数据库管理用户
zcat /usr/share/doc/zabbix-server-mysql-4.0.21/create.sql.gz|mysql -uzabbix -pzabbix zabbix      --在zabbix数据库中导入相应的表信息
chown -R apache /usr/share/zabbix/assets     --必须有

第五个里程: 启动zabbix程序相关服务
数据库服务 zabbix服务 httpd服务
systemctl start zabbix-server.service httpd mariadb.service
systemctl enable zabbix-server.service httpd mariadb.service
说明: 至此zabbix-server命令行操作结束
LNMP: nginx php mysql
LAMP: apache(php模块) mysql

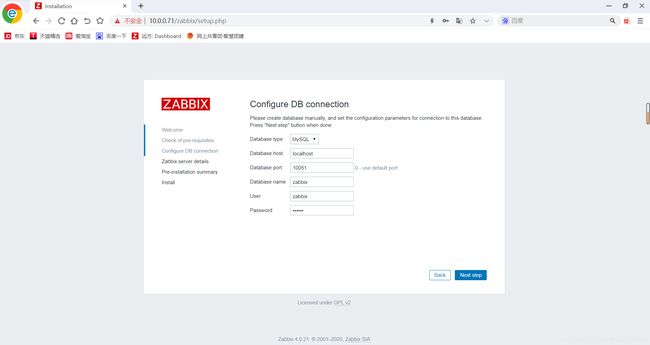
第六个里程: 登录zabbix服务端web界面, 进行初始化配置
http://10.0.0.71/zabbix/setup.php

10051  zabbix-server 服务端端口号
10050  zabbix-agent  客户端端口号
/etc/zabbix/web/zabbix.conf.php   -- 记录web页面初始化信息

第七个里程: 登录zabbix服务web页面
http://10.0.0.71/zabbix/
用户名Admin 密码zabbix
(2)客户端(其他服务器)
    第一个里程: 下载安装zabbix yum 源文件
    LTS long time support
    1) aliyun zabbix yum 源
    2) 清华源
    rpm -ivh https://mirrors.tuna.tsinghua.edu.cn/zabbix/zabbix/4.0/rhel/7/x86_64/zabbix-release-4.0-1.el7.noarch.rpm

    第二个里程: 下载安装zabbix客户端软件
    yum install -y zabbix-agent
    或者
    rpm -ivh https://mirrors.tuna.tsinghua.edu.cn/zabbix/zabbix/4.0/rhel/7/x86_64/zabbix-agent-4.0.0-2.el7.x86_64.rpm

    第三个里程: 编写zabbix客户端配置文件
    vim /etc/zabbix/zabbix_agentd.conf
    98 Server=172.16.1.71

    第四个里程: 启动zabbix-agent服务
    [root@web01 ~]# systemctl start zabbix-agent
    [root@web01 ~]# netstat -lntup|grep 10050
    tcp      0     0 0.0.0.0:10050           0.0.0.0:*            LISTEN      4509/zabbix_agentd
    tcp      0     0 :::10050                :::*                 LISTEN      4509/zabbix_agentd
(二)实现zabbix自定义监控
(1)需求:监控Nginx服务是否启动
1) 在zabbix-agent进行配置文件编写
第一步: 编写自定义监控命令
ps -ef|grep -c [n]ginx

第二步: 编写zabbix-agent配置文件
第一种方法: 直接修改zabbix-agent配置文件参数
UserParameter=
第二种方法: 在/etc/zabbix/zabbix_agentd.d/目录中编写自定义监控文件
vim web_server.conf
UserParameter=键(变量名),值(变量信息)
UserParameter=web_state,ps -ef|grep -c [n]ginx

第三步: 重启zabbix-agent服务
systemctl restart zabbix-agent

2) 在zabbix-server命令行进行操作
第一步: 检测自定义监控信息是否正确
yum install -y zabbix-get
zabbix_get  -s 172.16.1.7 -k 'web_state'
ps:
-s  表示要监控的主机IP  与zabbix-agent配置文件里的信息一致
-k  key即键信息

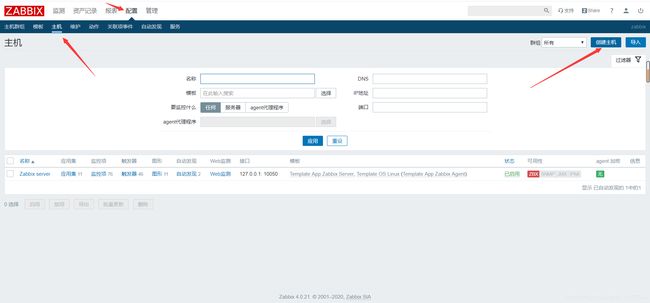
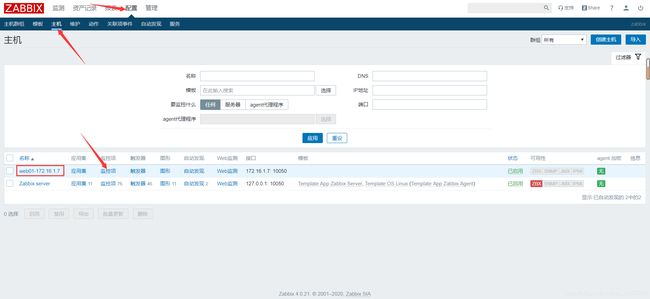
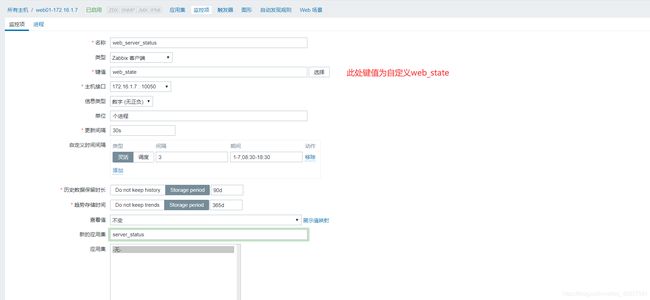
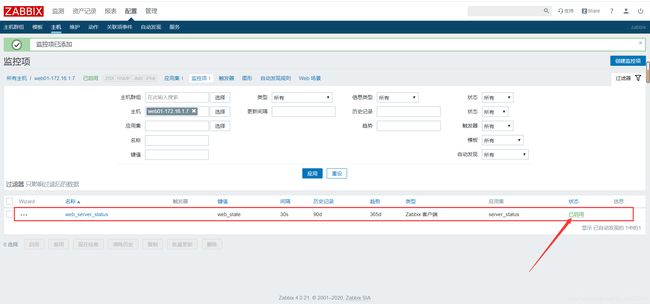
3) 在zabbix-server网站页面进行配置(如下图所示)
第一步: 进入到创建监控项页面:
配置---主机---选择相应主机的监控项
第二步: 监控项页面如何配置
名称 键值 更新间隔时间 应用集
第三步: 检查是否收集到监控信息
(2)复杂的自定义监控配置(多个服务状态)
1) 在zabbix-agent端编写配置文件
vim server_state.conf
UserParameter=server_state[*],netstat -lntup|grep -c $1

2) 在zabbix-server命令测试
zabbix_get  -s 172.16.1.7 -k 'server_state[22]'

3) 修改配置页面
键值: server_state[22]
(3)报警(邮件报警、微信报警、短信和电话)
1.邮件信息报警
第一个历程: 创建触发器
配置---主机---选择相应监控主机触发器---创建触发器
设置好表达式
{web01:server_state[nginx].last()}<=2
{监控主机名称:键值名称.调用的表达式函数}<=2

第二个历程: 修改动作配置
配置---动作---将默认动作进行开启

第三个历程: 建立和163邮箱服务关系
管理---报警媒介类型---创建报警媒介

第四个历程: 定义接收报警的邮件地址
小人头--报警媒介--设置收件人信息

2.微信报警
第一个历程: 需要注册企业微信,并进行配置
我的企业:
01. 获取企业id: ww32d68104ab5f51b0
02. 获取企业二维码: 允许员工加入
管理工具:
01. 成员加入---进行审核通过
应用小程序:
01. 进行创建
02. 收集程序信息
    AgentId: 1000006
    Secret: RvQYpaCjWbYMCcwhnPqg1ZYcEGB9cOQCvvlkn-ft6j4

第二个历程: 编写脚本(python)
cat /etc/zabbix/zabbix-server.conf
AlertScriptsPath=/usr/lib/zabbix/alertscripts  --- 放置告警脚本

执行脚本报错问题解决:
01. 问题: No module named requests
yum install -y python-pip
pip install requests
02. 问题: 脚本执行语法

第三个历程: 修改添加报警媒介---定义了发微信配置

第四个历程: 配置接收微信的人员

3.短信和电话:
利用第三方短信电话报警平台
01. 利用阿里大鱼(收费)
    https://yq.aliyun.com/articles/658524?spm=a2c4e.11155472.0.0.d821153fAjrH3q  --- 自行研究
02. 利用onealert发送告警

第一个历程: 配置报警平台
01. 配置--应用--选择zabbix报警
02. 配置--通知策略
03. 配置--分派策略


