【JavaEE】Java的多线程编程基础知识 -- 多线程篇(2)
Java多线程编程基础知识
- 一、多线程的创建
- 二、Thread类常用的方法和API
-
- 2.1 Thread 的几个常见的属性
- 2.2 start 启动一个线程
- 2.3 终止一个线程
- 2.4 等待一个线程-join()
- 2.5 线程休眠函数 -sleep()
- 三、线程状态
-
- 3.1 观察所有线程的状态
- 3.2 线程状态和线程转移的意义
- 四、线程安全(重点)
-
- 4.1 观察线程不安全的现象
- 4.2 线程安全的概念
- 4.3 线程安全出现的原因
- 4.4 synchronized 关键字 --加锁手段
- 4.5 volatile关键字
- 五、线程同步
-
- wait 和 notify
一、多线程的创建
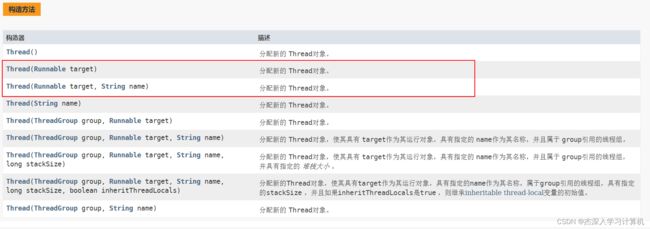
构造方法
Java创建多线程示例
- 创建一个类来继承Thread, 并重写run方法
class MyThread extends Thread {
    @Override
    public void run() {
        while (true) {
            System.out.println("hello word!");
            try {
                Thread.sleep(1000);
            } catch (InterruptedException e) {
                e.printStackTrace();
            }
        }
    }
}

public class Test1 {
    public static void main(String[] args) throws InterruptedException {
        MyThread thread = new MyThread();
        thread.start();
        while (true) {
            System.out.println("hello main!");
            try {
                Thread.sleep(1000);
            } catch (InterruptedException e) {
                e.printStackTrace();
            }
        }
    }
}
- 创建一个类实现Runnable, 并重写run方法
class MyRunnable implements Runnable {

    @Override
    public void run() {
        while (true) {
            System.out.println("Hello Runnable");
            try {
                Thread.sleep(1000);
            } catch (InterruptedException e) {
                e.printStackTrace();
            }
        }
    }
}

public class Test2 {
    public static void main(String[] args) {
        MyRunnable myRunnable = new MyRunnable();
        Thread t = new Thread(myRunnable);
        t.start();
    }
}
- 基于匿名内部类, 继承Thread, 并重写run方法
public class Test3 {
    public static void main(String[] args) {
        Thread t = new Thread() {
            @Override
            public void run() {
                while (true) {
                    System.out.println("Hello anonymous");
                    try {
                        Thread.sleep(1000);
                    } catch (InterruptedException e) {
                        e.printStackTrace();
                    }
                }
            }
        };
        t.start();
    }
}
- 基于内部类, 实现Runnable, 并重写run方法
public class Test4 {
    public static void main(String[] args) {
        Thread t = new Thread(new Runnable() {
            @Override
            public void run() {
                while (true) {
                    System.out.println("Hello anonymous runnable");
                    try {
                        Thread.sleep(1000);
                    } catch (InterruptedException e) {
                        e.printStackTrace();
                    }
                }
            }
        });

        t.start();
    }
}
- 使用lambda表达式, 来表示run方法 --推荐使用
public class Test5 {
    public static void main(String[] args) {
        Thread t = new Thread(()->{
            while (true) {
                System.out.println("Hello lambda");
                try {
                    Thread.sleep(1000);
                } catch (InterruptedException e) {
                    e.printStackTrace();
                }
            }
        });

        t.start();
    }
}
- 基于Callable
public class Test6 {
    public static void main(String[] args) throws ExecutionException, InterruptedException {
        Callable<Integer> callable = new Callable<Integer>() {
            @Override
            public Integer call() throws Exception {
                int sum = 0;
                for (int i = 0; i <= 100; i++) {
                    sum += i;
                }
                return sum;
            }
        };

        FutureTask<Integer> futureTask = new FutureTask<>(callable);
        Thread t = new Thread(futureTask);
        t.start();

        Integer result = futureTask.get();
        System.out.println(result);
    }
}
- 基于线程池
public class Test7 {
    public static void main(String[] args) {
        ExecutorService executorService = Executors.newFixedThreadPool(4);
        for (int i = 0; i < 100; i++) {
            executorService.submit(new Runnable() {
                @Override
                public void run() {
                    System.out.println("Hello threadPool: executorService");
                }
            });
        }
    }
}
多线程的命名
- 多线程的默认命名是 thread + 线程编号(从0开始逐渐递增)
- 通过构造函数来指定线程名
run方法 和 start方法的区别
-
观察现象
-
得出结论
- run方法是继承Thread并重写run方法匿名类中的一个方法, 调用该方法就只是调用该方法, 并没有创建出新的线程
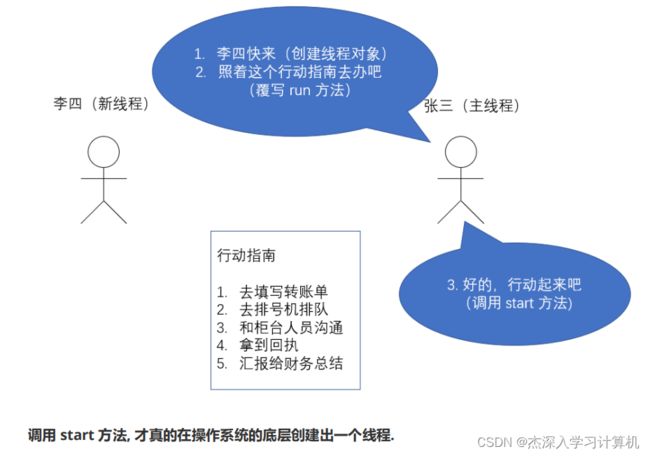
- start方法是先创建出来一个新的线程, 在让该新的线程来执行run方法
二、Thread类常用的方法和API
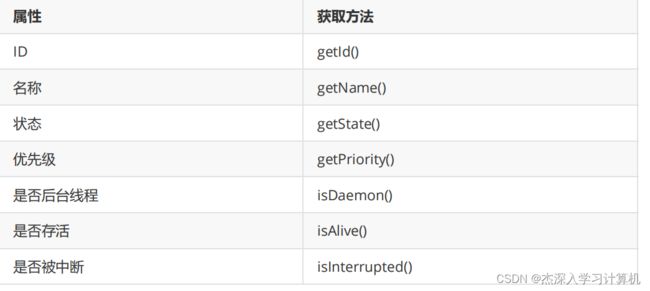
2.1 Thread 的几个常见的属性
ID
这个是线程的身份标识 – 在JVM中给线程设定的标识
线程的不同身份标识:
- JVM有一个身份表示
- pthread 库(系统给程序员提供的操作线程的API), 也有一个线程的身份标识
- 在内核里, 针对线程的 PCB 还有身份标识
不同身份标识的意义: 可以解耦合!
状态和优先级
是否是后台线程 – isDaemon()
- 前台线程: 前台线程会影响进程, 如果前台线程没有结束, 则进程就不会结束, 如果所有的前台线程都结束了, 即使还存在后台线程, 进程也会推出
- 后台线程/守护线程: 后台线程不会影响进程的结束与否
是否存活 – isAlive()
Thread 对象, 对应的线程(系统内核中), 是否存活;
Thread 对象的生命周期, 并不是和系统中的线程完全一致的!
2.2 start 启动一个线程
之前我们已经看到了如何通过覆写 run 方法创建一个线程对象,但线程对象被创建出来并不意味着线程就开始运行了。
2.3 终止一个线程
- 线程结束的标志
- run 函数结束
- 此处的终止线程, 就是想办法, 让 run 能够尽快的执行完毕
终止线程的方法
- 程序员手动设定标志位
public class Test02 {
    private static boolean isQuit = false;

    public static void main(String[] args) throws InterruptedException {
        Thread t = new Thread(() -> {
            while (!isQuit) {
                System.out.println("Hello world");
                try {
                    Thread.sleep(1000);
                } catch (InterruptedException e) {
                    e.printStackTrace();
                }
            }
        });
        t.start();

        Thread.sleep(3000);

        isQuit = true;
        System.out.println("把t线程终止了");
    }
}
| lambda表达式捕捉变量的理解 |
-
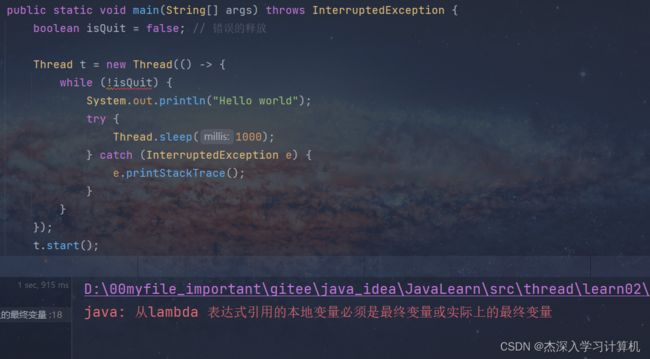
问题提出:
- lambda表达是可以捕获到外面的变量, 既然是lambada 表达式, 执行时机更靠后的, 这就导致了, 后续真正执行 lambda 的时候, 局部变量 isQuit 是否可能已经被销毁了呢?
- 这种情况是客观存在的, 让 lambda 去访问一个已经被销毁了变量很明显是不合适的。
-
问题解决
- lambda 引入了“变量捕获”这样的机制,lambda 内部看起来是直接访问外部的变量,其实本质上是把外部的变量复制了一份,到 lambda 里面。(这样就可以解决刚才 生命周期 的问题了)
- 所以,变量捕获这里的限制,要求捕获的变量得是 final (至少 事实上是 final)-- 就是该变量只有一次赋值操作
-
如果这个变量想要修改,就不能进行变量捕获了
- 为什么java这么设定?
- 因为 java 是通过复制的方式来实现 “变量捕获”。如果外面的代码想要这个变量进行修改,就会出现一个情况,外面的变量变了,里面的没变 – 代码更容易出现歧义
- 为什么java这么设定?
-
相比较之下,其它语言(JS)采取了更激进的设计 – 也有变量捕获,不是通过复制的方式实现,而是直接改变外部变量的生命周期从而保证 lambda 在执行的时候肯定能访问到外部的变量 – 此时JS的变量捕获就没有final的限制
- 直接使用 Thread 类,给我们提供好了现成的标志位,不同咱们手动设置这个标志。
public class Test03 {
    public static void main(String[] args) throws InterruptedException {
        Thread t =new Thread(() -> {
           while (!Thread.currentThread().isInterrupted()) {
               System.out.println("Hello world");
               try {
                   Thread.sleep(1000);
               } catch (InterruptedException e) {
                   e.printStackTrace();
                   break;
               }
           }
        });
        t.start();
        Thread.sleep(3000);
        t.interrupt(); // 将 Thread 中断标志位设置为 true
        System.out.println("把t线程终止了");
    }
}
运行现象
- t 线程正在sleep, 然后被 interrupt 给唤醒了, 而手动设置的标志位, 此时是没法唤醒sleep的
- 因此, 线程正在 sleep 过程中, 其它线程调用 interrupt 方法, 就会强制 sleep 抛出一个异常, sleep 就会被立即唤醒了, 但 sleep 在唤醒的同时, 会自动清除前面设置的标志位! – 这样就给程序员留下更多的操作空间
- 我们通过 try - catch 捕获 InterruptedException 异常, 在catch 中写自己想要的处理逻辑
- a. 立即停止循环, 立即结束线程
- b. 继续做点别的事情, 过一会再结束线程
- c. 忽略终止的请求, 继续循环
- 我们通过 try - catch 捕获 InterruptedException 异常, 在catch 中写自己想要的处理逻辑
2.4 等待一个线程-join()
- 问题分析
- 多个线程是并发执行的, 具体的执行过程, 都是由操作系统负责调度的, 操作系统的调度线程的过程, 是 “随机” 的, 无法确定, 线程执行的先后顺序, 上述随机性, 程序员不太喜欢, 更喜欢的是"确定"的东西
- 等待线程 是规划 线程结束顺序的一种手段
join() 方法的参数
-
没有参数的是阻塞的等待线程结束, 就是让等待线程不在执行代码了, 不在使用CPU的资源了 – 但是死的策略不合适, 所以我们应该设定等待线程结束最大的时间 – 只要时间到, 不管来没来, 就不等了
-
join 能否被 interrupt 唤醒? --可以的-- 会自动清除中断标志位
【使用示例】
public class Test04 {
    public static void main(String[] args) throws InterruptedException {
        Thread t = new Thread(() -> {
            int cnt = 5;
            while (cnt-- != 0) {
                System.out.println("Hello join");
                try {
                    Thread.sleep(1000);
                } catch (InterruptedException e) {
                    e.printStackTrace();
                }
            }
            System.out.println("t thread end");
        });
        t.start();
        t.join();
        System.out.println("main thread end");
    }
}
2.5 线程休眠函数 -sleep()
- 这是一个类方法, 调用的时候需要 Thread.sleep(long )
- 参数是表示休眠 n 毫秒
- 该休眠时间不是精确的, 例如: sleep(1000) – 该线程开始休眠 1000 ms, 1000 ms后, 该线程变成就绪状态, 时刻准备被CPU调度。但CPU调度也是需要时间的, 所以这其中就会出现误差
- sleep的作用还有一个功能, 让当前线程主动放弃CPU资源; 利用这个特性, 可以 Thread.sleep(0) – 表示放弃啊CPU资源, 到就绪队列中等待CPU的重新调度。这个与 yield() 方法功能类似
三、线程状态
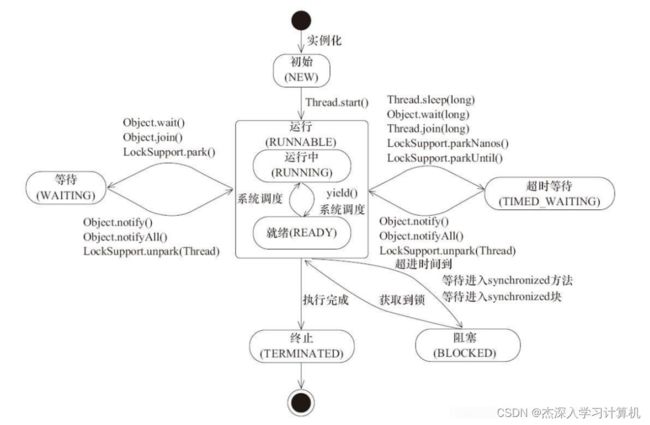
就绪状态、阻塞状态是系统设定的状态, Java对线程的状态的设定进行更进一步的细分.
3.1 观察所有线程的状态
线程状态是一个枚举类型 Thread.State
    public static void main(String[] args) {
        for(Thread.State x : Thread.State.values()) {
            System.out.println(x);
        }
    }
- NEW: 安排了工作, 还未开始行动;
- RUNNABLE: 可工作的, 又可以分成正在工作中和即将开始工作
- BLOCKED: 表示队列排队等着其它事情 – 因为锁产生阻塞了
- WATING: 表示队列排队等着其它事情 – 因为调用 wait 产生阻塞了
- TIMED_WAITING: 表示队列排队等着其它事情 – 因为sleep 产生阻塞
- TERMINATED: 工作完成了
3.2 线程状态和线程转移的意义
四、线程安全(重点)
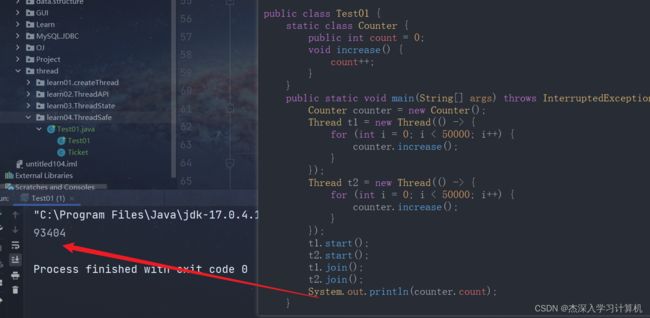
4.1 观察线程不安全的现象
4.2 线程安全的概念
- 在多线程下,发现由于多线程执行,导致的 bug,统一成为“线程安全问题”,如果某个代码,在单线程下执行没有问题,多个线程下执行也没有问题,则成为“线程安全”,反之也可以称为“线程不安全”;
4.3 线程安全出现的原因
- [根本原因] 多个线程之间的调度顺序是"随机的", 操作系统使用"抢占式"执行的策略来调度线程, 罪魁祸首, 万恶资源
- 和单线程不同的是, 多线程下, 代码的执行顺序, 产生了更多的变化, 以往只需要考虑代码在一个固定的顺序下执行, 执行正确即可, 现在则要考虑多线程下, N中执行顺序, 代码执行都得正确
- 这件事情, 木已成舟, 无法改变, 当前主流的操作系统, 都是这样的抢占式 执行的
- 过个线程同时修改同一个变量, 容易产生线程安全问题 – 代码结构
- 一个线程修改一个变量 – 没事
- 多个线程同时读取同一变量 – 没事
- 多个线程修改多个变量 – 没事
- 多个线程同时修改同一个变量 – 危险
- 进行的修改, 不是 “原子的” – 解决线程安全主要的切入手段
- 如果修改操作, 能够按照原子的方式来完成, 此时也不会有线程安全问题
- 内存可见性, 引起的线程安全问题
- 指令重排序, 引起的线程安全问题
解决线程安全的主要手段: 加锁, 将修改操作打包成原子性的
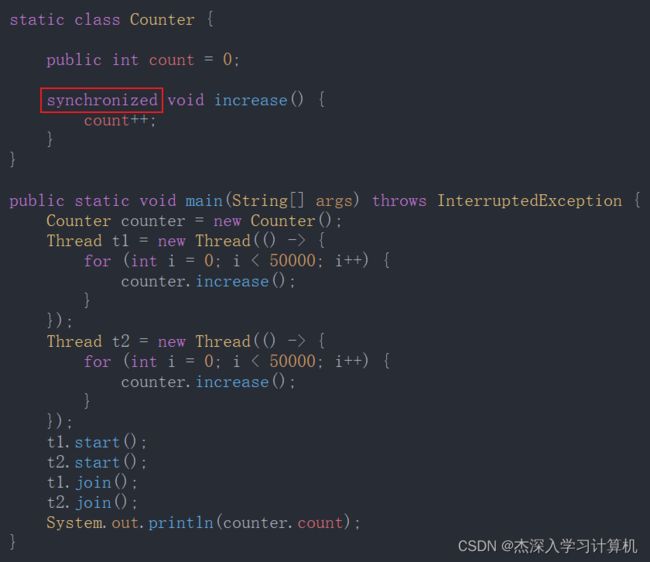
4.4 synchronized 关键字 --加锁手段
语法格式:
synchronized (一个对象) {
	// 代码块
}
作用 :
- 进入代码块就加锁
- 出了代码块就解锁
- 理解synchronized
- synchronized 进行加锁解锁操作, 其实是以 “对象” 为维度进行展开的
- 加锁的目的是为了互斥使用临界资源
- 加锁规则如下:
- 如果两个线程针对同一个对象进行加锁, 就会出现 锁竞争 / 锁冲突(一个线程能加锁成功, 另一个线程阻塞等待)
- 如果两个线程针对的不同对象加锁, 不会产生锁竞争, 也就不会存在阻塞等待一系列的操作了
- 具体是针对哪个对象加锁不重要, 重要的是两个线程是否是对同一个对象进行加锁!
- synchronized 可以直接修饰方法
- 如果修饰的普通成员方法 – 则加锁的对象就是 this 引用
- 如果修饰的类方法 – 则加锁对象就是该类对象(.class) – 类用来实例化出对象的模板
4.5 volatile关键字
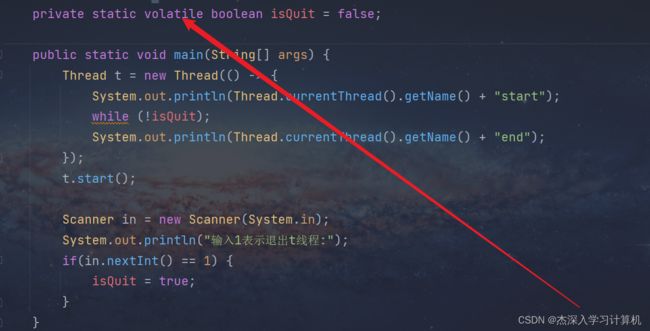
内存可见性引起的线程安全问题
问题现象指出
- 问题出现:
- 输入1, 在 main 线程中已经修改了 isQuit 的值, 但是 t 线程中没有看到isQuit 的值, 一直在循环, 没有退出
- 不符合预期, 出现 bug , 是一个线程安全的问题
- 问题分析:
- 程序在编译运行的时候, Java 编辑器, 和 JVM 可能会对代码做出一些 “优化”
- 程序员负责写代码的, 当写好一个代码之后, 人家开发 Java编辑器, 开发 JVM 的大佬, 可能会认为你这个代码写的不好, 当你的代码实际执行的时候, 编辑器/JVM 就可能把你的代码改了, 保持原有逻辑不变的情况下, 提供代码的执行效率
- 编译器/JVM 优化的效果是非常明显的, 可以提高效率
- 但是, 遇到了多线程, 此时的优化可能会出现差错
while (!isQuit) {}
该执行代码本质上有两个指令:
- load(读取内存) – 速度慢
- jcmp (比较并跳转) – 纯CPU, 速度贼快
- 此时, 编译器/JVM就发现, 这个逻辑中, 代码要反复的, 快速的读取同一个内促的值, 并且, 这个内存的值, 每次读出来还是一样的!
- 此时, 编译器就做出了一个大胆的决定, 直接 load 操作优化了, 只是执行第一次 load, 后续不在执行load, 直接拿寄存器中的数据进行比较了
- 但是, 万万没想到, 程序员不讲武德, 搞偷袭, 在另一个线程中, 修改了 isQuit 的值!
- 因为是通过scanner进行数据的输入, 编译器无法准确判断, main 线程 到底会不会修改 isQuit 的值, 啥时候执行, 因此就出现了误判
- 所以虽然 main 线程把内存中的 isQuit 给改了, 但是另一个线程中, 并没有重复从内存中读取 isQuit 的值, 因此 t 线程就无法感知 main 的修改,也就出现了上述的问题
volatile 解决内存可见性的问题
- 给要变的变量加上 volatile 关键字进行加以修饰, 说明该变量的是容易发生变化的, 就告诉编译器不要出现上述的优化, 每次都要从内存中读取变量的值
- volatile 本质就是保证了变量的内存可见性
- volatile 不保证原子性
编译器的优化是一种玄学, 为了保证代码的逻辑, 不能完全依靠编译器的优化
Java 中的内存模型
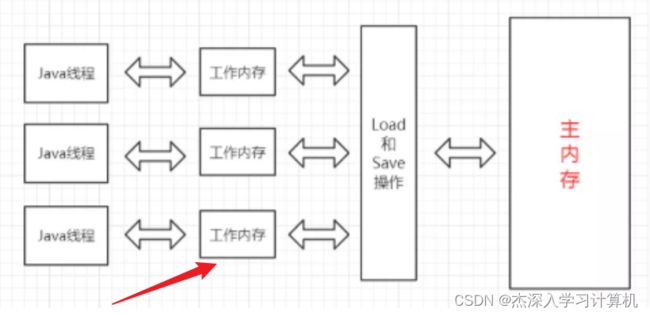
- Java在主内存和CPU之间, 增加了一个 工作内存(也就是一个存储区)
- 思考: CPU中有寄存器, 寄存器和主内存之间有1~3级的缓冲区, 为什么Java 对这些缓冲区叫做工作内存呢?
- Java 要保证 “跨平台”
- 支持不同的操作系统
- 支持不同的硬件设备 (CPU)
- 如果对每个硬件都需要特定的描述, 就会比较复杂, 因此官方直接发明了一个新的术语, “工作内存”, 同时也可以通过这个新的术语, 来屏蔽硬件的相关信息
- Java 要保证 “跨平台”
五、线程同步
wait 和 notify
- 多线程调度是随机的
- 很多时候希望多个线程能够按照咱们自定的顺序来进行, 完成线程之间的配合工作
- wait(等待) 和 notify(通知) 就是一个用来协调线程顺序的重要工具
- 这两个方法, 都是 Object 提供的方法, 随便找个对象, 都可以使用wait 和 notify
wait
wait 在执行的时候, 会做三件事:
- 解锁 object,wait, 就会尝试针对 object 对象解锁
- 阻塞等待
- 当被其它线程唤醒之后, 就会尝试重新加锁, 加锁成功, wait 执行完毕, 继续往下执行其他逻辑
| wait需要的注意事项 |
- wait 要解锁, 就得先要加上锁
- 所以, 先要synchronized给对象加上锁, 并在代码块里面使用wait方法等待
notify
- 就是用来唤醒 在相应对象上 wait 的线程
- wait 和 notify 都需要放到 synchronized 之内
- 虽然 notify 不涉及 “解锁操作”, 但是 Java 也强制要求 notify 放到 synchronized中
- 如果notify 的时候, 另一个线程没有处于 wait 状态, 此时notify相当于"孔大一炮", 不会有任何副作用
wait 和 notify 的控制线程的执行顺序, 解决线程饥饿的问题
wait 和 sleep 之间的区别
sleep 是有一个明确的时间, 到达时间, 自然会被唤醒, 也能提前唤醒, 使用 interrupt 就可以
wait 默认是一个死等, 一直等到有其他线程 notify . wait 也能够被 interrupt 提前唤醒.
- notify是顺理成章的唤醒, 唤醒之后该线程还需要继续工作, 后续还会进入到 wait 状态
- interrupt 告知线程要结束了, 接下来线程就要进入到收尾工作了
wait 也有一个带有超时间的版本(和 join 类似)
因此, 协调多个线程之间阿德执行顺序, 当然还是优先考虑使用 wait notify, 而不是 sleep
