CAT学习 (超详细)
文章目录
- 0.学习目标
- 1.CAT入门
-
- 1.1 什么是调用链监控
-
-
- 1.1.1 架构的演进历史
- 1.1.2 调用链监控的需求
- 1.1.3 调用链监控的原理
-
- 1.2 什么是CAT
-
-
- PinPoint
- **SkyWalking**
- Zipkin
-
- 1.3 CAT报表介绍
- 2.CAT基础
-
- 2.1 下载与安装
-
- 2.1.1 github源码下载
- 2.1.2 模块介绍
- 2.1.3 服务端安装
-
- 2.1.3.1 linux源码安装
- 2.1.3.2 windows安装
- 2.2 客户端集成
-
- 2.2.1 简单案例
-
- 添加 Maven 添加依赖
- 启动 cat 客户端前的准备工作
- 初始化
- 编写代码
- 运行SpringBoot
- 2.2.2 API介绍
-
- 2.2.2.1 Transaction
-
- 基本用法
- 扩展API
- 2.2.2.2 Event
-
- Cat.logEvent
- Cat.logError
- 2.2.2.3 Metric
- 2.2.3 CAT监控界面介绍
-
- 2.2.3.1 DashBoard
- 2.2.3.2 Transaction
-
- 小时报表
- 历史报表
- 2.2.3.3 Event
-
- 第一级分类(Type)统计界面
- 第二级分类(Name)统计界面
- 2.2.3.4 Problem
- 2.2.3.5 HeartBeat
-
- JVM相关指标
- 系统指标
- 2.2.3.6 Business
-
- 基线
- 基线生成算法:
- 如何开启基线:
- 注意事项
- 2.2.3.7 State
- 3.CAT高级
-
- 3.1框架集成
-
- 3.1.1 dubbo
-
- 3.1.1.1 制作cat-dubbo插件
- 3.1.1.2 服务提供方
- 3.1.1.3 服务消费方
- 3.1.1.4 测试
- 3.1.2 mybatis
-
- 3.1.2.1 创建spring boot和mybatis的集成项目
- 3.1.2.2 集成cat-mybatis插件:
- 3.1.2.3 测试
- 3.1.3 日志框架
-
- 3.1.3.1 搭建环境
- 3.1.3.2 集成cat
- 3.1.3.3 测试
- 3.1.4 Spring Boot
-
- 3.1.4.1 搭建环境
- 3.1.4.2 测试
- 3.1.5 Spring AOP
-
- 3.1.5.1 搭建环境
- 3.1.5.2 测试
- 3.1.6 Spring MVC
- 3.2告警配置
-
- 3.2.1 告警通用配置
-
- 告警服务器配置
- 告警策略
-
- 配置示例
- 配置说明:
- 告警接收人
- 告警服务端
-
- 配置示例
- 配置说明:
- 3.2.2 告警规则
-
-
- 子条件类型:
- Transaction告警
-
- 配置图示
- 配置说明:
- Event告警
-
- 配置图示
- 配置说明:
- 心跳告警
-
- 配置图示
- 配置说明:
- 异常告警
-
- 配置图示
- 配置说明:
-
- 3.2.3 告警接口编写
-
-
- 配置示例
-
- 4.CAT原理
-
- 4.1 客户端原理
-
- 4.1.1 客户端设计
-
- 架构设计
- API设计
- 序列化和通信
- 4.1.2 核心类分析
- 4.1.3 流程分析
-
- 启动
- 创建Message
- 发送数据
- 4.2 服务端原理
-
- 4.2.1 架构设计
- 4.2.2 消息ID设计
-
- 消息ID的设计
- 4.2.3 存储数据设计
- 参考链接
0.学习目标
- 能够知道什么是CAT
- 能够搭建CAT服务端环境
- 能够进行CAT客户端的集成
- 能够使用CAT监控界面进行服务监控
- 能够完成CAT和常用框架集成
- 了解CAT告警配置
- 了解CAT客户端和服务端原理
1.CAT入门
在这一部分我们主要介绍以下3部分内容:
-
什么是调用链监控
-
什么是CAT
-
CAT报表介绍
1.1 什么是调用链监控
1.1.1 架构的演进历史
单体应用
架构说明:
全部功能集中在一个项目内(All in one)。
在单体应用的年代,分析线上问题主要靠日志以及系统级别的指标。
微服务架构
架构说明:
将系统服务层完全独立出来,抽取为一个一个的微服务。
当我们开始微服务架构之后,服务变成分布式的了,并且对服务进行了拆分。当用户的一个请求进来,会依次经过不同的服务节点进行处理,处理完成后再返回结果给用户。那么在整个处理的链条中,如果有任何一个节点出现了延迟或者问题,都有可能导致最终的结果出现异常,有的时候不同的服务节点甚至是由不同的团队开发的、部署在不同的服务器上,那么在这么错综复杂的环境下,我们想要排查出是链条中的具体哪个服务节点出了问题,其实并不容易。如下图片很形象的解释了在微服务架构下的复杂调用关系:
1.1.2 调用链监控的需求
调用链监控是在微服务架构中非常重要的一环。它除了能帮助我们定位问题以外,还能帮助项目成员清晰的去了解项目部署结构,毕竟一个几十上百的微服务,相信在运行时间久了之后,项目的结构会出现上述非常复杂的调用链,在这种情况下,团队开发者甚至是架构师都不一定能对项目的网络结构有很清晰的了解,那就更别谈系统优化了。
这里我们会使用到调用链监控工具,那么首先我们先对调用链监控工具提出我们的需求:
1.线上的服务是否运行正常。是不是有一些服务已经宕机了,但是我们没有发现呢?如何快速发现已经宕机的服务?
2.来自用户的一笔调用失败了,到底是哪个服务导致的错误,我们需要能够快速定位到才能做到修复。
3.用户反映,我们的系统很“慢”。如何知道究竟慢在何处?
从上述问题可以看出,微服务架构下,如果没有一款强大的调用链监控工具,势必会产生如下问题:
- 问题处理不及时,影响用户的体验
- 不同应用的负责人不承认是自己的问题导致失败,容易出现“扯皮”
- 服务之间的调用关系难以梳理,可能会存在很多错误的调用关系
- 由于没有具体的数据,团队成员对自己的应用性能不在意
1.1.3 调用链监控的原理
在2010年,google发表了一篇名为“Dapper, a Large-Scale Distributed Systems Tracing Infrastructure”的论文,在文中介绍了google生产环境中大规模分布式系统下的跟踪系统Dapper的设计和使用经验。而如今很多的调用链系统如zipkin/pinpoint等系统都是基于这篇文章而实现的。
接下来我们就简单的介绍一下Dapper中调用链监控的原理:
如上图所示,这是一个查询订单的简单业务,他有如下的步骤:
1.前端浏览器发起请求到订单服务,订单服务会从数据库中查询出对应的订单数据。订单数据中包含了商品的ID,所以还需要查询商品信息。
2.订单服务发起一笔调用,通过rpc的方式,远程调用商品服务的查询商品信息接口。
3.订单服务组装数据,返回给前端。
这几个步骤中,有几个核心概念需要了解:
-
Trace:
Trace是指一次请求调用的链路过程,trace id 是指这次请求调用的ID。在一次请求中,会在网络的最开始生成一个全局唯一的用于标识此次请求的trace id,这个trace id在这次请求调用过程中无论经过多少个节点都会保持不变,并且在随着每一层的调用不停的传递。最终,可以通过trace id将这一次用户请求在系统中的路径全部串起来。
-
Span:
Span是指一个模块的调用过程,一般用span id来标识。在一次请求的过程中会调用不同的节点/模块/服务,每一次调用都会生成一个新的span id来记录。这样,就可以通过span id来定位当前请求在整个系统调用链中所处的位置,以及它的上下游节点分别是什么。
那么回到上面的案例中,查询订单数据和查询商品数据这两个过程,就分别是两个span,我们记为span A和B。B的parent也就是父span就是A。这两个span都拥有同一个Trace Id:1。
并且在信息收集过程中,会记录调用的开始时间,结束时间,从中计算出调用的耗时。
这样,就可以清楚的知道,每笔调用:
- 经过了哪几个服务以及服务的调用顺序
- 每个服务过程的耗时
1.2 什么是CAT
![]()
CAT是由大众点评开源的一款调用链监控系统,基于JAVA开发的。有很多互联网企业在使用,热度非常高。它有一个非常强大和丰富的可视化报表界面,这一点其实对于一款调用链监控系统而来非常的重要。在CAT提供的报表界面中有非常多的功能,几乎能看到你想要的任何维度的报表数据。
特点:聚合报表丰富,中文支持好,国内案例多
国内案例:携程、点评、陆金所等
PinPoint
Pinpoint是由一个韩国团队实现并开源,针对Java编写的大规模分布式系统设计,通过JavaAgent的机制做字节代码植入,实现加入traceid和获取性能数据的目的,对应用代码零侵入。
特点:支持多种插件,UI功能强大,接入端无代码侵入
官方网站:
https://github.com/naver/pinpoint
SkyWalking
SkyWalking是apache基金会下面的一个开源APM项目,为微服务架构和云原生架构系统设计。它通过探针自动收集所需的指标,并进行分布式追踪。通过这些调用链路以及指标,Skywalking APM会感知应用间关系和服务间关系,并进行相应的指标统计。Skywalking支持链路追踪和监控应用组件基本涵盖主流框架和容器,如国产RPC Dubbo和motan等,国际化的spring boot,spring cloud。
特点:支持多种插件,UI功能较强,接入端无代码侵入
官方网站:
http://skywalking.apache.org/
Zipkin
Zipkin是由Twitter开源,是分布式链路调用监控系统,聚合各业务系统调用延迟数据,达到链路调用监控跟踪。Zipkin基于Google的Dapper论文实现,主要完成数据的收集、存储、搜索与界面展示。
特点:轻量,使用部署简单
官方网站:
https://zipkin.io/
1.3 CAT报表介绍
CAT支持如下报表:
| 报表名称 | 报表内容 |
|---|---|
| Transaction报表 | 一段代码的运行时间、次数、比如URL/cache/sql执行次数相应时间 |
| Event报表 | 一段代码运行次数,比如出现一次异常 |
| Problem报表 | 根据Transaction/Event数据分析出系统可能出现的一次,慢程序 |
| Heartbeat报表 | JVM状态信息 |
| Business报表 | 业务指标等,用户可以自己定制 |
Transaction报表:
[外链图片转存失败,源站可能有防盗链机制,建议将图片保存下来直接上传(img-4Q3YqQVG-1667320090088)(assert\transaction_view.png)]
Event报表
Problem报表
Heartbeat报表
Business报表
2.CAT基础
2.1 下载与安装
2.1.1 github源码下载
要安装CAT,首先需要从github上下载最新版本的源码。
官方给出的建议如下:
- 注意cat的3.0代码分支更新都发布在master上,包括最新文档也都是这个分支
- 注意文档请用最新master里面的代码文档作为标准,一些开源网站上面一些老版本的一些配置包括数据库等可能遇到不兼容情况,请以master代码为准,这份文档都是美团点评内部同学为这个版本统一整理汇总。内部同学已经核对,包括也验证过,如果遇到一些看不懂,或者模糊的地方,欢迎提交PR。
所以本次学习中将会使用master分支的3.0版本。CAT的官方github地址:
https://github.com/dianping/cat/tree/master
打开页面之后,进行如下操作:
也可以在git bash控制台使用命令进行下载:
git clone https://github.com/dianping/cat.git
2.1.2 模块介绍
-
cat-client: 客户端,上报监控数据
-
cat-consumer: 服务端,收集监控数据进行统计分析,构建丰富的统计报表
-
cat-alarm: 实时告警,提供报表指标的监控告警
-
cat-hadoop: 数据存储,logview 存储至 Hdfs
-
cat-home: 管理端,报表展示、配置管理等
2.1.3 服务端安装
CAT服务端的环境要求如下:
- Linux 2.6以及之上(2.6内核才可以支持epoll),线上服务端部署请使用Linux环境,Mac以及Windows环境可以作为开发环境,美团点评内部CentOS 6.5
- Java 6,7,8,服务端推荐使用jdk7的版本,客户端jdk6、7、8都支持
- Maven 3及以上
- MySQL 5.6,5.7,更高版本MySQL都不建议使用,不清楚兼容性
- J2EE容器建议使用tomcat,建议使用推荐版本7.*.或8.0.
- Hadoop环境可选,一般建议规模较小的公司直接使用磁盘模式,可以申请CAT服务端,500GB磁盘或者更大磁盘,这个磁盘挂载在/data/目录上
数据库安装
-
数据库的脚本文件 script/CatApplication.sql
mysql -uroot -Dcat < CatApplication.sql -
说明:
数据库编码使用utf8mb4,否则可能造成中文乱码等问题
应用打包
-
源码构建
- 在cat的源码目录,执行
mvn clean install -DskipTests - 如果发现cat的war打包不通过,CAT所需要依赖jar都部署在 http://unidal.org/nexus/
- 可以配置这个公有云的仓库地址到本地Maven配置(一般为~/.m2/settings.xml),理论上不需要配置即可,可以参考cat的pom.xml配置:
<repositories> <repository> <id>centralid> <name>Maven2 Central Repositoryname> <layout>defaultlayout> <url>http://repo1.maven.org/maven2url> repository> <repository> <id>unidal.releasesid> <url>http://unidal.org/nexus/content/repositories/releases/url> repository> repositories> - 在cat的源码目录,执行
-
官方下载
-
如果自行打包仍然问题,请使用下面链接进行下载:
http://unidal.org/nexus/service/local/repositories/releases/content/com/dianping/cat/cat-home/3.0.0/cat-home-3.0.0.war
-
官方的cat的master版本,
重命名为cat.war进行部署,注意此war是用jdk8,服务端请使用jdk8版本
-
2.1.3.1 linux源码安装
使用资料中提供的虚拟机打开,输入对应的账号和密码: root/itcast。
查看IP地址
使用命令查看当前虚拟机的IP地址:
ip addr
如上图所示,当前虚拟机的IP地址为192.168.226.132。
程序对于/data/目录具体读写权限
-
要求/data/目录能进行读写操作,如果/data/目录不能写,建议使用linux的软链接链接到一个固定可写的目录。所有的客户端集成程序的机器以及CAT服务端机器都需要进行这个权限初始化。(可以通过公司运维工具统一处理)
-
此目录会存一些CAT必要的配置文件以及运行时候的数据存储目录。
-
CAT支持CAT_HOME环境变量,可以通过JVM参数修改默认的路径。
mkdir /data
chmod -R 777 /data/
配置/data/appdatas/cat/client.xml ($CAT_HOME/client.xml)
mkdir -p /data/appdatas/cat
cd /data/appdatas/cat
vi client.xml
编写程序运行盘下的/data/appdatas/cat/client.xml,代码如下:
<config mode="client">
    <servers>

        <server ip="192.168.1.101" port="2280" http-port="8080"/>
    servers>
config>
配置/data/appdatas/cat/datasources.xml($CAT_HOME/datasources.xml)
vi datasources.xml
<data-sources>
	<data-source id="cat">
		<maximum-pool-size>3maximum-pool-size>
		<connection-timeout>1sconnection-timeout>
		<idle-timeout>10midle-timeout>
		<statement-cache-size>1000statement-cache-size>
		<properties>
			<driver>com.mysql.jdbc.Driverdriver>
			<url>url>
			<user>rootuser>
			<password>rootpassword>
			<connectionProperties>connectionProperties>
		properties>
	data-source>
data-sources>
安装mysql
虚拟机上已经使用docker安装了mysql,直接启动即可。
docker start mysql
使用sqlyog等工具测试连接,账号密码root/root,端口号为3306。
创建数据库,导入sql脚本
导入cat\script\CatApplication.sql初始化脚本。
安装tomcat
虚拟机中已经安装了对应tomcat并且上传了cat的war包,目录位置:
/root/deploy/apache-tomcat-8.5.50/bin
以下操作已完成:
修改中文乱码 tomcat conf 目录下 server.xml
<Connector port="8080" protocol="HTTP/1.1"
           URIEncoding="utf-8"    connectionTimeout="20000"
               redirectPort="8443" />
启动tomcat:
cd /root/deploy/apache-tomcat-8.5.50/bin
./startup.sh
服务端配置
配置链接:http://{ip:port}/cat/s/config?op=serverConfigUpdate
输入账号密码admin/admin进行登录
以下所有IP地址为127.0.0.1内容,均修改为实际的IP地址!
输入以下内容:
<server-config>
   <server id="default">
      <properties>
         <property name="local-mode" value="false"/>
         <property name="job-machine" value="false"/>
         <property name="send-machine" value="false"/>
         <property name="alarm-machine" value="false"/>
         <property name="hdfs-enabled" value="false"/>
         <property name="remote-servers" value="127.0.0.1:8080"/>
      properties>
      <storage local-base-dir="/data/appdatas/cat/bucket/" max-hdfs-storage-time="15" local-report-storage-time="2" local-logivew-storage-time="1" har-mode="true" upload-thread="5">
         <hdfs id="dump" max-size="128M" server-uri="hdfs://127.0.0.1/" base-dir="/user/cat/dump"/>
         <harfs id="dump" max-size="128M" server-uri="har://127.0.0.1/" base-dir="/user/cat/dump"/>
         <properties>
            <property name="hadoop.security.authentication" value="false"/>
            <property name="dfs.namenode.kerberos.principal" value="hadoop/dev80.hadoop@testserver.com"/>
            <property name="dfs.cat.kerberos.principal" value="cat@testserver.com"/>
            <property name="dfs.cat.keytab.file" value="/data/appdatas/cat/cat.keytab"/>
            <property name="java.security.krb5.realm" value="value1"/>
            <property name="java.security.krb5.kdc" value="value2"/>
         properties>
      storage>
      <consumer>
         <long-config default-url-threshold="1000" default-sql-threshold="100" default-service-threshold="50">
            <domain name="cat" url-threshold="500" sql-threshold="500"/>
            <domain name="OpenPlatformWeb" url-threshold="100" sql-threshold="500"/>
         long-config>
      consumer>
   server>
   <server id="127.0.0.1">
      <properties>
         <property name="job-machine" value="true"/>
         <property name="send-machine" value="true"/>
         <property name="alarm-machine" value="true"/>
      properties>
   server>
server-config>
配置链接:http://{ip:port}/cat/s/config?op=routerConfigUpdate
<router-config backup-server="127.0.0.1" backup-server-port="2280">
   <default-server id="127.0.0.1" weight="1.0" port="2280" enable="true"/>
   <network-policy id="default" title="默认" block="false" server-group="default_group">
   network-policy>
   <server-group id="default_group" title="default-group">
      <group-server id="127.0.0.1"/>
   server-group>
   <domain id="cat">
      <group id="default">
         <server id="127.0.0.1" port="2280" weight="1.0"/>
      group>
   domain>
router-config>
2.1.3.2 windows安装
禁用虚拟网卡
在windows下进行安装,首先我们将虚拟网卡都禁用,防止CAT使用虚拟网卡的IP地址。
配置环境变量CAT_HOME
在windows的环境变量中,配置CAT_HOME变量。变量内容是 [CAT的Tomcat启动的盘符]:\data\appdatas\cat。
如下图所示:
修改中文乱码 tomcat conf 目录下 server.xml
<Connector port="8080" protocol="HTTP/1.1"
           URIEncoding="utf-8"    connectionTimeout="20000"
               redirectPort="8443" />
程序对于/data/目录具体读写权限
对程序运行盘下的/data/appdatas/cat和/data/applogs/cat有读写权限。例如cat服务运行在e盘的tomcat中,则需要对e:/data/appdatas/cat和e:/data/applogs/cat有读写权限。
配置/data/appdatas/cat/client.xml ($CAT_HOME/client.xml)
编写程序运行盘下的/data/appdatas/cat/client.xml,代码如下:
<config mode="client">
    <servers>

        <server ip="192.168.1.101" port="2280" http-port="8080"/>
    servers>
config>
配置/data/appdatas/cat/datasources.xml($CAT_HOME/datasources.xml)
<data-sources>
	<data-source id="cat">
		<maximum-pool-size>3maximum-pool-size>
		<connection-timeout>1sconnection-timeout>
		<idle-timeout>10midle-timeout>
		<statement-cache-size>1000statement-cache-size>
		<properties>
			<driver>com.mysql.jdbc.Driverdriver>
			<url>url>
			<user>rootuser>
			<password>rootpassword>
			<connectionProperties>connectionProperties>
		properties>
	data-source>
data-sources>
启动tomcat
将cat.war放置到tomcat的webapps目录下,然后执行startup.bat启动tomcat。
在资料中提供了对应的tomcat
服务端配置
服务端配置详见linux安装小节
访问页面:http://localhost:8080/cat/r
如果出现如下页面,证明配置成功:
2.2 客户端集成
2.2.1 简单案例
接下来我们编写一个简单的springboot与Cat整合的案例,首先创建一个Spring Boot的初始化工程。只需要勾选web依赖即可。
添加 Maven 添加依赖
        <dependency>
            <groupId>com.dianping.catgroupId>
            <artifactId>cat-clientartifactId>
            <version>3.0.0version>
        dependency>
启动 cat 客户端前的准备工作
以下所有文件,如果在windows下,需要创建在启动项目的盘符下。
-
创建
/data/appdatas/cat目录确保你具有这个目录的读写权限。
-
创建
/data/applogs/cat目录 (可选)这个目录是用于存放运行时日志的,这将会对调试提供很大帮助,同样需要读写权限。
-
创建
/data/appdatas/cat/client.xml,内容如下<config xmlns:xsi="http://www.w3.org/2001/XMLSchema" xsi:noNamespaceSchemaLocation="config.xsd"> <servers> <server ip="127.0.0.1" port="2280" http-port="8080" /> servers> config>
初始化
在你项目中创建 src/main/resources/META-INF/app.properties 文件, 并添加如下内容:
app.name={appkey}
appkey 只能包含英文字母 (a-z, A-Z)、数字 (0-9)、下划线 (_) 和中划线 (-)
编写代码
在com.itcast.springbootcat包下创建CatController
package com.itcast.springbootcat;

import com.dianping.cat.Cat;
import com.dianping.cat.message.Event;
import com.dianping.cat.message.Transaction;
import org.springframework.web.bind.annotation.RequestMapping;
import org.springframework.web.bind.annotation.RestController;

@RestController
public class CatController {

    @RequestMapping("test")
    public String test(){

        Transaction t = Cat.newTransaction("URL", "pageName");

        try {
            Cat.logEvent("URL.Server", "serverIp", Event.SUCCESS, "ip=${serverIp}");
            Cat.logMetricForCount("metric.key");
            Cat.logMetricForDuration("metric.key", 5);

            //让代码抛出异常
            int i = 1/0;
            t.setStatus(Transaction.SUCCESS);
        } catch (Exception e) {
            t.setStatus(e);
            Cat.logError(e);
        } finally {
            t.complete();
        }

        return "hello cat";
    }
}
运行SpringBoot
启动SpringBoot项目,访问接口 http://[ip:端口]/test。然后在Cat中查看结果。
如上图所示,已经出现了一笔调用,我们来看下调用的细节。
查看具体的错误信息:
很显然看出上图所示其实是一个除0异常,到此为止SpringBoot客户端集成Cat就完成了。
2.2.2 API介绍
2.2.2.1 Transaction
基本用法
Transaction 适合记录跨越系统边界的程序访问行为,比如远程调用,数据库调用,也适合执行时间较长的业务逻辑监控,Transaction用来记录一段代码的执行时间和次数。
现在我们的框架还没有与dubbo、mybatis做集成,所以我们通过手动编写一个本地方法,来测试Transaction的用法,创建TransactionController用于测试。
package com.itcast.springbootcat.api;

import com.dianping.cat.Cat;
import com.dianping.cat.message.Transaction;
import org.springframework.web.bind.annotation.RequestMapping;
import org.springframework.web.bind.annotation.RestController;

@RestController
@RequestMapping("/transaction")
public class TransactionController {

    @RequestMapping("/test")
    public String test(){
        //开启第一个Transaction,类别为URL,名称为test
        Transaction t = Cat.newTransaction("URL", "test");

        try {
            dubbo();
            t.setStatus(Transaction.SUCCESS);
        } catch (Exception e) {
            t.setStatus(e);
            Cat.logError(e);
        } finally {
            t.complete();
        }

        return "test";
    }


    private String dubbo(){
        //开启第二个Transaction,类别为DUBBO,名称为dubbo
        Transaction t = Cat.newTransaction("DUBBO", "dubbo");

        try {
            t.setStatus(Transaction.SUCCESS);
        } catch (Exception e) {
            t.setStatus(e);
            Cat.logError(e);
        } finally {
            t.complete();
        }

        return "test";
    }
}
上面的代码中,开启了两个Transaction,其中第一个Transaction为Controller接收到的接口调用,第二个位我们编写的本地方法dubbo用来模拟远程调用。在方法内部,开启第二个Transaction。
启动项目,访问接口http://localhost:8085/transaction/test。
点击左侧菜单Transaction报表,选中URL类型对应的Log View查看调用链关系。
如图所示调用链已经形成,可以看到类型为URL的test调用了类型为DUBBO的dubbo方法,分别耗时0.02ms和0.01ms。
扩展API
CAT提供了一系列 API 来对 Transaction 进行修改。
- addData 添加额外的数据显示
- setStatus 设置状态,成功可以设置SUCCESS,失败可以设置异常
- setDurationInMillis 设置执行耗时(毫秒)
- setTimestamp 设置执行时间
- complete 结束Transaction
编写如下代码进行测试:
  @RequestMapping("/api")
    public String api(){
        Transaction t = Cat.newTransaction("URL", "pageName");

        try {
            //设置执行时间1秒
            t.setDurationInMillis(1000);
            t.setTimestamp(System.currentTimeMillis());
            //添加额外数据
            t.addData("content");
            t.setStatus(Transaction.SUCCESS);
        } catch (Exception e) {
            t.setStatus(e);
            Cat.logError(e);
        } finally {
            t.complete();
        }

        return "api";
    }
启动项目,访问接口http://localhost:8085/transaction/api。
点击左侧菜单Transaction报表,选中URL类型对应的Log View查看调用链关系。
![]()
如图所示,调用耗时已经被手动修改成了1000ms,并且添加了额外的信息content。
在使用 Transaction API 时,你可能需要注意以下几点:
- 你可以调用
addData多次,添加的数据会被&连接起来。- 不要忘记完成 transaction!否则你会得到一个毁坏的消息树以及内存泄漏!
2.2.2.2 Event
Event 用来记录一件事发生的次数,比如记录系统异常,它和transaction相比缺少了时间的统计,开销比transaction要小。
Cat.logEvent
记录一个事件。
Cat.logEvent("URL.Server", "serverIp", Event.SUCCESS, "ip=${serverIp}");
Cat.logError
记录一个带有错误堆栈信息的 Error。
Error 是一种特殊的事件,它的 type 取决于传入的 Throwable e.
- 如果
e是一个Error,type会被设置为Error。 - 如果
e是一个RuntimeException,type会被设置为RuntimeException。 - 其他情况下,
type会被设置为Exception。
同时错误堆栈信息会被收集并写入 data 属性中。
try {
    int i = 1 / 0;
} catch (Throwable e) {
    Cat.logError(e);
}
你可以向错误堆栈顶部添加你自己的错误消息,如下代码所示:
Cat.logError("error(X) := exception(X)", e);
编写案例测试上述API:
package com.itcast.springbootcat.api;

import com.dianping.cat.Cat;
import com.dianping.cat.message.Event;
import com.dianping.cat.message.Transaction;
import org.springframework.web.bind.annotation.RequestMapping;
import org.springframework.web.bind.annotation.RestController;

@RestController
    @RequestMapping("/event")
public class EventController {

    @RequestMapping("/logEvent")
    public String logEvent(){
        Cat.logEvent("URL.Server", "serverIp",
                Event.SUCCESS, "ip=127.0.0.1");
        return "test";
    }

    @RequestMapping("/logError")
    public String logError(){
        try {
            int i = 1 / 0;
        } catch (Throwable e) {
            Cat.logError("error(X) := exception(X)", e);
        }
        return "test";
    }

}
启动项目,访问接口http://localhost:8085/event/logEvent和http://localhost:8085/event/logError。
通过上图可以看到,增加了两个事件:URL.Server和RuntimeException。点开LOG查看。
这里出现了两个Event的详细内容:
1.URL.Server是一个正常的事件,打印出了IP=127.0.0.1的信息。
2.RuntimeException是一个错误Event,不仅打印出了错误堆栈,还将我们打印的
error(X) := exception(X)
内容放到了堆栈的最上方便于查看。
2.2.2.3 Metric
Metric 用于记录业务指标、指标可能包含对一个指标记录次数、记录平均值、记录总和,业务指标最低统计粒度为1分钟。
# Counter
Cat.logMetricForCount("metric.key");
Cat.logMetricForCount("metric.key", 3);

# Duration
Cat.logMetricForDuration("metric.key", 5);
我们每秒会聚合 metric。
举例来说,如果你在同一秒调用 count 三次(相同的 name),累加他们的值,并且一次性上报给服务端。
在 duration 的情况下,用平均值来取代累加值。
编写案例测试上述API:
package com.itcast.springbootcat.api;

import com.dianping.cat.Cat;
import com.dianping.cat.message.Event;
import org.springframework.web.bind.annotation.RequestMapping;
import org.springframework.web.bind.annotation.RestController;

@RestController
@RequestMapping("/metric")
public class MetricController {

    @RequestMapping("/count")
    public String count(){
        Cat.logMetricForCount("count");
        return "test";
    }

    @RequestMapping("/duration")
    public String duration(){
        Cat.logMetricForDuration("duration", 1000);
        return "test";
    }
}
启动项目,访问接口http://localhost:8085/metric/count 点击5次和http://localhost:8085/metric/duration。
通过上图可以看到,count和duration的具体数值。
count一共点击了5次,所以这一分钟内数值为5。而duration不管点击多少次,由于取的是平均值,所以一直是1000。
2.2.3 CAT监控界面介绍
2.2.3.1 DashBoard
DashBoard仪表盘显示了每分钟出现错误的系统及其错误的次数和时间。
- 点击右上角的时间按钮可以切换不同的展示时间,-7d代表7天前,-1h代表1小时前,now定位到当前时间
- 上方的时间轴按照分钟进行排布,点击之后可以看到该时间到结束的异常情况
- 下方标识了出错的系统和出错的时间、次数,点击系统名称可以跳转到Problem报表
2.2.3.2 Transaction
Transaction报表用来监控一段代码运行情况:运行次数、QPS、错误次数、失败率、响应时间统计(平均影响时间、Tp分位值)等等。
应用启动后默认会打点的部分:
| 打点 | 来源组件 | 描述 |
|---|---|---|
| System | cat-client | 上报监控数据的打点信息 |
| URL | 需要接入cat-filter | URL访问的打点信息 |
小时报表
Type统计界面展示了一个Transaction的第一层分类的视图,可以知道这段时间里面一个分类运行的次数,平均响应时间,延迟,以及分位线。
从上而下分析报表:
-
报表的时间跨度 CAT默认是以一小时为统计时间跨度,点击[切到历史模式],更改查看报表的时间跨度:默认是小时模式;切换为历史模式后,右侧快速导航,变为month(月报表)、week(周报表)、day(天报表),可以点击进行查看,注意报表的时间跨度会有所不同。
-
时间选择 通过右上角时间导航栏选择时间:点击[+1h]/[-1h]切换时间为下一小时/上一小时;点击[+1d]/[-1d]切换时间为后一天的同一小时/前一天的同一小时;点击右上角[+7d]/[-7d]切换时间为后一周的同一小时/前一周的同一小时;点击[now]回到当前小时。
-
项目选择 输入项目名,查看项目数据;如果需要切换其他项目数据,输入项目名,回车即可。
-
机器分组 CAT可以将若干个机器,作为一个分组进行数据统计。默认会有一个All分组,代表所有机器的统计数据,即集群统计数据。
-
所有Type汇总表格 第一层分类(Type),点击查看第二级分类(称为name)数据:
- Transaction的埋点的Type和Name由业务自己定义,当打点了Cat.newTransaction(type, name)时,第一层分类是type,第二级分类是name。
- 第二级分类数据叫是统计相同type下的所有name数据,数据均与第一级(type)一样的展示风格
-
单个Type指标图表 点击show,查看Type所有name分钟级统计,如下图:
-
指标说明 显示的是小时粒度第一级分类(type)的次数、错误数、失败率等数据。
-
样本logview L代表logview,为一个样例的调用链路。
-
分位线说明 小时粒度的时间第一级分类(type)相关统计
- 95line表示95%的请求的响应时间比参考值要小,999line表示99.9%的响应时间比参考值要小,95line以及99line,也称之为tp95、tp99。
历史报表
Transaction历史报表支持每天、每周、每月的数据统计以及趋势图,点击导航栏的切换历史模式进行查询。Transaction历史报表以响应时间、访问量、错误量三个维度进行展示,以天报表为例:选取一个type,点击show,即可查看天报表。
2.2.3.3 Event
Event报表监控一段代码运行次数:例如记录程序中一个事件记录了多少次,错误了多少次。Event报表的整体结构与Transaction报表几乎一样,只缺少响应时间的统计。
第一级分类(Type)统计界面
Type统计界面展示了一个Event的第一层分类的视图,Event相对于Transaction少了运行时间统计。可以知道这段时间里面一个分类运行的次数,失败次数,失败率,采样logView,QPS。
第二级分类(Name)统计界面
第二级分类在Type统计界面中点击具体的Type进入,展示的是相同type下所有的name数据,可以理解为某type下更细化的分类。
2.2.3.4 Problem
Problem记录整个项目在运行过程中出现的问题,包括一些异常、错误、访问较长的行为。Problem报表是由logview存在的特征整合而成,方便用户定位问题。 来源:
- 业务代码显示调用Cat.logError(e) API进行埋点,具体埋点说明可查看埋点文档。
- 与LOG框架集成,会捕获log日志中有异常堆栈的exception日志。
- long-url,表示Transaction打点URL的慢请求
- long-sql,表示Transaction打点SQL的慢请求
- long-service,表示Transaction打点Service或者PigeonService的慢请求
- long-call,表示Transaction打点Call或者PigeonCall的慢请求
- long-cache,表示Transaction打点Cache.开头的慢请求
所有错误汇总报表 第一层分类(Type),代表错误类型,比如error、long-url等;第二级分类(称为Status),对应具体的错误,比如一个异常类名等。
错误数分布 点击type和status的show,分别展示type和status的分钟级错误数分布:
2.2.3.5 HeartBeat
Heartbeat报表是CAT客户端,以一分钟为周期,定期向服务端汇报当前运行时候的一些状态。
JVM相关指标
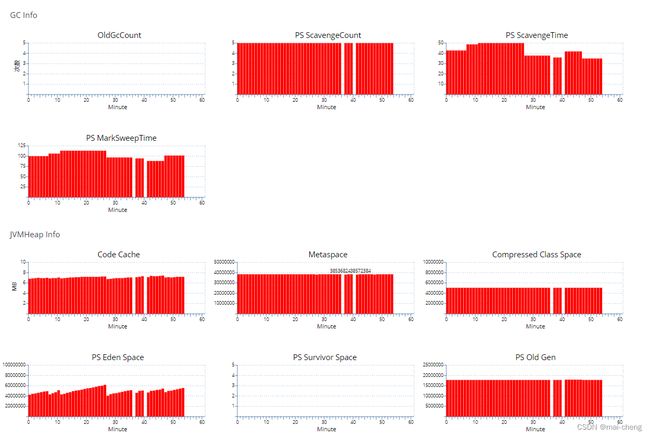
以下所有的指标统计都是1分钟内的值,cat最低统计粒度是一分钟。
| JVM GC 相关指标 | 描述 |
|---|---|
| NewGc Count / PS Scavenge Count | 新生代GC次数 |
| NewGc Time / PS Scavenge Time | 新生代GC耗时 |
| OldGc Count | 老年代GC次数 |
| PS MarkSweepTime | 老年代GC耗时 |
| Heap Usage | Java虚拟机堆的使用情况 |
| None Heap Usage | Java虚拟机Perm的使用情况 |
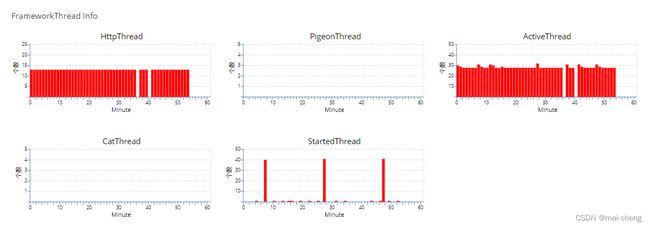
| JVM Thread 相关指标 | 描述 |
|---|---|
| Active Thread | 系统当前活动线程 |
| Daemon Thread | 系统后台线程 |
| Total Started Thread | 系统总共开启线程 |
| Started Thread | 系统每分钟新启动的线程 |
| CAT Started Thread | 系统中CAT客户端启动线程 |
可以参考java.lang.management.ThreadInfo的定义
系统指标
| System 相关指标 | 描述 |
|---|---|
| System Load Average | 系统Load详细信息 |
| Memory Free | 系统memoryFree情况 |
| FreePhysicalMemory | 物理内存剩余空间 |
| / Free | /根的使用情况 |
| /data Free | /data盘的使用情况 |
2.2.3.6 Business
Business报表对应着业务指标,比如订单指标。与Transaction、Event、Problem不同,Business更偏向于宏观上的指标,另外三者偏向于微观代码的执行情况。
场景示例:
1. 我想监控订单数量。
2. 我想监控订单耗时。
基线
基线是对业务指标的预测值。
基线生成算法:
最近一个月的4个每周几的数据加权求和平均计算得出,秉着更加信任新数据的原则,cat会基于历史数据做异常点的修正,会把一些明显高于以及低于平均值的点剔除。
举例:今天是2018-10-25(周四),今天整天基线数据的算法是最近四个周四(2018-10-18,2018-10-11,2018-10-04,2018-09-27)的每个分钟数据的加权求和或平均,权重值依次为1,2,3,4。如:当前时间为19:56分设为value,前四周对应的19:56分数据(由远及近)分别为A,B,C,D,则value = (A+2B+3C+4D) / 10。
对于刚上线的应用,第一天没有基线,第二天的基线基线是前一天的数据,以此类推。
如何开启基线:
只有配置了基线告警的指标,才会自动计算基线。如需基线功能,请配置基线告警。
注意事项
打点尽量用纯英文,不要带一些特殊符号,例如 空格( )、分号(:)、竖线(|)、斜线(/)、逗号(,)、与号(&)、星号(*)、左右尖括号(<>)、以及一些奇奇怪怪的字符如果有分隔需求,建议用下划线(_)、中划线(-)、英文点号(.)等由于数据库不区分大小写,请尽量统一大小写,并且不要对大小写进行改动有可能出现小数:趋势图每个点都代表一分钟的值。假设监控区间是10分钟,且10分钟内总共上报5次,趋势图中该点的值为5%10=0.5
2.2.3.7 State
State报表显示了与CAT相关的信息。
3.CAT高级
3.1框架集成
3.1.1 dubbo
3.1.1.1 制作cat-dubbo插件
使用idea打开cat源码,找到integration目录,右键点击如下:
然后使用install命令将插件安装到本地仓库:
接下来我们就可以使用如下依赖自动引入dubbo插件了。
		<dependency>
			<groupId>net.dubboclubgroupId>
			<artifactId>cat-monitorartifactId>
			<version>0.0.6version>
		dependency>
3.1.1.2 服务提供方
pom文件:
<project xmlns="http://maven.apache.org/POM/4.0.0" xmlns:xsi="http://www.w3.org/2001/XMLSchema-instance"
	xsi:schemaLocation="http://maven.apache.org/POM/4.0.0 https://maven.apache.org/xsd/maven-4.0.0.xsd">
	<modelVersion>4.0.0modelVersion>
	<parent>
		<groupId>org.springframework.bootgroupId>
		<artifactId>spring-boot-starter-parentartifactId>
		<version>2.1.13.RELEASEversion>
		<relativePath/>
	parent>
	<groupId>com.itcastgroupId>
	<artifactId>dubbo-provider-catartifactId>
	<version>0.0.1-SNAPSHOTversion>
	<name>dubbo-provider-catname>
	<description>Demo project for Spring Bootdescription>

	<properties>
		<java.version>1.8java.version>
	properties>

	<dependencies>
		<dependency>
			<groupId>org.springframework.bootgroupId>
			<artifactId>spring-boot-starter-webartifactId>
		dependency>

		<dependency>
			<groupId>org.springframework.bootgroupId>
			<artifactId>spring-boot-starter-testartifactId>
			<scope>testscope>
		dependency>


		<dependency>
			<groupId>com.alibaba.spring.bootgroupId>
			<artifactId>dubbo-spring-boot-starterartifactId>
			<version>2.0.0version>
		dependency>

		<dependency>
			<groupId>net.dubboclubgroupId>
			<artifactId>cat-monitorartifactId>
			<version>0.0.6version>
		dependency>

	dependencies>

	<build>
		<plugins>
			<plugin>
				<groupId>org.springframework.bootgroupId>
				<artifactId>spring-boot-maven-pluginartifactId>
			plugin>
		plugins>
	build>

project>
这里直接使用了
dubbo-spring-boot-starter这一dubbo与spring-boot集成的组件。官方文档地址:https://github.com/alibaba/dubbo-spring-boot-starter/blob/master/README_zh.md
application.properties:
server.port=7072
spring.application.name=dubbo_provider_cat
spring.dubbo.server=true
spring.dubbo.registry=N/A
为了简化环境搭建,采用了本地直接调用的方式,所以将注册中心写成N/A表示不注册到注册中心。
HelloService接口:
package com.itcast.api;

public interface HelloService {
    public String hello();
}
简化项目的开发,将HelloService接口在消费方和提供方都编写一份。
HelloServiceImpl实现类:
package com.itcast.dubboprovidercat.service;

import com.alibaba.dubbo.config.annotation.Service;
import com.itcast.api.HelloService;
import org.springframework.stereotype.Component;

@Service(interfaceClass = HelloService.class)
@Component
public class HelloServiceImpl implements HelloService {

    public String hello() {
        return "hello cat";
    }
}
DubboProviderCatApplication启动类:
package com.itcast.dubboprovidercat;

import com.alibaba.dubbo.spring.boot.annotation.EnableDubboConfiguration;
import org.springframework.boot.SpringApplication;
import org.springframework.boot.autoconfigure.SpringBootApplication;

@SpringBootApplication
@EnableDubboConfiguration
public class DubboProviderCatApplication {

	public static void main(String[] args) {
		SpringApplication.run(DubboProviderCatApplication.class, args);
	}

}
需要添加@EnableDubboConfiguration注解。
3.1.1.3 服务消费方
pom文件:
<project xmlns="http://maven.apache.org/POM/4.0.0" xmlns:xsi="http://www.w3.org/2001/XMLSchema-instance"
	xsi:schemaLocation="http://maven.apache.org/POM/4.0.0 https://maven.apache.org/xsd/maven-4.0.0.xsd">
	<modelVersion>4.0.0modelVersion>
	<parent>
		<groupId>org.springframework.bootgroupId>
		<artifactId>spring-boot-starter-parentartifactId>
		<version>2.1.13.RELEASEversion>
		<relativePath/>
	parent>
	<groupId>com.itcastgroupId>
	<artifactId>dubbo-consumer-catartifactId>
	<version>0.0.1-SNAPSHOTversion>
	<name>dubbo-consumer-catname>
	<description>Demo project for Spring Bootdescription>

	<properties>
		<java.version>1.8java.version>
	properties>

	<dependencies>
		<dependency>
			<groupId>org.springframework.bootgroupId>
			<artifactId>spring-boot-starter-webartifactId>
		dependency>

		<dependency>
			<groupId>org.springframework.bootgroupId>
			<artifactId>spring-boot-starter-testartifactId>
			<scope>testscope>
		dependency>


		<dependency>
			<groupId>com.alibaba.spring.bootgroupId>
			<artifactId>dubbo-spring-boot-starterartifactId>
			<version>2.0.0version>
		dependency>

		<dependency>
			<groupId>net.dubboclubgroupId>
			<artifactId>cat-monitorartifactId>
			<version>0.0.6version>
		dependency>

	dependencies>

	<build>
		<plugins>
			<plugin>
				<groupId>org.springframework.bootgroupId>
				<artifactId>spring-boot-maven-pluginartifactId>
			plugin>
		plugins>
	build>

project>
application.properties:
server.port=7074
spring.application.name=dubbo_consumer_cat
HelloService接口:
package com.itcast.api;

public interface HelloService {
    public String hello();
}
简化项目的开发,将IHelloService接口在消费方和提供方都编写一份。
TestController:
package com.itcast.dubboconsumercat.controller;

import com.alibaba.dubbo.config.annotation.Reference;
import com.itcast.api.HelloService;
import org.springframework.web.bind.annotation.GetMapping;
import org.springframework.web.bind.annotation.RestController;

@RestController
public class TestController {
    @Reference(url = "dubbo://127.0.0.1:20880")
    private HelloService helloService;

    @GetMapping("/hello")
    public String hello(){
        return helloService.hello();
    }
}
采用直连而非从注册中心获取服务地址的方式,在@Reference注解中声明
url = "dubbo://127.0.0.1:20880"
DubboConsumerCatApplication启动类:
package com.itcast.dubboconsumercat;

import com.alibaba.dubbo.spring.boot.annotation.EnableDubboConfiguration;
import org.springframework.boot.SpringApplication;
import org.springframework.boot.autoconfigure.SpringBootApplication;

@SpringBootApplication
@EnableDubboConfiguration
public class DubboConsumerCatApplication {

	public static void main(String[] args) {
		SpringApplication.run(DubboConsumerCatApplication.class, args);
	}

}
需要添加@EnableDubboConfiguration注解。
3.1.1.4 测试
按照如下顺序启动相关应用:
1.启动DubboProviderCatApplication
2.启动DubboConsumerCatApplication
3.访问地址:http://localhost:7074/hello
4.查看cat页面
如图所示dubbo的调用已经被正确显示在transaction报表中。点击log view查看详细的调用。
如图所示,调用的日志已经被成功打印。
dubbo插件的日志打印内容显示的并不是十分的良好,如果在企业中应用,可以基于dubbo插件进行二次开发。
3.1.2 mybatis
3.1.2.1 创建spring boot和mybatis的集成项目
表结构:
CREATE TABLE `t_user` (
  `id` int(11) NOT NULL AUTO_INCREMENT,
  `username` varchar(32) COLLATE utf8mb4_unicode_ci DEFAULT NULL,
  `password` varchar(32) COLLATE utf8mb4_unicode_ci DEFAULT NULL,
  PRIMARY KEY (`id`)
) ENGINE=InnoDB AUTO_INCREMENT=1 DEFAULT CHARSET=utf8mb4 COLLATE=utf8mb4_unicode_ci
pom文件:
<project xmlns="http://maven.apache.org/POM/4.0.0" xmlns:xsi="http://www.w3.org/2001/XMLSchema-instance"
         xsi:schemaLocation="http://maven.apache.org/POM/4.0.0 https://maven.apache.org/xsd/maven-4.0.0.xsd">
    <modelVersion>4.0.0modelVersion>
    <parent>
        <groupId>org.springframework.bootgroupId>
        <artifactId>spring-boot-starter-parentartifactId>
        <version>2.1.13.RELEASEversion>
        <relativePath/>
    parent>
    <groupId>com.itcastgroupId>
    <artifactId>mybatis-catartifactId>
    <version>0.0.1-SNAPSHOTversion>
    <name>mybatis-catname>
    <description>Demo project for Spring Bootdescription>

    <properties>
        <java.version>1.8java.version>
    properties>

    <dependencies>
        <dependency>
            <groupId>org.springframework.bootgroupId>
            <artifactId>spring-boot-starter-webartifactId>
        dependency>
        <dependency>
            <groupId>org.mybatis.spring.bootgroupId>
            <artifactId>mybatis-spring-boot-starterartifactId>
            <version>2.1.2version>
        dependency>

        <dependency>
            <groupId>mysqlgroupId>
            <artifactId>mysql-connector-javaartifactId>
            <scope>runtimescope>
            <version>5.1.27version>
        dependency>
        <dependency>
            <groupId>org.springframework.bootgroupId>
            <artifactId>spring-boot-starter-testartifactId>
            <scope>testscope>
        dependency>
        <dependency>
            <groupId>com.dianping.catgroupId>
            <artifactId>cat-clientartifactId>
            <version>3.0.0version>
        dependency>
        <dependency>
            <groupId>com.alibabagroupId>
            <artifactId>druidartifactId>
            <version>1.1.10version>
        dependency>
    dependencies>

    <build>
        <plugins>
            <plugin>
                <groupId>org.springframework.bootgroupId>
                <artifactId>spring-boot-maven-pluginartifactId>
            plugin>
        plugins>
    build>

project>
application.yml配置文件:
# datasource
spring:
  datasource:
    url: jdbc:mysql:///springboot?serverTimezone=UTC
    username: root
    password: root
    driver-class-name: com.mysql.jdbc.Driver
    type: com.alibaba.druid.pool.DruidDataSource

# mybatis
mybatis:
  mapper-locations: classpath:mapper/*Mapper.xml # mapper映射文件路径
  type-aliases-package: com.itcast.mybatiscat.entity
server:
  port: 7079
编写dao层:
package com.itcast.mybatiscat.dao;

import com.itcast.mybatiscat.entity.User;
import org.apache.ibatis.annotations.Mapper;
import org.springframework.stereotype.Repository;

import java.util.List;

@Mapper
@Repository
public interface UserXmlMapper {

    public List<User> findAll();
}
userMapper.xml:
DOCTYPE mapper PUBLIC "-//mybatis.org//DTD Mapper 3.0//EN" "http://mybatis.org/dtd/mybatis-3-mapper.dtd">
<mapper namespace="com.itcast.mybatiscat.dao.UserXmlMapper">
    <select id="findAll" resultType="user">
        select * from t_user1
    select>
mapper>
启动类:
package com.itcast.mybatiscat;

import org.springframework.boot.SpringApplication;
import org.springframework.boot.autoconfigure.SpringBootApplication;

@SpringBootApplication
public class MybatisCatApplication {

    public static void main(String[] args) {
        SpringApplication.run(MybatisCatApplication.class, args);
    }

}
编写Controller进行测试:
package com.itcast.mybatiscat.controller;

import com.dianping.cat.Cat;
import com.dianping.cat.message.Event;
import com.dianping.cat.message.Transaction;
import com.itcast.mybatiscat.dao.UserXmlMapper;
import org.springframework.beans.factory.annotation.Autowired;
import org.springframework.web.bind.annotation.RequestMapping;
import org.springframework.web.bind.annotation.RestController;

@RestController
public class MybatisController {

    @Autowired
    private UserXmlMapper userXmlMapper;

    @RequestMapping("mybatis")
    public String test(){

        return  userXmlMapper.findAll().toString();
    }
}
3.1.2.2 集成cat-mybatis插件:
将以下文件放置到项目中,该文件来源于cat的官方代码。
package com.itcast.mybatiscat.cat;

import com.alibaba.druid.pool.DruidDataSource;
import com.dianping.cat.Cat;
import com.dianping.cat.message.Message;
import com.dianping.cat.message.Transaction;
import org.apache.ibatis.datasource.pooled.PooledDataSource;
import org.apache.ibatis.datasource.unpooled.UnpooledDataSource;
import org.apache.ibatis.executor.Executor;
import org.apache.ibatis.mapping.*;
import org.apache.ibatis.plugin.*;
import org.apache.ibatis.reflection.MetaObject;
import org.apache.ibatis.session.Configuration;
import org.apache.ibatis.session.ResultHandler;
import org.apache.ibatis.session.RowBounds;
import org.apache.ibatis.type.TypeHandlerRegistry;

import javax.sql.DataSource;
import java.lang.reflect.Field;
import java.lang.reflect.InvocationTargetException;
import java.text.DateFormat;
import java.util.Date;
import java.util.List;
import java.util.Locale;
import java.util.Properties;
import java.util.regex.Matcher;
import java.util.regex.Pattern;


/**
 *  1.Cat-Mybatis plugin:  Rewrite on the version of Steven;
 *  2.Support DruidDataSource,PooledDataSource(mybatis Self-contained data source);
 * @author zhanzehui(west_20@163.com)
 */

@Intercepts({
        @Signature(method = "query", type = Executor.class, args = {
                MappedStatement.class, Object.class, RowBounds.class,
                ResultHandler.class }),
        @Signature(method = "update", type = Executor.class, args = { MappedStatement.class, Object.class })
})
public class CatMybatisPlugin implements Interceptor {

    private static final Pattern PARAMETER_PATTERN = Pattern.compile("\\?");
    private static final String MYSQL_DEFAULT_URL = "jdbc:mysql://UUUUUKnown:3306/%s?useUnicode=true";
    private Executor target;

    @Override
    public Object intercept(Invocation invocation) throws Throwable {
        MappedStatement mappedStatement = this.getStatement(invocation);
        String          methodName      = this.getMethodName(mappedStatement);
        Transaction t = Cat.newTransaction("SQL", methodName);

        String sql = this.getSql(invocation,mappedStatement);
        SqlCommandType sqlCommandType = mappedStatement.getSqlCommandType();
        Cat.logEvent("SQL.Method", sqlCommandType.name().toLowerCase(), Message.SUCCESS, sql);

        String url = this.getSQLDatabaseUrlByStatement(mappedStatement);
        Cat.logEvent("SQL.Database", url);

        return doFinish(invocation,t);
    }

    private MappedStatement getStatement(Invocation invocation) {
        return (MappedStatement)invocation.getArgs()[0];
    }

    private String getMethodName(MappedStatement mappedStatement) {
        String[] strArr = mappedStatement.getId().split("\\.");
        String methodName = strArr[strArr.length - 2] + "." + strArr[strArr.length - 1];

        return methodName;
    }

    private String getSql(Invocation invocation, MappedStatement mappedStatement) {
        Object parameter = null;
        if(invocation.getArgs().length > 1){
            parameter = invocation.getArgs()[1];
        }

        BoundSql boundSql = mappedStatement.getBoundSql(parameter);
        Configuration configuration = mappedStatement.getConfiguration();
        String sql = sqlResolve(configuration, boundSql);

        return sql;
    }

    private Object doFinish(Invocation invocation,Transaction t) throws InvocationTargetException, IllegalAccessException {
        Object returnObj = null;
        try {
            returnObj = invocation.proceed();
            t.setStatus(Transaction.SUCCESS);
        } catch (Exception e) {
            Cat.logError(e);
            throw e;
        } finally {
            t.complete();
        }

        return returnObj;
    }


    private String getSQLDatabaseUrlByStatement(MappedStatement mappedStatement) {
        String url = null;
        DataSource dataSource = null;
        try {
            Configuration configuration = mappedStatement.getConfiguration();
            Environment environment = configuration.getEnvironment();
            dataSource = environment.getDataSource();

            url = switchDataSource(dataSource);

            return url;
        } catch (NoSuchFieldException|IllegalAccessException|NullPointerException e) {
            Cat.logError(e);
        }

        Cat.logError(new Exception("UnSupport type of DataSource : "+dataSource.getClass().toString()));
        return MYSQL_DEFAULT_URL;
    }

    private String switchDataSource(DataSource dataSource) throws NoSuchFieldException, IllegalAccessException {
        String url = null;

        if(dataSource instanceof DruidDataSource) {
            url = ((DruidDataSource) dataSource).getUrl();
        }else if(dataSource instanceof PooledDataSource) {
            Field dataSource1 = dataSource.getClass().getDeclaredField("dataSource");
            dataSource1.setAccessible(true);
            UnpooledDataSource dataSource2 = (UnpooledDataSource)dataSource1.get(dataSource);
            url =dataSource2.getUrl();
        }else {
            //other dataSource expand
        }

        return url;
    }

    public String sqlResolve(Configuration configuration, BoundSql boundSql) {
        Object parameterObject = boundSql.getParameterObject();
        List<ParameterMapping> parameterMappings = boundSql.getParameterMappings();
        String sql = boundSql.getSql().replaceAll("[\\s]+", " ");
        if (parameterMappings.size() > 0 && parameterObject != null) {
            TypeHandlerRegistry typeHandlerRegistry = configuration.getTypeHandlerRegistry();
            if (typeHandlerRegistry.hasTypeHandler(parameterObject.getClass())) {
                sql = sql.replaceFirst("\\?", Matcher.quoteReplacement(resolveParameterValue(parameterObject)));

            } else {
                MetaObject metaObject = configuration.newMetaObject(parameterObject);
                Matcher matcher = PARAMETER_PATTERN.matcher(sql);
                StringBuffer sqlBuffer = new StringBuffer();
                for (ParameterMapping parameterMapping : parameterMappings) {
                    String propertyName = parameterMapping.getProperty();
                    Object obj = null;
                    if (metaObject.hasGetter(propertyName)) {
                        obj = metaObject.getValue(propertyName);
                    } else if (boundSql.hasAdditionalParameter(propertyName)) {
                        obj = boundSql.getAdditionalParameter(propertyName);
                    }
                    if (matcher.find()) {
                        matcher.appendReplacement(sqlBuffer, Matcher.quoteReplacement(resolveParameterValue(obj)));
                    }
                }
                matcher.appendTail(sqlBuffer);
                sql = sqlBuffer.toString();
            }
        }
        return sql;
    }

    private String resolveParameterValue(Object obj) {
        String value = null;
        if (obj instanceof String) {
            value = "'" + obj.toString() + "'";
        } else if (obj instanceof Date) {
            DateFormat formatter = DateFormat.getDateTimeInstance(DateFormat.DEFAULT, DateFormat.DEFAULT, Locale.CHINA);
            value = "'" + formatter.format((Date) obj) + "'";
        } else {
            if (obj != null) {
                value = obj.toString();
            } else {
                value = "";
            }

        }
        return value;
    }

    @Override
    public Object plugin(Object target) {
        if (target instanceof Executor) {
            this.target = (Executor) target;
            return Plugin.wrap(target, this);
        }
        return target;
    }

    @Override
    public void setProperties(Properties properties) {
    }

}
将此文件和所有其他cat插件一同打包放到私有仓库上是一种更好的选择。
编写mybatis-config.xml配置文件,将文件放置在resources/mybatis文件夹下:
DOCTYPE configuration PUBLIC "-//mybatis.org//DTD Config 3.0//EN"
        "http://mybatis.org/dtd/mybatis-3-config.dtd">
<configuration>
    <plugins>
        <plugin interceptor="com.itcast.mybatiscat.cat.CatMybatisPlugin">plugin>
    plugins>
configuration>
修改application.yml文件:
# mybatis
mybatis:
  mapper-locations: classpath:mapper/*Mapper.xml # mapper映射文件路径
  type-aliases-package: com.itcast.mybatiscat.entity
  # config-location:  # 指定mybatis的核心配置文件
  config-location: classpath:mybatis/mybatis-config.xml
3.1.2.3 测试
访问接口http://localhost:7079/mybatis
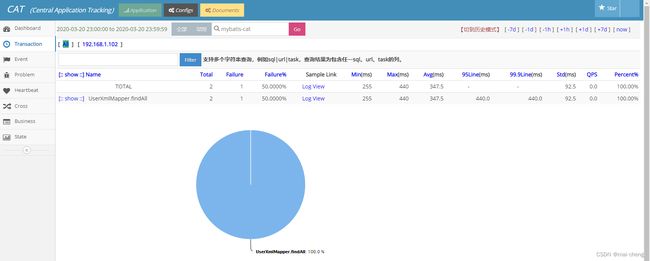
如果我们将sql语句修改为错误的语句,如下图所示:
已经能够显示出有部分语句执行错误,如果要查看具体的错误,点击Log View查看:
图中不止能看到具体的sql语句,也可以看到报错的堆栈信息。
3.1.3 日志框架
CAT集成日志框架的思路大体上都类似,所以课程中采用Spring Boot默认的logback日志框架来进行讲解,如果使用了log4j、log4j2处理方式也是类似的。
3.1.3.1 搭建环境
搭建Spring Boot初始化环境,只需要添加Web起步依赖。
修改pom,xml文件,添加cat客户端依赖:
<project xmlns="http://maven.apache.org/POM/4.0.0" xmlns:xsi="http://www.w3.org/2001/XMLSchema-instance"
         xsi:schemaLocation="http://maven.apache.org/POM/4.0.0 https://maven.apache.org/xsd/maven-4.0.0.xsd">
    <modelVersion>4.0.0modelVersion>
    <parent>
        <groupId>org.springframework.bootgroupId>
        <artifactId>spring-boot-starter-parentartifactId>
        <version>2.1.13.RELEASEversion>
        <relativePath/>
    parent>
    <groupId>com.itcastgroupId>
    <artifactId>logback-catartifactId>
    <version>0.0.1-SNAPSHOTversion>
    <name>logback-catname>
    <description>Demo project for Spring Bootdescription>

    <properties>
        <java.version>1.8java.version>
    properties>

    <dependencies>
        <dependency>
            <groupId>org.springframework.bootgroupId>
            <artifactId>spring-boot-starter-webartifactId>
        dependency>

        <dependency>
            <groupId>org.springframework.bootgroupId>
            <artifactId>spring-boot-starter-testartifactId>
            <scope>testscope>
        dependency>

        <dependency>
            <groupId>com.dianping.catgroupId>
            <artifactId>cat-clientartifactId>
            <version>3.0.0version>
        dependency>

    dependencies>

    <build>
        <plugins>
            <plugin>
                <groupId>org.springframework.bootgroupId>
                <artifactId>spring-boot-maven-pluginartifactId>
            plugin>
        plugins>
    build>

project>
删除application.properties,使用application.yml:
logging:
  level:
    root: info
  path: ./logs
  config: classpath:logback-spring.xml
server:
  port: 7080
编写配置文件logback-spring.xml,放在resources目录下:
<configuration>

    <springProperty scope="context" name="logging.path" source="logging.path"/>
    <contextName>catcontextName>
    <appender name="consoleLog" class="ch.qos.logback.core.ConsoleAppender">
        <encoder class="ch.qos.logback.classic.encoder.PatternLayoutEncoder">

            <pattern>%yellow(%d{yyyy-MM-dd HH:mm:ss}) %red([%thread]) %highlight(%-5level) %cyan(%logger{50}) - %magenta(%msg) %n
            pattern>
            <charset>UTF-8charset>
        encoder>
    appender>


    <appender name="fileInfoLog" class="ch.qos.logback.core.rolling.RollingFileAppender">
        <filter class="ch.qos.logback.classic.filter.LevelFilter">
            <level>ERRORlevel>
            <onMatch>DENYonMatch>
            <onMismatch>ACCEPTonMismatch>
        filter>
        <encoder class="ch.qos.logback.classic.encoder.PatternLayoutEncoder">
            <pattern>
                %d{yyyy-MM-dd HH:mm:ss} [%thread] %-5level %logger{50} - %msg%n
            pattern>
            <charset>UTF-8charset>
        encoder>

        <rollingPolicy class="ch.qos.logback.core.rolling.TimeBasedRollingPolicy">

            <fileNamePattern>${logging.path}/cat.info.%d{yyyy-MM-dd}.logfileNamePattern>

            <MaxHistory>90MaxHistory>

            <totalSizeCap>1GBtotalSizeCap>
        rollingPolicy>
    appender>

    <appender name="fileErrorLog" class="ch.qos.logback.core.rolling.RollingFileAppender">
        <filter class="ch.qos.logback.classic.filter.ThresholdFilter">
            <level>ERRORlevel>
        filter>
        <encoder>
            <pattern>
                %d{yyyy-MM-dd HH:mm:ss} [%thread] %-5level %logger{50} - %msg%n
            pattern>
        encoder>

        <rollingPolicy class="ch.qos.logback.core.rolling.TimeBasedRollingPolicy">

            <fileNamePattern>${logging.path}/cat.error.%d{yyyy-MM-dd}.logfileNamePattern>
            <MaxHistory>90MaxHistory>
        rollingPolicy>
    appender>
    <root level="info">
        <appender-ref ref="consoleLog"/>
        <appender-ref ref="fileInfoLog"/>
        <appender-ref ref="fileErrorLog"/>
    root>
configuration>
编写Controller接口:
package com.itcast.logbackcat.controller;

import com.dianping.cat.Cat;
import org.slf4j.Logger;
import org.slf4j.LoggerFactory;
import org.springframework.web.bind.annotation.RequestMapping;
import org.springframework.web.bind.annotation.RestController;

@RestController
public class LogbackController {

    private Logger log = LoggerFactory.getLogger(LogbackController.class);

    @RequestMapping("logback")
    public String test(){
        log.info("cat info");
        try {
            int i = 1/0;
        }catch (Exception e){
            log.error("cat error",e);
        }
        return  "logback";
    }
}
3.1.3.2 集成cat
创建CatLogbackAppender类,放置在cat目录下:
package com.itcast.logbackcat.cat;

import ch.qos.logback.classic.Level;
import ch.qos.logback.classic.spi.ILoggingEvent;
import ch.qos.logback.classic.spi.ThrowableProxy;
import ch.qos.logback.core.AppenderBase;
import ch.qos.logback.core.LogbackException;
import com.dianping.cat.Cat;

import java.io.PrintWriter;
import java.io.StringWriter;

public class CatLogbackAppender extends AppenderBase<ILoggingEvent> {

	@Override
	protected void append(ILoggingEvent event) {
		try {
			boolean isTraceMode = Cat.getManager().isTraceMode();
			Level level = event.getLevel();
			if (level.isGreaterOrEqual(Level.ERROR)) {
				logError(event);
			} else if (isTraceMode) {
				logTrace(event);
			}
		} catch (Exception ex) {
			throw new LogbackException(event.getFormattedMessage(), ex);
		}
	}

	private void logError(ILoggingEvent event) {
		ThrowableProxy info = (ThrowableProxy) event.getThrowableProxy();
		if (info != null) {
			Throwable exception = info.getThrowable();

			Object message = event.getFormattedMessage();
			if (message != null) {
				Cat.logError(String.valueOf(message), exception);
			} else {
				Cat.logError(exception);
			}
		}
	}

	private void logTrace(ILoggingEvent event) {
		String type = "Logback";
		String name = event.getLevel().toString();
		Object message = event.getFormattedMessage();
		String data;
		if (message instanceof Throwable) {
			data = buildExceptionStack((Throwable) message);
		} else {
			data = event.getFormattedMessage().toString();
		}

		ThrowableProxy info = (ThrowableProxy) event.getThrowableProxy();
		if (info != null) {
			data = data + '\n' + buildExceptionStack(info.getThrowable());
		}

		Cat.logTrace(type, name, "0", data);
	}

	private String buildExceptionStack(Throwable exception) {
		if (exception != null) {
			StringWriter writer = new StringWriter(2048);
			exception.printStackTrace(new PrintWriter(writer));
			return writer.toString();
		} else {
			return "";
		}
	}

}
修改logback-spring.xml配置文件:
    <appender name="CatAppender" class="com.itcast.logbackcat.cat.CatLogbackAppender">appender>
    <root level="info">
        <appender-ref ref="consoleLog"/>
        <appender-ref ref="fileInfoLog"/>
        <appender-ref ref="fileErrorLog"/>
        <appender-ref ref="CatAppender" />
    root>
configuration>
修改Controller接口:
    @RequestMapping("logback")
    public String test(){
        Cat.getManager().setTraceMode(true);
        log.info("cat info");
        try {
            int i = 1/0;
        }catch (Exception e){
            log.error("cat error",e);
        }
        return  "logback";
    }
3.1.3.3 测试
启动项目,访问http://localhost:7080/logback
访问cat控制台,可以看到Problem报表中已经出现了一个error,点击SampleLinks查看详细信息
Cat列出的信息还是相对详细的,有INFO级别的日志与ERROR级别的日志,其中ERROR级别的日志显示出了所有的堆栈信息方便分析问题。
3.1.4 Spring Boot
3.1.4.1 搭建环境
Spring Boot的集成方式相对比较简单,我们使用已经搭建完的Mybatis框架来进行测试:
添加如下配置类到config包中
package com.itcast.mybatiscat.config;

import com.dianping.cat.servlet.CatFilter;
import org.springframework.boot.web.servlet.FilterRegistrationBean;
import org.springframework.context.annotation.Bean;
import org.springframework.context.annotation.Configuration;

@Configuration
public class CatFilterConfigure {

    @Bean
    public FilterRegistrationBean catFilter() {
        FilterRegistrationBean registration = new FilterRegistrationBean();
        CatFilter filter = new CatFilter();
        registration.setFilter(filter);
        registration.addUrlPatterns("/*");
        registration.setName("cat-filter");
        registration.setOrder(1);
        return registration;
    }
}
3.1.4.2 测试
访问地址http://localhost:7079/mybatis
图中的调用先经过了Controller,所以打印出了相关信息:
- /mybatis 接口地址
- URL.Server 服务器、浏览器等相关信息
- URL.Method 调用方法(GET、POST等)和URL
3.1.5 Spring AOP
使用Spring AOP技术可以简化我们的埋点操作,通过添加统一注解的方式,使得指定方法被能被CAT监控起来。
3.1.5.1 搭建环境
创建基于SpringBoot的springaop-cat项目。
<project xmlns="http://maven.apache.org/POM/4.0.0" xmlns:xsi="http://www.w3.org/2001/XMLSchema-instance"
         xsi:schemaLocation="http://maven.apache.org/POM/4.0.0 https://maven.apache.org/xsd/maven-4.0.0.xsd">
    <modelVersion>4.0.0modelVersion>
    <parent>
        <groupId>org.springframework.bootgroupId>
        <artifactId>spring-boot-starter-parentartifactId>
        <version>2.1.13.RELEASEversion>
        <relativePath/>
    parent>
    <groupId>com.itcastgroupId>
    <artifactId>springaop-catartifactId>
    <version>0.0.1-SNAPSHOTversion>
    <name>springaop-catname>
    <description>Demo project for Spring Bootdescription>

    <properties>
        <java.version>1.8java.version>
    properties>

    <dependencies>
        <dependency>
            <groupId>org.springframework.bootgroupId>
            <artifactId>spring-boot-starter-webartifactId>
        dependency>

        <dependency>
            <groupId>org.springframework.bootgroupId>
            <artifactId>spring-boot-starter-testartifactId>
            <scope>testscope>
        dependency>
        <dependency>
            <groupId>com.dianping.catgroupId>
            <artifactId>cat-clientartifactId>
            <version>3.0.0version>
        dependency>
        <dependency>
            <groupId>org.springframework.bootgroupId>
            <artifactId>spring-boot-starter-aopartifactId>
        dependency>
    dependencies>

    <build>
        <plugins>
            <plugin>
                <groupId>org.springframework.bootgroupId>
                <artifactId>spring-boot-maven-pluginartifactId>
            plugin>
        plugins>
    build>

project>
添加以下依赖:
- cat-client cat的客户端程序
- spring-boot-starter-aop 使用AOP必须添加的依赖
创建AOP接口:
package com.itcast.springaopcat.aop;

import static java.lang.annotation.RetentionPolicy.RUNTIME;

import java.lang.annotation.ElementType;
import java.lang.annotation.Retention;
import java.lang.annotation.Target;

@Retention(RUNTIME)
@Target(ElementType.METHOD)
public @interface CatAnnotation {
}
创建AOP处理类:
package com.itcast.springaopcat.aop;

import java.lang.reflect.Method;

import org.aspectj.lang.ProceedingJoinPoint;
import org.aspectj.lang.annotation.Around;
import org.aspectj.lang.annotation.Aspect;
import org.aspectj.lang.reflect.MethodSignature;

import com.dianping.cat.Cat;
import com.dianping.cat.message.Transaction;
import org.springframework.stereotype.Component;

@Component
@Aspect
public class CatAopService {

	@Around(value = "@annotation(CatAnnotation)")
	public Object aroundMethod(ProceedingJoinPoint pjp) throws Throwable {
		MethodSignature joinPointObject = (MethodSignature) pjp.getSignature();
		Method method = joinPointObject.getMethod();

		Transaction t = Cat.newTransaction("method", method.getName());

		try {
			Object res = pjp.proceed();
			t.setSuccessStatus();
			return res;
		} catch (Throwable e) {
			t.setStatus(e);
			Cat.logError(e);
			throw e;
		} finally {
			t.complete();
		}

	}

}
创建controller:
在aop2上添加注解@CatAnnotation,这样aop2就能被CAT监控起来。
package com.itcast.springaopcat.controller;

import com.dianping.cat.Cat;
import com.itcast.springaopcat.aop.CatAnnotation;
import org.slf4j.Logger;
import org.slf4j.LoggerFactory;
import org.springframework.web.bind.annotation.RequestMapping;
import org.springframework.web.bind.annotation.RestController;

@RestController
public class AopController {

    @RequestMapping("aop")
    @CatAnnotation
    public String aop1(){

        return  "aop";
    }

}
3.1.5.2 测试
访问接口http://localhost:7090/aop
查看cat的transaction报表可以看到:
![]()
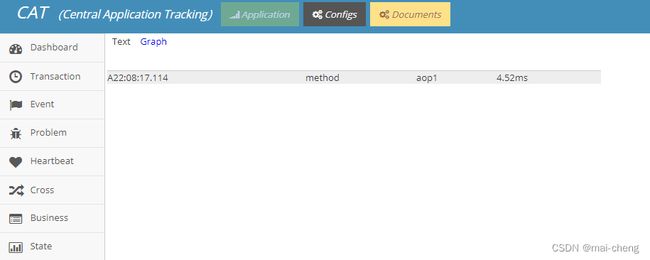
加上CatAnnotation注解的方法被调用后,生成了1次调用记录。点击Log View显示详细信息:
上图中显示了当前调用的方法名aop1以及时间4.52ms,证明spring-aop注解方式与CAT集成成功。
3.1.6 Spring MVC
Spring MVC的集成方式,官方提供的是使用AOP来进行集成,源码如下:
AOP接口
import java.lang.annotation.ElementType;
import java.lang.annotation.Retention;
import java.lang.annotation.RetentionPolicy;
import java.lang.annotation.Target;

@Retention(RetentionPolicy.RUNTIME)
@Target(ElementType.METHOD)
public @interface CatTransaction {
    String type() default "Handler";//"URL MVC Service SQL" is reserved for Cat Transaction Type
    String name() default "";
}
AOP处理代码:
 @Around("@annotation(catTransaction)")
    public Object catTransactionProcess(ProceedingJoinPoint pjp, CatTransaction catTransaction) throws Throwable {
        String transName = pjp.getSignature().getDeclaringType().getSimpleName() + "." + pjp.getSignature().getName();
        if(StringUtils.isNotBlank(catTransaction.name())){
            transName = catTransaction.name();
        }
        Transaction t = Cat.newTransaction(catTransaction.type(), transName);
        try {
            Object result = pjp.proceed();
            t.setStatus(Transaction.SUCCESS);
            return result;
        } catch (Throwable e) {
            t.setStatus(e);
            throw e;
        }finally{
            t.complete();
        }
    }
因这部分与Spring AOP处理方式基本你一样,如需集成请详见Spring AOP。
3.2告警配置
CAT提供给我们完善的告警功能。合理、灵活的监控规则可以帮助更快、更精确的发现业务线上故障。
3.2.1 告警通用配置
告警服务器配置
只有配置为告警服务器的机器,才会执行告警逻辑;只有配置为发送服务器的机器,才会发送告警。
进入功能 全局系统配置-服务端配置,修改服务器类型,对告警服务器增加配置、以及配置。如下图所示:
告警策略
告警策略:配置某种告警类型、某个项目、某个错误级别,对应的告警发送渠道,以及暂停时间。
举例:下述配置示例,说明对于Transaction告警,当告警项目名为demo_project:
- 当告警级别为error时,发送渠道为邮件、短信、微信,连续告警之间的间隔为5分钟
- 当告警级别为warning时,发送渠道为邮件、微信,连续告警之间的间隔为10分钟
配置示例
<alert-policy>
	<type id="Transaction">
          <group id="default">
             <level id="error" send="mail,weixin" suspendMinute="5"/>
             <level id="warning" send="mail,weixin" suspendMinute="5"/>
          group>
          <group id="demo-project">
             <level id="error" send="mail,weixin,sms" suspendMinute="5"/>
             <level id="warning" send="mail,weixin" suspendMinute="10"/>
          group>
    type>
alert-policy>
配置说明:
- type:告警的类型,可选:Transaction、Event、Business、Heartbeat
- group id属性:group可以为default,代表默认,即所有项目;也可以为项目名,代表某个项目的策略,此时default策略不会生效
- level id属性:错误级别,分为warning代表警告、error代表错误
- level send属性:告警渠道,分为mail-邮箱、weixin-微信、sms-短信
- level suspendMinute属性:连续告警的暂停时间
告警接收人
告警接收人,为告警所属项目的联系人:
- 项目组邮件:项目负责人邮件,或项目组产品线邮件,多个邮箱由英文逗号分割,不要留有空格;作为发送告警邮件、微信的依据
- 项目组号码:项目负责人手机号;多个号码由英文逗号分隔,不要留有空格;作为发送告警短信的依据
告警服务端
告警发送中心的配置。(什么是告警发送中心:提供发送短信、邮件、微信功能,且提供Http API的服务)
CAT在生成告警后,调用告警发送中心的Http接口发送告警。CAT自身并不集成告警发送中心,请自己搭建告警发送中心。
配置示例
<sender-config>
   <sender id="mail" url="http://test/" type="post" successCode="200" batchSend="true">
      <par id="type=1500"/>
      <par id="key=title,body"/>
      <par id="re=test@test.com"/>
      <par id="to=${receiver}"/>
      <par id="value=${title},${content}"/>
   sender>
   <sender id="weixin" url="http://test/" type="post" successCode="success" batchSend="true">
      <par id="domain=${domain}"/>
      <par id="email=${receiver}"/>
      <par id="title=${title}"/>
      <par id="content=${content}"/>
      <par id="type=${type}"/>
   sender>
   <sender id="sms" url="http://test/" type="post" successCode="200" batchSend="false">
      <par id="jsonm={type:808,mobile:'${receiver}',pair:{body='${content}'}}"/>
   sender>
sender-config>
配置说明:
- sender id属性:告警的类型,可选:mail、sms、weixin
- sender url属性:告警中心的URL
- sender batchSend属性:是否支持批量发送告警信息
- par:告警中心所需的Http参数。${argument}代表构建告警对象时,附带的动态参数;此处需要根据告警发送中心的需求,将动态参数加入到代码AlertEntity中的m_paras
3.2.2 告警规则
目前CAT的监控规则有五个要素
-
告警时间段。同一项业务指标在每天不同的时段可能有不同的趋势。设定该项,可让CAT在每天不同的时间段执行不同的监控规则。注意:告警时间段,不是监控数据的时间段,只是告警从这一刻开始进行检查数据
-
规则组合。在一个时间段中,可能指标触发了多个监控规则中的一个规则就要发出警报,也有可能指标要同时触发了多个监控规则才需要发出警报。
-
监控规则类型。通过以下六种类型对指标进行监控:最大值、最小值、波动上升百分比、波动下降百分比、总和最大值、总和最小值
-
监控最近分钟数。设定时间后(单位为分钟),当指标在设定的最近的时间长度内连续触发了监控规则,才会发出警报。比如最近分钟数为3,表明连续三分钟的数组都满足条件才告警。如果分钟数为1,表示最近的一分钟满足条件就告警
-
规则与被监控指标的匹配。监控规则可以按照名称、正则表达式与监控的对象(指标)进行匹配
子条件类型:
有六种类型。子条件的内容为对应的阈值,请注意阈值只能由数字组成,当阈值表达百分比时,不能在最后加上百分号。八种类型如下:
| 类型 | 说明 |
|---|---|
| MaxVal 最大值(当前值) | 当前实际值 最大值,比如检查最近3分钟数据,3分钟数据会有3个value,是表示(>=N)个值都必须同时>=设定值 |
| MinVal 最小值(当前值) | 当前实际值 最小值,比如检查最近3分钟数据,3分钟数据会有3个value,是表示(>=N)个值都必须同时比<=设定值 |
| FluAscPer 波动上升百分比(当前值) | 波动百分比最大值。即当前最后(N)分钟值比监控周期内其它分钟值(M-N个)的增加百分比都>=设定的百分比时触发警报,比如检查最近10分钟数据,触发个数为3;10分钟内数据会算出7个百分比数据,是表示最后3分钟值分别相比前面7分钟值,3组7次比较的上升波动百分比全部>=配置阈值。比如下降50%,阈值填写50。 |
| FluDescPer 波动下降百分比(当前值) | 波动百分比最小值。当前最后(N)分钟值比监控周期内其它(M-N个)分钟值的减少百分比都大于设定的百分比时触发警报,比如检查最近10分钟数据,触发个数为3;10分钟数据会算出7个百分比数据,是表示最后3分钟值分别相比前面7分钟值,3组7次比较的下降波动百分比全部>=配置阈值。比如下降50%,阈值填写50。 |
| SumMaxVal 总和最大值(当前值) | 当前值总和最大值,比如检查最近3分钟数据,表示3分钟内的总和>=设定值就告警。 |
| SumMinVal 总和最小值(当前值) | 当前值总和最小值,比如检查最近3分钟数据,表示3分钟内的总和<=设定值就告警。 |
Transaction告警
对Transaction的告警,支持的指标有次数、延时、失败率;监控周期:一分钟
配置图示
如下图所示,配置了springboot-cat项目的Transaction监控规则。
配置说明:
-
项目名:要监控的项目名
-
type:被监控transaction的type
-
name:被监控transaction的name;如果为All,代表全部name
-
监控指标:次数、延时、失败率
-
告警规则:详情见告警规则部分
Event告警
对Event的个数进行告警;监控周期:一分钟
配置图示
配置说明:
- 项目名:要监控的项目名
- type:被监控event的type
- name:被监控event的name;如果为All,代表全部name
- 告警规则:详情见告警规则部分
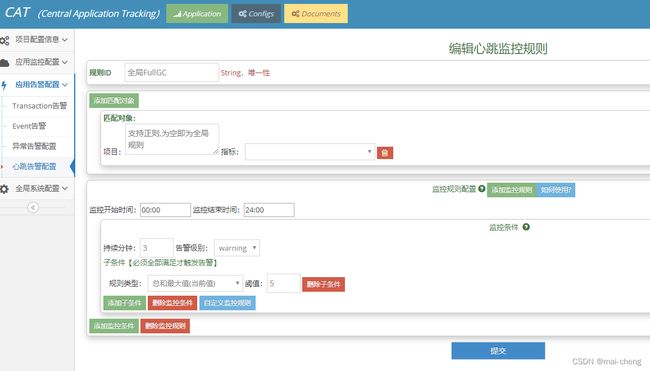
心跳告警
心跳告警是对服务器当前状态的监控,如监控系统负载、GC数量等信息;监控周期:一分钟
配置图示
配置说明:
- 项目名:要监控的项目名
- 指标:被监控的心跳指标名称;心跳告警是由两级匹配的:首先匹配项目,然后按照指标匹配
- 告警规则:详情见告警规则部分
异常告警
对异常的个数进行告警;监控周期:一分钟
配置图示
配置说明:
- 项目名:要监控的项目名
- 异常名称:被监控异常名称;当设置为“Total”时,是针对当前项目组所有异常总数阈值进行设置;当设置为特定异常名称时,针对当前项目组所有同名的异常阈值进行设定
- warning阈值:到达该阈值,发送warning级别告警;当异常数小于该阈值时,不做任何警报
- error阈值:到达该阈值,发送error级别告警
- 总数大于Warning阈值,小于Error阈值,进行Warning级别告警;大于Error阈值,进行Error级别告警
3.2.3 告警接口编写
编写controller接口:
package com.itcast.springbootcat;

import com.dianping.cat.Cat;
import com.dianping.cat.message.Event;
import com.dianping.cat.message.Transaction;
import org.springframework.web.bind.annotation.RequestBody;
import org.springframework.web.bind.annotation.RequestMapping;
import org.springframework.web.bind.annotation.RequestParam;
import org.springframework.web.bind.annotation.RestController;

import javax.servlet.http.HttpServletRequest;
import java.util.Map;

@RestController
public class AlertController {

    @RequestMapping(value = "/alert/msg")
    public String sendAlert(@RequestParam String to) {
        System.out.println("告警了" +to);
        return "200";
    }
}
修改告警服务端的配置,填写接口地址,以邮件为例:
配置示例
 <sender id="mail" url="http://localhost:8085/alert/msg" type="post" successCode="200" batchSend="true">
      <par id="type=1500"/>
      <par id="key=title,body"/>
      <par id="re=test@test.com"/>
      <par id="to=${receiver}"/>
      <par id="value=${title},${content}"/>
   sender>
测试结果,输出内容如下:
告警了testUser1@test.com,testUser2@test.com
4.CAT原理
本章中介绍两部分内容:
- 客户端原理介绍
- 服务端原理介绍
4.1 客户端原理
4.1.1 客户端设计
架构设计
客户端设计是CAT系统设计中最为核心的一个环节,客户端要求是做到API简单、高可靠性能,因为监控只是公司核心业务流程一个旁路环节,无论在任何场景下都不能影响业务性能。
CAT客户端在收集端数据方面使用ThreadLocal(线程局部变量),是线程本地变量,也可以称之为线程本地存储。其实ThreadLocal的功用非常简单,就是为每一个使用该变量的线程都提供一个变量值的副本,属于Java中一种较为特殊的线程绑定机制,每一个线程都可以独立地改变自己的副本,不会和其它线程的副本冲突。
在监控场景下,为用户提供服务都是Web容器,比如tomcat或者Jetty,后端的RPC服务端比如Dubbo或者Pigeon,也都是基于线程池来实现的。业务方在处理业务逻辑时基本都是在一个线程内部调用后端服务、数据库、缓存等,将这些数据拿回来再进行业务逻辑封装,最后将结果展示给用户。所以将所有的监控请求作为一个监控上下文存入线程变量就非常合适。
[外链图片转存失败,源站可能有防盗链机制,建议将图片保存下来直接上传(img-EzgxCacK-1667320090173)(assert\client.png)]
如上图所示,业务执行业务逻辑的时候,就会把此次请求对应的监控存放于线程上下文中,存于上下文的其实是一个监控树的结构。在最后业务线程执行结束时,将监控对象存入一个异步内存队列中,CAT有个消费线程将队列内的数据异步发送到服务端。
总结流程如下:
- 业务线程产生消息,交给消息Producer,消息Producer将消息存放在该业务线程消息栈中;
- 业务线程通知消息Producer消息结束时,消息Producer根据其消息栈产生消息树放置在同步消息队列中;
- 消息上报线程监听消息队列,根据消息树产生最终的消息报文上报CAT服务端。
API设计
监控API定义往往取决于对监控或者性能分析这个领域的理解,监控和性能分析所针对的场景有如下几种:
- 一段代码的执行时间,一段代码可以是URL执行耗时,也可以是SQL的执行耗时。
- 一段代码的执行次数,比如Java抛出异常记录次数,或者一段逻辑的执行次数。
- 定期执行某段代码,比如定期上报一些核心指标:JVM内存、GC等指标。
- 关键的业务监控指标,比如监控订单数、交易额、支付成功率等。
在上述领域模型的基础上,CAT设计自己核心的几个监控对象:Transaction、Event、Heartbeat、Metric。
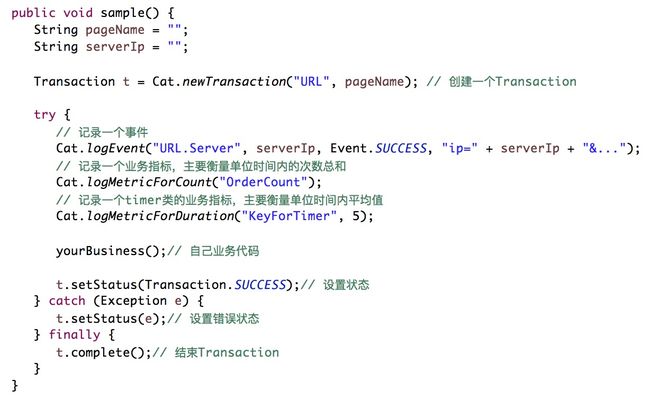
一段监控API的代码示例如下:
序列化和通信
序列化和通信是整个客户端包括服务端性能里面很关键的一个环节。
- CAT序列化协议是自定义序列化协议,自定义序列化协议相比通用序列化协议要高效很多,这个在大规模数据实时处理场景下还是非常有必要的。
- CAT通信是基于Netty来实现的NIO的数据传输,Netty是一个非常好的NIO开发框架,在这边就不详细介绍了。
4.1.2 核心类分析
CAT将监控的内容分为了4种:
- Transaction
- Event
- Heartbeat
- Metric
使用4个接口定义他们的行为,对应的实现类命名方式均为Default+接口名。他们都继承自Message接口,以下是Message接口的定义:
/*
* Copyright (c) 2011-2018, Meituan Dianping. All Rights Reserved.
*
* Licensed to the Apache Software Foundation (ASF) under one or more
* contributor license agreements. See the NOTICE file distributed with
* this work for additional information regarding copyright ownership.
* The ASF licenses this file to You under the Apache License, Version 2.0
* (the "License"); you may not use this file except in compliance with
* the License. You may obtain a copy of the License at
*
* http://www.apache.org/licenses/LICENSE-2.0
*
* Unless required by applicable law or agreed to in writing, software
* distributed under the License is distributed on an "AS IS" BASIS,
* WITHOUT WARRANTIES OR CONDITIONS OF ANY KIND, either express or implied.
* See the License for the specific language governing permissions and
* limitations under the License.
*/
package com.dianping.cat.message;
/**
*
* Message represents data collected during application runtime. It will be sent to back-end system asynchronous for
* further processing.
*
*
*
* Super interface of Event, Heartbeat and Transaction.
*
*
* @author Frankie Wu
* @see Event, Heartbeat, Transaction
*/
public interface Message {
public static final String SUCCESS = "0";
/**
* add one or multiple key-value pairs to the message.
*
* @param keyValuePairs key-value pairs like 'a=1&b=2&...'
*/
public void addData(String keyValuePairs);
/**
* add one key-value pair to the message.
*
* @param key
* @param value
*/
public void addData(String key, Object value);
/**
* Complete the message construction.
*/
public void complete();
/**
* @return key value pairs data
*/
public Object getData();
/**
* Message name.
*
* @return message name
*/
public String getName();
/**
* Get the message status.
*
* @return message status. "0" means success, otherwise error code.
*/
public String getStatus();
/**
* Set the message status with exception class name.
*
* @param e exception.
*/
public void setStatus(Throwable e);
/**
* The time stamp the message was created.
*
* @return message creation time stamp in milliseconds
*/
public long getTimestamp();
public void setTimestamp(long timestamp);
/**
* Message type.
*
*
* Typical message types are:
*
* - URL: maps to one method of an action
* - Service: maps to one method of service call
* - Search: maps to one method of search call
* - SQL: maps to one SQL statement
* - Cache: maps to one cache access
* - Error: maps to java.lang.Throwable (java.lang.Exception and java.lang.Error)
*
*
*
* @return message type
*/
public String getType();
/**
* If the complete() method was called or not.
*
* @return true means the complete() method was called, false otherwise.
*/
public boolean isCompleted();
/**
* @return
*/
public boolean isSuccess();
/**
* Set the message status.
*
* @param status message status. "0" means success, otherwise error code.
*/
public void setStatus(String status);
public void setSuccessStatus();
}
这个接口中主要用来提供通用性的方法,比如添加数据、设置状态等。所以上述提到的四个功能性的接口均继承自它,比如最复杂的Transaction接口:
/*
 * Copyright (c) 2011-2018, Meituan Dianping. All Rights Reserved.
 *
 * Licensed to the Apache Software Foundation (ASF) under one or more
 * contributor license agreements. See the NOTICE file distributed with
 * this work for additional information regarding copyright ownership.
 * The ASF licenses this file to You under the Apache License, Version 2.0
 * (the "License"); you may not use this file except in compliance with
 * the License. You may obtain a copy of the License at
 *
 *    http://www.apache.org/licenses/LICENSE-2.0
 *
 * Unless required by applicable law or agreed to in writing, software
 * distributed under the License is distributed on an "AS IS" BASIS,
 * WITHOUT WARRANTIES OR CONDITIONS OF ANY KIND, either express or implied.
 * See the License for the specific language governing permissions and
 * limitations under the License.
 */
package com.dianping.cat.message;

import java.util.List;

/**
	*
	* Transaction is any interesting unit of work that takes time to complete and may fail.
	*
	*
	*
	* Basically, all data access across the boundary needs to be logged as a Transaction since it may fail and
	* time consuming. For example, URL request, disk IO, JDBC query, search query, HTTP request, 3rd party API call etc.
	*
	*
	*
	* Sometime if A needs call B which is owned by another team, although A and B are deployed together without any
	* physical boundary. To make the ownership clear, there could be some Transaction logged when A calls B.
	*
	*
	*
	* Most of Transaction should be logged in the infrastructure level or framework level, which is
	* transparent to the application.
	*
	*
	*
	* All CAT message will be constructed as a message tree and send to back-end for further analysis, and for monitoring.
	* Only Transaction can be a tree node, all other message will be the tree leaf. The transaction without
	* other messages nested is an atomic transaction.
	*
	*
	* @author Frankie Wu
	*/
public interface Transaction extends Message {
	/**
		* Add one nested child message to current transaction.
		*
		* @param message to be added
		*/
	public Transaction addChild(Message message);

	/**
		* Get all children message within current transaction.
		*
		*
		* Typically, a Transaction can nest other Transactions, Events and
		* Heartbeat s, while an Event or Heartbeat can't nest other messages.
		*
		*
		* @return all children messages, empty if there is no nested children.
		*/
	public List<Message> getChildren();

	/**
		* How long the transaction took from construction to complete. Time unit is microsecond.
		*
		* @return duration time in microsecond
		*/
	public long getDurationInMicros();

	/**
		* How long the transaction took from construction to complete. Time unit is millisecond.
		*
		* @return duration time in millisecond
		*/
	public long getDurationInMillis();

	/**
		* set duration in millisecond.
		*
		* @return duration time in millisecond
		*/
	public void setDurationInMillis(long durationInMills);

	/**
		* Has children or not. An atomic transaction does not have any children message.
		*
		* @return true if child exists, else false.
		*/
	public boolean hasChildren();

	/**
		* Check if the transaction is stand-alone or belongs to another one.
		*
		* @return true if it's an root transaction.
		*/
	public boolean isStandalone();
}
这个接口继承自Message接口。扩展了例如添加子节点、设置执行时间(这个在Transaction的API用法中介绍过)等。最后在DefaultTransaction实现类中实现这些方法即可,DefaultTransaction会继承自AbstractMessage这是一个抽象类,实现了Message定义的方法:
/*
 * Copyright (c) 2011-2018, Meituan Dianping. All Rights Reserved.
 *
 * Licensed to the Apache Software Foundation (ASF) under one or more
 * contributor license agreements. See the NOTICE file distributed with
 * this work for additional information regarding copyright ownership.
 * The ASF licenses this file to You under the Apache License, Version 2.0
 * (the "License"); you may not use this file except in compliance with
 * the License. You may obtain a copy of the License at
 *
 *    http://www.apache.org/licenses/LICENSE-2.0
 *
 * Unless required by applicable law or agreed to in writing, software
 * distributed under the License is distributed on an "AS IS" BASIS,
 * WITHOUT WARRANTIES OR CONDITIONS OF ANY KIND, either express or implied.
 * See the License for the specific language governing permissions and
 * limitations under the License.
 */
package com.dianping.cat.message.internal;

import java.nio.charset.Charset;

import io.netty.buffer.ByteBuf;
import io.netty.buffer.ByteBufAllocator;

import com.dianping.cat.message.Message;
import com.dianping.cat.message.spi.codec.PlainTextMessageCodec;

public abstract class AbstractMessage implements Message {
	protected String m_status = "unset";

	private String m_type;

	private String m_name;

	private long m_timestampInMillis;

	private CharSequence m_data;

	private boolean m_completed;

	public AbstractMessage(String type, String name) {
		m_type = String.valueOf(type);
		m_name = String.valueOf(name);
		m_timestampInMillis = MilliSecondTimer.currentTimeMillis();
	}

	@Override
	public void addData(String keyValuePairs) {
		if (m_data == null) {
			m_data = keyValuePairs;
		} else if (m_data instanceof StringBuilder) {
			((StringBuilder) m_data).append('&').append(keyValuePairs);
		} else {
			StringBuilder sb = new StringBuilder(m_data.length() + keyValuePairs.length() + 16);

			sb.append(m_data).append('&');
			sb.append(keyValuePairs);
			m_data = sb;
		}
	}

	@Override
	public void addData(String key, Object value) {
		if (m_data instanceof StringBuilder) {
			((StringBuilder) m_data).append('&').append(key).append('=').append(value);
		} else {
			String str = String.valueOf(value);
			int old = m_data == null ? 0 : m_data.length();
			StringBuilder sb = new StringBuilder(old + key.length() + str.length() + 16);

			if (m_data != null) {
				sb.append(m_data).append('&');
			}

			sb.append(key).append('=').append(str);
			m_data = sb;
		}
	}

	@Override
	public CharSequence getData() {
		if (m_data == null) {
			return "";
		} else {
			return m_data;
		}
	}

	public void setData(String str) {
		m_data = str;
	}

	@Override
	public String getName() {
		return m_name;
	}

	public void setName(String name) {
		m_name = name;
	}

	@Override
	public String getStatus() {
		return m_status;
	}

	@Override
	public void setStatus(Throwable e) {
		m_status = e.getClass().getName();
	}

	@Override
	public long getTimestamp() {
		return m_timestampInMillis;
	}

	@Override
	public void setTimestamp(long timestamp) {
		m_timestampInMillis = timestamp;
	}

	@Override
	public String getType() {
		return m_type;
	}

	public void setType(String type) {
		m_type = type;
	}

	@Override
	public boolean isCompleted() {
		return m_completed;
	}

	public void setCompleted(boolean completed) {
		m_completed = completed;
	}

	@Override
	public boolean isSuccess() {
		return Message.SUCCESS.equals(m_status);
	}

	@Override
	public void setStatus(String status) {
		m_status = status;
	}

	@Override
	public String toString() {
		PlainTextMessageCodec codec = new PlainTextMessageCodec();
		ByteBuf buf = ByteBufAllocator.DEFAULT.buffer();

		codec.encodeMessage(this, buf);
		codec.reset();
		return buf.toString(Charset.forName("utf-8"));
	}

	@Override
	public void setSuccessStatus() {
		m_status = SUCCESS;
	}

}
这样一来DefaultTransaction只需要实现Transaction定义的方法即可,当然如果有部分方法的逻辑比较特殊,可以选择性的覆盖:
/*
 * Copyright (c) 2011-2018, Meituan Dianping. All Rights Reserved.
 *
 * Licensed to the Apache Software Foundation (ASF) under one or more
 * contributor license agreements. See the NOTICE file distributed with
 * this work for additional information regarding copyright ownership.
 * The ASF licenses this file to You under the Apache License, Version 2.0
 * (the "License"); you may not use this file except in compliance with
 * the License. You may obtain a copy of the License at
 *
 *    http://www.apache.org/licenses/LICENSE-2.0
 *
 * Unless required by applicable law or agreed to in writing, software
 * distributed under the License is distributed on an "AS IS" BASIS,
 * WITHOUT WARRANTIES OR CONDITIONS OF ANY KIND, either express or implied.
 * See the License for the specific language governing permissions and
 * limitations under the License.
 */
package com.dianping.cat.message.internal;

import java.util.ArrayList;
import java.util.Collections;
import java.util.List;

import com.dianping.cat.Cat;
import com.dianping.cat.message.Message;
import com.dianping.cat.message.Transaction;
import com.dianping.cat.message.spi.MessageManager;

public class DefaultTransaction extends AbstractMessage implements Transaction {
	private long m_durationInMicro = -1; // must be less than 0

	private List<Message> m_children;

	private MessageManager m_manager;

	private boolean m_standalone;

	private long m_durationStart;

	public DefaultTransaction(String type, String name) {
		super(type, name);
		m_durationStart = System.nanoTime();
	}

	public DefaultTransaction(String type, String name, MessageManager manager) {
		super(type, name);

		m_manager = manager;
		m_standalone = true;
		m_durationStart = System.nanoTime();
	}

	@Override
	public DefaultTransaction addChild(Message message) {
		if (m_children == null) {
			m_children = new ArrayList<Message>();
		}

		if (message != null) {
			m_children.add(message);
		} else {
			Cat.logError(new Exception("null child message"));
		}
		return this;
	}

	@Override
	public void complete() {
		try {
			if (isCompleted()) {
				// complete() was called more than once
				DefaultEvent event = new DefaultEvent("cat", "BadInstrument");

				event.setStatus("TransactionAlreadyCompleted");
				event.complete();
				addChild(event);
			} else {
				if (m_durationInMicro == -1) {
					m_durationInMicro = (System.nanoTime() - m_durationStart) / 1000L;
				}
				setCompleted(true);
				if (m_manager != null) {
					m_manager.end(this);
				}
			}
		} catch (Exception e) {
			// ignore
		}
	}

	@Override
	public List<Message> getChildren() {
		if (m_children == null) {
			return Collections.emptyList();
		}

		return m_children;
	}

	@Override
	public long getDurationInMicros() {
		if (m_durationInMicro >= 0) {
			return m_durationInMicro;
		} else { // if it's not completed explicitly
			long duration = 0;
			int len = m_children == null ? 0 : m_children.size();

			if (len > 0) {
				Message lastChild = m_children.get(len - 1);

				if (lastChild instanceof Transaction) {
					DefaultTransaction trx = (DefaultTransaction) lastChild;

					duration = (trx.getTimestamp() - getTimestamp()) * 1000L;
				} else {
					duration = (lastChild.getTimestamp() - getTimestamp()) * 1000L;
				}
			}

			return duration;
		}
	}

	public void setDurationInMicros(long duration) {
		m_durationInMicro = duration;
	}

	@Override
	public long getDurationInMillis() {
		return getDurationInMicros() / 1000L;
	}

	@Override
	public void setDurationInMillis(long duration) {
		m_durationInMicro = duration * 1000L;
	}

	protected MessageManager getManager() {
		return m_manager;
	}

	@Override
	public boolean hasChildren() {
		return m_children != null && m_children.size() > 0;
	}

	@Override
	public boolean isStandalone() {
		return m_standalone;
	}

	public void setStandalone(boolean standalone) {
		m_standalone = standalone;
	}

	public void setDurationStart(long durationStart) {
		m_durationStart = durationStart;
	}

	@Override
	public void setStatus(Throwable e) {
		m_status = e.getClass().getName();
		m_manager.getThreadLocalMessageTree().setDiscard(false);
	}
}
上面的setStatus就覆盖掉了抽象类中定义的方法。
最后所有的数据都会放到DefaultMessageTree中:
/*
 * Copyright (c) 2011-2018, Meituan Dianping. All Rights Reserved.
 *
 * Licensed to the Apache Software Foundation (ASF) under one or more
 * contributor license agreements. See the NOTICE file distributed with
 * this work for additional information regarding copyright ownership.
 * The ASF licenses this file to You under the Apache License, Version 2.0
 * (the "License"); you may not use this file except in compliance with
 * the License. You may obtain a copy of the License at
 *
 *    http://www.apache.org/licenses/LICENSE-2.0
 *
 * Unless required by applicable law or agreed to in writing, software
 * distributed under the License is distributed on an "AS IS" BASIS,
 * WITHOUT WARRANTIES OR CONDITIONS OF ANY KIND, either express or implied.
 * See the License for the specific language governing permissions and
 * limitations under the License.
 */
package com.dianping.cat.message.spi.internal;

import java.nio.charset.Charset;
import java.util.ArrayList;
import java.util.List;

import com.dianping.cat.message.io.BufReleaseHelper;
import io.netty.buffer.ByteBuf;

import com.dianping.cat.Cat;
import com.dianping.cat.message.Event;
import com.dianping.cat.message.Heartbeat;
import com.dianping.cat.message.Message;
import com.dianping.cat.message.Metric;
import com.dianping.cat.message.Transaction;
import com.dianping.cat.message.internal.MessageId;
import com.dianping.cat.message.spi.MessageTree;
import com.dianping.cat.message.spi.codec.PlainTextMessageCodec;

public class DefaultMessageTree implements MessageTree {

	private ByteBuf m_buf;

	private String m_domain;

	private String m_hostName;

	private String m_ipAddress;

	private Message m_message;

	private String m_messageId;

	private String m_parentMessageId;

	private String m_rootMessageId;

	private String m_sessionToken;

	private String m_threadGroupName;

	private String m_threadId;

	private String m_threadName;

	private MessageId m_formatMessageId;

	private boolean m_discard = true;

	private boolean m_processLoss = false;

	private boolean m_hitSample = false;

	private List<Event> events = new ArrayList<Event>();

	private List<Transaction> transactions = new ArrayList<Transaction>();

	private List<Heartbeat> heartbeats = new ArrayList<Heartbeat>();

	private List<Metric> metrics = new ArrayList<Metric>();

	@Override
	public boolean canDiscard() {
		return m_discard;
	}

	@Override
	public MessageTree copy() {
		MessageTree tree = new DefaultMessageTree();

		tree.setDomain(m_domain);
		tree.setHostName(m_hostName);
		tree.setIpAddress(m_ipAddress);
		tree.setMessageId(m_messageId);
		tree.setParentMessageId(m_parentMessageId);
		tree.setRootMessageId(m_rootMessageId);
		tree.setSessionToken(m_sessionToken);
		tree.setThreadGroupName(m_threadGroupName);
		tree.setThreadId(m_threadId);
		tree.setThreadName(m_threadName);
		tree.setMessage(m_message);
		tree.setDiscardPrivate(m_discard);
		tree.setHitSample(m_hitSample);
		return tree;
	}

	public List<Event> findOrCreateEvents() {
		if (events == null) {
			events = new ArrayList<Event>();
		}
		return events;
	}

	public List<Heartbeat> findOrCreateHeartbeats() {
		if (heartbeats == null) {
			heartbeats = new ArrayList<Heartbeat>();
		}
		return heartbeats;
	}

	public List<Metric> findOrCreateMetrics() {
		if (metrics == null) {
			metrics = new ArrayList<Metric>();
		}
		return metrics;
	}

	public List<Transaction> findOrCreateTransactions() {
		if (transactions == null) {
			transactions = new ArrayList<Transaction>();
		}
		return transactions;
	}

	public MessageTree copyForTest() {
		ByteBuf buf = null;
		try {
			PlainTextMessageCodec codec = new PlainTextMessageCodec();
			buf = codec.encode(this);
			//buf.readInt(); // get rid of length

			return codec.decode(buf);
		} catch (Exception ex) {
			Cat.logError(ex);
		}

		return null;
	}

	public void clearMessageList() {
		if (transactions != null) {
			transactions.clear();
		}

		if (events != null) {
			events.clear();
		}

		if (heartbeats != null) {
			heartbeats.clear();
		}

		if (metrics != null) {
			metrics.clear();
		}
	}

	public ByteBuf getBuffer() {
		return m_buf;
	}

	public void setBuffer(ByteBuf buf) {
		m_buf = buf;
	}

	@Override
	public String getDomain() {
		return m_domain;
	}

	@Override
	public void setDomain(String domain) {
		m_domain = domain;
	}

	public List<Event> getEvents() {
		return events;
	}

	public MessageId getFormatMessageId() {
		if (m_formatMessageId == null) {
			m_formatMessageId = MessageId.parse(m_messageId);
		}

		return m_formatMessageId;
	}

	public void setFormatMessageId(MessageId formatMessageId) {
		m_formatMessageId = formatMessageId;
	}

	public List<Heartbeat> getHeartbeats() {
		return heartbeats;
	}

	@Override
	public String getHostName() {
		return m_hostName;
	}

	@Override
	public void setHostName(String hostName) {
		m_hostName = hostName;
	}

	@Override
	public String getIpAddress() {
		return m_ipAddress;
	}

	@Override
	public void setIpAddress(String ipAddress) {
		m_ipAddress = ipAddress;
	}

	@Override
	public String getSessionToken() {
		return m_sessionToken;
	}

	@Override
	public void setSessionToken(String sessionToken) {
		m_sessionToken = sessionToken;
	}

	@Override
	public Message getMessage() {
		return m_message;
	}

	@Override
	public void setMessage(Message message) {
		m_message = message;
	}

	@Override
	public String getMessageId() {
		return m_messageId;
	}

	@Override
	public void setMessageId(String messageId) {
		if (messageId != null && messageId.length() > 0) {
			m_messageId = messageId;
		}
	}

	public List<Metric> getMetrics() {
		return metrics;
	}

	@Override
	public String getParentMessageId() {
		return m_parentMessageId;
	}

	@Override
	public void setParentMessageId(String parentMessageId) {
		if (parentMessageId != null && parentMessageId.length() > 0) {
			m_parentMessageId = parentMessageId;
		}
	}

	@Override
	public String getRootMessageId() {
		return m_rootMessageId;
	}

	@Override
	public void setRootMessageId(String rootMessageId) {
		if (rootMessageId != null && rootMessageId.length() > 0) {
			m_rootMessageId = rootMessageId;
		}
	}

	@Override
	public String getThreadGroupName() {
		return m_threadGroupName;
	}

	@Override
	public void setThreadGroupName(String threadGroupName) {
		m_threadGroupName = threadGroupName;
	}

	@Override
	public String getThreadId() {
		return m_threadId;
	}

	@Override
	public void setThreadId(String threadId) {
		m_threadId = threadId;
	}

	@Override
	public String getThreadName() {
		return m_threadName;
	}

	@Override
	public void setThreadName(String threadName) {
		m_threadName = threadName;
	}

	public List<Transaction> getTransactions() {
		return transactions;
	}

	@Override
	public boolean isProcessLoss() {
		return m_processLoss;
	}

	@Override
	public void setProcessLoss(boolean loss) {
		m_processLoss = loss;
	}

	public void setDiscard(boolean discard) {
		m_discard = discard;
	}

	@Override
	public boolean isHitSample() {
		return m_hitSample;
	}

	@Override
	public void setHitSample(boolean hitSample) {
		m_hitSample = hitSample;
	}

	public void setDiscardPrivate(boolean discard) {
		m_discard = discard;
	}

	@Override
	public String toString() {
		ByteBuf buf = null;
		String result = "";
		try {
			PlainTextMessageCodec codec = new PlainTextMessageCodec();
			buf = codec.encode(this);
			buf.readInt(); // get rid of length
			result = buf.toString(Charset.forName("utf-8"));
		} catch (Exception ex) {
			Cat.logError(ex);
		} finally {
			if (buf != null) {
				BufReleaseHelper.release(buf);
			}
		}

        return result;
    }


}
这里用了四个ArrayList来存放对应的数据。
4.1.3 流程分析
启动
懒加载创建Cat客户端对象:
读取client.xml:
加载模块:
创建Message
创建一个新的Transaction:
创建上下文:
添加Transaction到上下文中:
添加Transaction到DefaultMessageTree中:
关闭Transaction:
这里需要介绍一下,消息进入到上下文之后,是通过栈的方式来存储的:
Transaction之间是有引用的,因此在end方法中只需要将第一个Transaction(封装在MessageTree中)通过MessageManager来flush,在拼接消息时可以根据这个引用关系来找到所有的Transaction 。所以来看代码:
发送数据
首先获取到发送类的对象,调用其方法进行发送:
发送时是经典的生产者-消费者模型,生产者只需要向队列中放入数据,消费者监听队列,获取数据并发送:
[外链图片转存失败,源站可能有防盗链机制,建议将图片保存下来直接上传(img-dCL53CJN-1667320090200)(assert\client-12.png)][外链图片转存失败,源站可能有防盗链机制,建议将图片保存下来直接上传(img-TbpJWYC1-1667320090202)(assert\client-13.png)]
消费者线程拉取消息:
使用自定义的序列化方式进行序列化,最后使用Netty发送数据:
Cat使用了自定义的序列化方式:
/*
 * Copyright (c) 2011-2018, Meituan Dianping. All Rights Reserved.
 *
 * Licensed to the Apache Software Foundation (ASF) under one or more
 * contributor license agreements. See the NOTICE file distributed with
 * this work for additional information regarding copyright ownership.
 * The ASF licenses this file to You under the Apache License, Version 2.0
 * (the "License"); you may not use this file except in compliance with
 * the License. You may obtain a copy of the License at
 *
 *    http://www.apache.org/licenses/LICENSE-2.0
 *
 * Unless required by applicable law or agreed to in writing, software
 * distributed under the License is distributed on an "AS IS" BASIS,
 * WITHOUT WARRANTIES OR CONDITIONS OF ANY KIND, either express or implied.
 * See the License for the specific language governing permissions and
 * limitations under the License.
 */
package com.dianping.cat.message.spi.codec;

import java.nio.charset.Charset;
import java.nio.charset.StandardCharsets;
import java.util.List;
import java.util.Stack;

import io.netty.buffer.ByteBuf;
import io.netty.buffer.PooledByteBufAllocator;

import com.dianping.cat.message.Event;
import com.dianping.cat.message.Heartbeat;
import com.dianping.cat.message.Message;
import com.dianping.cat.message.Metric;
import com.dianping.cat.message.Trace;
import com.dianping.cat.message.Transaction;
import com.dianping.cat.message.internal.DefaultEvent;
import com.dianping.cat.message.internal.DefaultHeartbeat;
import com.dianping.cat.message.internal.DefaultMetric;
import com.dianping.cat.message.internal.DefaultTrace;
import com.dianping.cat.message.internal.DefaultTransaction;
import com.dianping.cat.message.spi.MessageCodec;
import com.dianping.cat.message.spi.MessageTree;
import com.dianping.cat.message.spi.internal.DefaultMessageTree;

public class NativeMessageCodec implements MessageCodec {

	public static final String ID = "NT1"; // native message tree version 1

	@Override
	public MessageTree decode(ByteBuf buf) {
		buf.readInt(); // read the length of the message tree

		DefaultMessageTree tree = new DefaultMessageTree();
		Context ctx = new Context(tree);
		Codec.HEADER.decode(ctx, buf);
		Message msg = decodeMessage(ctx, buf);

		tree.setMessage(msg);
		tree.setBuffer(buf);

		return tree;
	}

	private Message decodeMessage(Context ctx, ByteBuf buf) {
		Message msg = null;

		while (buf.readableBytes() > 0) {
			char ch = ctx.readId(buf);

			switch (ch) {
			case 't':
				Codec.TRANSACTION_START.decode(ctx, buf);
				break;
			case 'T':
				msg = Codec.TRANSACTION_END.decode(ctx, buf);
				break;
			case 'E':
				Message e = Codec.EVENT.decode(ctx, buf);

				ctx.addChild(e);
				break;
			case 'M':
				Message m = Codec.METRIC.decode(ctx, buf);

				ctx.addChild(m);
				break;
			case 'H':
				Message h = Codec.HEARTBEAT.decode(ctx, buf);

				ctx.addChild(h);
				break;
			case 'L':
				Message l = Codec.TRACE.decode(ctx, buf);

				ctx.addChild(l);
				break;
			default:
				throw new RuntimeException(String.format("Unsupported message type(%s).", ch));
			}
		}

		if (msg == null) {
			msg = ctx.getMessageTree().getMessage();
		}

		return msg;
	}

	@Override
	public ByteBuf encode(MessageTree tree) {
		ByteBuf buf = PooledByteBufAllocator.DEFAULT.buffer(4 * 1024);

		try {
			Context ctx = new Context(tree);

			buf.writeInt(0); // place-holder

			Codec.HEADER.encode(ctx, buf, null);

			Message msg = tree.getMessage();

			if (msg != null) {
				encodeMessage(ctx, buf, msg);
			}
			int readableBytes = buf.readableBytes();

			buf.setInt(0, readableBytes - 4); // reset the message size

			return buf;
		} catch (RuntimeException e) {
			buf.release();

			throw e;
		}
	}

	private void encodeMessage(Context ctx, ByteBuf buf, Message msg) {
		if (msg instanceof Transaction) {
			Transaction transaction = (Transaction) msg;
			List<Message> children = transaction.getChildren();

			Codec.TRANSACTION_START.encode(ctx, buf, msg);

			for (Message child : children) {
				if (child != null) {
					encodeMessage(ctx, buf, child);
				}
			}

			Codec.TRANSACTION_END.encode(ctx, buf, msg);
		} else if (msg instanceof Event) {
			Codec.EVENT.encode(ctx, buf, msg);
		} else if (msg instanceof Metric) {
			Codec.METRIC.encode(ctx, buf, msg);
		} else if (msg instanceof Heartbeat) {
			Codec.HEARTBEAT.encode(ctx, buf, msg);
		} else if (msg instanceof Trace) {
			Codec.TRACE.encode(ctx, buf, msg);
		} else {
			throw new RuntimeException(String.format("Unsupported message(%s).", msg));
		}
	}

	@Override
	public void reset() {
	}

	enum Codec {
		HEADER {
			@Override
			protected Message decode(Context ctx, ByteBuf buf) {
				MessageTree tree = ctx.getMessageTree();
				String version = ctx.getVersion(buf);

				if (ID.equals(version)) {
					tree.setDomain(ctx.readString(buf));
					tree.setHostName(ctx.readString(buf));
					tree.setIpAddress(ctx.readString(buf));
					tree.setThreadGroupName(ctx.readString(buf));
					tree.setThreadId(ctx.readString(buf));
					tree.setThreadName(ctx.readString(buf));
					tree.setMessageId(ctx.readString(buf));
					tree.setParentMessageId(ctx.readString(buf));
					tree.setRootMessageId(ctx.readString(buf));
					tree.setSessionToken(ctx.readString(buf));
				} else {
					throw new RuntimeException(String.format("Unrecognized version(%s) for binary message codec!", version));
				}

				return null;
			}

			@Override
			protected void encode(Context ctx, ByteBuf buf, Message msg) {
				MessageTree tree = ctx.getMessageTree();

				ctx.writeVersion(buf, ID);
				ctx.writeString(buf, tree.getDomain());
				ctx.writeString(buf, tree.getHostName());
				ctx.writeString(buf, tree.getIpAddress());
				ctx.writeString(buf, tree.getThreadGroupName());
				ctx.writeString(buf, tree.getThreadId());
				ctx.writeString(buf, tree.getThreadName());
				ctx.writeString(buf, tree.getMessageId());
				ctx.writeString(buf, tree.getParentMessageId());
				ctx.writeString(buf, tree.getRootMessageId());
				ctx.writeString(buf, tree.getSessionToken());
			}
		},

		TRANSACTION_START {
			@Override
			protected Message decode(Context ctx, ByteBuf buf) {
				long timestamp = ctx.readTimestamp(buf);
				String type = ctx.readString(buf);
				String name = ctx.readString(buf);

				if ("System".equals(type) && name.startsWith("UploadMetric")) {
					name = "UploadMetric";
				}

				DefaultTransaction t = new DefaultTransaction(type, name);

				t.setTimestamp(timestamp);
				ctx.pushTransaction(t);

				MessageTree tree = ctx.getMessageTree();
				if (tree instanceof DefaultMessageTree) {
					tree.getTransactions().add(t);
				}

				return t;
			}

			@Override
			protected void encode(Context ctx, ByteBuf buf, Message msg) {
				ctx.writeId(buf, 't');
				ctx.writeTimestamp(buf, msg.getTimestamp());
				ctx.writeString(buf, msg.getType());
				ctx.writeString(buf, msg.getName());
			}
		},

		TRANSACTION_END {
			@Override
			protected Message decode(Context ctx, ByteBuf buf) {
				String status = ctx.readString(buf);
				String data = ctx.readString(buf);
				long durationInMicros = ctx.readDuration(buf);
				DefaultTransaction t = ctx.popTransaction();

				t.setStatus(status);
				t.addData(data);
				t.setDurationInMicros(durationInMicros);
				return t;
			}

			@Override
			protected void encode(Context ctx, ByteBuf buf, Message msg) {
				Transaction t = (Transaction) msg;

				ctx.writeId(buf, 'T');
				ctx.writeString(buf, msg.getStatus());
				ctx.writeString(buf, msg.getData().toString());
				ctx.writeDuration(buf, t.getDurationInMicros());
			}
		},

		EVENT {
			@Override
			protected Message decode(Context ctx, ByteBuf buf) {
				long timestamp = ctx.readTimestamp(buf);
				String type = ctx.readString(buf);
				String name = ctx.readString(buf);
				String status = ctx.readString(buf);
				String data = ctx.readString(buf);
				DefaultEvent e = new DefaultEvent(type, name);

				e.setTimestamp(timestamp);
				e.setStatus(status);
				e.addData(data);

				MessageTree tree = ctx.getMessageTree();
				if (tree instanceof DefaultMessageTree) {
					tree.getEvents().add(e);
				}

				return e;
			}

			@Override
			protected void encode(Context ctx, ByteBuf buf, Message msg) {
				ctx.writeId(buf, 'E');
				ctx.writeTimestamp(buf, msg.getTimestamp());
				ctx.writeString(buf, msg.getType());
				ctx.writeString(buf, msg.getName());
				ctx.writeString(buf, msg.getStatus());
				ctx.writeString(buf, msg.getData().toString());
			}
		},

		METRIC {
			@Override
			protected Message decode(Context ctx, ByteBuf buf) {
				long timestamp = ctx.readTimestamp(buf);
				String type = ctx.readString(buf);
				String name = ctx.readString(buf);
				String status = ctx.readString(buf);
				String data = ctx.readString(buf);
				DefaultMetric m = new DefaultMetric(type, name);

				m.setTimestamp(timestamp);
				m.setStatus(status);
				m.addData(data);

				MessageTree tree = ctx.getMessageTree();
				if (tree instanceof DefaultMessageTree) {
					tree.getMetrics().add(m);
				}

				return m;
			}

			@Override
			protected void encode(Context ctx, ByteBuf buf, Message msg) {
				ctx.writeId(buf, 'M');
				ctx.writeTimestamp(buf, msg.getTimestamp());
				ctx.writeString(buf, msg.getType());
				ctx.writeString(buf, msg.getName());
				ctx.writeString(buf, msg.getStatus());
				ctx.writeString(buf, msg.getData().toString());
			}
		},

		HEARTBEAT {
			@Override
			protected Message decode(Context ctx, ByteBuf buf) {
				long timestamp = ctx.readTimestamp(buf);
				String type = ctx.readString(buf);
				String name = ctx.readString(buf);
				String status = ctx.readString(buf);
				String data = ctx.readString(buf);
				DefaultHeartbeat h = new DefaultHeartbeat(type, name);

				h.setTimestamp(timestamp);
				h.setStatus(status);
				h.addData(data);

				MessageTree tree = ctx.getMessageTree();
				if (tree instanceof DefaultMessageTree) {
					tree.getHeartbeats().add(h);
				}

				return h;
			}

			@Override
			protected void encode(Context ctx, ByteBuf buf, Message msg) {
				ctx.writeId(buf, 'H');
				ctx.writeTimestamp(buf, msg.getTimestamp());
				ctx.writeString(buf, msg.getType());
				ctx.writeString(buf, msg.getName());
				ctx.writeString(buf, msg.getStatus());
				ctx.writeString(buf, msg.getData().toString());
			}
		},

		TRACE {
			@Override
			protected Message decode(Context ctx, ByteBuf buf) {
				long timestamp = ctx.readTimestamp(buf);
				String type = ctx.readString(buf);
				String name = ctx.readString(buf);
				String status = ctx.readString(buf);
				String data = ctx.readString(buf);
				DefaultTrace t = new DefaultTrace(type, name);

				t.setTimestamp(timestamp);
				t.setStatus(status);
				t.addData(data);
				return t;
			}

			@Override
			protected void encode(Context ctx, ByteBuf buf, Message msg) {
				ctx.writeId(buf, 'L');
				ctx.writeTimestamp(buf, msg.getTimestamp());
				ctx.writeString(buf, msg.getType());
				ctx.writeString(buf, msg.getName());
				ctx.writeString(buf, msg.getStatus());
				ctx.writeString(buf, msg.getData().toString());
			}
		};

		protected abstract Message decode(Context ctx, ByteBuf buf);

		protected abstract void encode(Context ctx, ByteBuf buf, Message msg);
	}

	private static class Context {
		private static Charset UTF8 = Charset.forName("UTF-8");

		private MessageTree m_tree;

		private Stack<DefaultTransaction> m_parents = new Stack<DefaultTransaction>();

		private byte[] m_data = new byte[256];

		public Context(MessageTree tree) {
			m_tree = tree;
		}

		public void addChild(Message msg) {
			if (!m_parents.isEmpty()) {
				m_parents.peek().addChild(msg);
			} else {
				m_tree.setMessage(msg);
			}
		}

		public MessageTree getMessageTree() {
			return m_tree;
		}

		public String getVersion(ByteBuf buf) {
			byte[] data = new byte[3];

			buf.readBytes(data);
			return new String(data);
		}

		public DefaultTransaction popTransaction() {
			return m_parents.pop();
		}

		public void pushTransaction(DefaultTransaction t) {
			if (!m_parents.isEmpty()) {
				m_parents.peek().addChild(t);
			}

			m_parents.push(t);
		}

		public long readDuration(ByteBuf buf) {
			return readVarint(buf, 64);
		}

		public char readId(ByteBuf buf) {
			return (char) buf.readByte();
		}

		public String readString(ByteBuf buf) {
			int len = (int) readVarint(buf, 32);

			if (len == 0) {
				return "";
			} else if (len > m_data.length) {
				m_data = new byte[len];
			}

			buf.readBytes(m_data, 0, len);
			return new String(m_data, 0, len, StandardCharsets.UTF_8);
		}

		public long readTimestamp(ByteBuf buf) {
			return readVarint(buf, 64);
		}

		protected long readVarint(ByteBuf buf, int length) {
			int shift = 0;
			long result = 0;

			while (shift < length) {
				final byte b = buf.readByte();
				result |= (long) (b & 0x7F) << shift;
				if ((b & 0x80) == 0) {
					return result;
				}
				shift += 7;
			}

			throw new RuntimeException("Malformed variable int " + length + "!");
		}

		public void writeDuration(ByteBuf buf, long duration) {
			writeVarint(buf, duration);
		}

		public void writeId(ByteBuf buf, char id) {
			buf.writeByte(id);
		}

		public void writeString(ByteBuf buf, String str) {
			if (str == null || str.length() == 0) {
				writeVarint(buf, 0);
			} else {
				byte[] data = str.getBytes(UTF8);

				writeVarint(buf, data.length);
				buf.writeBytes(data);
			}
		}

		public void writeTimestamp(ByteBuf buf, long timestamp) {
			writeVarint(buf, timestamp); // TODO use relative value of root message timestamp
		}

		private void writeVarint(ByteBuf buf, long value) {
			while (true) {
				if ((value & ~0x7FL) == 0) {
					buf.writeByte((byte) value);
					return;
				} else {
					buf.writeByte(((byte) value & 0x7F) | 0x80);
					value >>>= 7;
				}
			}
		}

		public void writeVersion(ByteBuf buf, String version) {
			buf.writeBytes(version.getBytes());
		}
	}

}
根据不同的数据类型,进行写入即可。
4.2 服务端原理
4.2.1 架构设计
单机的consumer架构设计如下:
如上图,CAT服务端在整个实时处理中,基本上实现了全异步化处理。
- 消息接受是基于Netty的NIO实现。
- 消息接受到服务端就存放内存队列,然后程序开启一个线程会消费这个消息做消息分发。
- 每个消息都会有一批线程并发消费各自队列的数据,以做到消息处理的隔离。
- 消息存储是先存入本地磁盘,然后异步上传到HDFS文件,这也避免了强依赖HDFS。
当某个报表处理器处理来不及时候,比如Transaction报表处理比较慢,可以通过配置支持开启多个Transaction处理线程,并发消费消息。
4.2.2 消息ID设计
消息ID的设计
CAT每个消息都有一个唯一的ID,这个ID在客户端生成,后续都通过这个ID在进行消息内容的查找。典型的RPC消息串起来的问题,比如A调用B的时候,在A这端生成一个Message-ID,在A调用B的过程中,将Message-ID作为调用传递到B端,在B执行过程中,B用context传递的Message-ID作为当前监控消息的Message-ID。
CAT消息的Message-ID格式ShopWeb-0a010680-375030-2,CAT消息一共分为四段:
- 第一段是应用名shop-web。
- 第二段是当前这台机器的IP的16进制格式,0a01010680表示10.1.6.108。
- 第三段的375030,是系统当前时间除以小时得到的整点数。
- 第四段的2,是表示当前这个客户端在当前小时的顺序递增号。
4.2.3 存储数据设计
消息存储是CAT最有挑战的部分。关键问题是消息数量多且大,目前美团每天处理消息1000亿左右,大小大约100TB,单物理机高峰期每秒要处理100MB左右的流量。CAT服务端基于此流量做实时计算,还需要将这些数据压缩后写入磁盘。
整体存储结构如下图:
[外链图片转存失败,源站可能有防盗链机制,建议将图片保存下来直接上传(img-5q7SiXzD-1667320090215)(assert/server-3.png)]
CAT在写数据一份是Index文件,一份是Data文件.
- Data文件是分段GZIP压缩,每个分段大小小于64K,这样可以用16bits可以表示一个最大分段地址。
- 一个Message-ID都用需要48bits的大小来存索引,索引根据Message-ID的第四段来确定索引的位置,比如消息Message-ID为ShopWeb-0a010680-375030-2,这条消息ID对应的索引位置为2*48bits的位置。
- 48bits前面32bits存数据文件的块偏移地址,后面16bits存数据文件解压之后的块内地址偏移。
- CAT读取消息的时候,首先根据Message-ID的前面三段确定唯一的索引文件,在根据Message-ID第四段确定此Message-ID索引位置,根据索引文件的48bits读取数据文件的内容,然后将数据文件进行GZIP解压,在根据块内偏移地址读取出真正的消息内容。
参考链接
- CAT 3.0 开源发布,支持多语言客户端及多项性能提升


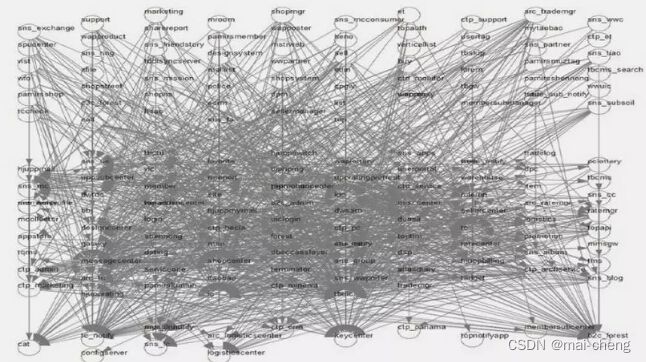


![[外链图片转存失败,源站可能有防盗链机制,建议将图片保存下来直接上传(img-1k9Gvlri-1667320090090)(assert\21.png)]](http://img.e-com-net.com/image/info8/3e71b69ab3e842b79c4377665a213349.jpg)

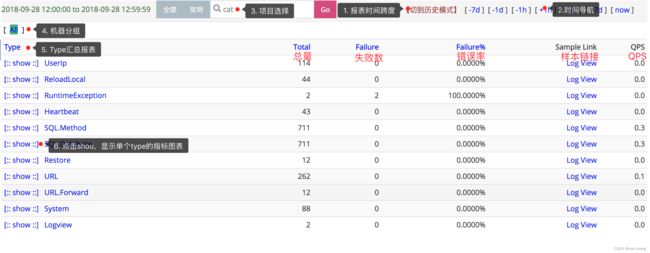
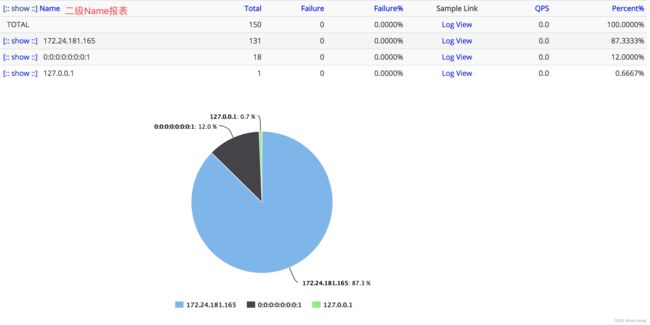


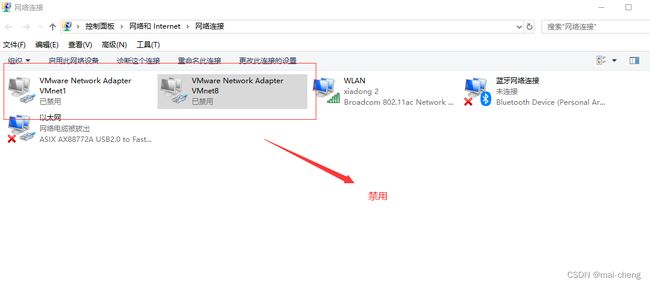


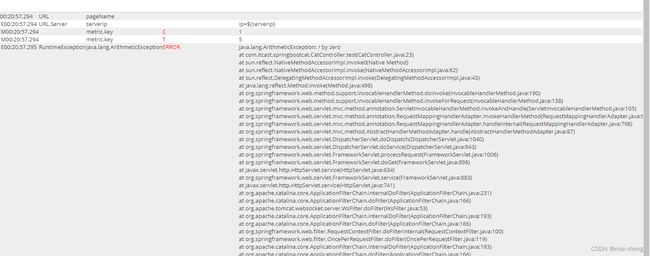

![[外链图片转存失败,源站可能有防盗链机制,建议将图片保存下来直接上传(img-JQqLYZGN-1667320090121)(assert\12.png)]](http://img.e-com-net.com/image/info8/94cd5cda41e845309d409ae51e8629a1.jpg)


![[外链图片转存失败,源站可能有防盗链机制,建议将图片保存下来直接上传(img-lhoo3LbO-1667320090133)(assert\21.png)]](http://img.e-com-net.com/image/info8/f8d8f22d29bf4f6491bfdc28878733d0.jpg)


