使用 spring.profiles.active 及 @profile 注解 动态化配置内部及外部配置
引言:使用 spring.profiles.active 参数,搭配@Profile注解,可以实现不同环境下(开发、测试、生产)配置参数的切换
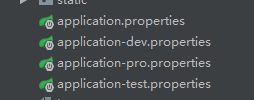
一.根据springboot的配置文件命名约定,结合active可在不同环境引用不同的properties外部配置
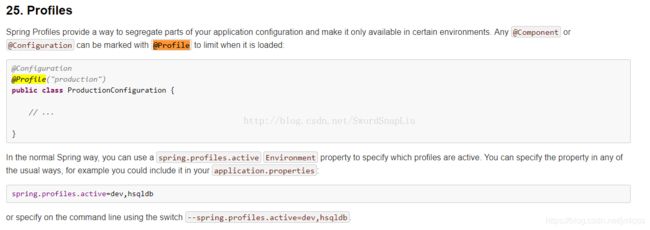
参考官方文档:

根据文档描述,我们除application.properties外,还可以根据命名约定( 命名格式:application-{profile}.properties)来配置,如果active赋予的参数没有与使用该命名约定格式文件相匹配的话,app则会默认从名为application-default.properties 的配置文件加载配置。
如:spring.profiles.active=hello-world,sender,dev 有三个参数,其中 dev 正好匹配下面配置中的application-dev.properties 配置文件,所以app启动时,项目会先从application-dev.properties加载配置,再从application.properties配置文件加载配置,如果有重复的配置,则会以application.properties的配置为准。(配置文件加载顺序详见官方文档:24. Externalized Configuration)

如此,我们就不用为了不同的运行环境而去更改大量的环境配置了(此处,dev、pro、test分别为:开发、生产、测试环境配置)
二.通过@Profile注解匹配active参数,动态加载内部配置
参考官方文档:

1.@Profile注解使用范围:@Configration 和 @Component 注解的类及其方法,其中包括继承了@Component的注解:@Service、@Controller、@Repository等…
2.@Profile可接受一个或者多个参数,例如:
@Profile({"tut1","hello-world"})
@Configuration
public class Tut1Config {

    @Bean
    public Queue hello() {
        return new Queue("hello");
    }

    @Profile("receiver")
    @Bean
    public Tut1Receiver receiver() {
        return new Tut1Receiver();
    }

    @Profile("sender")
    @Bean
    public Tut1Sender sender() {
        return new Tut1Sender();
    }
}
当 spring.profiles.active=hello-world,sender 时,该配置类生效,且第一个@Bean和第三个@Bean生效
如果spring.profiles.active=hello-world ,则该配置文件生效,第一个@Bean生效
如果spring.profiles.active=sender ,该配置文件未生效,所以下面的@Bean都不会生效
如此,当我们的项目需要运行在不同环境,特异化配置又比较多,该注解的优势是相当明显的!
分析二
根据系统环境的不同,Profile可以用来切换数据源。例如切换开发,测试,生产环境的数据源。
举个例子:
先创建配置类MainProfileConfig:
@Configuration
@PropertySource("classpath:/jdbc.properties")
public class MainProfileConfig implements EmbeddedValueResolverAware {

    @Value("${db.user}")
    private String user;

    private String driverClass;

    private StringValueResolver stringValueResolver;

    @Profile("test")
    @Bean("testDataSource")
    public  DataSource getTestDataSource(@Value("${db.password}") String pwd) throws PropertyVetoException {
        ComboPooledDataSource comboPooledDataSource = new ComboPooledDataSource();
        comboPooledDataSource.setUser(user);
        comboPooledDataSource.setPassword(pwd);
        comboPooledDataSource.setDriverClass(driverClass);
        return comboPooledDataSource;
    }

    @Profile("dev")
    @Bean("devDataSource")
    public  DataSource getDevDataSource(@Value("${db.password}") String pwd) throws PropertyVetoException {
        ComboPooledDataSource comboPooledDataSource = new ComboPooledDataSource();
        comboPooledDataSource.setUser(user);
        comboPooledDataSource.setPassword(pwd);
        comboPooledDataSource.setDriverClass(driverClass);
        return comboPooledDataSource;
    }

    @Profile("pro")
    @Bean("proDataSource")
    public  DataSource getproDataSource(@Value("${db.password}") String pwd) throws PropertyVetoException {
        ComboPooledDataSource comboPooledDataSource = new ComboPooledDataSource();
        comboPooledDataSource.setUser(user);
        comboPooledDataSource.setPassword(pwd);
        comboPooledDataSource.setDriverClass(driverClass);
        return comboPooledDataSource;
    }

    @Override
    public void setEmbeddedValueResolver(StringValueResolver stringValueResolver) {
        this.stringValueResolver = stringValueResolver;
        driverClass = stringValueResolver.resolveStringValue("${db.driverClass}");
    }
}
这里使用@Value和StringValueResolver来给属性赋值
public class ProFileTest {

    @Test
    public void  test(){
        AnnotationConfigApplicationContext applicationContext = new AnnotationConfigApplicationContext(MainProfileConfig.class);

        String[] beanNamesForType = applicationContext.getBeanNamesForType(DataSource.class);
        for (String name : beanNamesForType){
            System.out.println(name);
        }
        applicationContext.close();
    }
}
打印输出:
devDataSource
也可以使用代码的方式设置系统环境,创建容器的时候使用无参构造方法,然后设置属性。
@Test
    public void  test(){
        //创建容器
        AnnotationConfigApplicationContext applicationContext = new AnnotationConfigApplicationContext();
        //设置需要激活的环境
        applicationContext.getEnvironment().setActiveProfiles("test");
        //设置主配置类
        applicationContext.register(MainProfileConfig.class);
        //启动刷新容器
        applicationContext.refresh();

        String[] beanNamesForType = applicationContext.getBeanNamesForType(DataSource.class);
        for (String name : beanNamesForType){
            System.out.println(name);
        }
        applicationContext.close();
    }
打印输出:
testDataSource
setActiveProfiles设置环境的时候可以传入多个值,它的方法可以接受多个参数。
public interface ConfigurableEnvironment extends Environment, ConfigurablePropertyResolver {
    void setActiveProfiles(String... var1);
