使用 spring.profiles.active来区分配置(未全、未亲测)
转自https://blog.csdn.net/uniquewonderq/article/details/79963719
背景
很多时候,我们项目在开发环境和生成环境的环境配置是不一样的,例如,数据库配置,在开发的时候,我们一般用测试数据库,而在生产环境的时候,我们是用正式的数据,这时候,我们可以利用profile在不同的环境下使用不同的配置文件或者不同的配置。
dev:开发环境,该环境为了方便调试,配置比较随意。
test:测试环境,克隆生产环境的配置,用来测试正常工作。
prod:生产环境,正式拿出来对外使用,就是常说的真实环境。
dev–>test–>prod–>dev–>(遇到bug,就开始循环)
spring boot 提供profile的配置文件(第一种方式)
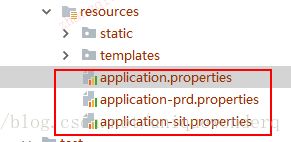
spring boot允许你通过命名约定按照一定的格式(application-{profile}.properties)来定义多个配置文件,然后在application.properyies通过spring.profiles.active来具体激活一个或者多个配置文件,如果没有没有指定任何profile的配置文件的话,spring boot默认会启动application-default.properties。
profile的配置文件可以按照application.properyies的放置位置一样,放于以下四个位置:
- 当前目录的 “/config”的子目录下
- 当前目录下
- classpath根目录的“/config”包下
- classpath的根目录下
demo 演示
定义两个profile文件
①application-sit.properties
#模拟测试变量
curvar=sit.curvar
②application-prd.properties
#模拟生产变量
curvar=prd.curvar

我们在application.properyies也写上,并把profile切换到application-sit.properties的配置文件
#修改tomcat的默认的端口号,将8080改为8889
server.port=8889

#启用shutdown endpoint的HTTP访问
endpoints.shutdown.enabled=true

#不需要用户名密码验证
endpoints.shutdown.sensitive=false

#默认curvar值
curvar=default.curvar

#切换配置文件
spring.profiles.active=sit
测试
package HelloWord;

import org.springframework.beans.factory.annotation.Value;
import org.springframework.web.bind.annotation.RequestMapping;
import org.springframework.web.bind.annotation.RestController;

@RestController
@RequestMapping("/task")
public class TaskController {

    @RequestMapping(value = {"/",""})
    public String hellTask(@Value("${curvar}")String cusvar ){

        return "hello task !! my current variable is " + cusvar;
    }

}
在浏览器中输入:http://localhost:8889/task/ 或者http://localhost:8889/task

在这里可以看到spring.profiles.active激活的profile不同,打印出来的结果也不一样。
@Profile注解(第二种方式)
举例数据库配置
先定义一个接口
public interface DBConnector {
    public void configure();
}
分别定义俩个实现类来实现它
package config;

import org.springframework.context.annotation.Profile;
import org.springframework.stereotype.Component;

/**
 * 测试数据库
 */
@Component
@Profile("sitdb")
public class SitDBConnector implements DBConnector {
    @Override
    public void configure() {
        System.out.println("sit-db");
    }
}
package config;
import org.springframework.context.annotation.Profile;
import org.springframework.stereotype.Component;

/**
 * 生产数据库
 */
@Component
@Profile("prddb")
public class PrdDBConnector implements DBConnector {
    @Override
    public void configure() {
        System.out.println("prd-db");
    }
}
通过在配置文件激活具体使用哪个实现类
#修改tomcat的默认的端口号,将8080改为8889
server.port=8889

#启用shutdown endpoint的HTTP访问
endpoints.shutdown.enabled=true

#不需要用户名密码验证
endpoints.shutdown.sensitive=false

#默认curvar值
curvar=default.curvar

#切换配置文件
#修改tomcat的默认的端口号,将8080改为8889
server.port=8889

#启用shutdown endpoint的HTTP访问
endpoints.shutdown.enabled=true

#不需要用户名密码验证
endpoints.shutdown.sensitive=false

#默认curvar值
curvar=default.curvar

#切换配置文件
spring.profiles.active=sitdb
然后就可以这么使用
package HelloWord;

import config.DBConnector;
import org.springframework.beans.factory.annotation.Autowired;
import org.springframework.beans.factory.annotation.Value;
import org.springframework.context.annotation.ComponentScan;
import org.springframework.web.bind.annotation.RequestMapping;
import org.springframework.web.bind.annotation.RestController;

@RestController
@RequestMapping("/task")
@ComponentScan(basePackages={"config"})
public class TaskController {
    @Autowired
    DBConnector connector;
    @RequestMapping(value = {"/",""})
    public String hellTask(@Value("${curvar}")String cusvar ){

        connector.configure();//最终打印配置的db
        return "hello task !! my current variable is " + cusvar;
    }
}
再次在浏览器中输入localhost:8889/task/

查看后台日志:
 说明生效。
说明生效。
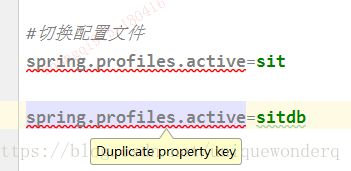
注意到,此时之前配置的property文件失效了,采用了默认的application.properties中配置的值。同时也看到,相同的属性只能配置一条,相同的属性不可以重复。

因此,spring.profiles.active是用来激活一个profile的,可以用spring.profiles.include来叠加profile
例如,刚刚我想让java中配置的,以及properties中配置的都生效为prd环境,
那么 application.properties内容为:
#修改tomcat的默认的端口号,将8080改为8889
server.port=8889

#启用shutdown endpoint的HTTP访问
endpoints.shutdown.enabled=true

#不需要用户名密码验证
endpoints.shutdown.sensitive=false

#默认curvar值
curvar=default.curvar

#切换配置文件(叠加了)
spring.profiles.include: prd,prddb
再次 在浏览器中输入 localhost:8889/task/

后台日志:

以上就是spring boot用profile的作用。
以下为可选(主要是命令行使用):
通过命令行设置属性值
使用过一段时间Spring Boot的用户,一定知道这条命令:java -jar xxx.jar --server.port=8888,通过使用–server.port属性来设置xxx.jar应用的端口为8888。
在命令行运行时,连续的两个减号–就是对application.properties中的属性值进行赋值的标识。所以,java -jar xxx.jar --server.port=8888命令,等价于我们在application.properties中添加属性server.port=8888,该设置在样例工程中可见,读者可通过删除该值或使用命令行来设置该值来验证。
通过命令行来修改属性值固然提供了不错的便利性,但是通过命令行就能更改应用运行的参数,那岂不是很不安全?是的,所以Spring Boot也贴心的提供了屏蔽命令行访问属性的设置,只需要这句设置就能屏蔽:SpringApplication.setAddCommandLineProperties(false)。
另外拓展的一个点:SpringBoot配置文件加载顺序
- bootstrap.properties(yml)
- application.properties(yml)
如果第2点中,有一行类似spring.profiles.active=dev这种代码的,则继续加载第三个文件 - application-dev.properties(yml)
bootstrap.yml 和application.yml 都可以用来配置参数。
bootstrap.yml 可以理解成系统级别的一些参数配置,这些参数一般是不会变动的。
application.yml 可以用来定义应用级别的。