昨天的屏幕到了,也用之前“发现的”Arduino-ST7789-Library“专用驱动库”进行了点亮操作,但总是感觉屏幕显示的效率差强人意。因为在做TFT屏幕选型的时候有了解Arduino生态下各种屏幕的驱动支持情况,发现一个感觉像“大神”一样的库:GFX Library For Arduino。
我买的屏幕是ST7789驱动,想着用专用的,应该不会错,就先有了上一篇的介绍。But, Sometimes, 专用的不一定完全合脚。
先来剧透下惊掉下巴的结果:GFX For Arduino以8倍效率的提升吊打“专用驱动”!!!
点击查看 【弱鸡版专用库介绍】,你看了这个可能会对背景更了解一些,顺便“专用库”的安装方式也不是通过Arduino库管理器进行的,是手动的!是手动的!是手动的!这篇文章也有介绍如何手动安装,大神可以略过…
GitHub地址
作者:Moon On Our Nation (貌似住在Hong Kong)。感谢作者的分享,开源伟大!
作者在著名的3D素材分享社区 Thingiverse,也有很优秀的作品,大家感兴趣可以去瞅瞅。作者Thingiverse主页
言归正传,先贴一张镇楼图(之前忽略了,我的错- -!):
这应该是作者对几种比较流行的驱动框架做的性能测试对比,我们可以看出来,还是很有优势的。
同时,支持的开发板也比较丰富,例如:
支持的屏幕驱动:
打开Arduino库管理器,输入“GFX Library For Arduino”,在结果中找到,选择最新版本,点击安装即可。
擂台方:Arduino-ST7789-Library
挑战方:GFX Library For Arduino
在一块1.3寸驱动ST7789 240*240的TFT屏幕上进行 刷屏上色,并画直线
我们先来看看运行效果:
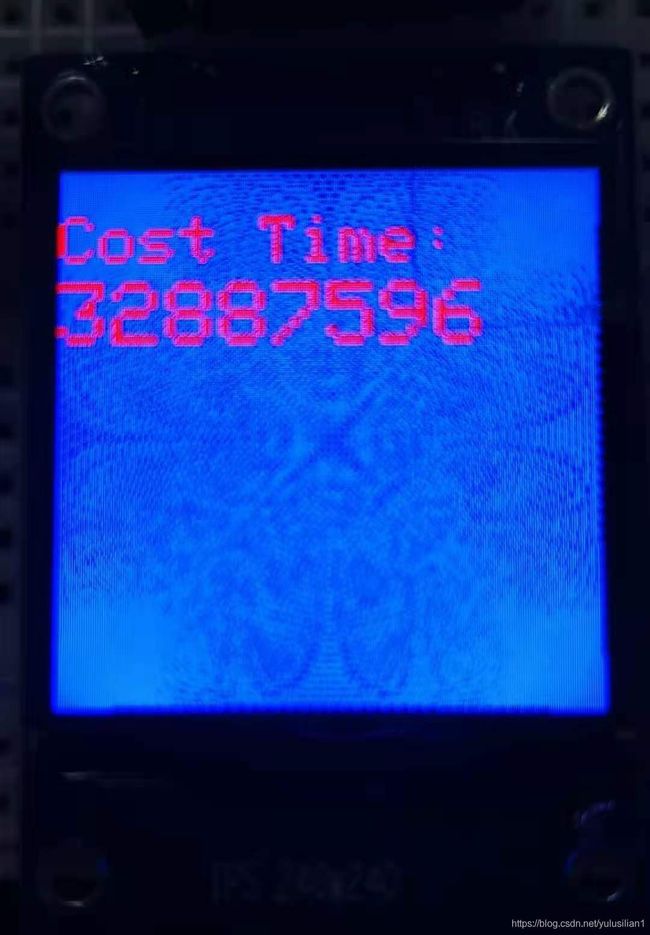
擂台方:实际结束大概耗时32S左右。CSDN单张图片最大5MB,我只截取了15S左右的GIF。我在下面附一张它运行完后的图片吧
挑战方 :耗时大概4S左右
看上面的结果,还是满震惊的,8倍左右的差距啊。
首先说一下引脚接线,和上一篇略有区别。本篇两种驱动都采取以下的接线方式,方便测试:
屏幕引脚 | Arduino引脚 | 说明 |
---|---|---|
GND | GND | 接地 |
VCC | 5V | 电源 |
SCL | 13 | 时钟线 |
SDA | 11 | 数据线 |
RES | 7 | 复位 |
DC | 8 | 命令控制 |
BLK | 6 | 背光 |
基本上按照擂台方的库文件默认定义来搭线。定义在 Arduino_GFX_Library.h 头文件内,因为我用的开发板是Arduino UNO,参考下图:
注:您也可以根据自己的实际需要去修改这个头文件里面的定义。
擂台方代码:
#include // Core graphics library by Adafruit
#include // Hardware-specific library for ST7789 (with or without CS pin)
#include
#define TFT_DC 8
#define TFT_RST 7 //9
#define TFT_CS 9 //10 // only for displays with CS pin
#define TFT_MOSI 11 // for hardware SPI data pin (all of available pins)
#define TFT_SCLK 13 // for hardware SPI sclk pin (all of available pins)
#define w 240
#define h 240
Arduino_ST7789 tft = Arduino_ST7789(TFT_DC, TFT_RST, TFT_MOSI, TFT_SCLK, TFT_CS); //for display with CS pin
static inline uint32_t micros_start() __attribute__((always_inline));
static inline uint32_t micros_start()
{
uint8_t oms = millis();
while ((uint8_t)millis() == oms)
;
return micros();
}
void setup(){
Serial.begin(9600);
tft.init(w, h);
}
void loop(){
uint32_t start = micros_start();
tft.fillScreen(BLACK);
testLines();
uint32_t usecLines = micros() - start;
tft.setCursor(0, 20);
tft.setTextSize(3);
tft.setTextColor(RED);
tft.println("Cost Time:");
tft.setCursor(0, 50);
tft.setTextSize(4);
tft.setTextColor(RED);
tft.println(usecLines);
delay(60 * 1000L);
}
int32_t testLines()
{
uint32_t start;
int32_t x1, y1, x2, y2;
start = micros_start();
x1 = y1 = 0;
y2 = h - 1;
for (x2 = 0; x2 < w; x2 += 6)
{
tft.drawLine(x1, y1, x2, y2, BLUE);
}
#ifdef ESP8266
yield(); // avoid long run triggered ESP8266 WDT restart
#endif
x2 = w - 1;
for (y2 = 0; y2 < h; y2 += 6)
{
tft.drawLine(x1, y1, x2, y2, BLUE);
}
#ifdef ESP8266
yield(); // avoid long run triggered ESP8266 WDT restart
#endif
x1 = w - 1;
y1 = 0;
y2 = h - 1;
for (x2 = 0; x2 < w; x2 += 6)
{
tft.drawLine(x1, y1, x2, y2, BLUE);
}
#ifdef ESP8266
yield(); // avoid long run triggered ESP8266 WDT restart
#endif
x2 = 0;
for (y2 = 0; y2 < h; y2 += 6)
{
tft.drawLine(x1, y1, x2, y2, BLUE);
}
#ifdef ESP8266
yield(); // avoid long run triggered ESP8266 WDT restart
#endif
x1 = 0;
y1 = h - 1;
y2 = 0;
for (x2 = 0; x2 < w; x2 += 6)
{
tft.drawLine(x1, y1, x2, y2, BLUE);
}
#ifdef ESP8266
yield(); // avoid long run triggered ESP8266 WDT restart
#endif
x2 = w - 1;
for (y2 = 0; y2 < h; y2 += 6)
{
tft.drawLine(x1, y1, x2, y2, BLUE);
}
#ifdef ESP8266
yield(); // avoid long run triggered ESP8266 WDT restart
#endif
x1 = w - 1;
y1 = h - 1;
y2 = 0;
for (x2 = 0; x2 < w; x2 += 6)
{
tft.drawLine(x1, y1, x2, y2, BLUE);
}
#ifdef ESP8266
yield(); // avoid long run triggered ESP8266 WDT restart
#endif
x2 = 0;
for (y2 = 0; y2 < h; y2 += 6)
{
tft.drawLine(x1, y1, x2, y2, BLUE);
}
#ifdef ESP8266
yield(); // avoid long run triggered ESP8266 WDT restart
#endif
return micros() - start;
}
挑战方代码:
#include
int32_t w, h;
/* More dev device declaration: https://github.com/moononournation/Arduino_GFX/wiki/Dev-Device-Declaration */
#if defined(DISPLAY_DEV_KIT)
Arduino_GFX *gfx = create_default_Arduino_GFX();
#else /* !defined(DISPLAY_DEV_KIT) */
/* More data bus class: https://github.com/moononournation/Arduino_GFX/wiki/Data-Bus-Class */
Arduino_DataBus *bus = create_default_Arduino_DataBus();
/* More display class: https://github.com/moononournation/Arduino_GFX/wiki/Display-Class */
Arduino_GFX *gfx = new Arduino_ST7789(bus, TFT_RST, 2 /* rotation */, true /* IPS */, 240 /* width */, 240 /* height */, 0 /* col offset 1 */, 80 /* row offset 1 */);
#endif /* !defined(DISPLAY_DEV_KIT) */
static inline uint32_t micros_start() __attribute__((always_inline));
static inline uint32_t micros_start()
{
uint8_t oms = millis();
while ((uint8_t)millis() == oms)
;
return micros();
}
void setup(){
Serial.begin(9600);
gfx->begin();
w = gfx->width();
h = gfx->height();
#ifdef TFT_BL
pinMode(TFT_BL, OUTPUT);
digitalWrite(TFT_BL, HIGH);
#endif
}
void loop(){
uint32_t start = micros_start();
gfx->fillScreen(BLACK);
testLines();
uint32_t usecLines = micros() - start;
gfx->setCursor(0, 20);
gfx->setTextSize(3);
gfx->setTextColor(RED);
gfx->println(F("Cost Time:"));
gfx->setCursor(0, 50);
gfx->setTextSize(4);
gfx->setTextColor(RED);
gfx->println(usecLines);
delay(60 * 1000L);
}
int32_t testLines()
{
uint32_t start;
int32_t x1, y1, x2, y2;
start = micros_start();
x1 = y1 = 0;
y2 = h - 1;
for (x2 = 0; x2 < w; x2 += 6)
{
gfx->drawLine(x1, y1, x2, y2, BLUE);
}
#ifdef ESP8266
yield(); // avoid long run triggered ESP8266 WDT restart
#endif
x2 = w - 1;
for (y2 = 0; y2 < h; y2 += 6)
{
gfx->drawLine(x1, y1, x2, y2, BLUE);
}
#ifdef ESP8266
yield(); // avoid long run triggered ESP8266 WDT restart
#endif
x1 = w - 1;
y1 = 0;
y2 = h - 1;
for (x2 = 0; x2 < w; x2 += 6)
{
gfx->drawLine(x1, y1, x2, y2, BLUE);
}
#ifdef ESP8266
yield(); // avoid long run triggered ESP8266 WDT restart
#endif
x2 = 0;
for (y2 = 0; y2 < h; y2 += 6)
{
gfx->drawLine(x1, y1, x2, y2, BLUE);
}
#ifdef ESP8266
yield(); // avoid long run triggered ESP8266 WDT restart
#endif
x1 = 0;
y1 = h - 1;
y2 = 0;
for (x2 = 0; x2 < w; x2 += 6)
{
gfx->drawLine(x1, y1, x2, y2, BLUE);
}
#ifdef ESP8266
yield(); // avoid long run triggered ESP8266 WDT restart
#endif
x2 = w - 1;
for (y2 = 0; y2 < h; y2 += 6)
{
gfx->drawLine(x1, y1, x2, y2, BLUE);
}
#ifdef ESP8266
yield(); // avoid long run triggered ESP8266 WDT restart
#endif
x1 = w - 1;
y1 = h - 1;
y2 = 0;
for (x2 = 0; x2 < w; x2 += 6)
{
gfx->drawLine(x1, y1, x2, y2, BLUE);
}
#ifdef ESP8266
yield(); // avoid long run triggered ESP8266 WDT restart
#endif
x2 = 0;
for (y2 = 0; y2 < h; y2 += 6)
{
gfx->drawLine(x1, y1, x2, y2, BLUE);
}
#ifdef ESP8266
yield(); // avoid long run triggered ESP8266 WDT restart
#endif
return micros() - start;
}
感兴趣的朋友可以将代码烧录到您的开发板实际验证下。