Pytest fixture 详细说明
Pytest fixture 详细说明
更多Python相关的学习文档,请参考https://github.com/yanghaiji/python-tutorial-books
添加小编微信 372787553 ,加入微信技术交流群
Pytest fixture
Software test fixtures 初始化测试功能。它们提供了一个固定的基线,以便测试可靠地执行并产生一致的、可重复的结果。初始化可以设置服务、状态或其他操作环境。在fixture函数中,每个函数的参数通常在test之后被命名为fixture。
pytest fixtures相对于传统的xUnit风格的setup/teardown函数提供了显著的改进:
- 装置有明确的名称,通过声明它们在测试函数、模块、类或整个项目中的使用来激活。
- 夹具以模块化的方式实现,因为每个夹具名称触发 夹具功能 可以使用其他固定装置。
- 夹具管理从简单的单元扩展到复杂的功能测试,允许根据配置和组件选项参数化夹具和测试,或者跨功能、类、模块或整个测试会话范围重复使用夹具。
- 无论使用多少夹具,拆卸逻辑都可以轻松、安全地进行管理,无需手动仔细处理错误或微观管理添加清理步骤的顺序。
此外,pytest继续支持 经典的Xunit风格设置 . 您可以混合这两种样式,根据您的喜好,逐步从经典样式移动到新样式。你也可以从现有的 unittest.TestCase style 或 nose based 项目。
Fixtures 使用 @pytest.fixture 装饰者, described below . Pytest有有用的内置设备,下面列出以供参考:
capfd以文本形式捕获输出到文件描述符
1和2.
capfdbinary以字节形式捕获输出到文件描述符
1和2.
caplog控制日志记录和访问日志条目。
capsys捕获,作为文本,输出到
sys.stdout和sys.stderr.
capsysbinary以字节形式捕获输出到
sys.stdout和sys.stderr.
cache跨pytest运行存储和检索值。
doctest_namespace提供注入到docstests命名空间中的dict。
monkeypatch临时修改类、函数、字典,
os.environ,以及其他对象。
pytestconfig访问配置值、pluginmanager和plugin hooks。
record_property向测试添加额外属性。
record_testsuite_property向测试套件添加额外属性。
recwarn记录测试函数发出的警告。
request提供有关执行测试功能的信息。
testdir提供一个临时测试目录来帮助运行和测试pytest插件。
tmp_path提供一个
pathlib.Path对象指向每个测试函数唯一的临时目录。
tmp_path_factory生成会话作用域的临时目录并返回
pathlib.Path物体。
tmpdir提供一个
py.path.local对象指向每个测试函数唯一的临时目录;替换为tmp_path.
tmpdir_factory生成会话作用域的临时目录并返回
py.path.local对象;替换为tmp_path_factory.
固定装置是什么?
在我们深入了解固定器是什么之前,让我们先来看看什么是测试。
最简单地说,测试的目的是查看特定行为的结果,并确保结果与您的预期一致。行为不是可以通过经验来衡量的,这就是为什么编写测试会很有挑战性的原因。
“行为”是指某些系统 作为回应 特定的情况和/或刺激。但确切地说 how 或 why 做了一些事情并不像做了什么那么重要 what 已经完成了。
您可以认为测试分为四个步骤:
- Arrange
- Act
- Assert
- Cleanup
安排 是我们为考试做准备的地方。这意味着几乎所有的东西,除了“ act “它把多米诺骨牌排成一排,这样 act 可以在一个改变状态的步骤中完成它的事情。这可能意味着准备对象、启动/终止服务、向数据库中输入记录,甚至是定义要查询的URL、为尚不存在的用户生成一些凭据,或者只是等待某个过程完成。
Act 是启动 行为 我们想测试一下。这一行为实现了被测系统(SUT)状态的改变,也是我们可以查看的改变后的状态,以便我们对行为做出判断。这通常采用函数/方法调用的形式。
断言 是我们观察结果状态的地方,检查尘埃落定后它看起来是否像我们预期的那样。这是我们收集证据来证明行为是否符合我们预期的地方。这个 assert 在我们的测试中,我们在哪里进行测量/观察,并对其应用我们的判断。如果什么东西应该是绿色的,我们会说 assert thing == "green" .
清理 是测试在其自身之后重新开始的位置,因此其他测试不会意外地受到它的影响。
在它的核心,测试最终是 act 和 断言 步骤,使用 安排 仅提供上下文的步骤。 行为 存在于 act 和 断言 .
返回到固定装置
从字面意义上讲,“装置”是每个 安排 步骤和数据。它们是测试完成任务所需的一切。
在基本级别上,测试函数通过将fixture声明为参数来请求fixture,如 test_ehlo(smtp_connection): 在前面的示例中。
在pytest中,“fixture”是您定义的用于此目的的函数。但它们不一定要局限于 安排 台阶。他们可以提供 act 步骤,对于设计更复杂的测试来说,这可能是一项强大的技术,特别是考虑到pytest的装置系统是如何工作的。但我们会更深入地探讨这一点。
我们可以告诉pytest一个特定的函数是一个fixture,方法是用 @pytest.fixture 。下面是一个简单的示例,说明pytest中的fixture可能是什么样子:
import pytest


class Fruit:
    def __init__(self, name):
        self.name = name

    def __eq__(self, other):
        return self.name == other.name


@pytest.fixture
def my_fruit():
    return Fruit("apple")


@pytest.fixture
def fruit_basket(my_fruit):
    return [Fruit("banana"), my_fruit]


def test_my_fruit_in_basket(my_fruit, fruit_basket):
    assert my_fruit in fruit_basket
测试也不必局限于单个装置。它们可以依赖于您想要的任意多个装置,装置也可以使用其他装置。这才是pytest的夹具系统真正闪耀的地方。
如果能让事情变得更干净,不要害怕拆散。
“请求”装置
所以固定装置就是我们 准备 对于一个测试,但是我们如何告诉pytest哪些测试和装置需要哪些装置呢?
在基本级别上,测试函数通过将fixture声明为参数来请求fixture,如 test_my_fruit_in_basket(my_fruit, fruit_basket): 在前面的示例中。
在基本级别上,pytest依赖于一个测试来告诉它它需要什么装置,所以我们必须将该信息构建到测试本身中。我们必须进行测试。“ 请求 它所依赖的装置,要做到这一点,我们必须将这些装置作为参数列在测试函数的“签名”中(这是 def test_something(blah, stuff, more): 线)。
当pytest运行测试时,它会查看该测试函数签名中的参数,然后搜索与这些参数同名的fixture。一旦pytest找到它们,它就会运行这些装置,捕获它们返回的内容(如果有的话),并将这些对象作为参数传递给测试函数。
快速实例
import pytest


class Fruit:
    def __init__(self, name):
        self.name = name
        self.cubed = False

    def cube(self):
        self.cubed = True


class FruitSalad:
    def __init__(self, *fruit_bowl):
        self.fruit = fruit_bowl
        self._cube_fruit()

    def _cube_fruit(self):
        for fruit in self.fruit:
            fruit.cube()


# Arrange
@pytest.fixture
def fruit_bowl():
    return [Fruit("apple"), Fruit("banana")]


def test_fruit_salad(fruit_bowl):
    # Act
    fruit_salad = FruitSalad(*fruit_bowl)

    # Assert
    assert all(fruit.cubed for fruit in fruit_salad.fruit)
在这个例子中, test_fruit_salad “ 请求 “ fruit_bowl (即 def test_fruit_salad(fruit_bowl): ),当pytest看到这一点时,它将执行 fruit_bowl 并将其返回的对象传递到 test_fruit_salad 作为 fruit_bowl 争论。
下面是如果我们用手做的话会发生的大致情况:
def fruit_bowl():
    return [Fruit("apple"), Fruit("banana")]


def test_fruit_salad(fruit_bowl):
    # Act
    fruit_salad = FruitSalad(*fruit_bowl)

    # Assert
    assert all(fruit.cubed for fruit in fruit_salad.fruit)


# Arrange
bowl = fruit_bowl()
test_fruit_salad(fruit_bowl=bowl)
装置可以 请求 其他固定装置
pytest最大的优势之一是其极其灵活的夹具系统。它允许我们将复杂的测试需求归结为更简单、更有组织的功能,在这些功能中,我们只需要让每个功能描述它们所依赖的东西。我们将更深入地介绍这一点,但现在,这里有一个快速示例来演示装置如何使用其他装置:
# contents of test_append.py
import pytest


# Arrange
@pytest.fixture
def first_entry():
    return "a"


# Arrange
@pytest.fixture
def order(first_entry):
    return [first_entry]


def test_string(order):
    # Act
    order.append("b")

    # Assert
    assert order == ["a", "b"]
请注意,这与上面的示例相同,但几乎没有更改。火柴里的固定装置 请求 固定装置就像测试一样。尽管如此, 请求 规则适用于进行测试的夹具。下面是如果我们手动完成此示例的工作方式:
def first_entry():
    return "a"


def order(first_entry):
    return [first_entry]


def test_string(order):
    # Act
    order.append("b")

    # Assert
    assert order == ["a", "b"]


entry = first_entry()
the_list = order(first_entry=entry)
test_string(order=the_list)
固定装置是可重复使用的
使pytest的装置系统如此强大的原因之一是,它使我们能够定义可以重复使用的通用设置步骤,就像使用普通函数一样。两个不同的测试可以请求相同的装置,并让pytest从该装置给出各自的测试结果。
这对于确保测试不受彼此影响非常有用。我们可以使用这个系统来确保每个测试都获得自己的新批次数据,并且是从干净的状态开始的,这样它就可以提供一致的、可重复的结果。
下面是一个如何派上用场的例子:
import pytest


# Arrange
@pytest.fixture
def first_entry():
    return "a"


# Arrange
@pytest.fixture
def order(first_entry):
    return [first_entry]


def test_string(order):
    # Act
    order.append("b")

    # Assert
    assert order == ["a", "b"]


def test_int(order):
    # Act
    order.append(2)

    # Assert
    assert order == ["a", 2]
这里的每个测试都有自己的副本 list 对象,这意味着 order Fixture正在执行两次(同样的情况也适用于 first_entry 固定装置)。如果我们也要手工完成这项工作,它将如下所示:
def first_entry():
    return "a"


def order(first_entry):
    return [first_entry]


def test_string(order):
    # Act
    order.append("b")

    # Assert
    assert order == ["a", "b"]


def test_int(order):
    # Act
    order.append(2)

    # Assert
    assert order == ["a", 2]


entry = first_entry()
the_list = order(first_entry=entry)
test_string(order=the_list)

entry = first_entry()
the_list = order(first_entry=entry)
test_int(order=the_list)
测试/夹具可以 请求 一次安装多个固定装置
测试和夹具并不局限于 请求 一次一个固定装置。他们可以想要多少就要求多少。下面是另一个快速演示的示例:
# contents of test_append.py
import pytest


# Arrange
@pytest.fixture
def first_entry():
    return "a"


# Arrange
@pytest.fixture
def second_entry():
    return 2


# Arrange
@pytest.fixture
def order(first_entry, second_entry):
    return [first_entry, second_entry]


# Arrange
@pytest.fixture
def expected_list():
    return ["a", 2, 3.0]


def test_string(order, expected_list):
    # Act
    order.append(3.0)

    # Assert
    assert order == expected_list
固定装置可以是 已请求 每个测试不止一次(缓存返回值)
固定装置也可以 已请求 在同一测试期间多次执行,pytest不会为该测试再次执行它们。这意味着我们可以 请求 依赖于它们的多个装置中的装置(甚至在测试本身中也是如此),而这些装置没有多次执行。
import pytest


# Arrange
@pytest.fixture
def first_entry():
    return "a"


# Arrange
@pytest.fixture
def order():
    return []


# Act
@pytest.fixture
def append_first(order, first_entry):
    return order.append(first_entry)


def test_string_only(append_first, order, first_entry):
    # Assert
    assert order == [first_entry]
如果A 已请求 每执行一次装置,就会执行一次 已请求 在测试期间,此测试将失败,因为 append_first 和 test_string_only 会看到 order 作为空列表(即 [] ),但由于 order 在第一次调用它之后被缓存(连同执行它可能具有的任何副作用),测试和 append_first 都引用了相同的对象,测试看到了效果 append_first 带在那个物体上。
自动使用设备(您不必请求设备)
有时,您可能希望有一个(甚至几个)您知道所有测试都将依赖的设备。“自动”灯具是一种自动进行所有测试的便捷方式 请求 他们。这可以去掉很多多余的东西 请求 ,甚至可以提供更高级的夹具用法(下面有更多信息)。
我们可以通过传入使设备成为自动设备。 autouse=True 给灯具的装饰师。下面是一个如何使用它们的简单示例:
# contents of test_append.py
import pytest


@pytest.fixture
def first_entry():
    return "a"


@pytest.fixture
def order(first_entry):
    return []


@pytest.fixture(autouse=True)
def append_first(order, first_entry):
    return order.append(first_entry)


def test_string_only(order, first_entry):
    assert order == [first_entry]


def test_string_and_int(order, first_entry):
    order.append(2)
    assert order == [first_entry, 2]
在这个例子中, append_first 灯具是一种自动使用的灯具。因为它是自动发生的,所以这两个测试都会受到它的影响,即使这两个测试都不是 已请求 它。这并不意味着他们 不能 是 已请求 不过,只是它不是 必要的 .
范围:跨类、模块、包或会话共享fixture
需要网络访问的设备依赖于连接性,通常创建成本很高。扩展前面的示例,我们可以添加 scope="module" 参数 @pytest.fixture 调用以导致 smtp_connection Fixture函数,负责创建与先前存在的SMTP服务器的连接,每次测试仅调用一次 模块 (默认情况下,每个测试调用一次 功能 )因此,一个测试模块中的多个测试功能将接收相同的 smtp_connection 夹具实例,节省时间。的可能值 scope 是: function , class , module , package 或 session .
下一个示例将fixture函数放入单独的 conftest.py fixture可以从目录中的多个测试模块访问以下功能:
# content of conftest.py
import pytest
import smtplib


@pytest.fixture(scope="module")
def smtp_connection():
    return smtplib.SMTP("smtp.gmail.com", 587, timeout=5)
# content of test_module.py


def test_ehlo(smtp_connection):
    response, msg = smtp_connection.ehlo()
    assert response == 250
    assert b"smtp.gmail.com" in msg
    assert 0  # for demo purposes


def test_noop(smtp_connection):
    response, msg = smtp_connection.noop()
    assert response == 250
    assert 0  # for demo purposes
这里, test_ehlo 需要 smtp_connection 夹具值。Pytest将发现并调用 @pytest.fixture 标记 smtp_connection 夹具功能。运行测试的方式如下:
$ pytest test_module.py
=========================== test session starts ============================
platform linux -- Python 3.x.y, pytest-6.x.y, py-1.x.y, pluggy-0.x.y
cachedir: $PYTHON_PREFIX/.pytest_cache
rootdir: $REGENDOC_TMPDIR
collected 2 items

test_module.py FF                                                    [100%]

================================= FAILURES =================================
________________________________ test_ehlo _________________________________

smtp_connection =

    def test_ehlo(smtp_connection):
        response, msg = smtp_connection.ehlo()
        assert response == 250
        assert b"smtp.gmail.com" in msg
>       assert 0  # for demo purposes
E       assert 0

test_module.py:7: AssertionError
________________________________ test_noop _________________________________

smtp_connection =

    def test_noop(smtp_connection):
        response, msg = smtp_connection.noop()
        assert response == 250
>       assert 0  # for demo purposes
E       assert 0

test_module.py:13: AssertionError
========================= short test summary info ==========================
FAILED test_module.py::test_ehlo - assert 0
FAILED test_module.py::test_noop - assert 0
============================ 2 failed in 0.12s =============================
你看这两个 assert 0 失败,更重要的是,您还可以看到 完全一样 smtp_connection 对象被传递到两个测试函数中,因为pytest在回溯中显示了传入的参数值。因此,两个测试函数使用 smtp_connection 像单个实例一样快速运行,因为它们重用同一个实例。
如果您决定希望在会话范围内 smtp_connection 例如,您可以简单地声明它:
@pytest.fixture(scope="session")
def smtp_connection():
    # the returned fixture value will be shared for
    # all tests requesting it
    ...
夹具范围
fixture是在测试首次请求时创建的,并根据它们的 scope :
function:默认范围,则在测试结束时销毁fixture。class:在课程中最后一次测试的拆卸过程中,夹具被破坏。module:在模块中最后一次测试的拆卸过程中,夹具被破坏。package:在拆下包装中的最后一次试验时,夹具被破坏。session:夹具在测试会话结束时被销毁。
注解
Pytest一次只缓存fixture的一个实例,这意味着当使用参数化fixture时,Pytest可以在给定范围内多次调用fixture。
动态范围
5.2 新版功能.
在某些情况下,您可能希望在不更改代码的情况下更改fixture的范围。为此,传递一个 scope . callable必须返回一个具有有效范围的字符串,并且在fixture定义期间只执行一次。将使用两个关键字参数调用它- fixture_name 作为一根绳子 config 配置对象。
这在处理需要时间进行设置的fixture时尤其有用,比如生成docker容器。您可以使用命令行参数来控制为不同环境生成的容器的范围。请参阅下面的示例。
def determine_scope(fixture_name, config):
    if config.getoption("--keep-containers", None):
        return "session"
    return "function"


@pytest.fixture(scope=determine_scope)
def docker_container():
    yield spawn_container()
夹具错误
pytest会尽最大努力将给定测试的所有装置按线性顺序排列,这样它就可以看到哪个装置出现在第一、第二、第三个位置,依此类推。但是,如果较早的fixture出现问题并引发异常,pytest将停止执行该测试的fixture,并将该测试标记为有错误。
When a test is marked as having an error, it doesn’t mean the test failed, though. It just means the test couldn’t even be attempted because one of the things it depends on had a problem.
这就是为什么在给定的测试中尽可能多地减少不必要的依赖是一个好主意。这样,不相关的问题不会导致我们对哪些可能有问题,哪些可能没有问题有一个不完整的了解。
这里有一个快速示例来帮助解释:
import pytest


@pytest.fixture
def order():
    return []


@pytest.fixture
def append_first(order):
    order.append(1)


@pytest.fixture
def append_second(order, append_first):
    order.extend([2])


@pytest.fixture(autouse=True)
def append_third(order, append_second):
    order += [3]


def test_order(order):
    assert order == [1, 2, 3]
如果,不管出于什么原因, order.append(1) 如果出现错误并引发异常,我们将无法知道 order.extend([2]) 或 order += [3] 也会有问题。之后 append_first 抛出异常,pytest将不再为 test_order ,它甚至不会尝试运行 test_order 它本身。唯一可以运行的就是 order 和 append_first .
拆卸/清理(AKA灯具定稿)
当我们运行我们的测试时,我们希望确保它们自己清理干净,这样它们就不会扰乱任何其他测试(同时也不会留下堆积如山的测试数据使系统变得臃肿)。pytest中的灯具提供了一个非常有用的拆卸系统,它允许我们定义每个灯具自身清理后所需的具体步骤。
这个系统可以通过两种方式加以利用。
1. yield 设备(推荐)
“屈服”灯具 yield 而不是 return 。使用这些装置,我们可以运行一些代码并将对象传递回请求装置/测试,就像其他装置一样。唯一的区别是:
return被替换为yield.- 将放置该装置的任何拆卸代码 之后 这个
yield.
一旦pytest计算出灯具的线性顺序,它就会运行每个灯具,直到它返回或屈服,然后转到列表中的下一个灯具来做同样的事情。
测试完成后,pytest将返回设备列表,但在 颠倒顺序 ,获取每一个屈服的代码,并运行其中的代码 之后 这个 yield 语句。
举个简单的例子,假设我们要测试从一个用户向另一个用户发送电子邮件。我们必须首先创建每个用户,然后将电子邮件从一个用户发送给另一个用户,最后断言另一个用户在其收件箱中收到了该消息。如果我们想要在测试运行后进行清理,我们可能必须确保在删除其他用户之前清空该用户的邮箱,否则系统可能会抱怨。
这看起来可能是这样的:
import pytest

from emaillib import Email, MailAdminClient


@pytest.fixture
def mail_admin():
    return MailAdminClient()


@pytest.fixture
def sending_user(mail_admin):
    user = mail_admin.create_user()
    yield user
    admin_client.delete_user(user)


@pytest.fixture
def receiving_user(mail_admin):
    user = mail_admin.create_user()
    yield user
    admin_client.delete_user(user)


def test_email_received(sending_user, receiving_user, email):
    email = Email(subject="Hey!", body="How's it going?")
    sending_user.send_email(email, receiving_user)
    assert email in receiving_user.inbox
因为 receiving_user 是安装过程中运行的最后一个装置,也是第一个在拆卸过程中运行的装置。
有一个风险是,即使把订单放在拆卸的那一边,也不能保证安全的清理。这一点在 安全拆卸 .
处理屈服夹具的错误
如果屈服装置在屈服前引发异常,pytest将不会在该屈服装置的异常之后尝试运行teardown代码。 yield 声明。但是,对于已经为该测试成功运行的每个灯具,pytest仍然会像往常一样尝试拆卸它们。
2.直接添加finalizer
虽然Year固定器被认为是更干净、更直接的选择,但是还有另一个选择,那就是将“终结器”功能直接添加到测试的 request-context 对象。它带来了与屈服装置类似的结果,但需要更多的冗长。
为了使用此方法,我们必须请求 request-context 对象(就像我们请求另一个fixture一样),我们需要为其添加teardown代码,然后将包含该teardown代码的可调用对象传递给它的 addfinalizer 方法。
不过,我们必须小心,因为pytest将在添加终结器后运行该终结器,即使该fixture在添加终结器后引发异常。因此,为了确保我们不会在不需要运行终结器代码的时候运行终结器代码,我们只需要在fixture完成需要拆除的操作之后才添加终结器。
下面是前面的示例使用 addfinalizer 方法:
import pytest

from emaillib import Email, MailAdminClient


@pytest.fixture
def mail_admin():
    return MailAdminClient()


@pytest.fixture
def sending_user(mail_admin):
    user = mail_admin.create_user()
    yield user
    admin_client.delete_user(user)


@pytest.fixture
def receiving_user(mail_admin, request):
    user = mail_admin.create_user()

    def delete_user():
        admin_client.delete_user(user)

    request.addfinalizer(delete_user)
    return user


@pytest.fixture
def email(sending_user, receiving_user, request):
    _email = Email(subject="Hey!", body="How's it going?")
    sending_user.send_email(_email, receiving_user)

    def empty_mailbox():
        receiving_user.delete_email(_email)

    request.addfinalizer(empty_mailbox)
    return _email


def test_email_received(receiving_user, email):
    assert email in receiving_user.inbox
它比屈服固定装置长一点,也稍微复杂一点,但它确实为你在紧要关头提供了一些细微的差别。
安全拆卸
PYTEST的夹具系统是 very 功能强大,但它仍然由计算机运行,所以它无法弄清楚如何安全地拆卸我们扔向它的所有东西。如果我们不小心,错误位置的错误可能会留下我们测试中的东西,这可能很快就会导致进一步的问题。
例如,考虑以下测试(基于上面的邮件示例):
import pytest

from emaillib import Email, MailAdminClient


@pytest.fixture
def setup():
    mail_admin = MailAdminClient()
    sending_user = mail_admin.create_user()
    receiving_user = mail_admin.create_user()
    email = Email(subject="Hey!", body="How's it going?")
    sending_user.send_emai(email, receiving_user)
    yield receiving_user, email
    receiving_user.delete_email(email)
    admin_client.delete_user(sending_user)
    admin_client.delete_user(receiving_user)


def test_email_received(setup):
    receiving_user, email = setup
    assert email in receiving_user.inbox
这个版本要紧凑得多,但也更难阅读,没有非常具描述性的装置名称,而且所有装置都不能很容易地重用。
还有一个更严重的问题,那就是如果设置中的任何一个步骤引发异常,则所有tearDown代码都不会运行。
一种选择可能是使用 addfinalizer 方法,而不是收益固定器,但这可能会变得相当复杂和难以维护(而且它将不再紧凑)。
安全夹具结构
最安全和最简单的装置结构要求将装置限制为每个装置只能执行一个状态更改操作,然后将它们与它们的拆卸代码捆绑在一起,如下所示 the email examples above 显示出来了。
状态更改操作可能失败但仍修改状态的可能性是不可能的,因为这些操作中的大多数往往都是这样 transaction -基于(至少在状态可能被抛在后面的测试级别)。因此,如果我们将任何成功的状态更改操作移动到单独的装置函数,并将其与其他可能失败的状态更改操作分开,以确保任何成功的状态更改操作被拆除,那么我们的测试将最有可能离开它们发现的测试环境。
例如,假设我们有一个网站,其中有一个登录页面,并且我们可以访问管理API,在那里我们可以生成用户。对于我们的测试,我们想要:
- 通过该管理API创建用户
- 使用Selenium启动浏览器
- 进入我们网站的登录页
- 以我们创建的用户身份登录
- 声明他们的名字在登录页的页眉中
我们不想让该用户留在系统中,也不想让浏览器会话保持运行,所以我们希望确保创建这些内容的fixture在它们自己之后被清除。
这看起来可能是这样的:
注解
在本例中,某些固定装置(即 base_url 和 admin_credentials )隐含着存在于其他地方。所以现在,让我们假设它们存在,我们只是不去看它们。
from uuid import uuid4
from urllib.parse import urljoin

from selenium.webdriver import Chrome
import pytest

from src.utils.pages import LoginPage, LandingPage
from src.utils import AdminApiClient
from src.utils.data_types import User


@pytest.fixture
def admin_client(base_url, admin_credentials):
    return AdminApiClient(base_url, **admin_credentials)


@pytest.fixture
def user(admin_client):
    _user = User(name="Susan", username=f"testuser-{uuid4()}", password="P4$$word")
    admin_client.create_user(_user)
    yield _user
    admin_client.delete_user(_user)


@pytest.fixture
def driver():
    _driver = Chrome()
    yield _driver
    _driver.quit()


@pytest.fixture
def login(driver, base_url, user):
    driver.get(urljoin(base_url, "/login"))
    page = LoginPage(driver)
    page.login(user)


@pytest.fixture
def landing_page(driver, login):
    return LandingPage(driver)


def test_name_on_landing_page_after_login(landing_page, user):
    assert landing_page.header == f"Welcome, {user.name}!"
依赖项的布局方式意味着不清楚 user Fixture将在 driver 固定装置。但是没关系,因为这些都是原子操作,所以先运行哪个操作并不重要,因为测试的事件顺序仍然是 linearizable 。但是什么呢? does 问题是,无论哪一个先运行,如果一个引发异常,而另一个不会引发异常,两个人都不会留下任何东西。如果 driver 在此之前执行 user 和 user 引发异常,驱动程序仍将退出,并且从未创建用户。如果 driver 如果是引发异常的人,那么驱动程序将永远不会启动,用户也永远不会被创建。
夹具可用性
夹具可用性是从测试的角度确定的。装置只有在定义装置的范围内时才可供测试请求。如果在类内定义了装置,则只能由该类内的测试请求它。但是,如果在模块的全局范围内定义了一个装置,那么该模块中的每个测试,即使它是在一个类中定义的,也可以请求它。
类似地,如果测试与定义自动使用夹具的范围相同,则该测试也只能受到自动使用夹具的影响(请参见 自动设备首先在其作用域内执行 )
一个装置也可以请求任何其他装置,不管它是在哪里定义的,只要请求它们的测试可以看到所有涉及的装置。
例如,下面是一个测试文件,其中包含一个装置 (outer )需要固定装置 (inner )来自未在中定义的作用域:
import pytest


@pytest.fixture
def order():
    return []


@pytest.fixture
def outer(order, inner):
    order.append("outer")


class TestOne:
    @pytest.fixture
    def inner(self, order):
        order.append("one")

    def test_order(self, order, outer):
        assert order == ["one", "outer"]


class TestTwo:
    @pytest.fixture
    def inner(self, order):
        order.append("two")

    def test_order(self, order, outer):
        assert order == ["two", "outer"]
从测试的角度来看,他们可以毫不费力地看到他们所依赖的每一个灯具:
所以当他们跑的时候, outer 会毫不费力地找到 inner ,因为pytest从测试的角度进行搜索。
注解
定义装置的作用域与实例化该装置的顺序无关:该顺序由所描述的逻辑强制执行 here .
conftest.py :跨多个文件共享装置
这个 conftest.py 文件用作为整个目录提供装置的方法。中定义的装置 conftest.py 可以由该包中的任何测试使用,而无需导入它们(pytest会自动发现它们)。
您可以有多个包含测试的嵌套目录/包,并且每个目录都可以有自己的目录 conftest.py 具有自己的灯具,添加到由提供的灯具上 conftest.py 父目录中的文件。
例如,假设测试文件结构如下:
tests/
    __init__.py

    conftest.py
        # content of tests/conftest.py
        import pytest

        @pytest.fixture
        def order():
            return []

        @pytest.fixture
        def top(order, innermost):
            order.append("top")

    test_top.py
        # content of tests/test_top.py
        import pytest

        @pytest.fixture
        def innermost(order):
            order.append("innermost top")

        def test_order(order, top):
            assert order == ["innermost top", "top"]

    subpackage/
        __init__.py

        conftest.py
            # content of tests/subpackage/conftest.py
            import pytest

            @pytest.fixture
            def mid(order):
                order.append("mid subpackage")

        test_subpackage.py
            # content of tests/subpackage/test_subpackage.py
            import pytest

            @pytest.fixture
            def innermost(order, mid):
                order.append("innermost subpackage")

            def test_order(order, top):
                assert order == ["mid subpackage", "innermost subpackage", "top"]
作用域的边界可以按如下方式可视化:
这些目录成为它们自己的作用域,其中在 conftest.py 该目录中的文件将对整个范围可用。
测试可以向上搜索(在圆圈外),但不能向下(在圆圈内)继续搜索。所以 tests/subpackage/test_subpackage.py::test_order 将能够找到 innermost 中定义的装置 tests/subpackage/test_subpackage.py ,而是在 tests/test_top.py 对它是不可用的,因为它必须向下一层(在圆圈内)才能找到它。
测试发现的第一个夹具是要使用的夹具,因此 fixtures can be overriden 如果您需要更改或扩展特定范围的操作。
您也可以使用 conftest.py 要实现的文件 local per-directory plugins .
来自第三方插件的装置
不过,不必在此结构中定义装置即可用于测试。它们也可以由安装的第三方插件提供,这就是许多最火爆的插件的运行方式。只要安装了这些插件,就可以从测试套件中的任何位置请求它们提供的夹具。
因为它们是从测试套件的结构之外提供的,所以第三方插件并不能真正提供这样的范围 conftest.py 测试套件中的文件和目录可以做到这一点。因此,pytest将如前所述通过作用域搜索跳出的装置,仅到达插件中定义的装置 last .
例如,给定以下文件结构:
tests/
    __init__.py

    conftest.py
        # content of tests/conftest.py
        import pytest

        @pytest.fixture
        def order():
            return []

    subpackage/
        __init__.py

        conftest.py
            # content of tests/subpackage/conftest.py
            import pytest

            @pytest.fixture(autouse=True)
            def mid(order, b_fix):
                order.append("mid subpackage")

        test_subpackage.py
            # content of tests/subpackage/test_subpackage.py
            import pytest

            @pytest.fixture
            def inner(order, mid, a_fix):
                order.append("inner subpackage")

            def test_order(order, inner):
                assert order == ["b_fix", "mid subpackage", "a_fix", "inner subpackage"]
如果 plugin_a 已安装,并提供夹具 a_fix 和 plugin_b 已安装,并提供夹具 b_fix ,则测试对灯具的搜索将如下所示:
pytest将仅搜索 a_fix 和 b_fix 在插件中,先在里面的作用域中搜索它们 tests/ .
共享测试数据
如果您想让来自文件的测试数据对您的测试可用,一个很好的方法是将这些数据加载到一个夹具中,供测试使用。这利用了pytest的自动缓存机制。
另一个好方法是将数据文件添加到 tests folder. There are also community plugins available to help managing this aspect of testing, e.g. pytest-datadir 和 pytest-datafiles .
卫浴装置实例化顺序
When pytest wants to execute a test, once it knows what fixtures will be executed, it has to figure out the order they’ll be executed in. To do this, it considers 3 factors:
- 范围
- 依赖项
- 汽车旅馆
除了重合之外,装置或测试的名称、它们的定义位置、定义顺序以及请求装置的顺序都不会影响执行顺序。虽然pytest会努力确保这样的巧合在一次又一次的运行中保持一致,但这不是应该依赖的东西。如果您想要控制顺序,最安全的方法是依赖这3件事,并确保清楚地建立了依赖关系。
首先执行作用域较高的装置
在fixture的函数请求中,那些更高范围的(例如 session )在较低范围的装置(如 function 或 class )
下面是一个例子:
import pytest


@pytest.fixture(scope="session")
def order():
    return []


@pytest.fixture
def func(order):
    order.append("function")


@pytest.fixture(scope="class")
def cls(order):
    order.append("class")


@pytest.fixture(scope="module")
def mod(order):
    order.append("module")


@pytest.fixture(scope="package")
def pack(order):
    order.append("package")


@pytest.fixture(scope="session")
def sess(order):
    order.append("session")


class TestClass:
    def test_order(self, func, cls, mod, pack, sess, order):
        assert order == ["session", "package", "module", "class", "function"]
测试将通过,因为较大的作用域装置将首先执行。
订单细分为:
相同顺序的装置基于依赖关系执行
When a fixture requests another fixture, the other fixture is executed first. So if fixture a requests fixture b, fixture b will execute first, because a depends on b and can’t operate without it. Even if a doesn’t need the result of b, it can still request b if it needs to make sure it is executed after b.
例如:
import pytest


@pytest.fixture
def order():
    return []


@pytest.fixture
def a(order):
    order.append("a")


@pytest.fixture
def b(a, order):
    order.append("b")


@pytest.fixture
def c(a, b, order):
    order.append("c")


@pytest.fixture
def d(c, b, order):
    order.append("d")


@pytest.fixture
def e(d, b, order):
    order.append("e")


@pytest.fixture
def f(e, order):
    order.append("f")


@pytest.fixture
def g(f, c, order):
    order.append("g")


def test_order(g, order):
    assert order == ["a", "b", "c", "d", "e", "f", "g"]
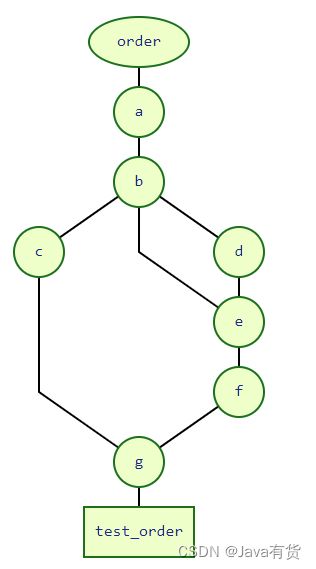
如果我们画出什么取决于什么,我们就会得到类似这样的东西:
每个灯具提供的规则(关于每个灯具必须遵循哪些灯具)足够全面,可以将其展平为:
必须通过这些请求提供足够的信息,以便pytest能够计算出清晰的线性依赖链,从而确定给定测试的操作顺序。如果有任何模棱两可的地方,并且操作顺序可以有多种解释,那么您应该假设pytest在任何时候都可以支持这些解释中的任何一种。
例如,如果 d 没有要求 c ,即图表将如下所示:
因为没有任何要求 c 以外 g 和 g 还要求 f ,现在还不清楚是否 c 应该走在前面/后面 f , e 或 d 。唯一为其设置的规则 c 它必须在 b 以前 g .
Pytest不知道在哪里 c 应该在这种情况下,所以应该假设它可以在 g 和 b .
这不一定是坏事,但要记住这一点。如果它们执行的顺序可能会影响测试的目标行为,或者可能会影响测试的结果,那么应该以允许pytest线性化/“扁平化”该顺序的方式明确地定义该顺序。
自动设备首先在其作用域内执行
假定自动装置应用于可以引用它们的每个测试,因此它们在该作用域中的其他装置之前执行。自动设备所请求的设备本身实际上变成了自动设备,用于实际的自动设备所适用的测试。
So if fixture a is autouse and fixture b is not, but fixture a requests fixture b, then fixture b will effectively be an autouse fixture as well, but only for the tests that a applies to.
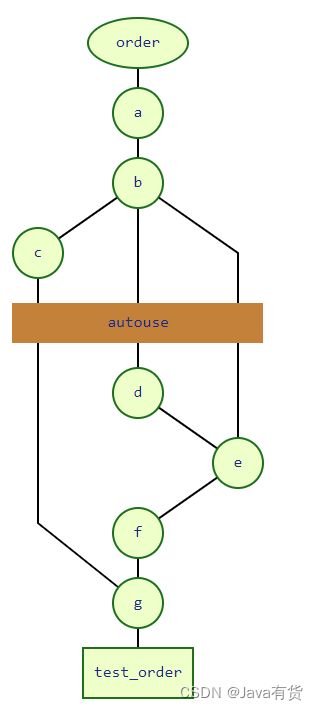
在最后一个示例中,图形变得不清楚是否 d 没有要求 c 。但是如果 c 是自动的,那么 b 和 a 实际上也是自动使用,因为 c 就看他们了。因此,它们将全部移到该范围内的非自动装置之上。
因此,如果测试文件如下所示:
import pytest


@pytest.fixture
def order():
    return []


@pytest.fixture
def a(order):
    order.append("a")


@pytest.fixture
def b(a, order):
    order.append("b")


@pytest.fixture(autouse=True)
def c(b, order):
    order.append("c")


@pytest.fixture
def d(b, order):
    order.append("d")


@pytest.fixture
def e(d, order):
    order.append("e")


@pytest.fixture
def f(e, order):
    order.append("f")


@pytest.fixture
def g(f, c, order):
    order.append("g")


def test_order_and_g(g, order):
    assert order == ["a", "b", "c", "d", "e", "f", "g"]
图表将如下所示:
因为 c 现在可以放在上面 d 在图形中,pytest可以再次将图形线性化为:
在这个例子中, c 使 b 和 a 还可以有效地自动切换固定装置。
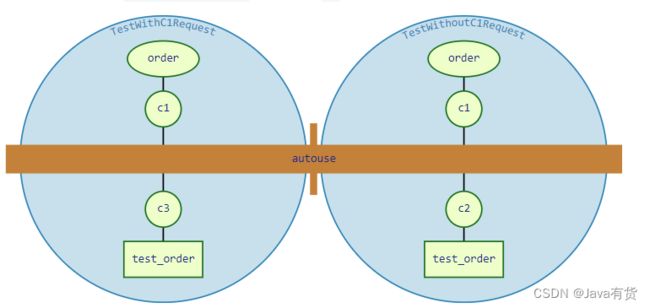
不过,要小心自动使用,因为自动使用固定装置将自动为每个可以到达它的测试执行,即使他们没有请求它。例如,请考虑以下文件:
import pytest


@pytest.fixture(scope="class")
def order():
    return []


@pytest.fixture(scope="class", autouse=True)
def c1(order):
    order.append("c1")


@pytest.fixture(scope="class")
def c2(order):
    order.append("c2")


@pytest.fixture(scope="class")
def c3(order, c1):
    order.append("c3")


class TestClassWithC1Request:
    def test_order(self, order, c1, c3):
        assert order == ["c1", "c3"]


class TestClassWithoutC1Request:
    def test_order(self, order, c2):
        assert order == ["c1", "c2"]
Even though nothing in TestClassWithC1Request is requesting c1, it still is executed for the tests inside it anyway:
但是,仅仅因为一个自动设备请求了非自动设备,这并不意味着非自动设备成为它可以应用到的所有上下文中的自动设备。它只能有效地成为实际自动使用装置(请求非自动装置的装置)可以应用的上下文的自动使用装置。
例如,查看此测试文件:
import pytest


@pytest.fixture
def order():
    return []


@pytest.fixture
def c1(order):
    order.append("c1")


@pytest.fixture
def c2(order):
    order.append("c2")


class TestClassWithAutouse:
    @pytest.fixture(autouse=True)
    def c3(self, order, c2):
        order.append("c3")

    def test_req(self, order, c1):
        assert order == ["c2", "c3", "c1"]

    def test_no_req(self, order):
        assert order == ["c2", "c3"]


class TestClassWithoutAutouse:
    def test_req(self, order, c1):
        assert order == ["c1"]

    def test_no_req(self, order):
        assert order == []
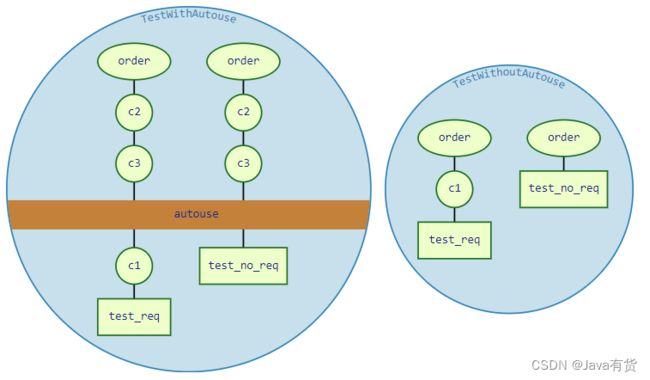
它会分解成这样的东西:
为了 test_req 和 test_no_req 里面 TestClassWithAutouse , c3 有效地使 c2 一个自动开关装置,这就是为什么 c2 和 c3 在未被请求的情况下为这两个测试执行,以及为什么 c2 和 c3 都是在执行之前执行的 c1 对于 test_req .
如果这使得 c2 一个 实际的 自动按键固定装置,然后 c2 也会为内部的测试执行 TestClassWithoutAutouse ,因为它们可以引用 c2 如果他们愿意的话。但事实并非如此,因为从 TestClassWithoutAutouse 测验, c2 不是自动装置,因为他们看不见 c3 .
运行多个 assert 安全的报表
有时,您可能希望在完成所有设置之后运行多个断言,这是有意义的,因为在更复杂的系统中,单个操作可以启动多个行为。pytest有一种便捷的方法来处理这个问题,它结合了我们到目前为止已经讨论过的一系列内容。
所有需要做的就是提高到更大的范围,然后拥有 act 步骤定义为自动使用灯具,最后,确保所有灯具都以更高级别的范围为目标。
我们拉吧 an example from above ,并稍微调整一下。假设除了检查标题中的欢迎消息外,我们还希望检查注销按钮和指向用户配置文件的链接。
让我们看一下如何构建它,这样我们就可以运行多个断言,而不必再次重复所有这些步骤。
注解
在本例中,某些固定装置(即 base_url 和 admin_credentials )隐含着存在于其他地方。所以现在,让我们假设它们存在,我们只是不去看它们。
# contents of tests/end_to_end/test_login.py
from uuid import uuid4
from urllib.parse import urljoin

from selenium.webdriver import Chrome
import pytest

from src.utils.pages import LoginPage, LandingPage
from src.utils import AdminApiClient
from src.utils.data_types import User


@pytest.fixture(scope="class")
def admin_client(base_url, admin_credentials):
    return AdminApiClient(base_url, **admin_credentials)


@pytest.fixture(scope="class")
def user(admin_client):
    _user = User(name="Susan", username=f"testuser-{uuid4()}", password="P4$$word")
    admin_client.create_user(_user)
    yield _user
    admin_client.delete_user(_user)


@pytest.fixture(scope="class")
def driver():
    _driver = Chrome()
    yield _driver
    _driver.quit()


@pytest.fixture(scope="class")
def landing_page(driver, login):
    return LandingPage(driver)


class TestLandingPageSuccess:
    @pytest.fixture(scope="class", autouse=True)
    def login(self, driver, base_url, user):
        driver.get(urljoin(base_url, "/login"))
        page = LoginPage(driver)
        page.login(user)

    def test_name_in_header(self, landing_page, user):
        assert landing_page.header == f"Welcome, {user.name}!"

    def test_sign_out_button(self, landing_page):
        assert landing_page.sign_out_button.is_displayed()

    def test_profile_link(self, landing_page, user):
        profile_href = urljoin(base_url, f"/profile?id={user.profile_id}")
        assert landing_page.profile_link.get_attribute("href") == profile_href
请注意,这些方法仅引用 self 在签名中作为一种形式。没有任何状态绑定到实际测试类,因为它可能在 unittest.TestCase 框架。一切都由最火爆的夹具系统管理。
每个方法只需请求它实际需要的装置,而不用担心顺序。这是因为 act Fitture是一个自动选择的装置,它确保所有其他装置在它之前执行。不需要进行更多的状态更改,因此测试可以随意进行任意数量的不更改状态的查询,而不会冒着触碰其他测试的风险。
这个 login Fixture也是在类中定义的,因为不是模块中的每个其他测试都期望成功登录,并且 act 对于另一个测试类,可能需要稍微不同地处理。例如,如果我们想要编写另一个关于提交错误凭据的测试场景,我们可以通过向测试文件添加类似以下内容来处理:
class TestLandingPageBadCredentials:
    @pytest.fixture(scope="class")
    def faux_user(self, user):
        _user = deepcopy(user)
        _user.password = "badpass"
        return _user

    def test_raises_bad_credentials_exception(self, login_page, faux_user):
        with pytest.raises(BadCredentialsException):
            login_page.login(faux_user)
fixtures可以反省请求的测试上下文
夹具功能可以接受 request 对象内省“请求”测试函数、类或模块上下文。进一步扩展前一个 smtp_connection fixture示例,让我们从使用fixture的测试模块中读取一个可选的服务器URL:
# content of conftest.py
import pytest
import smtplib


@pytest.fixture(scope="module")
def smtp_connection(request):
    server = getattr(request.module, "smtpserver", "smtp.gmail.com")
    smtp_connection = smtplib.SMTP(server, 587, timeout=5)
    yield smtp_connection
    print("finalizing {} ({})".format(smtp_connection, server))
    smtp_connection.close()
我们使用 request.module 属性以选择获取 smtpserver 来自测试模块的属性。如果我们再执行一次,没有什么改变:
$ pytest -s -q --tb=no
FFfinalizing  (smtp.gmail.com)

========================= short test summary info ==========================
FAILED test_module.py::test_ehlo - assert 0
FAILED test_module.py::test_noop - assert 0
2 failed in 0.12s
让我们快速创建另一个测试模块,该模块在其模块命名空间中实际设置服务器URL:
# content of test_anothersmtp.py

smtpserver = "mail.python.org"  # will be read by smtp fixture


def test_showhelo(smtp_connection):
    assert 0, smtp_connection.helo()
运行它:
$ pytest -qq --tb=short test_anothersmtp.py
F                                                                    [100%]
================================= FAILURES =================================
______________________________ test_showhelo _______________________________
test_anothersmtp.py:6: in test_showhelo
    assert 0, smtp_connection.helo()
E   AssertionError: (250, b'mail.python.org')
E   assert 0
------------------------- Captured stdout teardown -------------------------
finalizing  (mail.python.org)
========================= short test summary info ==========================
FAILED test_anothersmtp.py::test_showhelo - AssertionError: (250, b'mail....
哇!这个 smtp_connection fixture函数从模块名称空间中获取邮件服务器名称。
使用标记将数据传递到装置
使用 request 对象时,fixture还可以访问应用于测试函数的标记。这对于将数据从测试传递到夹具中非常有用:
import pytest


@pytest.fixture
def fixt(request):
    marker = request.node.get_closest_marker("fixt_data")
    if marker is None:
        # Handle missing marker in some way...
        data = None
    else:
        data = marker.args[0]

    # Do something with the data
    return data


@pytest.mark.fixt_data(42)
def test_fixt(fixt):
    assert fixt == 42
工厂作为固定装置
“工厂作为夹具”模式有助于在单个测试中多次需要夹具结果的情况下。夹具不直接返回数据,而是返回一个生成数据的函数。然后可以在测试中多次调用此函数。
工厂可以根据需要设置参数:
@pytest.fixture
def make_customer_record():
    def _make_customer_record(name):
        return {"name": name, "orders": []}

    return _make_customer_record


def test_customer_records(make_customer_record):
    customer_1 = make_customer_record("Lisa")
    customer_2 = make_customer_record("Mike")
    customer_3 = make_customer_record("Meredith")
如果工厂创建的数据需要管理,设备可以处理:
@pytest.fixture
def make_customer_record():

    created_records = []

    def _make_customer_record(name):
        record = models.Customer(name=name, orders=[])
        created_records.append(record)
        return record

    yield _make_customer_record

    for record in created_records:
        record.destroy()


def test_customer_records(make_customer_record):
    customer_1 = make_customer_record("Lisa")
    customer_2 = make_customer_record("Mike")
    customer_3 = make_customer_record("Meredith")
参数化夹具
fixture函数可以参数化,在这种情况下,它们将被多次调用,每次执行一组相关的测试,即依赖于该fixture的测试。测试函数通常不需要知道它们的重新运行。夹具参数化有助于为组件编写详尽的功能测试,这些组件本身可以通过多种方式进行配置。
扩展前面的示例,我们可以标记fixture以创建两个 smtp_connection fixture实例,它将导致使用fixture的所有测试运行两次。fixture函数通过 request 对象:
# content of conftest.py
import pytest
import smtplib


@pytest.fixture(scope="module", params=["smtp.gmail.com", "mail.python.org"])
def smtp_connection(request):
    smtp_connection = smtplib.SMTP(request.param, 587, timeout=5)
    yield smtp_connection
    print("finalizing {}".format(smtp_connection))
    smtp_connection.close()
主要变化是 params 具有 @pytest.fixture ,fixture函数将执行的每个值的列表,可以通过 request.param . 无需更改测试功能代码。让我们再跑一次:
$ pytest -q test_module.py
FFFF                                                                 [100%]
================================= FAILURES =================================
________________________ test_ehlo[smtp.gmail.com] _________________________

smtp_connection =

    def test_ehlo(smtp_connection):
        response, msg = smtp_connection.ehlo()
        assert response == 250
        assert b"smtp.gmail.com" in msg
>       assert 0  # for demo purposes
E       assert 0

test_module.py:7: AssertionError
________________________ test_noop[smtp.gmail.com] _________________________

smtp_connection =

    def test_noop(smtp_connection):
        response, msg = smtp_connection.noop()
        assert response == 250
>       assert 0  # for demo purposes
E       assert 0

test_module.py:13: AssertionError
________________________ test_ehlo[mail.python.org] ________________________

smtp_connection =

    def test_ehlo(smtp_connection):
        response, msg = smtp_connection.ehlo()
        assert response == 250
>       assert b"smtp.gmail.com" in msg
E       AssertionError: assert b'smtp.gmail.com' in b'mail.python.org\nPIPELINING\nSIZE 51200000\nETRN\nSTARTTLS\nAUTH DIGEST-MD5 NTLM CRAM-MD5\nENHANCEDSTATUSCODES\n8BITMIME\nDSN\nSMTPUTF8\nCHUNKING'

test_module.py:6: AssertionError
-------------------------- Captured stdout setup ---------------------------
finalizing
________________________ test_noop[mail.python.org] ________________________

smtp_connection =

    def test_noop(smtp_connection):
        response, msg = smtp_connection.noop()
        assert response == 250
>       assert 0  # for demo purposes
E       assert 0

test_module.py:13: AssertionError
------------------------- Captured stdout teardown -------------------------
finalizing
========================= short test summary info ==========================
FAILED test_module.py::test_ehlo[smtp.gmail.com] - assert 0
FAILED test_module.py::test_noop[smtp.gmail.com] - assert 0
FAILED test_module.py::test_ehlo[mail.python.org] - AssertionError: asser...
FAILED test_module.py::test_noop[mail.python.org] - assert 0
4 failed in 0.12s
我们看到我们的两个测试函数分别运行两次,针对不同的 smtp_connection 实例。还要注意的是, mail.python.org 连接第二次测试失败 test_ehlo 因为预期的服务器字符串与到达的服务器字符串不同。
pytest将构建一个字符串,该字符串是参数化fixture中每个fixture值的测试ID,例如 test_ehlo[smtp.gmail.com] 和 test_ehlo[mail.python.org] 在上面的例子中。这些ID可用于 -k 选择要运行的特定案例,当某个案例失败时,它们还将识别该特定案例。使用运行pytest --collect-only 将显示生成的ID。
数字、字符串、布尔和 None 将在测试ID中使用它们通常的字符串表示形式。对于其他对象,pytest将根据参数名称生成字符串。可以使用 ids 关键字参数:
# content of test_ids.py
import pytest


@pytest.fixture(params=[0, 1], ids=["spam", "ham"])
def a(request):
    return request.param


def test_a(a):
    pass


def idfn(fixture_value):
    if fixture_value == 0:
        return "eggs"
    else:
        return None


@pytest.fixture(params=[0, 1], ids=idfn)
def b(request):
    return request.param


def test_b(b):
    pass
上面显示了如何 ids 可以是要使用的字符串列表,也可以是将使用fixture值调用的函数,然后必须返回要使用的字符串。在后一种情况下,如果函数返回 None 然后将使用pytest的自动生成的ID。
运行上述测试将导致使用以下测试ID:
$ pytest --collect-only
=========================== test session starts ============================
platform linux -- Python 3.x.y, pytest-6.x.y, py-1.x.y, pluggy-0.x.y
cachedir: $PYTHON_PREFIX/.pytest_cache
rootdir: $REGENDOC_TMPDIR
collected 10 items


======================= 10 tests collected in 0.12s ========================
对参数化夹具使用标记
pytest.param() 可用于在参数化装置的值集中应用标记,方法与它们可用于的方法相同 @pytest.mark.parametrize .
例子:
# content of test_fixture_marks.py
import pytest


@pytest.fixture(params=[0, 1, pytest.param(2, marks=pytest.mark.skip)])
def data_set(request):
    return request.param


def test_data(data_set):
    pass
运行此测试将 skip 调用 data_set 有价值 2 :
$ pytest test_fixture_marks.py -v
=========================== test session starts ============================
platform linux -- Python 3.x.y, pytest-6.x.y, py-1.x.y, pluggy-0.x.y -- $PYTHON_PREFIX/bin/python
cachedir: $PYTHON_PREFIX/.pytest_cache
rootdir: $REGENDOC_TMPDIR
collecting ... collected 3 items

test_fixture_marks.py::test_data[0] PASSED                           [ 33%]
test_fixture_marks.py::test_data[1] PASSED                           [ 66%]
test_fixture_marks.py::test_data[2] SKIPPED (unconditional skip)     [100%]

======================= 2 passed, 1 skipped in 0.12s =======================
模块化:使用fixture函数中的fixture
除了在测试函数中使用fixture之外,fixture函数还可以使用其他fixture本身。这有助于夹具的模块化设计,并允许在许多项目中重复使用特定于框架的装置。作为一个简单的例子,我们可以扩展前面的例子并实例化一个对象 app 我们把已经定义好的 smtp_connection it资源:
# content of test_appsetup.py

import pytest


class App:
    def __init__(self, smtp_connection):
        self.smtp_connection = smtp_connection


@pytest.fixture(scope="module")
def app(smtp_connection):
    return App(smtp_connection)


def test_smtp_connection_exists(app):
    assert app.smtp_connection
我们在此声明 app 接收先前定义的 smtp_connection fixture并实例化 App 对象。让我们运行它:
$ pytest -v test_appsetup.py
=========================== test session starts ============================
platform linux -- Python 3.x.y, pytest-6.x.y, py-1.x.y, pluggy-0.x.y -- $PYTHON_PREFIX/bin/python
cachedir: $PYTHON_PREFIX/.pytest_cache
rootdir: $REGENDOC_TMPDIR
collecting ... collected 2 items

test_appsetup.py::test_smtp_connection_exists[smtp.gmail.com] PASSED [ 50%]
test_appsetup.py::test_smtp_connection_exists[mail.python.org] PASSED [100%]

============================ 2 passed in 0.12s =============================
由于参数化 smtp_connection ,测试将运行两次 App 实例和相应的SMTP服务器。没有必要 app 夹具应注意 smtp_connection 参数化,因为Pytest将充分分析夹具依赖关系图。
请注意 app 夹具的范围 module 并使用模块范围 smtp_connection 固定装置。如果 smtp_connection 被缓存在 session 范围:fixture可以使用“更广”范围的fixture,但不能使用另一种方式:会话范围的fixture不能以有意义的方式使用模块范围的fixture。
按设备实例自动分组测试
在测试运行期间,Pytest最小化活动设备的数量。如果您有一个参数化的fixture,那么使用它的所有测试将首先用一个实例执行,然后在创建下一个fixture实例之前调用终结器。此外,这简化了对创建和使用全局状态的应用程序的测试。
下面的示例使用两个参数化的设备,其中一个在每个模块的基础上确定范围,所有功能都执行 print 调用以显示安装/拆卸流程:
# content of test_module.py
import pytest


@pytest.fixture(scope="module", params=["mod1", "mod2"])
def modarg(request):
    param = request.param
    print("  SETUP modarg", param)
    yield param
    print("  TEARDOWN modarg", param)


@pytest.fixture(scope="function", params=[1, 2])
def otherarg(request):
    param = request.param
    print("  SETUP otherarg", param)
    yield param
    print("  TEARDOWN otherarg", param)


def test_0(otherarg):
    print("  RUN test0 with otherarg", otherarg)


def test_1(modarg):
    print("  RUN test1 with modarg", modarg)


def test_2(otherarg, modarg):
    print("  RUN test2 with otherarg {} and modarg {}".format(otherarg, modarg))
让我们在详细模式下运行测试,并查看打印输出:
$ pytest -v -s test_module.py
=========================== test session starts ============================
platform linux -- Python 3.x.y, pytest-6.x.y, py-1.x.y, pluggy-0.x.y -- $PYTHON_PREFIX/bin/python
cachedir: $PYTHON_PREFIX/.pytest_cache
rootdir: $REGENDOC_TMPDIR
collecting ... collected 8 items

test_module.py::test_0[1]   SETUP otherarg 1
  RUN test0 with otherarg 1
PASSED  TEARDOWN otherarg 1

test_module.py::test_0[2]   SETUP otherarg 2
  RUN test0 with otherarg 2
PASSED  TEARDOWN otherarg 2

test_module.py::test_1[mod1]   SETUP modarg mod1
  RUN test1 with modarg mod1
PASSED
test_module.py::test_2[mod1-1]   SETUP otherarg 1
  RUN test2 with otherarg 1 and modarg mod1
PASSED  TEARDOWN otherarg 1

test_module.py::test_2[mod1-2]   SETUP otherarg 2
  RUN test2 with otherarg 2 and modarg mod1
PASSED  TEARDOWN otherarg 2

test_module.py::test_1[mod2]   TEARDOWN modarg mod1
  SETUP modarg mod2
  RUN test1 with modarg mod2
PASSED
test_module.py::test_2[mod2-1]   SETUP otherarg 1
  RUN test2 with otherarg 1 and modarg mod2
PASSED  TEARDOWN otherarg 1

test_module.py::test_2[mod2-2]   SETUP otherarg 2
  RUN test2 with otherarg 2 and modarg mod2
PASSED  TEARDOWN otherarg 2
  TEARDOWN modarg mod2


============================ 8 passed in 0.12s =============================
您可以看到参数化模块的作用域 modarg 资源导致测试执行的顺序,导致可能的“活动”资源最少。的终结器 mod1 参数化资源在 mod2 资源已设置。
特别要注意,测试_0是完全独立的,首先完成。然后使用 mod1 ,然后用测试 mod1 ,然后用 mod2 最后用 mod2 .
这个 otherarg 参数化资源(具有功能范围)在使用它的每个测试之前设置,然后在使用它的每个测试之后拆下。
在类和模块中使用fixture usefixtures
有时测试函数不需要直接访问fixture对象。例如,测试可能需要使用空目录作为当前工作目录进行操作,但否则不关心具体目录。以下是如何使用标准 tempfile 实现夹具的测试。我们将fixture的创建分为conftest.py文件:
# content of conftest.py

import os
import shutil
import tempfile

import pytest


@pytest.fixture
def cleandir():
    old_cwd = os.getcwd()
    newpath = tempfile.mkdtemp()
    os.chdir(newpath)
    yield
    os.chdir(old_cwd)
    shutil.rmtree(newpath)
并通过一个 usefixtures 标记:
# content of test_setenv.py
import os
import pytest


@pytest.mark.usefixtures("cleandir")
class TestDirectoryInit:
    def test_cwd_starts_empty(self):
        assert os.listdir(os.getcwd()) == []
        with open("myfile", "w") as f:
            f.write("hello")

    def test_cwd_again_starts_empty(self):
        assert os.listdir(os.getcwd()) == []
由于 usefixtures 标记 cleandir 每个测试方法的执行都需要fixture,就像您为每个方法指定了“cleandir”函数参数一样。让我们运行它来验证夹具是否激活,测试是否通过:
$ pytest -q
..                                                                   [100%]
2 passed in 0.12s
您可以这样指定多个设备:
@pytest.mark.usefixtures("cleandir", "anotherfixture")
def test():
    ...
您可以使用 pytestmark :
pytestmark = pytest.mark.usefixtures("cleandir")
也可以将项目中所有测试所需的设备放入一个ini文件中:
# content of pytest.ini
[pytest]
usefixtures = cleandir
警告
注意这个标记在 夹具功能 . 例如,这个 无法按预期工作 :
@pytest.mark.usefixtures("my_other_fixture")
@pytest.fixture
def my_fixture_that_sadly_wont_use_my_other_fixture():
    ...
目前,这不会产生任何错误或警告,但这将由 #3664 .
覆盖不同级别的设备
在相对较大的测试套件中,您很可能需要 override 一 global 或 root 夹具与A locally 定义了一个,保持测试代码的可读性和可维护性。
覆盖文件夹(conftest)级别上的fixture
假设测试文件结构为:
tests/
    __init__.py

    conftest.py
        # content of tests/conftest.py
        import pytest

        @pytest.fixture
        def username():
            return 'username'

    test_something.py
        # content of tests/test_something.py
        def test_username(username):
            assert username == 'username'

    subfolder/
        __init__.py

        conftest.py
            # content of tests/subfolder/conftest.py
            import pytest

            @pytest.fixture
            def username(username):
                return 'overridden-' + username

        test_something.py
            # content of tests/subfolder/test_something.py
            def test_username(username):
                assert username == 'overridden-username'
如您所见,具有相同名称的fixture可以被某些测试文件夹级别覆盖。请注意 base 或 super 夹具可从 overriding 夹具很容易-在上面的例子中使用。
覆盖测试模块级别上的夹具
假设测试文件结构为:
tests/
    __init__.py

    conftest.py
        # content of tests/conftest.py
        import pytest

        @pytest.fixture
        def username():
            return 'username'

    test_something.py
        # content of tests/test_something.py
        import pytest

        @pytest.fixture
        def username(username):
            return 'overridden-' + username

        def test_username(username):
            assert username == 'overridden-username'

    test_something_else.py
        # content of tests/test_something_else.py
        import pytest

        @pytest.fixture
        def username(username):
            return 'overridden-else-' + username

        def test_username(username):
            assert username == 'overridden-else-username'
在上面的示例中,可以为某些测试模块重写具有相同名称的fixture。
通过直接测试参数化覆盖夹具
假设测试文件结构为:
tests/
    __init__.py

    conftest.py
        # content of tests/conftest.py
        import pytest

        @pytest.fixture
        def username():
            return 'username'

        @pytest.fixture
        def other_username(username):
            return 'other-' + username

    test_something.py
        # content of tests/test_something.py
        import pytest

        @pytest.mark.parametrize('username', ['directly-overridden-username'])
        def test_username(username):
            assert username == 'directly-overridden-username'

        @pytest.mark.parametrize('username', ['directly-overridden-username-other'])
        def test_username_other(other_username):
            assert other_username == 'other-directly-overridden-username-other'
在上面的示例中,fixture值被测试参数值覆盖。注意,即使测试没有直接使用夹具的值,也可以用这种方式覆盖夹具的值(在函数原型中没有提到)。
用非参数化夹具替代参数化夹具,反之亦然。
假设测试文件结构为:
tests/
    __init__.py

    conftest.py
        # content of tests/conftest.py
        import pytest

        @pytest.fixture(params=['one', 'two', 'three'])
        def parametrized_username(request):
            return request.param

        @pytest.fixture
        def non_parametrized_username(request):
            return 'username'

    test_something.py
        # content of tests/test_something.py
        import pytest

        @pytest.fixture
        def parametrized_username():
            return 'overridden-username'

        @pytest.fixture(params=['one', 'two', 'three'])
        def non_parametrized_username(request):
            return request.param

        def test_username(parametrized_username):
            assert parametrized_username == 'overridden-username'

        def test_parametrized_username(non_parametrized_username):
            assert non_parametrized_username in ['one', 'two', 'three']

    test_something_else.py
        # content of tests/test_something_else.py
        def test_username(parametrized_username):
            assert parametrized_username in ['one', 'two', 'three']

        def test_username(non_parametrized_username):
            assert non_parametrized_username == 'username'
在上面的示例中,参数化夹具被非参数化版本覆盖,而非参数化夹具被某些测试模块的参数化版本覆盖。显然,这同样适用于测试文件夹级别。
使用其他项目的固定装置
通常,提供pytest支持的项目将使用 entry points ,所以只要将这些项目安装到环境中,就可以使用这些设备。
如果要使用不使用入口点的项目中的装置,可以定义 pytest_plugins 穿着你的上衣 conftest.py 文件将该模块注册为插件。
假设你有固定装置 mylibrary.fixtures 你想在你的 app/tests 目录。
你需要做的就是定义 pytest_plugins 在里面 app/tests/conftest.py 指向那个模块。
pytest_plugins = "mylibrary.fixtures"
这有效地记录了 mylibrary.fixtures 作为一个插件,使其所有的fixture和hook都可以在中进行测试 app/tests .
注解
有时用户会 进口 但是不建议使用其他项目中的fixture:将fixture导入模块将在pytest中将它们注册为 定义 在那个模块里。
这会产生一些小的后果,比如多次出现在 pytest --help ,但事实并非如此 推荐 因为这种行为在将来的版本中可能会改变/停止工作。


