第二十天.
练习
寻找两个正序数组的中位数
给定两个大小分别为 m 和 n 的正序(从小到大)数组 nums1 和 nums2。请你找出并返回这两个正序数组的 中位数 。

算法的时间复杂度应该为 O(log (m+n)) 。


示例 1:

输入:nums1 = [1,3], nums2 = [2]
输出:2.00000
解释:合并数组 = [1,2,3] ,中位数 2
示例 2:

输入:nums1 = [1,2], nums2 = [3,4]
输出:2.50000
解释:合并数组 = [1,2,3,4] ,中位数 (2 + 3) / 2 = 2.5


提示:

nums1.length == m
nums2.length == n
0 <= m <= 1000
0 <= n <= 1000
1 <= m + n <= 2000
-106 <= nums1[i], nums2[i] <= 106
class Solution {
public double findMedianSortedArrays(int[] nums1, int[] nums2) {
// 始终保证nums1为较短的数组,nums1过长可能导致j为负数而越界
if (nums1.length > nums2.length) {
int[] temp = nums1;
nums1 = nums2;
nums2 = temp;
}
int m = nums1.length;
int n = nums2.length;
// m+n 为奇数,分割线要求左侧有 (m+n)/2 + 1 个元素
// m+n 为偶数,分割线要求左侧有 (m+n)/2 个元素
// 两种情况其实可以统一写作 (m+n+1)/2,表示对(m+n)/2向上取整
// 对整数来说,向上取整等于:(被除数 + (除数 - 1)) / 除数
// 也可以使用Math类中提供的库函数
int leftTotal = (m + n + 1) / 2;
int left = 0, right = m;
while (left < right) {
// +1 向上取整避免 left + 1 = right 时可能无法继续缩小区间而陷入死循环
int i = left + (right - left + 1) / 2;
int j = leftTotal - i;
//要找最大i,使得nums1[i-1] <= nums2[j]
//使用对立面缩小区间
if (nums1[i - 1] > nums2[j]) {
// [i+1, m]均不满足
right = i - 1;
} else {
// i满足说明[0, i-1]均不为满足条件的最大i,舍去以缩小区间
left = i;
}
}
//退出循环时left=right,表示最终nums1中分割线的位置
int i = left;
//nums2中分割线的位置
int j = leftTotal - left;
System.out.println(i);
//判断极端情况
int nums1LeftMax = (i == 0) ? Integer.MIN_VALUE : nums1[i - 1]; //nums1分割线左边没有元素
int nums2LeftMax = (j == 0) ? Integer.MIN_VALUE : nums2[j - 1]; //nums2分割线左边没有元素
int nums1RightMin = (i == m) ? Integer.MAX_VALUE : nums1[i]; //nums1分割线右边没有元素
int nums2RightMin = (j == n) ? Integer.MAX_VALUE : nums2[j]; //nums2分割线右边没有元素
if ((m + n) % 2 == 0) {
return (Math.max(nums1LeftMax, nums2LeftMax) + Math.min(nums1RightMin, nums2RightMin)) / 2.0;
} else {
return Math.max(nums1LeftMax, nums2LeftMax);
}
}
}说说感想,看题的第一眼就是直接俩数组合一起,然后正排列算中间的中位数不行了
确实行
超时
那就不行了
看了一眼官方给的代码,那叫一个头昏地暗
大神有四种解法,第一种跟我想的一样 第二种是用指针替代数组合并 但是时间都不达标
后两种都是二分查找,看的迷迷瞪瞪
思路懂了,代码不懂 就不解释了,误人子弟
八股
OSI 的七层模型都有哪些?
应用层 表示层 会话层 传输层 网络层 网络链路层 物理层
应用层:网络服务与最终用户的一个接口。
表示层:数据的表示、安全、压缩。
会话层:建立、管理、终止会话。
传输层:定义传输数据的协议端口号,以及流控和差错校验。
网络层:进行逻辑地址寻址,实现不同网络之间的路径选择。
数据链路层:建立逻辑连接、进行硬件地址寻址、差错校验等功能。
物理层:建立、维护、断开物理连接。
get 和 post 请求有哪些区别?
GET在浏览器回退时是无害的,而POST会再次提交请求。
GET产生的URL地址可以被Bookmark,而POST不可以。
GET请求会被浏览器主动cache,而POST不会,除非手动设置。
GET请求只能进行url编码,而POST支持多种编码方式。
GET请求参数会被完整保留在浏览器历史记录里,而POST中的参数不会被保留。
GET请求在URL中传送的参数是有长度限制的,而POST么有。
对参数的数据类型,GET只接受ASCII字符,而POST没有限制。
GET比POST更不安全,因为参数直接暴露在URL上,所以不能用来传递敏感信息。
GET参数通过URL传递,POST放在Request body中。
如何实现跨域?
方式一:图片ping或script标签跨域
方式二:JSONP跨域
方式三:CORS
方式四:window.name+iframe
方式五:window.postMessage()
方式六:修改document.domain跨子域
方式七:WebSocket
方式八:代理
说一下 tcp 粘包是怎么产生的?
在客户端与服务器保持长连接的情况下,可以一直传输数据,当有较小的数据包存在,会在发送缓冲区合并成一个包推送给接收方
而接收方也有一个接收缓冲区,一般情况下是一次取一个数据包,当缓冲区存在多个数据包时,就可以拿去多个,而这些数据包在缓冲区就称为粘包
基于阳哥第二季的SpringCloud(第五天)
Gateway新一代网关---为了管理网址信息
概述简介
官网
上一代zuul 1.X
https://github.com/Netflix/zuul/wiki
当前gateway
https://cloud.spring.io/spring-cloud-static/spring-cloud-gateway/2.2.1.RELEASE/reference/html/
是什么
概述:gateway是原zuul1.x版的替代
一句话:
SpringCloud Gateway 使用的Webflux中的reactor-netty响应式编程组件,底层使用了Netty通讯框架。
能干嘛
反向代理
鉴权
流量控制
熔断
日志监控
。。。。。。
微服务架构中网关在哪里
有Zuul了怎么又出来了gateway
我们为什么选择Gateway?
neflix不太靠谱,zuul2.0一直跳票,迟迟不发布
SpringCloud Gateway具有如下特性
基于Spring Framework 5, Project Reactor 和 Spring Boot 2.0 进行构建;
动态路由:能够匹配任何请求属性;
可以对路由指定 Predicate(断言)和 Filter(过滤器);
集成Hystrix的断路器功能;
集成 Spring Cloud 服务发现功能;
易于编写的 Predicate(断言)和 Filter(过滤器);
请求限流功能;
支持路径重写。
SpringCloud Gateway 与 Zuul的区别
1、Zuul 1.x,是一个基于阻塞 I/ O 的 API Gateway

2、Zuul 1.x 基于Servlet 2. 5使用阻塞架构它不支持任何长连接(如 WebSocket) Zuul 的设计模式和Nginx较像,每次 I/ O 操作都是从工作线程中选择一个执行,请求线程被阻塞到工作线程完成,但是差别是Nginx 用C++ 实现,Zuul 用 Java 实现,而 JVM 本身会有第一次加载较慢的情况,使得Zuul 的性能相对较差。

3、Zuul 2.x理念更先进,想基于Netty非阻塞和支持长连接,但SpringCloud目前还没有整合。 Zuul 2.x的性能较 Zuul 1.x 有较大提升。在性能方面,根据官方提供的基准测试, Spring Cloud Gateway 的 RPS(每秒请求数)是Zuul 的 1. 6 倍。

4、Spring Cloud Gateway 建立 在 Spring Framework 5、 Project Reactor 和 Spring Boot 2 之上, 使用非阻塞 API。

5、Spring Cloud Gateway 还 支持 WebSocket, 并且与Spring紧密集成拥有更好的开发体验
三大核心概念
Route(路由)
路由是构建网关的基本模块,它由ID,目标URI,一系列的断言和过滤器组成,如果断言为true则匹配该路由
Predicate(断言)
参考的是Java8的java.util.function.Predicate 开发人员可以匹配HTTP请求中的所有内容(例如请求头或请求参数),如果请求与断言相匹配则进行路由
Filter(过滤)
指的是Spring框架中GatewayFilter的实例,使用过滤器,可以在请求被路由前或者之后对请求进行修改。
总体
web请求,通过一些匹配条件,定位到真正的服务节点。并在这个转发过程的前后,进行一些精细化控制。
predicate就是我们的匹配条件;
而filter,就可以理解为一个无所不能的拦截器。有了这两个元素,再加上目标uri,就可以实现一个具体的路由了
Gateway工作流程
核心逻辑: 路由转发+执行过滤器链
入门配置
新建Module
cloud-gateway-gateway9527
POM
            org.springframework.cloud
            spring-cloud-starter-gateway


            org.springframework.cloud
            spring-cloud-starter-netflix-eureka-client


            com.atguigu.springcloud
            cloud-api-commons
            ${project.version}


            org.springframework.boot
            spring-boot-devtools
            runtime
            true


            org.projectlombok
            lombok
            true


            org.springframework.boot
            spring-boot-starter-test
            test
YML
server:
  port: 9527

spring:
  application:
    name: cloud-gateway

eureka:
  instance:
    hostname: cloud-gateway-service
  client: #服务提供者provider注册进eureka服务列表内
    service-url:
      register-with-eureka: true
      fetch-registry: true
      defaultZone: http://eureka7001.com:7001/eureka
业务类
无
主启动类
package com.atguigu.springcloud;

import org.springframework.boot.SpringApplication;
import org.springframework.boot.autoconfigure.SpringBootApplication;
import org.springframework.cloud.netflix.eureka.EnableEurekaClient;

@SpringBootApplication
@EnableEurekaClient
public class GateWayMain9527
{
    public static void main(String[] args)
    {
        SpringApplication.run(GateWayMain9527.class,args);
    }
}
9527网关如何做路由映射那???
cloud-provider-payment8001看看controller的访问地址 get lb
我们目前不想暴露8001端口,希望在8001外面套一层9527
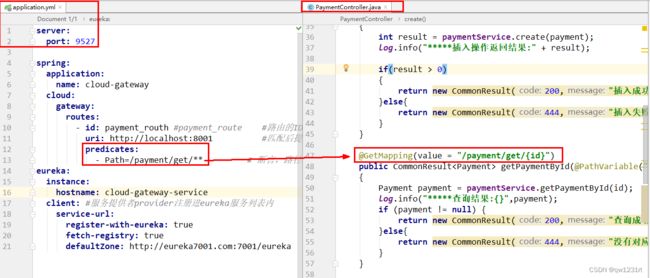
YML新增网关配置
 cloud:
    gateway:
      routes:
        - id: payment_routh #payment_route    #路由的ID,没有固定规则但要求唯一,建议配合服务名
          uri: http://localhost:8001          #匹配后提供服务的路由地址
          predicates:
            - Path=/payment/get/**         # 断言,路径相匹配的进行路由

        - id: payment_routh2 #payment_route    #路由的ID,没有固定规则但要求唯一,建议配合服务名
          uri: http://localhost:8001          #匹配后提供服务的路由地址
          predicates:
            - Path=/payment/lb/**         # 断言,路径相匹配的进行路由
----------------------------------------------------------------------------

server:
  port: 9527

spring:
  application:
    name: cloud-gateway
  cloud:
    gateway:
      routes:
        - id: payment_routh #payment_route    #路由的ID,没有固定规则但要求唯一,建议配合服务名
          uri: http://localhost:8001          #匹配后提供服务的路由地址
          predicates:
            - Path=/payment/get/**         # 断言,路径相匹配的进行路由

        - id: payment_routh2 #payment_route    #路由的ID,没有固定规则但要求唯一,建议配合服务名
          uri: http://localhost:8001          #匹配后提供服务的路由地址
          predicates:
            - Path=/payment/lb/**         # 断言,路径相匹配的进行路由

eureka:
  instance:
    hostname: cloud-gateway-service
  client: #服务提供者provider注册进eureka服务列表内
    service-url:
      register-with-eureka: true
      fetch-registry: true
      defaultZone: http://eureka7001.com:7001/eureka
测试
启动7001
启动8001
cloud-provider-payment8001
启动9527网关
访问说明
添加网关前
http://localhost:8001/payment/get/31
添加网关后
http://localhost:9527/payment/get/31
YML配置说明
Gateway网关路由有两种配置方式:
在配置文件yml中配置
见前面的步骤
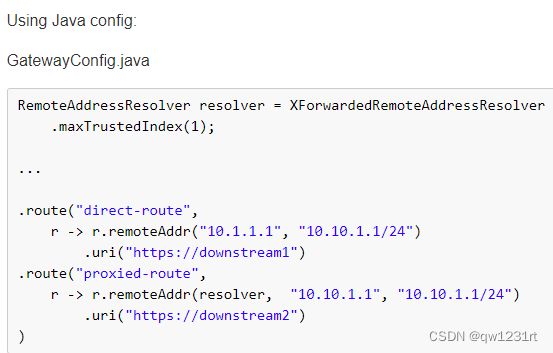
代码中注入RouteLocator的Bean
官网案例
百度国内新闻网址,需要外网
http://news.baidu.com/guonei
自己写一个
百度新闻
业务需求
通过9527网关访问到外网的百度新闻网址
编码
cloud-gateway-gateway9527
业务实现
config
package com.atguigu.springcloud.config;

import org.springframework.cloud.gateway.route.RouteLocator;
import org.springframework.cloud.gateway.route.builder.RouteLocatorBuilder;
import org.springframework.context.annotation.Bean;
import org.springframework.context.annotation.Configuration;

/**
 * @auther zzyy
 * @create 2020-02-06 11:26
 */
@Configuration
public class GateWayConfig
{
    /**
     * 配置了一个id为route-name的路由规则,
     * 当访问地址 http://localhost:9527/guonei时会自动转发到地址:http://news.baidu.com/guonei
     * @param builder
     * @return
     */
    @Bean
    public RouteLocator customRouteLocator(RouteLocatorBuilder builder)
    {
        RouteLocatorBuilder.Builder routes = builder.routes();

        routes.route("path_route_atguigu", r -> r.path("/guonei").uri("http://news.baidu.com/guonei")).build();

        return routes.build();

    }
    @Bean
    public RouteLocator customRouteLocator2(RouteLocatorBuilder builder)
    {
        RouteLocatorBuilder.Builder routes = builder.routes();
        routes.route("path_route_atguigu2", r -> r.path("/guoji").uri("http://news.baidu.com/guoji")).build();
        return routes.build();
    }
}
通过微服务名实现动态路由
默认情况下Gateway会根据注册中心注册的服务列表, 以注册中心上微服务名为路径创建动态路由进行转发,从而实现动态路由的功能
启动:
一个eureka7001 + 两个服务提供者8001/8002
POM
    org.springframework.cloud
    spring-cloud-starter-netflix-eureka-client
YML
server:
  port: 9527

spring:
  application:
    name: cloud-gateway
  cloud:
    gateway:
      discovery:
        locator:
          enabled: true #开启从注册中心动态创建路由的功能,利用微服务名进行路由
      routes:
        - id: payment_routh #payment_route    #路由的ID,没有固定规则但要求唯一,建议配合服务名
          # uri: http://localhost:8001          #匹配后提供服务的路由地址
          uri: lb://cloud-payment-service #匹配后提供服务的路由地址
          predicates:
            - Path=/payment/get/**         # 断言,路径相匹配的进行路由

        - id: payment_routh2 #payment_route    #路由的ID,没有固定规则但要求唯一,建议配合服务名
          # uri: http://localhost:8001          #匹配后提供服务的路由地址
          uri: lb://cloud-payment-service #匹配后提供服务的路由地址
          predicates:
            - Path=/payment/lb/**         # 断言,路径相匹配的进行路由

eureka:
  instance:
    hostname: cloud-gateway-service
  client: #服务提供者provider注册进eureka服务列表内
    service-url:
      register-with-eureka: true
      fetch-registry: true
      defaultZone: http://eureka7001.com:7001/eureka
需要注意的是uri的协议为lb,表示启用Gateway的负载均衡功能。
lb://serviceName是spring cloud gateway在微服务中自动为我们创建的负载均衡uri
测试
http://localhost:9527/payment/lb
8001/8002两个端口切换
Predicate的使用
是什么
启动我们的gateway9527
Route Predicate Factories这个是什么东东?
常用的Route Predicate
After Route Predicate
Before Route Predicate
Between Route Predicate
Cookie Route Predicate
Header Route Predicate
Host Route Predicate
Method Route Predicate
Path Route Predicate
Query Route Predicate
All
server:
  port: 9527

spring:
  application:
    name: cloud-gateway
  cloud:
    gateway:
      discovery:
        locator:
          enabled: true #开启从注册中心动态创建路由的功能
      routes:
        - id: payment_routh #payment_route    #路由的ID,没有固定规则但要求唯一,建议配合服务名
          # uri: http://localhost:8001          #匹配后提供服务的路由地址
          uri: lb://cloud-payment-service #匹配后提供服务的路由地址
          predicates:
            - Path=/payment/get/**         # 断言,路径相匹配的进行路由

        - id: payment_routh2 #payment_route    #路由的ID,没有固定规则但要求唯一,建议配合服务名
          # uri: http://localhost:8001          #匹配后提供服务的路由地址
          uri: lb://cloud-payment-service #匹配后提供服务的路由地址
          predicates:
            - Path=/payment/lb/**         # 断言,路径相匹配的进行路由
            - After=2020-02-05T15:10:03.685+08:00[Asia/Shanghai]         # 断言,路径相匹配的进行路由
            #- Before=2020-02-05T15:10:03.685+08:00[Asia/Shanghai]         # 断言,路径相匹配的进行路由
            #- Between=2020-02-02T17:45:06.206+08:00[Asia/Shanghai],2020-03-25T18:59:06.206+08:00[Asia/Shanghai]
            #- Cookie=username,zzyy
            #- Header=X-Request-Id, \d+  # 请求头要有X-Request-Id属性并且值为整数的正则表达式
            #- Host=**.atguigu.com
            - Method=GET
            - Query=username, \d+  # 要有参数名username并且值还要是整数才能路由


eureka:
  instance:
    hostname: cloud-gateway-service
  client: #服务提供者provider注册进eureka服务列表内
    service-url:
      register-with-eureka: true
      fetch-registry: true
      defaultZone: http://eureka7001.com:7001/eureka

#id:我们自定义的路由 ID,保持唯一
 ##uri:目标服务地址
 ##predicates:路由条件,Predicate接受一个输入参数返回一个布尔值。
 ##            该属性包含多种默认方法来将Predicate组合成其他复杂的逻辑(比如:与,或,非)
说白了,Predicate就是为了实现一组匹配规则, 让请求过来找到对应的Route进行处理。
Filter的使用
是什么
路由过滤器可用于修改进入的HTTP请求和返回的HTTP响应,路由过滤器只能指定路由进行使用。

Spring Cloud Gateway 内置了多种路由过滤器,他们都由GatewayFilter的工厂类来产生
Spring Cloud Gateway的Filter
生命周期,Only Two
pre
post
种类,Only Two
GatewayFilter
GlobalFilter
常用的GatewayFilter
AddRequestParameter
YML
filters:
    - AddRequestParameter=X-Request-Id,1024 #过滤器工厂会在匹配的请求头加上一对请求头,名称为X-Request-Id值为1024
-------------------------------------------------------------------------------

server:
  port: 9588

spring:
  application:
    name: cloud-gateway
  cloud:
    gateway:
      discovery:
        locator:
          enabled: true #开启从注册中心动态创建路由的功能
          lower-case-service-id: true #使用小写服务名,默认是大写
      routes:
        - id: payment_routh #payment_route #路由的ID,没有固定规则但要求唯一,建议配合服务名
          uri: lb://cloud-provider-payment #匹配后的目标服务地址,供服务的路由地址
          #uri: http://localhost:8001 #匹配后提供服务的路由地址
          filters:
            - AddRequestParameter=X-Request-Id,1024 #过滤器工厂会在匹配的请求头加上一对请求头,名称为X-Request-Id值为1024
          predicates:
            - Path=/paymentInfo/**        # 断言,路径相匹配的进行路由
            - Method=GET,POST

eureka:
  instance:
    hostname: cloud-gateway-service
  client: #服务提供者provider注册进eureka服务列表内
    service-url:
      register-with-eureka: true
      fetch-registry: true
      defaultZone: http://eureka7001.com:7001/eureka
自定义过滤器
自定义全局GlobalFilter
两个主要接口介绍
implements GlobalFilter,Ordered
能干嘛
全局日志记录
统一网关鉴权
。。。。。。
案例代码
package com.atguigu.springcloud.filter;

import org.springframework.cloud.gateway.filter.GatewayFilterChain;
import org.springframework.cloud.gateway.filter.GlobalFilter;
import org.springframework.core.Ordered;
import org.springframework.http.HttpStatus;
import org.springframework.stereotype.Component;
import org.springframework.web.server.ServerWebExchange;
import reactor.core.publisher.Mono;
import java.util.Date;

@Component //必须加,必须加,必须加
public class MyLogGateWayFilter implements GlobalFilter,Ordered
{
    @Override
    public Mono filter(ServerWebExchange exchange, GatewayFilterChain chain)
    {
        System.out.println("time:"+new Date()+"\t 执行了自定义的全局过滤器: "+"MyLogGateWayFilter"+"hello");

        String uname = exchange.getRequest().getQueryParams().getFirst("uname");
        if (uname == null) {
            System.out.println("****用户名为null,无法登录");
            exchange.getResponse().setStatusCode(HttpStatus.NOT_ACCEPTABLE);
            return exchange.getResponse().setComplete();
        }
        return chain.filter(exchange);
    }

    @Override
    public int getOrder()
    {
        return 0;
    }
}
测试
启动
正确
http://localhost:9527/payment/lb?uname=z3
错误
没有参数uname
http://localhost:9527/payment/lb
无法正常使用转发
SpringCloud Config 分布式配置中心---为了管理项目配置
概述
分布式系统面临的---配置问题
微服务意味着要将单体应用中的业务拆分成一个个子服务,每个服务的粒度相对较小,
因此系统中会出现大量的服务。由于每个服务都需要必要的配置信息才能运行,
所以一套集中式的、动态的配置管理设施是必不可少的。

SpringCloud提供了ConfigServer来解决这个问题,
我们每一个微服务自己带着一个application.yml,上百个配置文件的管理......
/(ㄒoㄒ)/~~
是什么
是什么
SpringCloud Config为微服务架构中的微服务提供集中化的外部配置支持,
配置服务器为各个不同微服务应用的所有环境提供了一个中心化的外部配置。

怎么玩
SpringCloud Config分为服务端和客户端两部分。
服务端也称为分布式配置中心,它是一个独立的微服务应用,
用来连接配置服务器并为客户端提供获取配置信息,加密/解密信息等访问接口
能干嘛
集中管理配置文件
不同环境不同配置,动态化的配置更新,分环境部署比如dev/test/prod/beta/release
运行期间动态调整配置,不再需要在每个服务部署的机器上编写配置文件,服务会向配置中心统一拉取配置自己的信息
当配置发生变动时,服务不需要重启即可感知到配置的变化并应用新的配置
将配置信息以REST接口的形式暴露
post、curl访问刷新均可......
与GitHub整合配置
由于SpringCloud Config默认使用Git来存储配置文件(也有其它方式,比如支持SVN和本地文件), 但最推荐的还是Git,而且使用的是http/https访问的形式
官网
https://cloud.spring.io/spring-cloud-static/spring-cloud-config/2.2.1.RELEASE/reference/html/
Config服务端配置与测试
一
用你自己的账号在GitHub上新建一个名为springcloud-config的新Repository
由上一步获得刚新建的git地址
[email protected]:zzyybs/springcloud-config.git
本地硬盘目录上新建git仓库并clone
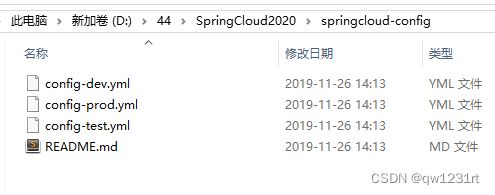
本地地址:D:\44\SpringCloud2020
git命令
git clone [email protected]:zzyybs/springcloud-config.git
此时在本地D盘符下D:\44\SpringCloud2020\springcloud-config
表示多个环境的配置文件
保存格式必须为UTF-8
如果需要修改,此处模拟运维人员操作git和github
git add .
git commit -m "init yml"
git push origin master
二
新建Module模块cloud-config-center-3344 它即为Cloud的配置中心模块cloudConfig Center
POM
            org.springframework.cloud
            spring-cloud-config-server


            org.springframework.cloud
            spring-cloud-starter-netflix-eureka-client


            org.springframework.boot
            spring-boot-starter-web


            org.springframework.boot
            spring-boot-starter-actuator


            org.springframework.boot
            spring-boot-devtools
            runtime
            true


            org.projectlombok
            lombok
            true


            org.springframework.boot
            spring-boot-starter-test
            test
YML
server:
  port: 3344

spring:
  application:
    name:  cloud-config-center #注册进Eureka服务器的微服务名
  cloud:
    config:
      server:
        git:
          uri: [email protected]:zzyybs/springcloud-config.git #GitHub上面的git仓库名字
        ####搜索目录
          search-paths:
            - springcloud-config
      ####读取分支
      label: master

#服务注册到eureka地址
eureka:
  client:
    service-url:
      defaultZone: http://localhost:7001/eureka
主启动类
ConfigCenterMain3344
package com.atguigu.springcloud;

import org.springframework.boot.SpringApplication;
import org.springframework.boot.autoconfigure.SpringBootApplication;
import org.springframework.cloud.config.server.EnableConfigServer;


@SpringBootApplication
@EnableConfigServer
public class ConfigCenterMain3344
{
    public static void main(String[] args) {
            SpringApplication.run(ConfigCenterMain3344.class, args);
    }
}
@EnableConfigServer
三
windows下修改hosts文件,增加映射
127.0.0.1 config-3344.com
测试通过Config微服务是否可以从GitHub上获取配置内容
启动微服务3344
http://config-3344.com:3344/master/config-dev.yml
配置读取规则
官网
/{label}/{application}-{profile}.yml
master分支
http://config-3344.com:3344/master/config-dev.yml
http://config-3344.com:3344/master/config-test.yml
http://config-3344.com:3344/master/config-prod.yml
dev分支
http://config-3344.com:3344/dev/config-dev.yml
http://config-3344.com:3344/dev/config-test.yml
http://config-3344.com:3344/dev/config-prod.yml
/{application}-{profile}.yml
http://config-3344.com:3344/config-dev.yml
http://config-3344.com:3344/config-test.yml
http://config-3344.com:3344/config-prod.yml
http://config-3344.com:3344/config-xxxx.yml(不存在的配置)
/{application}/{profile}[/{label}]
http://config-3344.com:3344/config/dev/master
http://config-3344.com:3344/config/test/master
http://config-3344.com:3344/config/test/dev
重要配置细节总结
/{name}-{profiles}.yml

/{label}-{name}-{profiles}.yml

label:分支(branch)
name :服务名
profiles:环境(dev/test/prod)
成功实现了用SpringCloud Config通过GitHub获取配置信息
Config客户端配置与测试
一
新建cloud-config-client-3355
POM
            org.springframework.cloud
            spring-cloud-starter-config


            org.springframework.cloud
            spring-cloud-starter-netflix-eureka-client


            org.springframework.boot
            spring-boot-starter-web


            org.springframework.boot
            spring-boot-starter-actuator


            org.springframework.boot
            spring-boot-devtools
            runtime
            true


            org.projectlombok
            lombok
            true


            org.springframework.boot
            spring-boot-starter-test
            test
bootstrap.yml
是什么
applicaiton.yml是用户级的资源配置项
bootstrap.yml是系统级的,优先级更加高

Spring Cloud会创建一个“Bootstrap Context”,
作为Spring应用的`Application Context`的父上下文。
初始化的时候,`Bootstrap Context`负责从外部源加载配置属性并解析配置。
这两个上下文共享一个从外部获取的`Environment`。

`Bootstrap`属性有高优先级,默认情况下,它们不会被本地配置覆盖。
`Bootstrap context`和`Application Context`有着不同的约定,
所以新增了一个`bootstrap.yml`文件,
保证`Bootstrap Context`和`Application Context`配置的分离。

要将Client模块下的application.yml文件改为bootstrap.yml,这是很关键的,
因为bootstrap.yml是比application.yml先加载的。bootstrap.yml优先级高于application.yml
内容
server:
  port: 3355

spring:
  application:
    name: config-client
  cloud:
    #Config客户端配置
    config:
      label: master #分支名称
      name: config #配置文件名称
      profile: dev #读取后缀名称   上述3个综合:master分支上config-dev.yml的配置文件被读取http://config-3344.com:3344/master/config-dev.yml
      uri: http://localhost:3344 #配置中心地址k

#服务注册到eureka地址
eureka:
  client:
    service-url:
      defaultZone: http://localhost:7001/eureka
说明
修改config-dev.yml配置并提交到GitHub中,比如加个变量age或者版本号version
主启动
package com.atguigu.springcloud;

import org.springframework.boot.SpringApplication;
import org.springframework.boot.autoconfigure.SpringBootApplication;
import org.springframework.cloud.netflix.eureka.EnableEurekaClient;

/**
 * @auther zzyy
 * @create 2020-02-08 11:09
 */
@EnableEurekaClient
@SpringBootApplication
public class ConfigClientMain3355
{
    public static void main(String[] args)
    {
        SpringApplication.run(ConfigClientMain3355.class,args);
    }
}
类ConfigClientMain3355
业务类
package com.atguigu.springcloud.controller;

import org.springframework.cloud.context.config.annotation.RefreshScope;
import org.springframework.web.bind.annotation.GetMapping;
import org.springframework.web.bind.annotation.RequestMapping;
import org.springframework.web.bind.annotation.RestController;
import org.springframework.beans.factory.annotation.Value;

/**
 * @auther zzyy
 * @create 2019-11-15 15:00
 */
@RestController
public class ConfigClientController
{
    @Value("${config.info}")
    private String configInfo;

    @GetMapping("/configInfo")
    public String getConfigInfo()
    {
        return configInfo;
    }
}
测试
启动Config配置中心3344微服务并自测
http://config-3344.com:3344/master/config-prod.yml
http://config-3344.com:3344/master/config-dev.yml
启动3355作为Client准备访问
http://localhost:3355/configInfo
成功实现了客户端3355访问SpringCloud Config3344通过GitHub获取配置信息
问题随时而来,分布式配置的动态刷新问题
Linux运维修改GitHub上的配置文件内容做调整
刷新3344,发现ConfigServer配置中心立刻响应
刷新3355,发现ConfigClient客户端没有任何响应
3355没有变化除非自己重启或者重新加载
难到每次运维修改配置文件,客户端都需要重启??噩梦
Config客户端之动态刷新
避免每次更新配置都要重启客户端微服务3355
动态刷新
步骤
修改3355模块
POM引入actuator监控
    org.springframework.boot
    spring-boot-starter-actuator
修改YML,暴露监控端口
# 暴露监控端点
management:
  endpoints:
    web:
      exposure:
        include: "*"
 0---------------------------------------------------------
 server:
  port: 3355

spring:
  application:
    name: config-client
  cloud:
    #Config客户端配置
    config:
      label: master #分支名称
      name: config #配置文件名称
      profile: dev #读取后缀名称   上述3个综合:master分支上config-dev.yml的配置文件被读取
      uri: http://localhost:3344 #配置中心地址k

#服务注册到eureka地址
eureka:
  client:
    service-url:
      defaultZone: http://localhost:7001/eureka
# 暴露监控端点
management:
  endpoints:
    web:
      exposure:
        include: "*"
@RefreshScope业务类Controller修改
@RestController
@RefreshScope
public class ConfigClientController
{
    @Value("${config.info}")
    private String configInfo;

    @GetMapping("/configInfo")
    public String getConfigInfo() {
        return configInfo;
    }
}
此时修改github---> 3344 ---->3355
http://localhost:3355/configInfo
3355改变没有???
没有,/(ㄒoㄒ)/~~
How
需要运维人员发送Post请求刷新3355
必须是POST请求
curl -X POST "http://localhost:3355/actuator/refresh"
再次
http://localhost:3355/configInfo
OK,O(∩_∩)O
成功实现了客户端3355刷新到最新配置内容
避免了服务重启
想想还有什么问题?
假如有多个微服务客户端3355/3366/3377。。。。。。
每个微服务都要执行一次post请求,手动刷新?
可否广播,一次通知,处处生效?
我们想大范围的自动刷新,求方法
总结
学了一段时间的springcloud,马上要学2020年的主流了,虽然明天还要学一波第一版的springcloud,但是就现在感觉,更多的是配置,我都已经忘了怎么写代码了,就一个劲的配置,所以不愧说程序员都是cv工程师


