spring boot学习笔记:mybatis,分页,事务,时钟调度,拦截器,全局异常,数据校验
spring boot 初探
随着动态语⾔流⾏(Ruby、Scala、NodeJs等),Java 开发变得相对笨重,配置繁琐,开发效率低下, 部署流程复杂,以及第三⽅集成难度也相对较⼤,针对该环境,Spring Boot 被开发出来,其使⽤“习惯 ⼤于配置⽬标”,借助Spring Boot 能够让项⽬快速运⾏起来,同时借助 Spring Boot 可以快速创建 web 应⽤并独⽴进⾏部署(jar包 war 包⽅式,内嵌 servlet 容器),同时借助 Spring Boot 在开发应⽤时可以 不⽤或很少去进⾏相关 xml 环境配置,简化了开发,⼤⼤提⾼项⽬开发效率。
Spring Boot 是由 Pivotal 团队提供的全新框架,其设计⽬的是⽤来简化 Spring 应⽤的初始搭建以及 开发过程。该框架使⽤了特定的⽅式来进⾏配置,从⽽使开发⼈员不再需要定义样板化的配置。通过这 种⽅式,让 Spring Boot在蓬勃发展的快速应⽤开发领域 (rapid application development) 成为领导 者。
特点
创建独⽴ Spring 应⽤程序、嵌⼊式 Tomcat、Jetty 容器、⽆需部署 WAR 包、简化 Maven 及 Gradle 配置、尽可能⾃动化配置 Spring、直接植⼊产品环境下的实⽤功能,⽐如度量指标、健康检查及扩展配 置、⽆需代码⽣成及 XML 配置等,同时 Spring Boot 不仅对 web 应⽤程序做了简化,还提供⼀系列的 依赖包来把其它⼀些⼯作做成开箱即⽤。
构建springBoot项目
-
使用idea
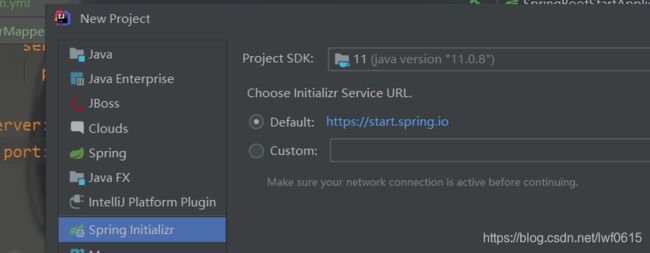
next
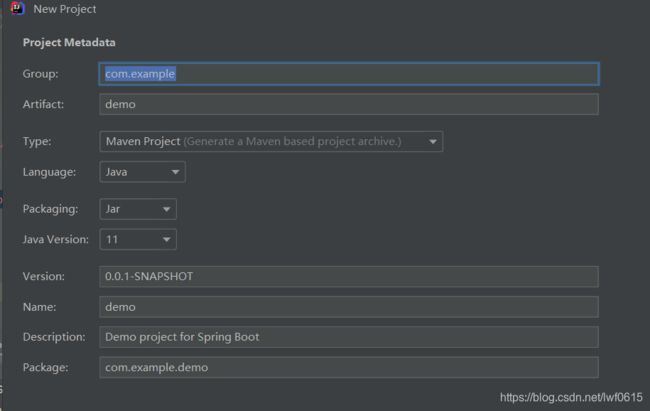
修改Group(域名倒写),Artifact(项目名),点击next
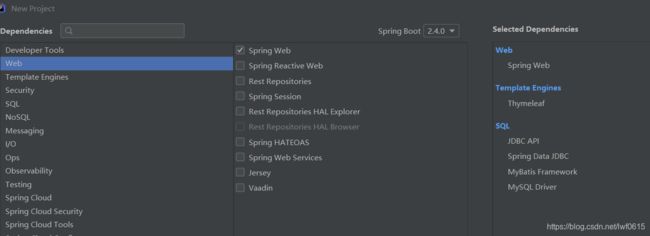
勾选右侧6个依赖,就可以使用springBoot操作Mybatis,在Thymeleaf页面上展示或修改信息
等待maven构建好项目
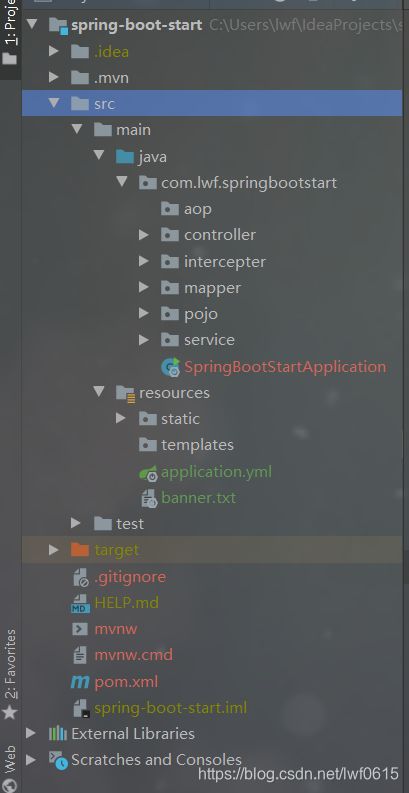
最后项目结构为:
-
使用maven构建简单web环境
maven依赖
org.springframework.boot spring-boot-starter-parent 2.2.2.RELEASE org.springframework.boot spring-boot-starter-web Spring Boot 的项⽬必须要将 parent 设置为 Spring Boot 的 parent,该 parent 包含了⼤量默认的配 置,简化程序的开发。
maven插件
 org.springframework.boot
 spring-boot-maven-plugin
代码
注意:mvc各层(controller,service,dao,pojo)包与启动程序须在同一包下
/*
springBoot启动程序,类名为Artifact(项目名)+Application.java
*/
@SpringBootApplication
public class SpringBootStartApplication {

    public static void main(String[] args) {
        SpringApplication.run(SpringBootStartApplication.class, args);
    }

}
控制器
@RestController//控制器返回json数据 @Controller 默认返回视图 @RequestMapping("/user") public class UserController { //j2ee注解,相当于spring注解@AutoWire 和@Qualifier()组合 @Resource private UserService userService; @RequestMapping("/hello") public Mapusers(){ return userService.queryAll(); } @RequestMapping(value = "/",method = RequestMethod.POST) public Map

配置文件
application.properties:在resources下,application.properties和application.yml只能存在一个
#jdbc
spring.datasource.driver-class-name=com.mysql.cj.jdbc.Driver
spring.datasource.username=root
spring.datasource.password=admine
spring.datasource.url=jdbc:mysql://localhost:3306/springboot?useUnicode=true&characterEncoding=utf8&serverTimezone=GMT%2B8&useSSL=false
#事务
spring.transaction.rollback-on-commit-failure=true
spring.aop.auto=true
application.yml:流行的写法,层次分明
spring:
#数据库
  datasource:
    driver-class-name: com.mysql.cj.jdbc.Driver
    username: root
    password: admine
    url: jdbc:mysql://localhost:3306/springboot?useUnicode=true&characterEncoding=utf8&serverTimezone=GMT%2B8&useSSL=false
#aop
  aop:
    auto: true
#事务设置提交失败就回滚
  transaction:
    rollback-on-commit-failure: true
#设置项目context
  mvc:
    servlet:
      path: /
#设置端口
server:
  port: 8080
打包jar,war
jar:
mvn package 默认打jar包,java -jar jar包全路径 默认使用内置tomcat
war包
继承SpringBootServletInitializer,ctrl o 选择父类方法configure,修改maven打包方式为war
定时调度-Quartz
在⽇常项⽬运⾏中,我们总会有需求在某⼀时间段周期性的执⾏某个动作。⽐如每天在某个时间段导 出报表,或者每隔多久统计⼀次现在在线的⽤户量等。
在 Spring Boot 中有 Java ⾃带的 java.util.Timer 类,也有强⼤的调度器 Quartz,还有 SpringBoot ⾃带的Scheduled 来实现。Scheduled 在 Spring3.X 引⼊,默认 SpringBoot ⾃带该功能,使⽤起来也 很简单,在启动类级别添加 @EnableScheduling 注解即可引⼊定时任务环境。但遗憾的是 Scheduled 默认不⽀持分布式环境,这⾥主要讲解 Quartz 时钟调度框架与 Spring Boot 集成。
我们需要明白 Quartz 的几个核心概念,这样理解起 Quartz 的原理就会变得简单了。
-
Job
表示一个工作,要执行的具体内容。此接口中只有一个方法,如下:
void execute(JobExecutionContext context) -
JobDetail 表示一个具体的可执行的调度程序,Job 是这个可执行程调度程序所要执行的内容,另外 JobDetail 还包含了这个任务调度的方案和策略。
-
Trigger 代表一个调度参数的配置,什么时候去调。
-
Scheduler 代表一个调度容器,一个调度容器中可以注册多个 JobDetail 和 Trigger。当 Trigger 与 JobDetail 组合,就可以被 Scheduler 容器调度了。
引入依赖
 org.springframework.boot
 spring-boot-starter-quartz
定义任务
execute里定义要执行业务
public class MyFirstJob implements Job {

 private Logger log = LoggerFactory.getLogger(MyFirstJob.class);
 @Override
 public void execute(JobExecutionContext context) throws
JobExecutionException {
 SimpleDateFormat sdf = new SimpleDateFormat("yyyy-MM-dd HH:mm:ss");
 log.info(sdf.format(new Date()) + "-->" + "Hello Spring BootQuartz...");
 }
}
构建调度配置类
创建 JobDetail 实例并定义 Trigger 注册到 scheduler ,启动 scheduler 开启调度
@Configuration
public class QuartzConfig {
 @Bean
 public JobDetail jobDetail1(){
 return JobBuilder.newJob(MyFirstJob.class).storeDurably().build();
 }
 @Bean
 public Trigger trigger1(){
 SimpleScheduleBuilder scheduleBuilder =
SimpleScheduleBuilder.simpleSchedule()
 // 每⼀秒执⾏⼀次
 .withIntervalInSeconds(1)
 // 永久重复,⼀直执⾏下去
 .repeatForever();
 return TriggerBuilder.newTrigger()
 .withIdentity("trigger1","group1")
 .withSchedule(scheduleBuilder)
 .forJob(jobDetail1())
 .build();
 }
 // 每5秒触发⼀次任务
 @Bean
 public Trigger trigger2(){
 return TriggerBuilder.newTrigger()
 .withIdentity("trigger2", "group1")
 .withSchedule(CronScheduleBuilder.cronSchedule("0/5 * * * * ?
*"))
 .forJob(jobDetail1())
 .build();
 }
}
Cron Expressions
Cron-Expressions用于配置CronTrigger的实例。Cron Expressions是由七个子表达式组成的字符串,用于描述日程表的各个细节。这些子表达式用空格分隔,并表示:
- Seconds
- Minutes
- Hours
- Day-of-Month :表所有用?
- Month
- Day-of-Week
- Year (optional field)
一个完整的Cron-Expressions的例子是字符串“0 0 12 ?* WED“ - 这意味着”每个星期三下午12:00“。
单个子表达式可以包含范围和/或列表。例如,可以用“MON-FRI”,“MON,WED,FRI”或甚至“MON-WED,SAT”代替前一个(例如“WED”)示例中的星期几字段。
通配符(’ '字符)可用于说明该字段的“每个”可能的值。因此,前一个例子的“月”字段中的“”字符仅仅是“每个月”。因此,“星期几”字段中的“*”显然意味着“每周的每一天”。
所有字段都有一组可以指定的有效值。这些值应该是相当明显的 - 例如秒和分钟的数字0到59,数小时的值0到23。日期可以是1-31的任何值,但是您需要注意在给定的月份中有多少天!月份可以指定为0到11之间的值,或者使用字符串JAN,FEB,MAR,APR,MAY,JUN,JUL,AUG,SEP,OCT,NOV和DEC。星期几可以指定为1到7(1 =星期日)之间的值,或者使用字符串SUN,MON,TUE,WED,THU,FRI和SAT。
’/'字符可用于指定值的增量。例如,如果在“分钟”字段中输入“0/15”,则表示“每隔15分钟,从零开始”。如果您在“分钟”字段中使用“3/20”,则意味着“每隔20分钟,从三分钟开始” - 换句话说,它与“分钟”中的“3,243,43”相同领域。请注意“ / 35”的细微之处并不代表“每35分钟” - 这意味着“每隔35分钟,从零开始” - 或者换句话说,与指定“0,35”相同。
’?’ 字符是允许的日期和星期几字段。用于指定“无特定值”。当您需要在两个字段中的一个字段中指定某个字符而不是另一个字段时,这很有用。请参阅下面的示例(和CronTrigger JavaDoc)以进行说明。
“L”字符允许用于月日和星期几字段。这个角色对于“最后”来说是短暂的,但是在这两个领域的每一个领域都有不同的含义。例如,“月”字段中的“L”表示“月的最后一天” - 1月31日,非闰年2月28日。如果在本周的某一天使用,它只是意味着“7”或“SAT”。但是如果在星期几的领域中再次使用这个值,就意味着“最后一个月的xxx日”,例如“6L”或“FRIL”都意味着“月的最后一个星期五”。您还可以指定从该月最后一天的偏移量,例如“L-3”,这意味着日历月份的第三个到最后一天。当使用’L’选项时,重要的是不要指定列表或值的范围,因为您会得到混乱/意外的结果。
“W”用于指定最近给定日期的工作日(星期一至星期五)。例如,如果要将“15W”指定为月日期字段的值,则意思是:“最近的平日到当月15日”。
'#'用于指定本月的“第n个”XXX工作日。例如,“星期几”字段中的“6#3”或“FRI#3”的值表示“本月的第三个星期五”。
简单开启定时任务
主程序加注解@EnableScheduling
在spring boot 管理的bean的方法上加注解: @Scheduled(cron = “0/5 * * * * *”),cron写Cron Expressions
 @Scheduled(cron = "0/5 * * * * *")
    public void job(){
        System.out.println("任务");
        myService.getBySome(new Panda(2,null,null)).forEach(System.out::println);
    }
整合mybatis
依赖:事务什么的问就是传递依赖被加进来了
            org.mybatis.spring.boot
            mybatis-spring-boot-starter
            2.1.4


            mysql
            mysql-connector-java
            runtime
application.yml添加数据库连接信息即可
spring:
  ## 热部署配置
  devtools:
    restart:
      enabled: true
  # 设置重启的⽬录,添加⽬录的⽂件需要restart
      additional-paths: src/main/java
  # 解决项⽬⾃动重新编译后接⼝报404的问题
      poll-interval: 3000
      quiet-period: 1000
  datasource:
#    type: com.alibaba.druid.pool.DruidDataSource
    driver-class-name: com.mysql.cj.jdbc.Driver
    password: admine
    url: jdbc:mysql://localhost:3306/springboot?useUnicode=true&characterEncoding=utf8&serverTimezone=GMT%2B8&useSSL=false
    username: root

  mvc:
    servlet:
      path: /
### pageHelper
### mybatis 配置这里使用注解,就不需要配置了
#mybatis:
#  mapper-locations: classpath:/mappers/*.xml
#  type-aliases-package: com.lwf.springbootstart.pojo
#  configuration:
### 下划线转驼峰配置
#     map-underscore-to-camel-case: true
这就配置完了,下面写查询语句。
@Mapper
public interface UserMapper {
    @Select("select * from user")
    List queryAll();
    @Select("select * from user where id=#{id}")
    User queryOne(Integer id);
    @Select("select * from user where name like #{name}")
    List querySome(String name);
    @Delete("delete from user where id =#{id}")
    int deleteById(Integer id);
}
service层调用
@Service
public class UserService {
    @Resource
    private UserMapper userMapper;
    //所有用户
    public List queryAll(){return userMapper.queryAll();}
    }
分页
依赖
            com.github.pagehelper
            pagehelper-spring-boot-starter
            1.2.13
核心类:

PageHelper.startPage(当前页数, 页数据条数);
核心方法,开始分页,查询页数,页大小。
PageInfo分页结果
代码
//service层
    //分页
    @Transactional(readOnly = true)
    public PageInfo pageInfo(PageManager pageManager){
        PageHelper.startPage(pageManager.getCurPage(), pageManager.getPageSize());
        return new PageInfo(userMapper.querySome("%"+pageManager.getQuery()+"%"));
    }
   //所有用户
    public List queryAll(){return userMapper.queryAll();}

//mapper层
    @Select("select * from user")
    List queryAll();
    @Select("select * from user where name like #{name}")
    List querySome(String name);
比较分页,与不分页流程:
不分页:
![[外链图片转存失败,源站可能有防盗链机制,建议将图片保存下来直接上传(img-Be4pHAj4-1606647085636)(spring boot 初探.assets/image-20201129181258010.png)]](http://img.e-com-net.com/image/info8/d786f6ef1e6142cda09965d828b865e1.jpg)
只执行了一次sql;
分页


分页会执行2次sql语句,首先查询数据条数,再查出分页数据。
拦截器
与Filter区别:
执行顺序:Filter------>前端控制器(DispatherServlet 本质上是一个Servlet,但是springBoot的所有请求url都归它接收)–>拦截器
拦截器:继承HandlerInterceptAdaptor(已废弃)或实现HandlerInterceptor(推荐,扩展性好)
public class GlobalIntercepter  implements HandlerInterceptor {
    @Override
    public boolean preHandle(HttpServletRequest request, HttpServletResponse response, Object handler) throws Exception {
        User user= (User) request.getSession().getAttribute("user");
        System.out.println("-----------------------拦截器");
        if(user==null){
            System.out.println("拦截");
            return false;
        }
        return true;
    }
}
注册拦截器:继承WebMvcConfigurationSupport,将拦截器注册进来,再加入拦截器
@Configuration
public class MyAdapt extends WebMvcConfigurationSupport {
    @Override
    protected void addInterceptors(InterceptorRegistry registry) {
        registry.addInterceptor(new GlobalIntercepter())
                .addPathPatterns("/*")
                .excludePathPatterns("/user/hello")
                .excludePathPatterns("/user/");
        super.addInterceptors(registry);

    }
}
第二种使用xml配置,再启动类加@ImportResources({配置文件路径}),类似spring mvc写法
@EnableTransactionManagement
@SpringBootApplication
@ImportResource(locations = {"intercepter.xml"})//注意xml文件写法参考springmvc
public class SpringBootStartApplication extends SpringBootServletInitializer {

    public static void main(String[] args) {
        SpringApplication.run(SpringBootStartApplication.class, args);
    }

    @Override
    protected SpringApplicationBuilder configure(SpringApplicationBuilder builder) {
        return super.configure(builder);
    }
}
全局异常与事务控制
事务
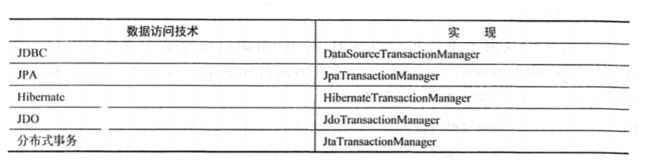
在使⽤ Jdbc 作为数据库访问技术时,Spring Boot 框架定义了基于 jdbc 的 PlatformTransactionManager 接⼝的实现 DataSourceTransactionManager,并在 Spring Boot 应⽤ 启动时⾃动进⾏配置。如果使⽤ jpa 的话 Spring Boot 同样提供了对应实现。
这⾥ Spring Boot 集成了 mybatis 框架,mybatis 底层数据访问层实现基于 jdbc 来实现,所以在 Spring Boot 环境下对事务进⾏控制,事务实现由 Spring Boot 实现并⾃动配置,在使⽤时通过注解⽅ 式标注相关⽅法加⼊事务控制即可。
开启:在spring boot启动类上注解:
@EnableTransactionManagement//开启事务,有的地方说不要加,默认配置里有,扫描到注解@Transactional会自动开启,加总没有错
@SpringBootApplication//启动类注解
public @interface Transactional {
    @AliasFor("transactionManager")
    String value() default "";

    @AliasFor("value")
    String transactionManager() default "";

    String[] label() default {};

    Propagation propagation() default Propagation.REQUIRED;

    Isolation isolation() default Isolation.DEFAULT;

    int timeout() default -1;

    String timeoutString() default "";

    boolean readOnly() default false;

    Class[] rollbackFor() default {};

    String[] rollbackForClassName() default {};

    Class[] noRollbackFor() default {};

    String[] noRollbackForClassName() default {};
}
value:事务方式,默认值,一个值时默认为value属性
1.propagation_required
spring默认的事务方式,如果当前存在事务,沿用当前事务,不存在事务,开启一个事务
2.propagation_suports
以当前事务方式运行,当前没事务,不开启新的事务
3.propagation_mandatory
强制要有事务,以当前事务方式运行,当前不存在事务,抛出异常
4.propagation_requires_new
总是开启一个新的事务,当前存在事务,将当前事务挂起
7.propagation_not_supported
以非事务方式运行,如存在事务,讲当前事务挂起
6.propagation_never
以非事务方式运行,如果当前存在事务,则抛出异常
7.propagation_nested
嵌套事务,如果当前存在事务,则在嵌套事务中执行,如果没事务,则以required方式运行
//业务层,删除用户
     @Transactional(propagation = Propagation.REQUIRED)
    public int delete(Integer id){
       CheckUtils.isNull(id==null, "id不为空");
       return userMapper.deleteById(id);
    }
rollbackFor:碰到什么异常回滚
后面属性表产生了改异常回滚事务,默认遇到RuntimeException异常回滚(推荐手动throw new RuntimeException),然后在控制层抓异常。但是如果碰到别的异常也需要回滚定义:rollbackFor=异常Class
//业务层,删除用户
     @Transactional(propagation = Propagation.REQUIRED,rollbackFor = ParamException.class)
    public int delete(Integer id){
       CheckUtils.isNull(id==null, "id不为空");
       return userMapper.deleteById(id);
    }
noRollbackFor:指定遇到什么异常不回滚,和rollbackFor用法相反
readOnly:是否只读;true则只能读不能修改
    //分页
    @Transactional(readOnly = true)
    public PageInfo pageInfo(PageManager pageManager){
        PageHelper.startPage(pageManager.getCurPage(), pageManager.getPageSize());
        return new PageInfo(userMapper.querySome("%"+pageManager.getQuery()+"%"));
    }
设置超时时间
@Transactional (propagation = Propagation.REQUIRED,timeout=30)
设置数据库隔离级别
@Transactional (propagation = Propagation.REQUIRED,isolation=Isolation.DEFAULT)
全局异常
SpringMvc 中对异常统⼀处理提供了相应处理⽅式,推荐⼤家使⽤的是实现接⼝ HandlerExceptionResolver的⽅式,对代码侵⼊性较⼩。 在Spring Boot 应⽤中同样提供了对异常的全局性处理,相关注解如下:
-
@ControllerAdvice(@RestControllerAdvice处理@RestController)
该注解组合了 @Component 注解功能,最常⽤的就是作为全局异常处理的切⾯类,同时通过该注解 可以指定包扫描的范围。@ControllerAdvice 约定了⼏种可⾏的返回值,如果是直接返回 model 类的 话,需要使⽤@ResponseBody 进⾏ json 转换
-
@ExceptionHandler
该注解在 Spring 3.X 版本引⼊,在处理异常时标注在⽅法级别,代表当前⽅法处理的异常类型有哪些 具体应⽤以 Restful 接⼝为例,测试保存⽤户接⼝
开始我们是在service层抛异常,然后再控制层抓,这里我们把异常处理交给全局异常处理
原来代码:
//参数异常
@NoArgsConstructor
@Data
public class ParamException extends RuntimeException{
private Integer code;
private String msg;
public ParamException(Integer code, String msg) {
super(msg);
this.msg=msg;
this.code = code;
}
}
public class CheckUtils {
//第一个表达式正确是抛参数异常
public static void isNull(boolean flag,String msg){
if(flag){
throw new ParamException(500,msg);
}
}
}
//mybatis
@Mapper
public interface UserMapper {
@Select("select * from user")
List queryAll();
@Select("select * from user where id=#{id}")
User queryOne(Integer id);
@Select("select * from user where name like #{name}")
List querySome(String name);
@Delete("delete from user where id =#{id}")
int deleteById(Integer id);
}
//业务层
@Service
public class UserService {
@Resource
private UserMapper userMapper;
//所有用户
public List queryAll(){return userMapper.queryAll();}
//id查用户
public User queryOne(Integer id){ return userMapper.queryOne(id);}
//登录业务
public Map login(Integer id,String password){
//自定义空抛异常,contrlller抓异常(后面在全局里抓)
CheckUtils.isNull(id==null, "id空");
CheckUtils.isNull(StringUtils.isBlank(password), "密码空");
Map map=new HashMap<>();
User user=queryOne(id);
if(user==null){
map.put("code", "400");
map.put("msg", "账号不存在");
return map;
}
if(user.getPassword().equals(password)){
map.put("code", "200");
map.put("msg", "账号密码正确");
}else {
map.put("code", "400");
map.put("msg", "密码错误");
}
return map;
}
//业务层,删除用户
@Transactional(propagation = Propagation.REQUIRED,rollbackFor = ParamException.class)
public int delete(Integer id){
CheckUtils.isNull(id==null, "id不为空");
return userMapper.deleteById(id);
}
//分页
@Transactional(readOnly = true)
public PageInfo pageInfo(PageManager pageManager){
PageHelper.startPage(pageManager.getCurPage(), pageManager.getPageSize());
return new PageInfo(userMapper.querySome("%"+pageManager.getQuery()+"%"));
}
}
//控制层
@RestController
@RequestMapping("/user")
public class UserController {
@Resource
private UserService userService;
@RequestMapping("/hello")
public Map hello(){
Map map=new HashMap<>();
map.put("name", "lwf");
return map;
}
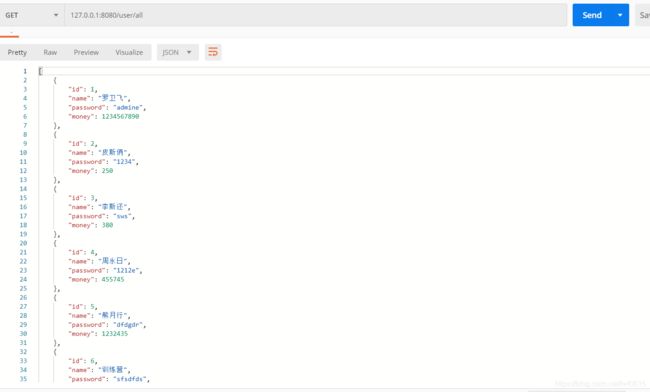
@RequestMapping(value = "/all",method = RequestMethod.GET)
public List users(){
return userService.queryAll();
}
@RequestMapping(value = "/some",method = RequestMethod.GET)
public PageInfo userPage(@RequestBody PageManager pageManager){
PageInfo pageInfo=null;
try {
pageInfo = userService.pageInfo(pageManager);
}catch (PageException e){
e.printStackTrace();
}
return pageInfo;
}
@RequestMapping(value = "/",method = RequestMethod.POST)
public Map login(@RequestBody User user, HttpSession session){
Map map=new HashMap<>();
try {
map = userService.login(user.getId(), user.getPassword());
if(map.get("code").equals("200")){
session.setAttribute("user", userService.queryOne(user.getId()));
}
}catch (ParamException e){
map.put("code", e.getCode());
map.put("msg", e.getMsg());
}finally {
return map;
}
}
@RequestMapping(value = "/{id}",method = RequestMethod.DELETE)
public Map delete(@PathVariable Integer id){
Map map=new HashMap<>();
try {
int change = userService.delete(id);
map.put("code", 200);
map.put("msg", "删除"+change);
}catch (ParamException e){
map.put("code", e.getCode());
map.put("msg", e.getMsg());
}finally {
return map;
}
}
}
测试:
空参测试
传全参数

修改后:只修改控制层,添加全局异常
//修改后的控制层
@RestController
@RequestMapping("/user1")
public class UserController1 {
    @Resource
    private UserService userService;
    @RequestMapping(value = "/some",method = RequestMethod.GET)
    public PageInfo userPage(@RequestBody PageManager pageManager){
        PageInfo pageInfo = userService.pageInfo(pageManager);
        return pageInfo;
    }
    @RequestMapping(value = "/",method = RequestMethod.POST)
    public  Map login(@RequestBody User user, HttpSession session){
        Map map= userService.login(user.getId(), user.getPassword());
        if(map.get("code").equals("200")){
                session.setAttribute("user", userService.queryOne(user.getId()));
            }

        return map;
    }
    @RequestMapping(value = "/{id}",method = RequestMethod.DELETE)
    public Map delete(@PathVariable Integer id){
        Map map=new HashMap<>();
        int change = userService.delete(id);
        map.put("code", 200);
        map.put("msg", "删除"+change);
        return map;
    }
}

//添加的全局异常处理
@RestControllerAdvice
public class MyExeceptionHandler{
    @ExceptionHandler
    @ResponseBody
    public Map globleExeception(Exception e){
        Map map=new HashMap<>();
        if(e instanceof ParamException){
            map.put("code", ((ParamException) e).getCode());
            map.put("msg", ((ParamException) e).getMsg());
        }
        else {
            map.put("code", 500);
            map.put("msg", "其他异常");
        }
        return map;
    }
}
测试:
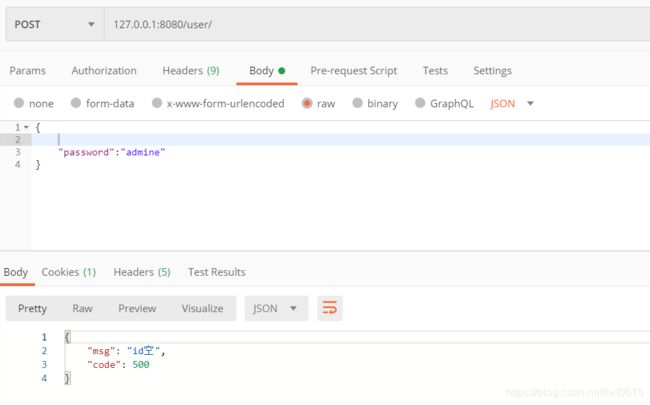
少参

参数全,密码填错

数据校验
    org.springframework.boot
    spring-boot-starter-validation
    2.3.5.RELEASE

我们本来业务层检查了参数异常,但是我们没有检查参数格式,这就导致错的格式数据也被用去数据库查询,浪费了数据库连接资源,虽然前端输入可以校验,但是用postman或用脚本去请求,那么可能插入错误的数据(sessionid被泄露,就可能非法请求,后端又没有使用正则校验就会插入非法格式的数据)。
校验失败会抛出:BindException异常。

@Data//lombok注解,帮助生成get,set,toString,hashCode,eQuails方法
public class User implements Serializable {
@NotNull(message = "id不能为空")//设置id不为空,为空抛出异常信息为message的BindExeception异常
private Integer id;
private String name;
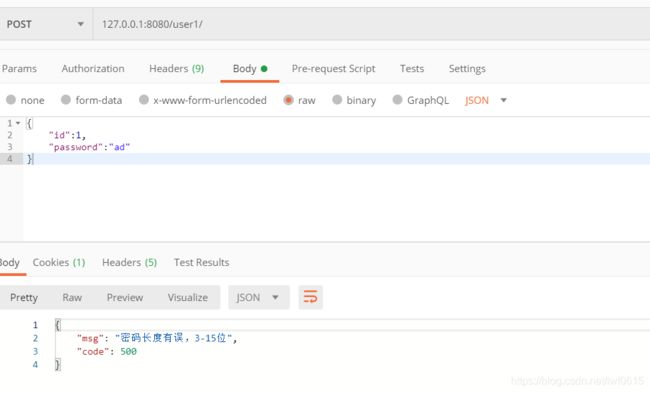
@Length(min = 3,max = 15,message = "密码长度有误,3-15位")//密码3-15位
@NotNull(message = "不能空")
private String password;
private BigDecimal money;
}
业务层UserService代码不用改
控制层接收参数加@Valid注解,会对传入参数进行校验。
@RequestMapping(value = "/",method = RequestMethod.POST)
    public  Map login(@RequestBody @Valid User user, HttpSession session){
        Map map= userService.login(user.getId(), user.getPassword());
        if(map.get("code").equals("200")){
                session.setAttribute("user", userService.queryOne(user.getId()));
            }

        return map;
    }
全局异常修改
@RestControllerAdvice
public class MyExeceptionHandler{
    @ExceptionHandler
    @ResponseBody
    public Map globleExeception(Exception e){
        Map map=new HashMap<>();
        if(e instanceof ParamException){
            map.put("code", ((ParamException) e).getCode());
            map.put("msg", ((ParamException) e).getMsg());
        }else if(e instanceof BindException){//添加
            BindException exception = (BindException) e;
            map.put("code", 500);
            map.put("msg", exception.getBindingResult().getFieldError().getDefaultMessage());
        }
        else {
            map.put("code", 500);
            map.put("msg", "其他异常");
        }
        return map;
    }
测试: