Spring框架
文章目录
- Spring 框架
- 1 概述
- 2 IOC
- 3 Bean管理
-
- 3.1 XML配置方式
- 3.2 Java注解方式
- 3.3 Java代码方式
- 3.4 对象之间调用示例
- 3.5 自动装配
- 4 单例和多例
-
- 4.1 单例(Singleton)
- 4.2 多例(Prototype)
- 5 生命周期
- 6 注解管理Bean
-
- 6.1 @Component、@Service、@Repository和@Controller
- 6.2 @Autowired
- 7 AOP
-
- 7.1 几个要点
- 7.2 通知类型
- 7.3 配置AOP
-
- 7.3.1 使用XML配置AOP的示例
- 7.3.2 使用注解配置AOP的示例
- 8 JdbcTemplate
-
- 8.1 配置数据源和 JdbcTemplate
- 8.2 使用 JdbcTemplate 进行数据库操作
- 9 事务管理
-
- 9.1 事务的传播行为
- 9.2 事务的隔离级别
- 9.3 案例:银行转账
-
- 9.3.1 基于注解的声明式事务管理
- 9.3.2 基于XML配置的声明式事务管理
Spring 框架
1 概述
Spring 框架是一个开源的 Java 平台应用程序框架,主要用于简化企业级 Java 应用的开发。它为Java开发者提供了一种全面的、一致的编程和配置模型,用于构建现代化、可维护、可测试的企业级应用。Spring 框架包含了多个模块,可以根据需要选择使用:
-
核心容器(Core Container): 提供了Spring框架的基本功能,包括IOC(控制反转)和DI(依赖注入)。
- Beans: 提供了创建、配置和管理Java对象的机制。
- Core: 提供了核心功能,包括IOC容器和事件系统。
- Context: 建立在Beans模块之上,提供了访问定义和配置的对象的方式。
-
数据访问/集成(Data Access/Integration): 提供了与数据库和其他数据源集成的功能。
- JDBC: 提供了简化JDBC编码的方法。
- ORM(对象关系映射): 例如Hibernate、JPA等,提供了简化数据库操作的方式。
- JMS(Java消息服务): 提供了用于发送和接收消息的功能。
- 事务管理: 提供了编程和声明式事务管理的支持。
-
Web(Web): 提供了创建Web应用程序的方法。
- Web模块: 提供了与基于Servlet的JSP应用程序集成的功能。
- Web MVC: 提供了一个模型-视图-控制器(MVC)架构,用于构建灵活和强大的Web应用程序。
-
AOP(面向切面编程): 提供了与切面编程和联盟代理的功能。
- AOP: 提供了与面向切面编程相关的功能,例如声明性方法拦截。
- Aspects: 提供了与AspectJ集成的功能。
-
安全性(Security): 提供了对应用程序进行认证和授权的功能。
- Security: 提供了与安全性相关的配置和功能。
-
测试(Test): 提供了对Spring组件进行单元测试和集成测试的支持。
- Test: 提供了对Spring组件进行测试的功能。
Spring 框架的特点:
- 轻量级: Spring是一个轻量级的框架,不需要大量的配置信息,可以快速启动和运行。
- IC容器: Spring使用IoC容器来管理对象的生命周期和配置,将组件之间的依赖关系交给Spring进行管理。
- AOP支持: 提供了面向切面编程的支持,可以将横切关注点(例如日志、事务管理等)从业务逻辑中分离出来。
- 事务管理: Spring提供了声明式的事务管理,可以将事务管理逻辑与业务逻辑分离开来,简化了事务管理的配置和使用。
- 模块化和可扩展: Spring框架被设计为由多个模块组成,开发者可以根据需要选择使用特定的模块,使得Spring具有很好的可扩展性。
2 IOC
IOC(Inversion of Control,控制反转) 是一种软件设计思想,它将传统的程序控制流方向颠倒过来,即将原本由程序员控制的对象实例化和执行流程的权力,交由外部容器(通常是框架)来管理,实现了程序的解耦和灵活性增强。
在传统的程序设计中,应用程序通过直接调用类(或对象)的方法来实现各种功能。而在 IOC 容器中,所有的组件(对象)的创建、销毁、依赖关系的维护等都由 IOC 容器来管理,应用程序只需通过配置的方式告诉 IOC 容器需要哪些组件以及这些组件之间的关系,IOC 容器负责实例化对象、维护对象之间的关系,并且在需要的时候将对象提供给应用程序使用。
在 Spring 框架中,IOC 容器主要有两种实现方式:BeanFactory 和 ApplicationContext。
BeanFactory :是 Spring 框架的基础容器,提供了基本的 IOC 功能。 它是 Spring 内部使用的接口,不提供给开发人员使用, 加载 applicationContext.xml 文件的时候不会创建对象,在使用对象的时候才去创建对象。
ApplicationContext : 它是 BeanFactory 的子接口,提供了更强大的功能,一般由开发人员来使用,加载 applicationContext.xml 文件的时候会创建对象。
IOC 的实现方式主要有两种:
-
依赖注入(Dependency Injection,DI): 在 IOC 容器中,对象的依赖关系不再通过对象自身控制,而是由外部容器注入。这种方式可以通过构造函数、Setter 方法、接口注入等方式实现。
构造函数注入: 通过构造函数向对象注入依赖的对象。
public Student() {
 }

 public Student(String name, Integer age) {
     this.name = name;
     this.age = age;
 }
Setter方法注入: 通过Setter方法向对象注入依赖的对象。
public String getName() {
     return name;
 }

 public void setName(String name) {
     this.name = name;
 }
xml配置:
<bean id="student" class="com.kdx.entity.Student"> <property name="name" value="kong"/> <property name="age" value="18"/> bean> <bean id="student1" class="com.kdx.entity.Student"> <constructor-arg name="name" value="xing"/> <constructor-arg name="age" value="18"/> bean> <bean id="student2" class="com.kdx.entity.Student" p:name="de" p:age="18"> -
控制反转(Inversion of Control,IOC): 控制反转是 IOC 的核心,它是一种设计思想,实现了对象的解耦。在 IOC 容器中,对象的生命周期由容器管理,对象之间的依赖关系由容器来维护。
3 Bean管理
在Spring框架中,Bean的管理是指Spring容器负责创建、配置和组装应用中的对象。在Spring中,Bean可以通过XML配置、Java注解或Java代码方式进行管理。
3.1 XML配置方式
在XML配置文件中,可以定义Bean的配置,例如:
<bean id="userService" class="com.kdx.UserService">
    <property name="userDao" ref="userDao"/>
bean>

<bean id="userDao" class="com.kdx.UserDao">
bean>
上述配置表示创建了一个名为userService的Bean,它的类型是com.kdx.UserService,并且它依赖另一个名为userDao的Bean。
3.2 Java注解方式
使用注解方式,可以在类上使用@Component或其派生注解(如@Service、@Repository、@Controller)来标识Bean,例如:
@Component
public class UserService {
    // class implementation
}
Spring会自动扫描这些注解,并将标记的类作为Bean进行管理。
3.3 Java代码方式
在Java配置类中,可以使用@Bean注解定义Bean的配置,例如:
@Configuration
public class AppConfig {
    @Bean
    public UserService userService() {
        return new UserService(userDao());
    }

    @Bean
    public UserDao userDao() {
        return new UserDao();
    }
}
上述代码定义了两个Bean,分别是userService和userDao。Spring容器会自动调用这些方法,将它们返回的对象注册为Bean。
3.4 对象之间调用示例
员工和部门之间关系:
Dept实体类:
public class Dept implements Serializable {
    private String name;

    public String getName() {
        return name;
    }

    public void setName(String name) {
        this.name = name;
    }

    @Override
    public String toString() {
        return "Dept{" +
                "name='" + name + '\'' +
                '}';
    }
}
员工实体类:
public class Employee implements Serializable {

    private String name;
    private String sex;
    //员工隶属于哪个部门
    private  Dept dept;

    public String getName() {
        return name;
    }

    public void setName(String name) {
        this.name = name;
    }

    public String getSex() {
        return sex;
    }

    public void setSex(String sex) {
        this.sex = sex;
    }

    public Dept getDept() {
        return dept;
    }

    public void setDept(Dept dept) {
        this.dept = dept;
    }

    @Override
    public String toString() {
        return "Employee{" +
                "name='" + name + '\'' +
                ", sex='" + sex + '\'' +
                ", dept=" + dept +
                '}';
    }
}
配置 ApplicationContext.xml 文件:
<beans xmlns="http://www.springframework.org/schema/beans"
       xmlns:xsi="http://www.w3.org/2001/XMLSchema-instance"
       xmlns:p="http://www.springframework.org/schema/p"
       xmlns:context="http://www.springframework.org/schema/context"
       xmlns:aop="http://www.springframework.org/schema/aop"
       xsi:schemaLocation="http://www.springframework.org/schema/beans
       http://www.springframework.org/schema/beans/spring-beans.xsd">


    <bean id="employee" class="com.kdx.entity.Employee">
        <property name="name" value="kdx"/>
        <property name="sex" value="男"/>
        <property name="dept">
            <bean id="dept" class="com.kdx.entity.Dept">
                <property name="name" value="开发">property>
            bean>
        property>
    bean>


    <bean id="employee1" class="com.kdx.entity.Employee">
        <property name="name" value="sun"/>
        <property name="sex" value="男"/>
        <property name="dept" ref="dept1"/>
    bean>
    <bean id="dept1" class="com.kdx.entity.Dept">
        <property name="name" value="开发">property>
    bean>
beans>
测试:
public class DeptEmployeeTest {
    public static void main(String[] args) {
        ApplicationContext applicationContext = new ClassPathXmlApplicationContext("ApplicationContext.xml");
        Employee employee = applicationContext.getBean("employee", Employee.class);
        System.out.println(employee);

        Employee employee1 = applicationContext.getBean("employee1", Employee.class);
        System.out.println(employee1);
    }
}
运行结果:
Employee{name='kdx', sex='男', dept=Dept{name='开发'}}
Employee{name='sun', sex='男', dept=Dept{name='开发'}}
3.5 自动装配
在Spring框架中,autowire 是一种自动装配(autowiring)的机制,用于自动处理bean之间的依赖关系。当一个bean的某个属性需要另一个bean的引用时,Spring可以根据指定的autowire模式,在容器中自动查找匹配的bean并将其注入。
在Spring中,autowire 属性可以在bean的配置中使用,以下是几种常用的autowire模式:
-
no(默认值):默认值,不使用自动装配。所有的依赖关系需要手动指定。
<bean id="beanA" class="com.example.BeanA" autowire="no"> bean> -
byName:根据属性名进行自动装配。Spring容器会查找和属性名相同的bean,并将其注入。
<bean id="beanA" class="com.example.BeanA" autowire="byName"> bean> -
byType:根据属性类型进行自动装配。Spring容器会查找和属性类型匹配的bean,并将其注入。如果存在多个匹配的bean,会抛出异常。
<bean id="beanA" class="com.example.BeanA" autowire="byType"> bean> -
constructor:根据构造函数参数类型进行自动装配。类似于
byType,但是应用于构造函数参数。<bean id="beanA" class="com.example.BeanA" autowire="constructor"> bean> -
autodetect:根据属性名和类型进行自动装配。如果找到符合名称和类型的bean,则按照
byName进行装配,如果找不到,则按照byType进行装配。<bean id="beanA" class="com.example.BeanA" autowire="autodetect"> bean>
使用autowire可以减少配置文件中的冗余,但是在大型应用中,谨慎使用自动装配,以避免因为自动装配引发的意外错误。
还是员工和部门的例子:
配置 ApplicationContext.xml:
	<bean id="employee" class="com.kdx.entity.Employee" autowire="byName">
        <property name="name" value="kong"/>
        <property name="sex" value="男"/>
    </bean>

    <bean id="dept" class="com.kdx.entity.Dept">
        <property name="name" value="开发部"/>
    </bean>
测试:
public class EmpTest {

    public static void main(String[] args) {
        ApplicationContext ac = new ClassPathXmlApplicationContext("ApplicationContext.xml");
        Employee employee = ac.getBean("employee ", Employee .class);
        System.out.println(employee );
    }
}
运行结果:
Employee{name='kong', sex='男', dept=Dept{name='开发部'}}
4 单例和多例
在Spring中,Bean(组件)可以被配置为单例(Singleton)或多例(Prototype)的作用域。
4.1 单例(Singleton)
- 单例模式:在单例模式下,Spring容器中只会存在一个实例(对象)的拷贝。无论有多少个客户端请求,Spring容器每次都返回相同的实例。
Spring容器创建对象默认是单例模式。
-
特点:
- 在应用程序的整个生命周期内,只创建一个Bean的实例。
- 默认的作用域是单例,如果不显式指定作用域,Spring会将Bean配置为单例。
- 单例模式可以提高性能,因为只有一个实例需要被创建和管理。
-
配置方式:在XML配置文件中,可以使用以下方式将Bean配置为单例:
<bean id="user" class="com.kdx.entity.User" scope="singleton">bean>
测试:
public class UserTest {

    public static void main(String[] args) {
        ApplicationContext applicationContext = new ClassPathXmlApplicationContext("ApplicationContext.xml");
        User user1 = applicationContext.getBean("user", User.class);
        User user2 = applicationContext.getBean("user", User.class);
        System.out.println(user1 == user2);
    }
}
打断点进行调试:
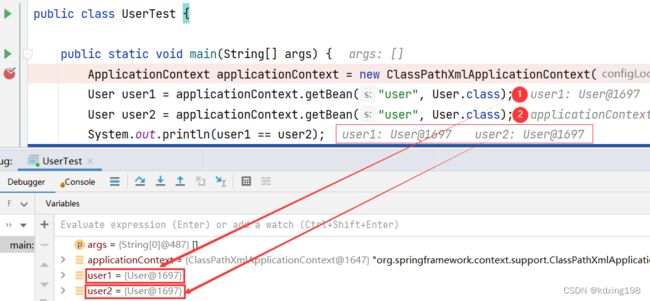
结果表明 Spring 容器每次都返回相同的实例。
4.2 多例(Prototype)
-
多例模式:在多例模式下,每次客户端请求Bean时,Spring容器都会创建一个新的实例。
-
特点:
- 每次请求时,都会创建一个新的Bean实例。
- 每个客户端请求都会得到一个独立的Bean实例。
-
配置方式:在XML配置文件中,可以使用以下方式将Bean配置为多例:
<bean id="myBean" class="com.kdx.entity.MyBean" scope="prototype"> bean>
测试:
public class UserTest {

    public static void main(String[] args) {
        ApplicationContext applicationContext = new ClassPathXmlApplicationContext("ApplicationContext.xml");
        User user1 = applicationContext.getBean("user", User.class);
        User user2 = applicationContext.getBean("user", User.class);
        System.out.println(user1 == user2);
    }
}
同样的代码,打断点调试:

结果表明每次客户端请求 Bean 时,Spring 容器都会创建一个新的实例。并且加载 Spring 配置文件不会创建对象,在调用getBean方法创建多实例对象。
5 生命周期
生命周期就是从对象的创建到对象的销毁的过程。
Student实体类:
public class Student implements Serializable {
    private String name;

    public Student() {
        System.out.println("1.执行无参构造方法");
    }

    public String getName() {
        return name;
    }

    public void setName(String name) {
        System.out.println("2.执行set方法设置属性值");
        this.name = name;
    }

    public void initMethod(){
        System.out.println("3.执行初始化方法");
    }

    public void destroyMethod(){
        System.out.println("5.执行销毁方法");
    }
}
配置 ApplicationContext.xml:
<bean id="student" class="com.kdx.entity.Student" init-method="initMethod" destroy-method="destroyMethod">
    <property name="name" value="kong"/>
bean>
测试类:
public class StudentTest {

    public static void main(String[] args) {
        ApplicationContext ac = new ClassPathXmlApplicationContext("ApplicationContext.xml");
        Student student = ac.getBean("student", Student.class);
        System.out.println("4.获取bean的实例对象");
        //销毁bean
        ((ClassPathXmlApplicationContext) ac).close();
    }
}
运行结果:
1.执行无参构造方法
2.执行set方法设置属性值
3.执行初始化方法
4.获取bean的实例对象
5.执行销毁方法
生命周期的后置处理器:BeanPostProcessor
public interface BeanPostProcessor {
	//在 Bean 的初始化方法(例如在 init-method 指定的方法)执行之前调用。
    @Nullable
    default Object postProcessBeforeInitialization(Object bean, String beanName) throws BeansException {
        return bean;
    }
	//在 Bean 的初始化方法执行之后调用。
    @Nullable
    default Object postProcessAfterInitialization(Object bean, String beanName) throws BeansException {
        return bean;
    }
}
将上面演示生命周期的部分加上初始化前后操作
MyBean:
public class MyBean implements BeanPostProcessor {

    @Override
    public Object postProcessBeforeInitialization(Object bean, String beanName) throws BeansException {
        System.out.println("---初始化之前执行的方法---");
        return bean;
    }

    @Override
    public Object postProcessAfterInitialization(Object bean, String beanName) throws BeansException {
        System.out.println("---初始化之后执行的方法---");
        return bean;
    }
}
配置 ApplicationContext.xml:
<bean id="myBean" class="com.kdx.entity.MyBean">bean>
再次运行测试类结果:
1.执行无参构造方法
2.执行set方法设置属性值
---初始化之前执行的方法---
3.执行初始化方法
---初始化之后执行的方法---
4.获取bean的实例对象
5.执行销毁方法
6 注解管理Bean
在Spring框架中,可以使用注解来管理Bean。以下是几个常用的注解:
6.1 @Component、@Service、@Repository和@Controller
这些注解用于标识类为Spring的Bean,并由Spring进行管理。它们的作用是相同的,只是在语义上有所区别:
-
@Component:通用的组件注解,用于标识任意的Spring组件。
@Component public class MyComponent { // 类定义 } -
@Service:用于标识业务逻辑层的Bean。
@Service public class MyService { // 类定义 } -
@Repository:用于标识数据访问层(DAO)的Bean。
@Repository public class MyRepository { // 类定义 } -
@Controller:用于标识控制器层的Bean(Spring MVC中使用)。
@Controller
public class MyController {
    // 类定义
}
6.2 @Autowired
@Autowired 用于自动装配Bean,可以标注在构造方法、Setter方法、字段或者方法上。
-
在构造方法上使用:
@Service public class MyService { private MyRepository repository; @Autowired public MyService(MyRepository repository) { this.repository = repository; } } -
在Setter方法上使用:
@Service public class MyService { private MyRepository repository; @Autowired public void setRepository(MyRepository repository) { this.repository = repository; } } -
在字段上使用:
@Service public class MyService { @Autowired private MyRepository repository; } -
在方法上使用:
@Service
public class MyService {
    private MyRepository repository;

    @Autowired
    public void setRepository(MyRepository repository) {
        this.repository = repository;
    }
}
7 AOP
AOP(面向切面编程)是一种编程范式,它允许将横切关注点(cross-cutting concerns)从业务逻辑中分离出来,使得代码更加模块化、易于维护和扩展。横切关注点通常包括日志、事务管理、安全性、缓存、性能监控等。在AOP中,这些关注点被称为切面(Aspect),它们可以被模块化地织入到应用程序的不同部分,而不需要修改这些部分的源代码。
7.1 几个要点
-
切面(Aspect) 是动作,把通知应用到切入点的过程称为切面。
-
通知(Advice):定义了在何时(例如方法执行前、方法执行后)执行横切逻辑的代码。通知类型包括前置通知(Before)、后置通知(AfterReturning)、异常通知(AfterThrowing)、最终通知(After)和环绕通知(Around)。
public class MyAspect { // 前置通知 public void beforeAdvice() { // 在方法执行前执行的逻辑 } // 后置通知 public void afterReturningAdvice() { // 在方法执行后(正常返回时)执行的逻辑 } // 异常通知 public void afterThrowingAdvice(Exception ex) { // 在方法抛出异常时执行的逻辑 } // 最终通知 public void afterAdvice() { // 在方法执行后(无论正常返回还是抛出异常时)执行的逻辑 } // 环绕通知 public Object aroundAdvice(ProceedingJoinPoint joinPoint) throws Throwable { // 在方法执行前后执行的逻辑 Object result = joinPoint.proceed(); // 在方法执行后(正常返回时)执行的逻辑 return result; } } -
切点(Pointcut):定义了在哪些连接点(例如方法调用、方法执行等)应用通知。切点使用表达式指定连接点的规则。
@Aspect public class MyAspect { @Pointcut("execution(* com.example.service.*.*(..))") public void serviceMethods() {} @Before("serviceMethods()") public void beforeServiceMethods() { // 前置通知逻辑 } } -
连接点(Join Point): 是在程序执行过程中能够插入切面的点。通俗地说,连接点就是程序中可能会被拦截到的点,比如方法调用、方法执行、异常抛出等。在AOP中,切点(Pointcut)用于定位连接点。也可以说类里面可以被增强的方法称为连接点。
-
public void myMethod() { // 连接点 } -
切入点表达式:
作用:知道哪个类中的哪个方法被增强
格式:execution([权限修饰符][返回值类型][类全路径][方法名][参数列表])对 cn.kdx.dao.BookDao 类里面的add方法进行增强 execution(* cn.kdx.dao.BookDao.add(..)) 对 cn.kdx.dao.BookDao 类里面的所有方法进行增强 execution(* cn.kdx.dao.BookDao.*(..)) 对 cn.kdx.dao 包里面的所有类中所有方法进行增强 execution(* cn.kdx.dao.*.*(..))
7.2 通知类型
-
前置通知(Before):在方法执行前执行的通知。
@Before("execution(* com.example.service.*.*(..))") public void beforeAdvice() { // 前置通知逻辑 } -
后置通知(AfterReturning):在方法正常返回后执行的通知。
@AfterReturning(pointcut = "execution(* com.example.service.*.*(..))", returning = "result") public void afterReturningAdvice(Object result) { // 后置通知逻辑 } -
异常通知(AfterThrowing):在方法抛出异常后执行的通知。
@AfterThrowing(pointcut = "execution(* com.example.service.*.*(..))", throwing = "ex") public void afterThrowingAdvice(Exception ex) { // 异常通知逻辑 } -
最终通知(After):在方法执行后(无论正常返回还是抛出异常时)执行的通知。
@After("execution(* com.example.service.*.*(..))") public void afterAdvice() { // 最终通知逻辑 } -
环绕通知(Around):在方法执行前后都可以自定义逻辑的通知。
@Around("execution(* com.example.service.*.*(..))")
public Object aroundAdvice(ProceedingJoinPoint joinPoint) throws Throwable {
    // 在方法执行前的逻辑
    Object result = joinPoint.proceed();
    // 在方法执行后的逻辑
    return result;
}
7.3 配置AOP
在Spring中,配置AOP主要使用XML配置或者注解配置。
7.3.1 使用XML配置AOP的示例
User类
public class User implements Serializable {

    public void show(){
        System.out.println("showing...");
    }
}
UserProxy增强类:
public class UserProxy{

    public void before(){
        System.out.println("前置通知");
    }

    public void afterReturning(){
        System.out.println("后置通知");
    }

    public void after(){
        System.out.println("最终通知");
    }

    public void afterThrowing(){
        System.out.println("异常通知");
    }

    public void around(ProceedingJoinPoint proceedingJoinPoint) throws Throwable{
        System.out.println("环绕之前通知");
        proceedingJoinPoint.proceed();
        System.out.println("环绕之后通知");
    }
}
配置 ApplicationContext.xml:
	<bean id="user" class="com.kdx.entity.User">bean>

    <bean id="userProxy" class="com.kdx.entity.UserProxy">bean>

    <aop:config>

        <aop:pointcut id="p" expression="execution(* com.kdx.entity.User.show(..))"/>

        <aop:aspect ref="userProxy">

            <aop:before method="before" pointcut-ref="p">aop:before>

            <aop:after-returning method="afterReturning" pointcut-ref="p">aop:after-returning>

            <aop:after method="after" pointcut-ref="p">aop:after>

            <aop:after-throwing method="afterThrowing" pointcut-ref="p">aop:after-throwing>

            <aop:around method="around" pointcut-ref="p">aop:around>
        aop:aspect>
    aop:config>
测试:
public class UserTest {
    public static void main(String[] args) {
        ApplicationContext applicationContext = new ClassPathXmlApplicationContext("ApplicationContext.xml");
        User user = applicationContext.getBean("user", User.class);
        user.show();
    }
}
运行结果:
前置通知
环绕之前通知
showing...
环绕之后通知
最终通知
后置通知
7.3.2 使用注解配置AOP的示例
Student类:
@Service
public class Student implements Serializable {

    public void study(){
        System.out.println("studying...");
    }
}
StudentProxy增强类:
@Service
@Aspect
public class StudentProxy {

    /*抽取相同代码*/
    @Pointcut(value = "execution(* com.kdx.domain.Student.study(..))")
    public void proxy(){
    }

    @Before(value = "proxy()")
    public void before(){
        System.out.println("前置通知");
    }

    @AfterReturning(value = "proxy()")
    public void afterReturning(){
        System.out.println("后置通知");
    }

    @After(value = "proxy()")
    public void after(){
        System.out.println("最终通知");
    }

    @AfterThrowing(value = "proxy()")
    public void afterThrowing(){
        System.out.println("异常通知");
    }

    @Around(value = "proxy()")
    public void around(ProceedingJoinPoint proceedingJoinPoint) throws Throwable{
        System.out.println("环绕之前通知");
        proceedingJoinPoint.proceed();
        System.out.println("环绕之后通知");
    }
}
配置 ApplicationContext.xml:
    <context:component-scan base-package="com.kdx.domain">context:component-scan>

    <aop:aspectj-autoproxy>aop:aspectj-autoproxy>
测试:
public class StudentTest {

    public static void main(String[] args) {
        ApplicationContext applicationContext = new ClassPathXmlApplicationContext("ApplicationContext1.xml");
        Student student = applicationContext.getBean("student", Student.class);
        student.study();
    }
}
运行结果:
环绕之前通知
前置通知
studying...
环绕之后通知
最终通知
后置通知
8 JdbcTemplate
JdbcTemplate 是 Spring 框架提供的一个简化 JDBC 开发的模板类。它封装了使用 JDBC 进行数据库操作的常见任务,如查询、更新、删除等,使得开发者无需编写冗长的 JDBC 代码,提高了代码的简洁性和可读性。
8.1 配置数据源和 JdbcTemplate
配置 ApplicationContext.xml:
    <bean id="dataSource" class="com.alibaba.druid.pool.DruidDataSource">
        <property name="url" value="jdbc:mysql:///mybatis"/>
        <property name="username" value="root"/>
        <property name="password" value="kdx010908"/>
        <property name="driverClassName" value="com.mysql.jdbc.Driver"/>
    bean>


    <bean id="jdbcTemplate" class="org.springframework.jdbc.core.JdbcTemplate">
        <property name="dataSource" ref="dataSource"/>
    bean>


    <context:component-scan base-package="com.kdx">context:component-scan>
8.2 使用 JdbcTemplate 进行数据库操作
public interface UserDao {
    List<User> findAll();

    int addUser(User user);

    int updateUser(User user);

    int deleteUser(int id);
}
@Service
public class UserDaoImpl implements UserDao {
    @Autowired
    private JdbcTemplate jdbcTemplate;

    @Override
    public List<User> findAll() {
        String sql = "select * from user";
        BeanPropertyRowMapper<User> mapper = new BeanPropertyRowMapper<>(User.class);
        List<User> userList = jdbcTemplate.query(sql, mapper);
        return userList;
    }

    @Override
    public int addUser(User user) {
        String sql = "insert into user (username) values(?)";
        Object [] args = {user.getUsername()};
        int rows = jdbcTemplate.update(sql, args);
        return rows;
    }

    @Override
    public int updateUser(User user) {
        String sql = "update user set username = ? where id = ?";
        Object [] args = {user.getUsername(),user.getId()};
        int rows = jdbcTemplate.update(sql, args);
        return rows;
    }

    @Override
    public int deleteUser(int id) {
        String sql = "delete from user where id = ?";
        int rows = jdbcTemplate.update(sql,id);
        return rows;
    }
}
在上面的示例中,JdbcTemplate 的 query 方法用于查询结果集,update 方法用于更新、插入和删除操作。JdbcTemplate 会处理 SQL 的执行、异常捕获和资源释放等繁琐的操作,使得我们只需关注 SQL 语句和数据映射即可。
9 事务管理
在Spring框架中,事务管理是一项关键的功能,它可以确保一组操作要么全部成功执行,要么全部回滚到初始状态。
9.1 事务的传播行为
在Spring框架中,事务的传播行为定义了在方法调用链中的多个方法都具有事务性时,这些事务应该如何交互。
Spring框架定义了七种事务传播行为:
-
REQUIRED(默认): 如果当前存在事务,则加入该事务;如果当前没有事务,则创建一个新的事务。这是最常见的传播行为,也是默认的行为。
-
SUPPORTS: 如果当前存在事务,则加入该事务;如果当前没有事务,则以非事务的方式执行。
-
MANDATORY: 必须在一个已有的事务中执行,否则抛出异常。如果当前没有事务,则抛出异常。
-
REQUIRES_NEW: 创建一个新的事务,如果当前存在事务,则将当前事务挂起。新的事务与外部事务无关,是独立的。
-
NOT_SUPPORTED: 以非事务的方式执行,如果当前存在事务,则将当前事务挂起。
-
NEVER: 以非事务的方式执行,如果当前存在事务,则抛出异常。
-
NESTED: 如果当前存在事务,则在嵌套事务内执行。嵌套事务可以独立提交或回滚,但是外部事务的提交或回滚会影响到所有嵌套事务。
在使用@Transactional注解时,可以设置propagation属性来指定事务的传播行为。例如:
@Transactional(propagation = Propagation.REQUIRED)
public void method() {
}
在XML配置中,可以这样设置传播行为:
<tx:method name="method" propagation="REQUIRED"/>
9.2 事务的隔离级别
Spring框架支持四种事务隔离级别,用来控制并发事务执行时的相互影响程度。这些事务隔离级别在标准的JDBC事务中也是适用的:
-
READ_UNCOMMITTED(读未提交): 允许读取还未提交的事务的修改。可能会导致脏读、不可重复读和幻读的问题。
-
READ_COMMITTED(读已提交): 确保一个事务只能读取到已提交的事务所做的修改。避免了脏读,但是可能会出现不可重复读和幻读的问题。
-
REPEATABLE_READ(可重复读)
(默认): 确保一个事务在多次读取同一数据行时,能够看到同样的数据版本。避免了脏读和不可重复读,但是可能会出现幻读的问题。 -
SERIALIZABLE(串行化): 最高的隔离级别,在事务执行期间,其他事务无法并发执行。避免了脏读、不可重复读和幻读,但是性能较差,因为事务是串行执行的。
在Spring事务管理中,可以使用@Transactional注解的isolation属性来设置事务的隔离级别。例如:
@Transactional(isolation = Isolation.READ_COMMITTED)
public void method() {
}
在XML配置中,可以这样设置隔离级别:
<tx:method name="method" isolation="READ_COMMITTED"/>
事务隔离级别效果:

9.3 案例:银行转账
A和B原本都有1000元,A向B转账100元,数据库对应操作A-100元,B+100元
Bank 实体类:
public class Bank implements Serializable {

    private Integer id;
    private String username;
    private Integer money;

    public Bank() {
    }

    public Bank(Integer id, String username, Integer money) {
        this.id = id;
        this.username = username;
        this.money = money;
    }

    public Integer getId() {
        return id;
    }

    public void setId(Integer id) {
        this.id = id;
    }

    public String getUsername() {
        return username;
    }

    public void setUsername(String username) {
        this.username = username;
    }

    public Integer getMoney() {
        return money;
    }

    public void setMoney(Integer money) {
        this.money = money;
    }
}
BankDao接口:
public interface BankDao {
	//加钱
    void addMoney();
	//减钱
    void reduceMoney();
}
9.3.1 基于注解的声明式事务管理
1.在实体类Bank上面加上注解 @Service
2.BankDaoImpl实现BankDao接口
@Service
public class BankDaoImpl implements BankDao {

    @Autowired
    private JdbcTemplate jdbcTemplate;

    @Override
    public void addMoney() {
        String sql = "update bank set money = money + ? where id = ?";
        jdbcTemplate.update(sql,100,1);
    }

    @Override
    public void reduceMoney() {
        String sql = "update bank set money = money - ? where id = ?";
        jdbcTemplate.update(sql,100,2);
    }
}
3.BankService业务逻辑
@Service
public class BankService {
    @Autowired
    private BankDao bankDao;

    @Transactional(propagation = Propagation.REQUIRED,//传播行为
                   isolation = Isolation.REPEATABLE_READ,//隔离级别
                   readOnly = false //不是只读
                   timeout = 1000, //超时
                   rollbackFor = Exception.class) //回滚
    public void accountMoney(){
        bankDao.reduceMoney();
        System.out.println("-------");
        //发生异常,事务回滚
        System.out.println(1/0);
        bankDao.addMoney();
        System.out.println("转账成功!");
    }
}
如果注解中没有配置
rollbackFor = Exception.class,则当发生异常时,事务不会进行回滚,数据库数据出现异常,只有A减了100元,而B还是1000元。
4.配置 ApplicationContext.xml
<beans xmlns="http://www.springframework.org/schema/beans"
       xmlns:xsi="http://www.w3.org/2001/XMLSchema-instance"
       xmlns:p="http://www.springframework.org/schema/p"
       xmlns:context="http://www.springframework.org/schema/context"
       xmlns:aop="http://www.springframework.org/schema/aop" xmlns:tx="http://www.springframework.org/schema/tx"
       xsi:schemaLocation="http://www.springframework.org/schema/beans
       http://www.springframework.org/schema/beans/spring-beans.xsd
       http://www.springframework.org/schema/context
       https://www.springframework.org/schema/context/spring-context.xsd
       http://www.springframework.org/schema/aop
       https://www.springframework.org/schema/aop/spring-aop.xsd http://www.springframework.org/schema/tx http://www.springframework.org/schema/tx/spring-tx.xsd">

    <bean id="dataSource" class="com.alibaba.druid.pool.DruidDataSource">
        <property name="url" value="jdbc:mysql:///mybatis"/>
        <property name="username" value="root"/>
        <property name="password" value="kdx010908"/>
        <property name="driverClassName" value="com.mysql.jdbc.Driver"/>
    bean>


    <bean id="jdbcTemplate" class="org.springframework.jdbc.core.JdbcTemplate">
        <property name="dataSource" ref="dataSource"/>
    bean>


    <context:component-scan base-package="com.kdx">context:component-scan>


    <bean id="transactionManager" class="org.springframework.jdbc.datasource.DataSourceTransactionManager">
        <property name="dataSource" ref="dataSource">property>
    bean>


    <tx:annotation-driven transaction-manager="transactionManager">tx:annotation-driven>
beans>
5.测试
public class BankServiceTest {

    public static void main(String[] args) {
        ApplicationContext applicationContext = new ClassPathXmlApplicationContext("ApplicationContext.xml");
        BankService bankService = applicationContext.getBean("bankService", BankService.class);
        bankService.accountMoney();
    }
}
由于发生异常,事务回滚,所以数据库没有发生变化。
9.3.2 基于XML配置的声明式事务管理
1.BankDao1Impl 实现 BankDao 接口
public class BankDao1Impl implements BankDao {

    private JdbcTemplate jdbcTemplate;

    public JdbcTemplate getJdbcTemplate() {
        return jdbcTemplate;
    }

    public void setJdbcTemplate(JdbcTemplate jdbcTemplate) {
        this.jdbcTemplate = jdbcTemplate;
    }

    @Override
    public void addMoney() {
        String sql = "update bank set money = money + ? where id = ?";
        jdbcTemplate.update(sql,100,3);
    }

    @Override
    public void reduceMoney() {
        String sql = "update bank set money = money - ? where id = ?";
        jdbcTemplate.update(sql,100,4);
    }
}
2.BankService1
public class BankService1 {

    private BankDao bankDao;

    public BankDao getBankDao() {
        return bankDao;
    }

    public void setBankDao(BankDao bankDao) {
        this.bankDao = bankDao;
    }

    public void accountMoney1(){
        bankDao.reduceMoney();
        System.out.println("-------");
        //发生异常,事务回滚
        System.out.println(1/0);
        bankDao.addMoney();
        System.out.println("转账成功!");
    }
}
3.配置 ApplicationContext1.xml
    <bean id="dataSource" class="com.alibaba.druid.pool.DruidDataSource">
        <property name="url" value="jdbc:mysql:///mybatis"/>
        <property name="username" value="root"/>
        <property name="password" value="kdx010908"/>
        <property name="driverClassName" value="com.mysql.jdbc.Driver"/>
    bean>


    <bean id="jdbcTemplate" class="org.springframework.jdbc.core.JdbcTemplate">
        <property name="dataSource" ref="dataSource"/>
    bean>

    <bean id="bankDao1" class="com.kdx.dao.impl.BankDao1Impl">
        <property name="jdbcTemplate" ref="jdbcTemplate">property>
    bean>

    <bean id="bankService1" class="com.kdx.service.BankService1">
        <property name="bankDao" ref="bankDao1">property>
    bean>


    <bean id="transactionManager" class="org.springframework.jdbc.datasource.DataSourceTransactionManager">
        <property name="dataSource" ref="dataSource">property>
    bean>


    <tx:advice id="advice">

        <tx:attributes>
            <tx:method name="accountMoney1" propagation="REQUIRED" rollback-for="Exception.class"/>
        tx:attributes>
    tx:advice>


    <aop:config>

        <aop:pointcut id="p" expression="execution(* com.kdx.service.BankService1.accountMoney1(..))"/>

        <aop:advisor advice-ref="advice" pointcut-ref="p">aop:advisor>
    aop:config>
在上述配置中,transactionManager是事务管理器,advice是事务通知器,它定义了哪些方法(这里是accountMoney1方法)需要进行事务管理。
若没有配置
,则当发生异常时,事务不会进行回滚,数据库数据出现异常,只有A减了100元,而B还是1000元。
4.测试
public class BankService1Test {

    public static void main(String[] args) {
        ApplicationContext applicationContext = new ClassPathXmlApplicationContext("ApplicationContext1.xml");
        BankService1 bankService1 = applicationContext.getBean("bankService1", BankService1.class);
        bankService1.accountMoney1();
    }
}
由于发生异常,事务回滚,所以数据库没有发生变化。