spring 注解: 更加简单的存储 Bean
目录
1. 更加简单的存储 Bean
1.1 添加注解
1.1.1 @Controller【控制器存储】
1.1.2 @Service【服务存储】
1.1.3 @Repository【仓库存储】
1.1.4 @Component【组件存储】
1.1.5 @Configuration【配置存储】
1.1.6 类注解存储 Bean 的命名规则(默认命名规则)
1.1.7 方法注解 Bean
1.1.8 重命名 Bean
1. 更加简单的存储 Bean
前置工作:
1.1 添加注解
1️⃣通过类注解实现 Bean 对象的存储:@Controller、@Service、@Repository、@Component、@Configuration
2️⃣通过方法注解实现 Bean 对象的存储:@Bean
1.1.1 @Controller【控制器存储】
效验参数的合法性(安检系统)
@Controller
public class User {
    public void sayHi() {
        System.out.println("Hi, User");
    }
}
public class App {
public static void main(String[] args) {
//1.得到容器
ApplicationContext context = new ClassPathXmlApplicationContext("spring-config.xml");
//2.得到 Bean 对象
User user = context.getBean("user", User.class);
//3.使用 Bean 对象
user.sayHi();
}
}1.1.2 @Service【服务存储】
业务组装(客服中心)
使用 @Service 存储 Bean:
@Service
public class UserService {
    public void sayHi() {
        System.out.println("Hi, UserService");
    }
}
读取 Bean:
public class App {
    public static void main(String[] args) {
        //1.得到容器
        ApplicationContext context = new ClassPathXmlApplicationContext("spring-config.xml");
        //2.得到 Bean 对象
        UserService userService = context.getBean("userService", UserService.class);
        //3.使用 Bean 对象
        userService.sayHi();
    }
}
1.1.3 @Repository【仓库存储】
实际业务处理(实际办理的业务)
使用 @Repository 存储 Bean:
@Repository
public class Teacher {
    public void sayHi() {
        System.out.println("Hi, Teacher");
    }
}
读取 Bean:
public class App {
    public static void main(String[] args) {
        //1.得到容器
        ApplicationContext context = new ClassPathXmlApplicationContext("spring-config.xml");
        //2.得到 Bean 对象
        Teacher teacher = context.getBean("teacher", Teacher.class);
        //3.使用 Bean 对象
        teacher.sayHi();
    }
}
1.1.4 @Component【组件存储】
工具类层(基础的工具)
使用 @Component 存储 Bean:
@Component
public class Teacher {
    public void sayHi() {
        System.out.println("Hi, Teacher");
    }
}
读取 Bean:
public class App {
    public static void main(String[] args) {
        //1.得到容器
        ApplicationContext context = new ClassPathXmlApplicationContext("spring-config.xml");
        //2.得到 Bean 对象
        Teacher teacher = context.getBean("teacher", Teacher.class);
        //3.使用 Bean 对象
        teacher.sayHi();
    }
}
1.1.5 @Configuration【配置存储】
使用 @Configuration 存储 Bean:
@Configuration
public class Teacher {
    public void sayHi() {
        System.out.println("Hi, Teacher");
    }
}
读取 Bean:
public class App {
    public static void main(String[] args) {
        //1.得到容器
        ApplicationContext context = new ClassPathXmlApplicationContext("spring-config.xml");
        //2.得到 Bean 对象
        Teacher teacher = context.getBean("teacher", Teacher.class);
        //3.使用 Bean 对象
        teacher.sayHi();
    }
}
1.1.6 类注解存储 Bean 的命名规则(默认命名规则)
1️⃣默认类对象首字母小写就能获取到 Bean 对象
Teacher teacher = context.getBean("teacher", Teacher.class);2️⃣使用原类名可以获取到 Bean 对象
UConfig uConfig = context.getBean("UConfig", UConfig.class);✅结论:
如果首字母是大写,第二个字母是小写,那么 Bean 的名称就是类名小写;
如果不满足首字母大写和第二个字母小写的情况,那么 Bean 的名称就为原类名。
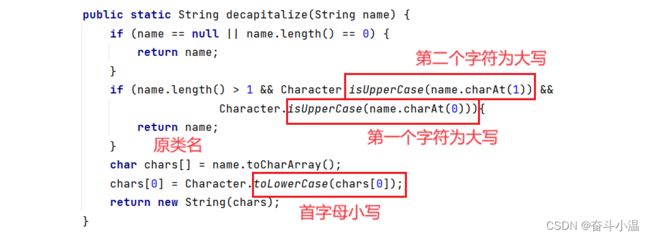
在这里 Bean 生成命名的源代码:
    public static String decapitalize(String name) {
        if (name == null || name.length() == 0) {
            return name;
        }
        if (name.length() > 1 && Character.isUpperCase(name.charAt(1)) &&
                        Character.isUpperCase(name.charAt(0))){
            return name;
        }
        char chars[] = name.toCharArray();
        chars[0] = Character.toLowerCase(chars[0]);
        return new String(chars);
    }
public class Test {
public static void main(String[] args) {
String name = "Student";
String name2 = "APPConfig";
System.out.println(name + ":" + Introspector.decapitalize(name));
System.out.println(name2 + ":" + Introspector.decapitalize(name2));
}
}命名规则:首字母和第二个字母大写返回原类名,否则就是首字母小写
1.1.7 方法注解 Bean
1️⃣使用 Bean——使用注意事项: @Bean 注解 必须要配合 五大类注解 一起使用
@Component
public class Articles {
    @Bean //将当前方法返回的对象存储到 IoC 容器中
    public ArticleInfo articleInfo() {
        // 伪代码
        ArticleInfo articleInfo = new ArticleInfo();
        articleInfo.setAid(1);
        articleInfo.setTitle("今天周几");
        articleInfo.setContent("今天周一");
        articleInfo.setCreatetime(LocalDateTime.now());
        return articleInfo;
    }
}
获取对象:
public class App {
    public static void main(String[] args) {
        //1.得到容器
        ApplicationContext context = new ClassPathXmlApplicationContext("spring-config.xml");
        //2.得到 Bean 对象
        ArticleInfo articleInfo = context.getBean("articleInfo", ArticleInfo.class);
        //3.使用 Bean 对象
        System.out.println(articleInfo.toString());
    }
}2️⃣Bean获取时注意事项:@Bean 的默认命名 = 方法名
    public ArticleInfo arc() {
        // 伪代码
        ArticleInfo articleInfo = new ArticleInfo();
        articleInfo.setAid(1);
        articleInfo.setTitle("今天周几");
        articleInfo.setContent("今天周一");
        articleInfo.setCreatetime(LocalDateTime.now());
        return articleInfo;
    }
获取 Bean:
ArticleInfo articleInfo = context.getBean("arc", ArticleInfo.class);1.1.8 重命名 Bean
1️⃣
@Bean("aaa") 2️⃣
@Bean(name = "bbb")3️⃣
@Bean(value = "ccc")重命名扩展:@Bean 支持指定多个名称
@Bean(value = {"ccc", "ddd"})默认命名使用注意事项:当 @Bean 进行重命名之后就不可以使用默认的使用方法获取 Bean 对象 (注意和默认命名区别)
必须要使用名字获取,例如:
ArticleInfo articleInfo = context.getBean("article", ArticleInfo.class);@Bean 名称注意事项:如果多个 Bean 名称相同,那么程序执行不会报错,但是第一个 Bean 之后的对象就不会存放在容器当中,也就是说只有第一次创建Bean 的时候会将 对象 和 Bean 存储的时候,容器会自动忽略
@Component
public class Articles {
    @Bean({"article"}) //将当前方法返回的对象存储到 IoC 容器中
    public ArticleInfo getArt() {
        // 伪代码
        ArticleInfo articleInfo = new ArticleInfo();
        articleInfo.setAid(1);
        articleInfo.setTitle("今天周几");
        articleInfo.setContent("今天周一");
        articleInfo.setCreatetime(LocalDateTime.now());
        return articleInfo;
    }

    @Bean({"article"}) //将当前方法返回的对象存储到 IoC 容器中
    public ArticleInfo getArt1() {
        // 伪代码
        ArticleInfo articleInfo = new ArticleInfo();
        articleInfo.setAid(2);
        articleInfo.setTitle("今天学习了什么");
        articleInfo.setContent("注解");
        articleInfo.setCreatetime(LocalDateTime.now());
        return articleInfo;
    }

    @Bean({"article"}) //将当前方法返回的对象存储到 IoC 容器中
    public ArticleInfo getArt2() {
        // 伪代码
        ArticleInfo articleInfo = new ArticleInfo();
        articleInfo.setAid(1);
        articleInfo.setTitle("今天写博客了吗");
        articleInfo.setContent("写了");
        articleInfo.setCreatetime(LocalDateTime.now());
        return articleInfo;
    }
}


