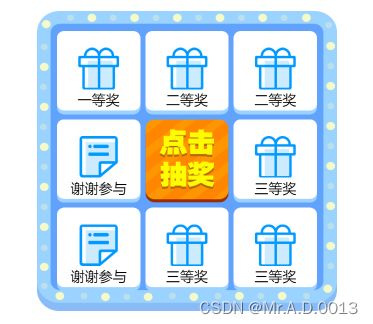
微信小程序九宫格抽奖活动制作
首先安装npm包
npm install @lucky-canvas/mini@latest然后构建 npm
微信开发者工具-> 找到左上角点击 ->工具- 点击 ->
构建 npm - 弹窗提示
构建成功即可
引入自定义组件
{
  ...
  "usingComponents": {
    "lucky-wheel": "/miniprogram_npm/@lucky-canvas/mini/lucky-wheel/index",
    "lucky-grid": "/miniprogram_npm/@lucky-canvas/mini/lucky-grid/index"
    "slot-machine": "/miniprogram_npm/@lucky-canvas/mini/slot-machine/index"
  }
  ...
}
然后就可以根据官网实例进行制作啦
以下是我的一个demo
wxml:
js:
data: {
        blocks: [{
            padding: '20px',
            imgs: [{
                src: '/image/k_bg.gif',
                width: '100%',
                height: '100%'
            }]
        }],
        prizes: [
            {
                x: 0, y: 0, range: 1, fonts: [{ text: '一等奖', top: '60px', fontSize: '14px' }], imgs: [{
                    src: '/image/k_bg0.png',
                    activeSrc: '/image/k_bg1.png',
                    width: '100%',
                    height: '100%'
                },
                {
                    src: '/image/prizes-1.png',
                    width: '50%',
                    top: '20%'
                }]
            },
            {
                x: 1, y: 0, range: 5, fonts: [{ text: '二等奖', top: '60px', fontSize: '14px' }], imgs: [{
                    src: '/image/k_bg0.png',
                    activeSrc: '/image/k_bg1.png',
                    width: '100%',
                    height: '100%'
                }, {
                    src: '/image/prizes-1.png',
                    width: '50%',
                    top: '20%'
                }
                ]
            },
            {
                x: 2, y: 0, range: 5, fonts: [{ text: '二等奖', top: '60px', fontSize: '14px' }], imgs: [{
                    src: '/image/k_bg0.png',
                    activeSrc: '/image/k_bg1.png',
                    width: '100%',
                    height: '100%'
                }, {
                    src: '/image/prizes-1.png',
                    width: '50%',
                    top: '20%'
                }]
            },
            {
                x: 2, y: 1, range: 9, fonts: [{ text: '三等奖', top: '60px', fontSize: '14px' }], imgs: [{
                    src: '/image/k_bg0.png',
                    activeSrc: '/image/k_bg1.png',
                    width: '100%',
                    height: '100%'
                }, {
                    src: '/image/prizes-1.png',
                    width: '50%',
                    top: '20%'
                }]
            },
            {
                x: 2, y: 2, range: 9, fonts: [{ text: '三等奖', top: '60px', fontSize: '14px' }], imgs: [{
                    src: '/image/k_bg0.png',
                    activeSrc: '/image/k_bg1.png',
                    width: '100%',
                    height: '100%'
                }, {
                    src: '/image/prizes-1.png',
                    width: '50%',
                    top: '20%'
                }]
            },
            {
                x: 1, y: 2, range: 9, fonts: [{ text: '三等奖', top: '60px', fontSize: '14px' }], imgs: [{
                    src: '/image/k_bg0.png',
                    activeSrc: '/image/k_bg1.png',
                    width: '100%',
                    height: '100%'
                }, {
                    src: '/image/prizes-1.png',
                    width: '50%',
                    top: '20%'
                }]
            },
            {
                x: 0, y: 2, range: 31, fonts: [{ text: '谢谢参与', top: '60px', fontSize: '14px' }], imgs: [{
                    src: '/image/k_bg0.png',
                    activeSrc: '/image/k_bg1.png',
                    width: '100%',
                    height: '100%'
                }, {
                    src: '/image/prizes-0.png',
                    width: '50%',
                    top: '20%'
                }]
            },
            {
                x: 0, y: 1, range: 31, fonts: [{ text: '谢谢参与', top: '60px', fontSize: '14px' }], imgs: [{
                    src: '/image/k_bg0.png',
                    activeSrc: '/image/k_bg1.png',
                    width: '100%',
                    height: '100%'
                }, {
                    src: '/image/prizes-0.png',
                    width: '50%',
                    top: '20%'
                }]
            },
        ],
        buttons: [
            {
                x: 1, y: 1,
                range: [1, 5, 5, 9, 9, 9, 31, 31],
                background: 'rgba(0,0,0,0)',
                imgs: [{
                    src: '/image/dianjichoujiangd.png',
                    width: '100%',
                    height: '100%',
                }],
            },
        ],
        defaultConfig: {
            accelerationTime: 3000,
            decelerationTime: 3000
        },
    },
   start() {
        // 获取抽奖组件实例
        const child = this.selectComponent('#myLucky')
        // 调用play方法开始旋转
        child.lucky.play()
        // 用定时器模拟请求接口
        setTimeout(() => {
            // 3s 后得到中奖索引 (假设抽到第0个奖品)
            // 调用stop方法然后缓慢停止
            child.lucky.stop()
        }, 6000)
    },
    end(event) {
        // 中奖奖品详情
        console.log(event.detail)
    },
实际效果图如下:
将图片路径更换为自己的图片路径即可实现啦
如有问题或指正,请在评论区指出,侵删
