java spring oauth2.0_Spring cloud微服务实战——基于OAUTH2.0统一认证授权的微服务基础架构...
1.架构图
技术团队通过一段时间的积累后,我们打算对往后的一些新项目采用Spring Cloud技术栈来实现。大概微服务的架构如下:

Euraka注册中心集群
Zuul网关集群
各模块微服务集群
Nginx实现负载均衡
Spring Cloud Config 统一配置中心
Monitor微服务监控
2.注册中心
注册中心很简单,这里主要说一下注册中心的高可用配置

这里看到我设置了node-1,node-2两个配置文件,就是在启动应用的时候,分别启动不同的配置。
node-1的端口为9010,并向node-2注册,配置如下:
server:
port: 9010
spring:
application:
name: register ##name必须一样,不然高可用会导致unavailable-replicas
eureka:
instance:
hostname: register1
client:
register-with-eureka: true
fetch-registry: true
service-url:
defaultZone: http://register2:9011/eureka/
node-2的端口为9011,并向node-1注册,配置如下:
server:
port: 9011
spring:
application:
name: register
eureka:
instance:
hostname: register2
client:
register-with-eureka: true
fetch-registry: true
service-url:
defaultZone: http://register1:9010/eureka/
这里注意一下:spring.application.name需要一致,不然会出现unavailable-replicas的情况
3.OAUTH2认证服务器
我这里采用认证服务器与资源服务器分离的方式。
3.1 oauth2 server 配置
我采取了数据库和redis两种方式来存储token,可以方便切换,生成环境下建议使用redis方式。
AuthorizationServer:
@Configuration
@EnableAuthorizationServer
public class AuthorizationServerConfig extends AuthorizationServerConfigurerAdapter {
@Autowired
private AuthenticationManager authenticationManager;
@Autowired
private DataSource dataSource;
@Autowired
private UserDetailsServiceImpl userDetailsService;
@Autowired
private RedisConnectionFactory redisConnectionFactory;
@Bean
RedisTokenStore redisTokenStore(){
return new RedisTokenStore(redisConnectionFactory);
}
//token存储数据库
// @Bean
// public JdbcTokenStore jdbcTokenStore(){
// return new JdbcTokenStore(dataSource);
// }
@Override
public void configure(ClientDetailsServiceConfigurer clients) throws Exception {
clients.withClientDetails(clientDetails());
}
@Bean
public ClientDetailsService clientDetails() {
return new JdbcClientDetailsService(dataSource);
}
@Override
public void configure(AuthorizationServerEndpointsConfigurer endpoints) throws Exception {
endpoints.tokenStore(redisTokenStore())
.userDetailsService(userDetailsService)
.authenticationManager(authenticationManager);
endpoints.tokenServices(defaultTokenServices());
}
/**
*
注意,自定义TokenServices的时候,需要设置@Primary,否则报错,
* @return
*/
@Primary
@Bean
public DefaultTokenServices defaultTokenServices(){
DefaultTokenServices tokenServices = new DefaultTokenServices();
tokenServices.setTokenStore(redisTokenStore());
tokenServices.setSupportRefreshToken(true);
tokenServices.setClientDetailsService(clientDetails());
tokenServices.setAccessTokenValiditySeconds(60*60*12); // token有效期自定义设置,默认12小时
tokenServices.setRefreshTokenValiditySeconds(60 * 60 * 24 * 7);//默认30天,这里修改
return tokenServices;
}
@Override
public void configure(AuthorizationServerSecurityConfigurer security) throws Exception {
security.tokenKeyAccess("permitAll()");
security .checkTokenAccess("isAuthenticated()");
security.allowFormAuthenticationForClients();
}
}
WebSecurityConfig:
@Configuration
public class WebSecurityConfig extends WebSecurityConfigurerAdapter {
@Autowired
private UserDetailsServiceImpl userDetailsService;
@Bean
public PasswordEncoder passwordEncoder() {
return new BCryptPasswordEncoder();
}
@Override
@Bean
public AuthenticationManager authenticationManagerBean() throws Exception {
return super.authenticationManagerBean();
}
@Override
protected void configure(AuthenticationManagerBuilder auth) throws Exception {
auth.userDetailsService(userDetailsService)
.passwordEncoder(passwordEncoder());
}
@Override
protected void configure(HttpSecurity http) throws Exception {
http
.authorizeRequests()
.anyRequest().authenticated()
.and()
.formLogin().and()
.csrf().disable()
.httpBasic();
}
@Override
public void configure(WebSecurity web) throws Exception {
web.ignoring().antMatchers("/favor.ioc");
}
}
3.2 ResourceServer
因为我们认证中心会提供User信息,所以也是资源服务器。
@Configuration
@EnableResourceServer
public class ResourceServerConfig extends ResourceServerConfigurerAdapter{
@Override
public void configure(HttpSecurity http) throws Exception {
http.
csrf().disable()
.exceptionHandling()
.authenticationEntryPoint(new Http401AuthenticationEntryPoint("Bearer realm=\"webrealm\""))
.and()
.authorizeRequests().anyRequest().authenticated()
.and()
.httpBasic();
}
}
4.资源服务器 Resource
ResourceServer:
@Configuration
@EnableResourceServer
public class ResourceServerConfig extends ResourceServerConfigurerAdapter {
@Override
public void configure(HttpSecurity http) throws Exception {
http.
csrf().disable()
.exceptionHandling()
.authenticationEntryPoint(new Http401AuthenticationEntryPoint("Bearer realm=\"webrealm\""))
.and()
.authorizeRequests().anyRequest().authenticated()
.and()
.httpBasic();
}
}
主要是application.yml的配置
security:
oauth2:
resource:
id: resource
user-info-uri: http://10.10.8.2:9030/uaa/user
prefer-token-info: false
**user-info-uri是对应网关地址,关于网关下面会介绍。上面的架构图也说明了,我们采用Nginx实现负载均衡,在使用Nginx的时候,那user-info-uri就换为Nginx的地址,这样才能实现Gateway的负载均衡 **
此处有误具体请查看:Spring cloud微服务实战——基于OAUTH2.0统一认证授权(五)
5.Zuul网关
5.1开启支持Sso
@Configuration
@EnableOAuth2Sso
public class SecurityConfig extends WebSecurityConfigurerAdapter{
@Override
protected void configure(HttpSecurity http) throws Exception {
http.csrf().disable();
}
}
5.2配置
spring:
application:
name: Gateway
zipkin:
base-url: http://10.10.8.2:9050
server:
port: 9030
eureka:
instance:
prefer-ip-address: true #使用IP注册
instance-id: ${spring.cloud.client.ipAddress}:${server.port}
client:
service-url:
defaultZone: http://register1:9010/eureka/,http://register2:9011/eureka/
###actuator监控点 start####
endpoints:
health:
sensitive: false
enabled: true
##默认情况下很多端点是不允许访问的,会返回401:Unauthorized
management:
security:
enabled: false
###actuator监控点 end####
zuul:
host:
connect-timeout-millis: 10000
socket-timeout-millis: 60000
routes:
uaa:
path: /uaa/**
strip-prefix: true
sensitiveHeaders:
serviceId: auth2.0-center
security:
basic:
enabled: false
oauth2:
client:
access-token-uri: http://10.10.8.2:9030/uaa/oauth/token ##网关的地址
user-authorization-uri: http://10.10.8.2:9030/uaa/oauth/authorize
resource:
user-info-uri: http://10.10.8.2:9030/uaa/user
prefer-token-info: false
##############end#####################
####超时配置####
ribbon:
ReadTimeout: 10000
ConnectTimeout: 10000
MaxAutoRetries: 1
MaxAutoRetriesNextServer: 2
eureka:
enabled: true
hystrix:
command:
default:
execution:
timeout:
enabled: true
isolation:
thread:
timeoutInMilliseconds: 600000
###超时配置###
6.展示
分别启动register、auth-center、gateway、resource。效果如下:

6.1获取access_token

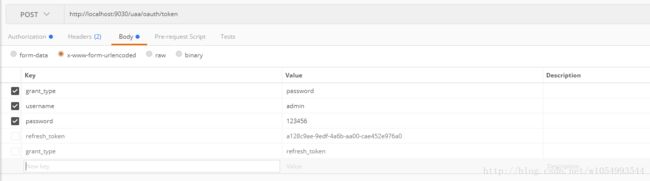

6.2刷新token

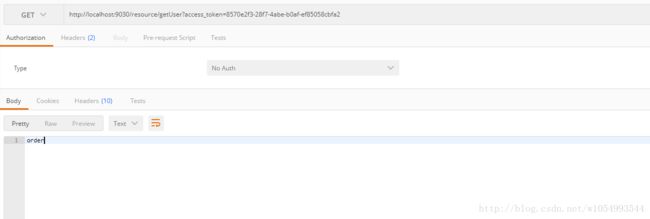
6.3用access_token获取资源

7.结束
到这里Spring Cloud OAUTH2.0统一认证的骨架就完成了,具体项目拿过来修改就可以满足项目的需求了。
重要事情再说三遍:
源码传送
源码传送
源码传送