SpringCloud整合阿里云OSS实现文件上传
阿里云OSS官网:OSS管理控制台 (aliyun.com)
什么是对象存储OSS
阿里云对象存储OSS(Object Storage Service)是一款海量、安全、低成本、高可靠的云存储服务,可提供99.9999999999%(12个9)的数据持久性,99.995%的数据可用性。多种存储类型供选择,全面优化存储成本。
OSS具有与平台无关的RESTful API接口,您可以在任何应用、任何时间、任何地点存储和访问任意类型的数据。
您可以使用阿里云提供的API、SDK接口或者OSS迁移工具轻松地将海量数据移入或移出阿里云OSS。数据存储到阿里云OSS以后,您可以选择标准存储(Standard)作为移动应用、大型网站、图片分享或热点音视频的主要存储方式,也可以选择成本更低、存储期限更长的低频访问存储(Infrequent Access)、归档存储(Archive)、冷归档存储(Cold Archive)作为不经常访问数据的存储方式。
一.开通账号并创建空间
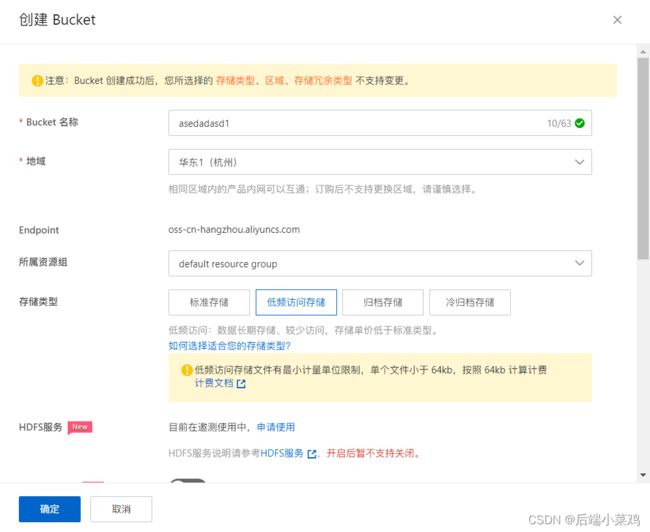
Bucket名称可随意填写,地域选择离我们当前地区最近的即可,因为是测试,我们的存储类型选择低频访问,读写权限我们选择公告读
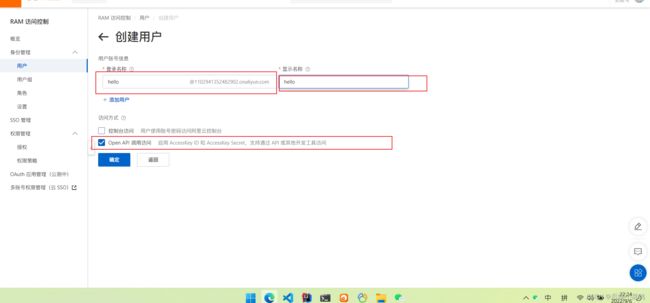
4.创建完成后,点击右上角进入AccessKey,选择开始使用子账户Key
5.创建完子账号后,保留生成的账号和密钥,以后我们都用这个子账户进行操作
6.其中我们的endpoint等信息可在控制台中的概览可查看
二 .在java中简单使用OSS客户端上传文件到服务器
- 导入依赖spring-cloud-starter-alicloud-oss
            com.alibaba.cloud
            spring-cloud-starter-alicloud-oss
            2.2.0.RELEASE
2.添加配置(access-key、secret-key、endoint)
spring:
  cloud:
    alicloud:
      access-key: 你的 access-key
      secret-key: 你的 secret-key
      oss:
        endpoint: oss-cn-shenzhen.aliyuncs.com
注意:endpoint是oss包下的
3.编写测试类测试上传图片至OSS服务器
    @Resource
    OSS ossClient;

    @Test
    public void uploadDemo() throws FileNotFoundException {
        // 填写Bucket名称,例如examplebucket。
        String bucketName = "hola76";
        // 填写Object完整路径,完整路径中不能包含Bucket名称,例如exampledir/exampleobject.txt。
        String objectName = "1111727083.jpg";
        // 填写本地文件的完整路径,例如D:\\localpath\\examplefile.txt。
        // 如果未指定本地路径,则默认从示例程序所属项目对应本地路径中上传文件流。
        String filePath= "C:\\Users\\Administrator\\Pictures\\111727083.jpg";

        // 创建OSSClient实例。
        //OSS ossClient = new OSSClientBuilder().build(endpoint, accessKeyId, accessKeySecret);
        InputStream inputStream = new FileInputStream(filePath);
        // 创建PutObject请求。
        ossClient.putObject(bucketName, objectName, inputStream);
        System.out.println("上传成功!");
        ossClient.shutdown();

    }
4.到控制台查看
5.图片上传成功
三.服务端签名直传并设置上传回调
官方文档:服务端签名后直传 (aliyun.com)
1.流程介绍
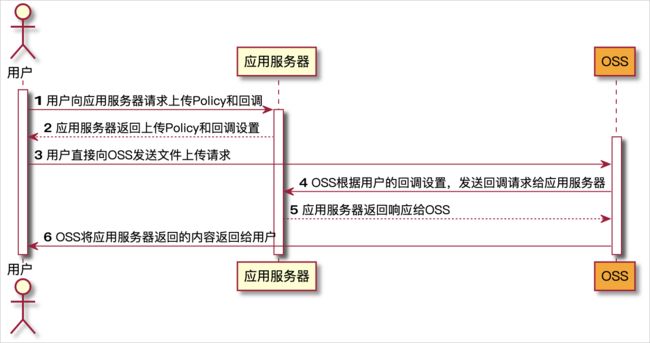
流程如下图所示:
当用户要上传一个文件到OSS,而且希望将上传的结果返回给应用服务器时,需要设置一个回调函数,将请求告知应用服务器。用户上传完文件后,不会直接得到返回结果,而是先通知应用服务器,再把结果转达给用户。
2.JAVA实现
1.我们新建一个项目专门为我们提供第三方服务,项目结构如下
2.引入阿里云OSS依赖及openFeign等依赖(服务注册与发现等包含在common中)
    4.0.0
    com.liucan.gulimall
    gulimall-third-party
    0.0.1-SNAPSHOT
    gulimall-third-party
    第三方服务


        1.8
        UTF-8
        UTF-8
        2.3.7.RELEASE
        Hoxton.SR9


            com.liucan.gulimall
            gulimall-common
            0.0.1-SNAPSHOT


                    com.baomidou
                    mybatis-plus-boot-starter


                    mysql
                    mysql-connector-java


            org.springframework.boot
            spring-boot-starter-web


            com.alibaba.cloud
            spring-cloud-starter-alicloud-oss
            2.2.0.RELEASE


            org.springframework.cloud
            spring-cloud-starter-bootstrap
            3.1.1


            org.springframework.cloud
            spring-cloud-starter-openfeign


            org.springframework.boot
            spring-boot-starter-test
            test


                    org.junit.vintage
                    junit-vintage-engine


                    com.vaadin.external.google
                    android-json


            junit
            junit
            test


                org.springframework.cloud
                spring-cloud-dependencies
                ${spring-cloud.version}
                pom
                import


                com.alibaba.cloud
                spring-cloud-alibaba-dependencies
                2.2.8.RELEASE
                pom
                import


                org.springframework.boot
                spring-boot-dependencies
                ${spring-boot.version}
                pom
                import


                org.apache.maven.plugins
                maven-compiler-plugin
                3.8.1

                    1.8
                    1.8
                    UTF-8


                org.springframework.boot
                spring-boot-maven-plugin
                2.3.7.RELEASE

                    com.liucan.gulimall.thirdparty.GulimallThirdPartyApplication


                        repackage

                            repackage
3.启动类添加@EnableDiscoveryClient以开启服务注册与发现,并在application.yml中配置注册中心地址
spring:
  application:
    name: gulimall-third-party
  cloud:
    nacos:
      discovery:
        server-addr: 127.0.0.1:8848
server:
  port: 30000
import org.springframework.boot.SpringApplication;
import org.springframework.boot.autoconfigure.SpringBootApplication;
import org.springframework.cloud.client.discovery.EnableDiscoveryClient;
@EnableDiscoveryClient
@SpringBootApplication
public class GulimallThirdPartyApplication {
public static void main(String[] args) {
SpringApplication.run(GulimallThirdPartyApplication.class, args);
}
}4.进入nacos,为当前服务新建一个命名空间 dataId为third-party
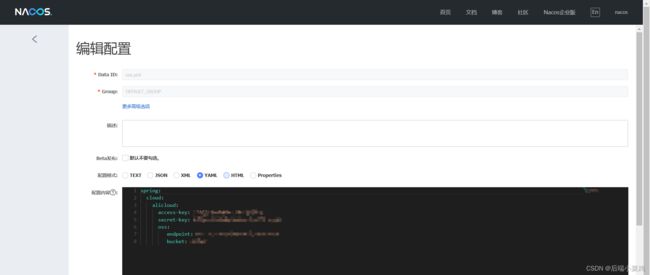
5.在nacos【配置管理】--【配置列表】中切换到我们刚刚新建的 third-party的命名空间,新建配置
配置如下:
6.在项目resource下新建bootstrap.properties指定我们配置中心的地址及所要读取的命名空间
spring.cloud.nacos.config.server-addr=127.0.0.1:8848
spring.cloud.nacos.config.namespace=be8c72c0-916d-4bd8-8f80-14916ade1faf

spring.cloud.nacos.config.extension-configs[0].data-id=oss.yml
spring.cloud.nacos.config.extension-configs[0].group=DEFAULT_GROUP
spring.cloud.nacos.config.extension-configs[0].refresh=true
7.新建一个OSSContrller测试获取Policy签名
package com.liucan.gulimall.thirdparty.controller;

import com.aliyun.oss.OSS;
import com.aliyun.oss.OSSClientBuilder;
import com.aliyun.oss.common.utils.BinaryUtil;
import com.aliyun.oss.model.MatchMode;
import com.aliyun.oss.model.PolicyConditions;
import org.codehaus.jettison.json.JSONObject;
import org.springframework.beans.factory.annotation.Autowired;
import org.springframework.beans.factory.annotation.Value;
import org.springframework.web.bind.annotation.RequestMapping;
import org.springframework.web.bind.annotation.RestController;

import javax.annotation.Resource;
import java.text.SimpleDateFormat;
import java.util.Date;
import java.util.LinkedHashMap;
import java.util.Map;

@RestController
public class OSSCntroller {

    @Autowired
    OSS ossClient;

    @Value("${spring.cloud.alicloud.oss.endpoint}")
    private String endpoint;
    @Value("${spring.cloud.alicloud.access-key}")
    private String accessId;
    @Value("${spring.cloud.alicloud.secret-key}")
    private String accessKey;
    @Value("${spring.cloud.alicloud.oss.bucket}")
    private String bucket;

    @RequestMapping("/oss/policy")
    public Map policy(){
        // 填写Host地址,格式为https://bucketname.endpoint。
        String host = "https://"+bucket+"."+endpoint;
        // 设置上传回调URL,即回调服务器地址,用于处理应用服务器与OSS之间的通信。OSS会在文件上传完成后,把文件上传信息通过此回调URL发送给应用服务器。
        String callbackUrl = "https://192.168.0.0:8888";
        // 设置上传到OSS文件的前缀,可置空此项。置空后,文件将上传至Bucket的根目录下。

        String dateDir = new SimpleDateFormat("yyyy-MM-dd").format(new Date());
        String dir = dateDir+"/";

        // 创建ossClient实例。
        OSS ossClient = new OSSClientBuilder().build(endpoint, accessId, accessKey);

        Map respMap = null;
        try {
            long expireTime = 30;
            long expireEndTime = System.currentTimeMillis() + expireTime * 1000;
            Date expiration = new Date(expireEndTime);
            PolicyConditions policyConds = new PolicyConditions();
            policyConds.addConditionItem(PolicyConditions.COND_CONTENT_LENGTH_RANGE, 0, 1048576000);
            policyConds.addConditionItem(MatchMode.StartWith, PolicyConditions.COND_KEY, dir);

            String postPolicy = ossClient.generatePostPolicy(expiration, policyConds);
            byte[] binaryData = postPolicy.getBytes("utf-8");
            String encodedPolicy = BinaryUtil.toBase64String(binaryData);
            String postSignature = ossClient.calculatePostSignature(postPolicy);

            respMap = new LinkedHashMap();
            respMap.put("accessId", accessId);
            respMap.put("policy", encodedPolicy);
            respMap.put("signature", postSignature);
            respMap.put("dir", dir);
            respMap.put("host", host);
            respMap.put("expire", String.valueOf(expireEndTime / 1000));
            // respMap.put("expire", formatISO8601Date(expiration));

            JSONObject jasonCallback = new JSONObject();
            jasonCallback.put("callbackUrl", callbackUrl);
            jasonCallback.put("callbackBody",
                    "filename=${object}&size=${size}&mimeType=${mimeType}&height=${imageInfo.height}&width=${imageInfo.width}");
            jasonCallback.put("callbackBodyType", "application/x-www-form-urlencoded");
            String base64CallbackBody = BinaryUtil.toBase64String(jasonCallback.toString().getBytes());
            respMap.put("callback", base64CallbackBody);
        } catch (Exception e) {
            // Assert.fail(e.getMessage());
            System.out.println(e.getMessage());
        }
        return respMap;
    }
}
8.请求localhost:30000/oss/policy
 成功获取到签名,之后用户上传图片前之前先请求这个接口,然后带上这个接口返回的签名直接请求阿里云,就可以直接上传到阿里云OSS,文件流无需保存到我们的服务器再进行转发,这就是服务端签名直传。
9.将该服务统一交由Gateway进行统一的路由管理
1.在Gateway模块中新增路由配置
我们访问OSS服务的统一入口为api/thirdparty/
spring:
  cloud:
    gateway:
      routes:
       - id: product_route
         uri: lb://gulimall-product #lb開啓負載均衡 路由到服務名為gulimall_product的服务
         predicates:
          - Path=/api/product/**
         filters:
          - RewritePath=/api/product/(?/?.*),/product/$\{segment}

       - id: third_party_route
         uri: lb://gulimall-third-party #lb開啓負載均衡 路由到服務名為gulimall-third-party的服务
         predicates:
          - Path=/api/thirdparty/**
         filters:
          - RewritePath=/api/thirdparty/(?/?.*),/$\{segment}

       - id: admin_route
         uri: lb://renren-fast #lb開啓負載均衡 路由到服務名為renren-fast的服务
         predicates:
         - Path=/api/**
         filters:
         - RewritePath=/api/(?/?.*),/renren-fast/$\{segment}
2.重启Gateway,访问
![]()
4.OOS前后端联调测试上传
1.在src/components新增文件夹upload用于存放上传的组件:
policy.js:
import http from '@/utils/httpRequest.js'
export function policy() {
   return  new Promise((resolve,reject)=>{
        http({
            url: http.adornUrl("/thirdparty/oss/policy"),
            method: "get",
            params: http.adornParams({})
        }).then(({ data }) => {
            resolve(data);
        })
    });
}
singleUpload.vue:(其中要将上传路径改为我们Bucket 公网域名,可在OSS控制台查看)
点击上传
只能上传jpg/png文件,且不超过10MB
![]()
multiUpload.vue:(其中要将上传路径改为我们Bucket 公网域名,可在OSS控制台查看)
![]()
2.在brand.vue中引入并使用组件
3.效果
发现在请求上传阿里云OSS时,产生了跨域问题
4.在OSS控制台开启跨域访问
5.测试
大概流程:前端点击上传图片->请求policy获取签名数据->将签名数据与文件流提交阿里云->阿里云进行验证、存储


