手摸手教你快速上手uniapp开发跨端应用实战及踩坑总结
前言
大家好,我是虚竹。如何快速学会一门新派武功,如果是我会怎么做,从哪里下手?是有师傅带领指导,还是自我琢磨?天下武功 BUG 多,唯有修炼内外功。边学边做,动手实操项目,快速(别犹豫干就对了)与反应(发现问题及时消灭)。
最近接到一个新项目,要求开发安卓版 APP 应用,指定技术栈 uni-app 框架。对于从未接触或使用过,甚至比较陌生的前端技术工具,不知从何下手,是有哪些坑,心里惶恐,没有把握。一想到俺们程序员都有打不死的小强精神,遇到问题和困难从不退缩大胆求证。一句话干就对了。
废话有点多,今天给大家分享一篇不咋地的技术水文。主题是如何快速上手学会 uniapp 开发一个多端应用的实战项目(环境搭建、配置、开发、自测、部署、编译、打包、发布等),以及补充开发中容易遇到的一些小坑小洼。
介绍 uni-app
uni-app 是一个使用 Vue.js 开发所有前端应用的开源框架,开发者编写一套代码,可发布到 iOS、Android、Web(响应式)、以及各种小程序(微信/支付宝/百度/头条/飞书/QQ/快手/钉钉/淘宝)等多个平台。
uni-app 使用 vue 的语法、小程序的标签和API。具有 vue 和微信小程序的开发经验,可快速上手 uni-app。
优点
- 兼容性好
uni-app 最大的特点就是一套代码编译以后多端通用,开发人员不需要在每个平台都单独开发一套代码就可以同时生成安卓、iOS、H5、百度小程序等等。节省了大量的成本。
- 学习成本低
uni-app 是基于 vue.js 开发,因此对于前端开发人员比较友好,学习 uni-app 的门槛也相应降低。尤其是封装的插件与微信端小程序的组件相同。
- 开发速度快
uni-app 使用 HBuilderX 进行开发,所以支持 vue 的语法。同时 HBuilderX 的开发和编译速度都很快,这也是很多人选择 uni-app 的理由之一。
- 扩展能力强
uni-app 支持 nvue,封装了 H5+。同时,还支持原生的 iOS 和安卓开发。因此将原有的H5和移动端 APP 转移到 uni-app 上面十分方便。
缺点
-
文档不太友好,学习运用起来会有点吃力(不过大佬们已默默的在完善优化中)
-
平板支持不太给力,主导还是微信小程序、APP移动端
开发规范
为了实现多端兼容,综合考虑编译速度、运行性能等因素,uni-app 约定了如下开发规范:
- 页面文件遵循
Vue 单文件组件 (SFC) 规范[1] - 组件标签靠近小程序规范,详见
uni-app 组件规范[2] - 接口能力(JS API)靠近微信小程序规范,但需将前缀 wx 替换为 uni,详见
uni-app 接口规范[3] - 数据绑定及事件处理同 Vue.js 规范,同时补充了 App 及页面的生命周期
- 为兼容多端运行,建议使用 flex 布局进行开发
环境搭建
安装编辑器 HBuilderX 3.2.12:官方 IDE 下载地址[4]
HBuilderX 是通用的前端开发工具,但为 uni-app 做了特别强化。下载 App 开发版,可开箱即用。
安装微信开发者工具(已安装过可忽略):官方下载地址[5]
初始化项目
利用 HBuilderX 工具初始化项目,其实官方文档有介绍,但重要的事情还得重复操作如下:
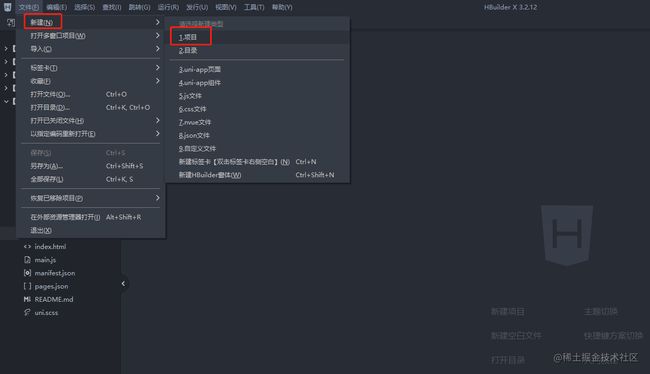
在点击菜单栏文件 -> 创建 -> 项目,如下图所示:
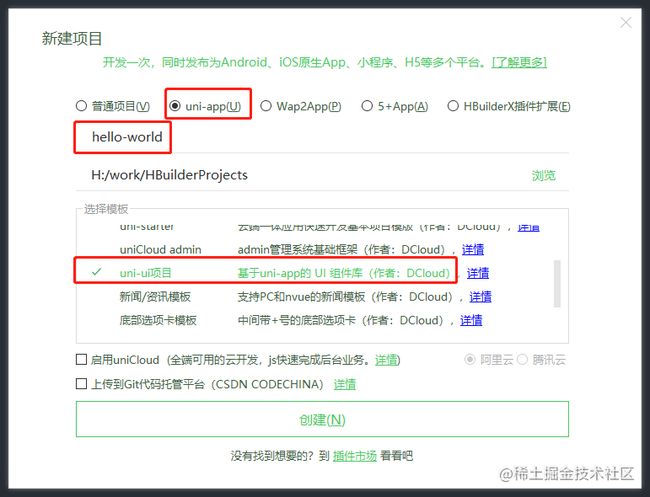
选择 uni-app,填写项目名称,选择模板,点击创建,即可成功创建,如下图所示:
运行项目
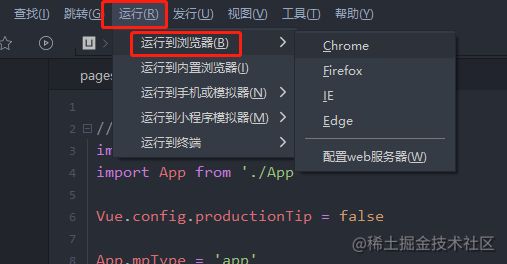
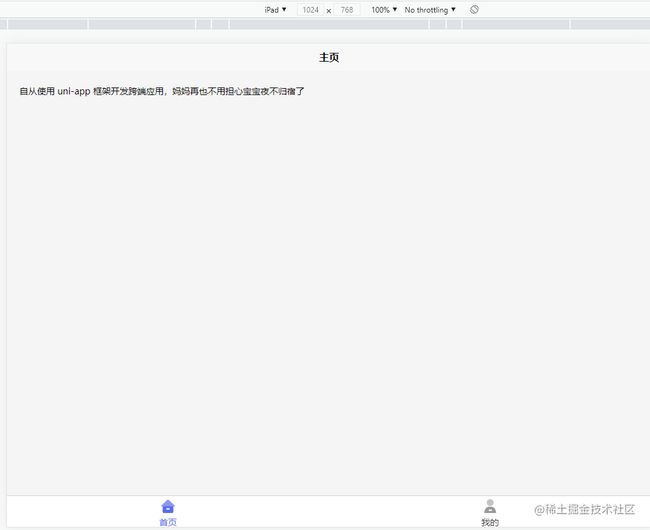
- 浏览器运行
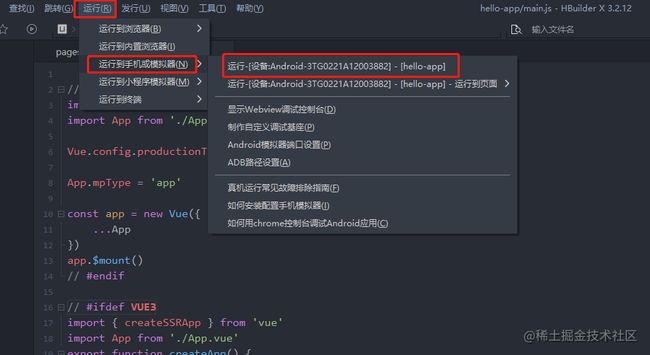
- 真机运行(手机、平板开启调试模式后,运行操作一致)
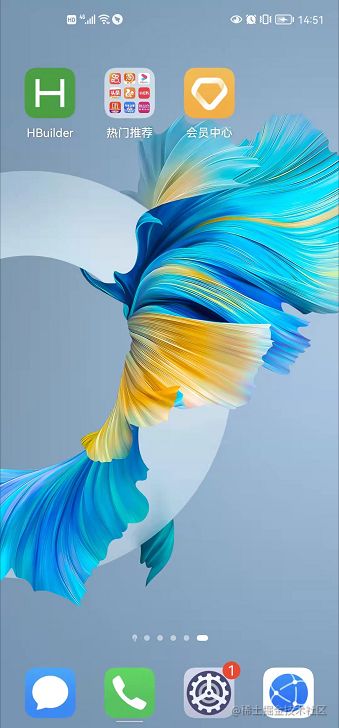
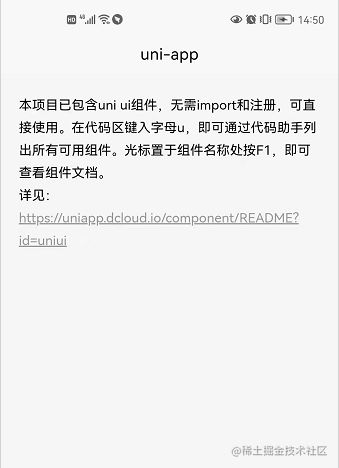
手机桌面会自动安装 HBuilderX 工具,并启动界面,如下图所示:
- 微信小程序运行
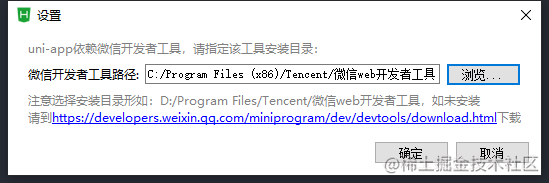
注意: 如果是第一次使用,需要先配置小程序 IDE 的相关路径,才能运行成功。如下图,需在输入框填入微信开发者工具的安装路径。 若 HBuilderX 不能正常启动微信开发者工具,需要开发者手动启动,然后将 uni-app 生成小程序工程的路径拷贝到微信开发者工具里面,在 HBuilderX 里面开发,在微信开发者工具里面就可看到实时的效果。
发布项目
打包原生 APP
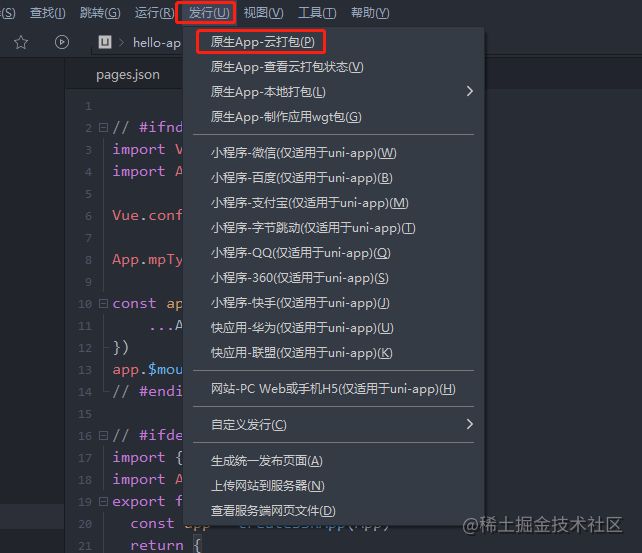
打包选择发行 -> 原生APP-云打包 -> 勾选安卓APK包,选择自有证书(输入证书密钥),勾选打正式包 -> 点击打包按钮即可。
使用自有 Android 证书生成签名证书操作如下:
安装JAVA环境(推荐使用JRE8环境)
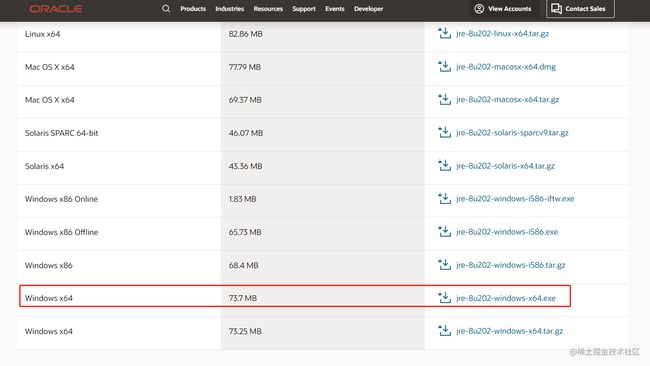
Oracle 官方下载地址:JAVA JRE8[6]
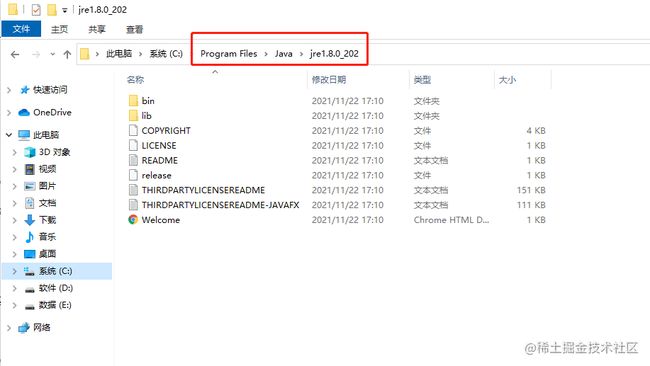
下载到本地,双击安装成功后,默认安装目录为“C:\Program Files\Java\jre1.8.0_202\bin”,如下图所示:
生成签名证书
命令如下:
// 进入默认安装JRE目录路径
cd C:\Program Files\Java\jre1.8.0_202\bin

// 使用keytool -genkey命令生成证书
.\keytool -genkey -alias testalias -keyalg RSA -keysize 2048 -validity 36500 -keystore D:\test.keystore
- testalias是证书别名,可修改为自己想设置的字符,建议使用英文字母和数字
- test.keystore是证书文件名称,可修改为自己想设置的文件名称,也可以指定完整文件路径
- 36500是证书的有效期,表示100年有效期,单位天,建议时间设置长一点,避免证书过期
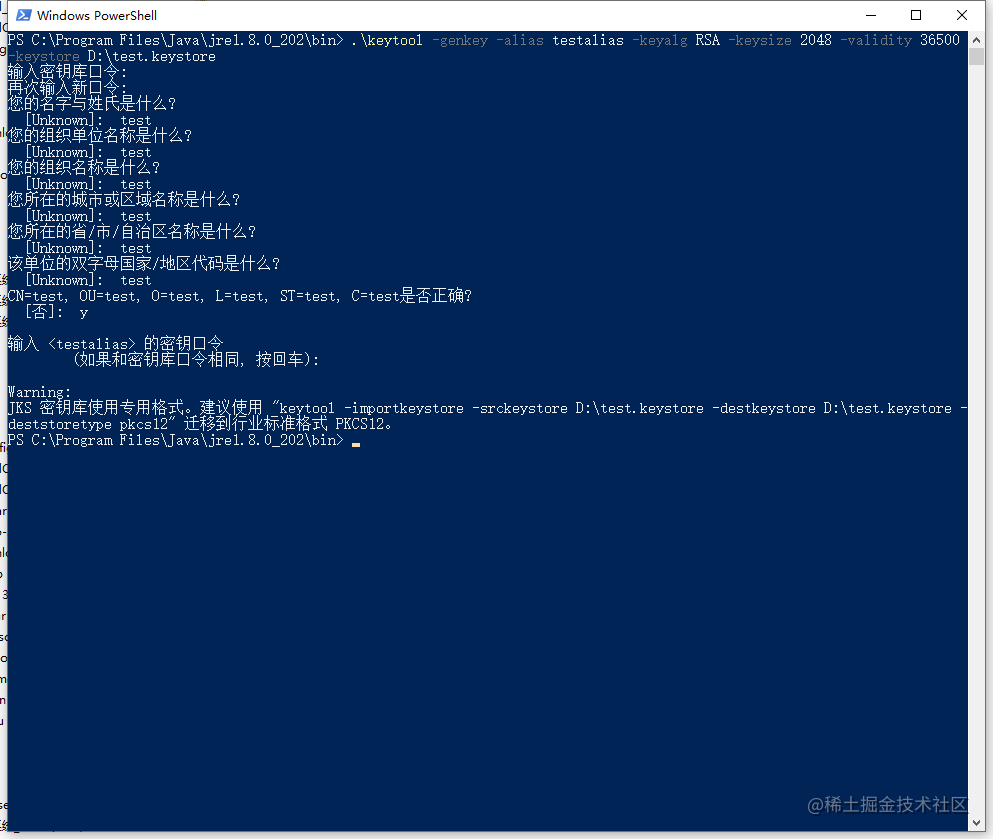
回车后会提示如下:
以上命令运行完成后就会生成证书,路径为“D:\test.keystore”。
查看证书信息
.\keytool -list -v -keystore D:\test.keystore
发布 H5
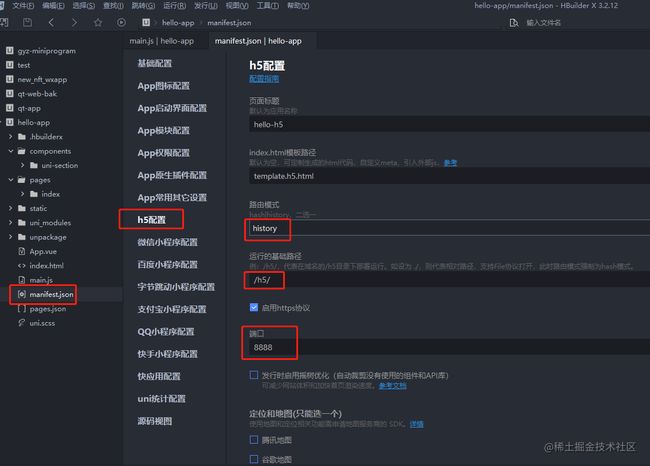
- 在 manifest.json 的可视化界面,进行如下配置(发行在网站根目录可不配置应用基本路径),此时发行网站路径是 www.baidu.com/h5
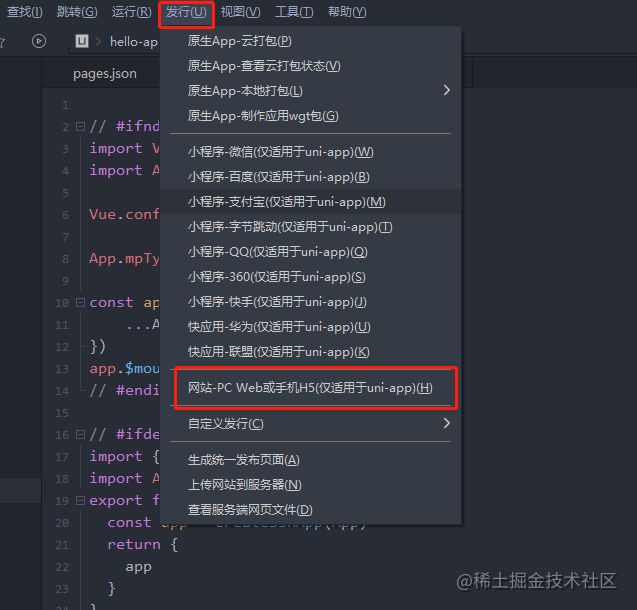
- 在 HBuilderX 工具栏,点击发行,选择网站-PC 或 H5 手机版,如下图,点击即可生成 H5 的相关资源文件,保存于 unpackage 目录。
发布微信小程序
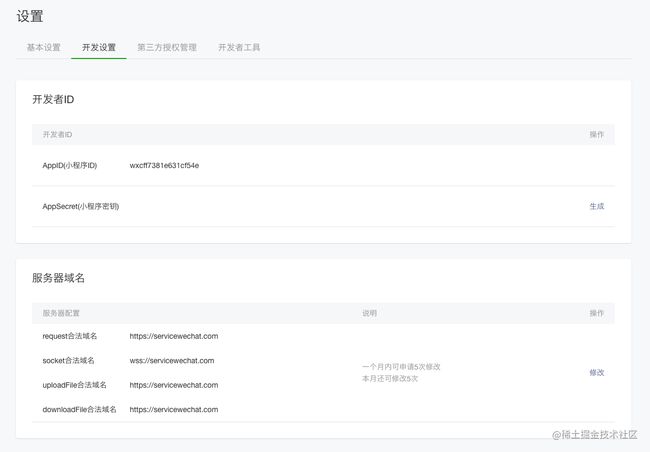
- 申请微信小程序AppID,参考:
微信官方教程[7]。
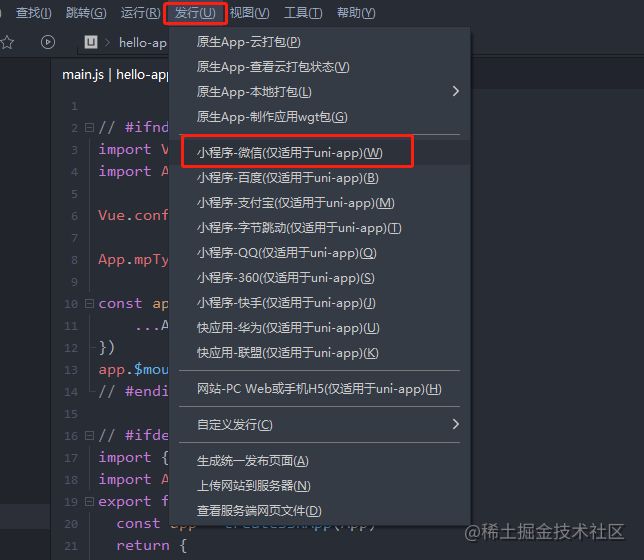
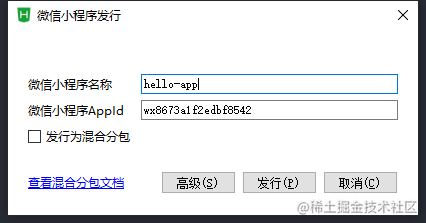
- 在 HBuilderX 中顶部菜单依次点击 “发行” => “小程序-微信”,输入小程序名称和 AppId 点击发行即可在 unpackage/dist/build/mp-weixin 生成微信小程序项目代码。
- 在微信小程序开发者工具中,导入生成的微信小程序项目,测试项目代码运行正常后,点击"上传"按钮,之后按照 “提交审核” => “发布” 小程序标准流程,逐步操作即可,详细查看
微信官方教程[8]。
目录结构
┌─components             符合vue组件规范的uni-app组件目录
│  ├─hello-update        版本更新
│  │  └─hello-update.vue
│  └─hello-modal         可复用的hello-modal模态框组件
│     └─hello-modal.vue
├─api                    统一封装API接口调用方法
├─pages                  业务页面文件存放的目录
│  ├─index
│  │  └─index.vue        首页
│  ├─login
│  │  └─Login.vue        登录
│  └─my
│     └─My.vue           我的
├─static                 存放应用引用的本地静态资源(如图片、视频等)的目录,静态资源只能存放于此
├─uni_modules            存放[uni_module](/uni_modules)规范的插件。
├─wxcomponents           存放小程序组件的目录
├─utils
│  ├─validate.js         工具函数校验
│  └─request.js          封装拦截器方法
├─main.js                Vue初始化入口文件
├─App.vue                应用配置,用来配置App全局样式以及监听 应用生命周期
├─manifest.json          配置应用名称、appid、logo、版本等打包信息
└─pages.json             配置页面路由、导航条、选项卡等页面类信息
功能模块
- 配置 tabbar
- 自定义导航栏
- 封装组件库
- 系统版本检测、下载、进度、更新
- 上传图片、视频
- 扫码(二维码、条形码)
- 平板横屏锁定
- 全局封装拦截器方法
- 密码转 base64 加密(查看踩坑记录)
代码实现
配置 tabbar
在 pages.json 中提供 tabBar 配置,不仅仅是为了方便快速开发导航,更重要的是在App和小程序端提升性能。在这两个平台,底层原生引擎在启动时无需等待js引擎初始化,即可直接读取 pages.json 中配置的 tabBar 信息,渲染原生tab。
可以自定义 tabbar,由于原生tabBar是相对固定的配置方式,可能无法满足所有场景。
但注意除了H5端,自定义tabBar的性能体验会低于原生tabBar。App和小程序端非必要不要自定义。
在 pages.json 中新增如下代码:
// 详细配置属性说明看这里:https://uniapp.dcloud.io/collocation/pages?id=tabbar
"tabBar": {
    "color": "#333333",
    "selectedColor": "#596CEA",
    "borderStyle": "black",
    "backgroundColor": "#ffffff",
    "fontSize": "14px",
    "iconWidth": "26px",
    "list": [{
        "pagePath": "pages/index/index",
        "iconPath": "static/imgs/home.png",
        "selectedIconPath": "static/imgs/home-active.png",
        "text": "首页"
    }, {
        "pagePath": "pages/my/My",
        "iconPath": "static/imgs/my.png",
        "selectedIconPath": "static/imgs/my-active.png",
        "text": "我的"
    }]
}
自定义导航栏
// 详细配置属性说明看这里:https://uniapp.dcloud.io/collocation/pages?id=app-plus
// 方法一
"globalStyle": {
    "app-plus": {
        "titleNView": false // 禁用原生导航栏
    },
}

// 方法二
"globalStyle": {
    "navigationStyle": "custom"
}
原生导航栏效果图:
禁用原生导航栏效果图:
自定义导航栏注意以下几点:
- 非H5端,手机顶部状态栏区域会被页面内容覆盖。这是因为窗体是沉浸式的原因,即全屏可写内容。uni-app提供了状态栏高度的css变量
--status-bar-height,如果需要把状态栏的位置从前景部分让出来,可写一个占位div,高度设为css变量。
// 详情介绍内置css变量:https://uniapp.dcloud.io/frame?id=css变量
<template>
    <view class="nav">
        <view class="status-bar">
            <!-- 这里是状态栏 -->
        </view>
        <uni-nav-bar left-icon="back" title="商品列表" @clickLeft="goBack" :fixed="true">
            <view slot="left">返回</view>
        </uni-nav-bar>
    </view>
</template>
<style>
.status-bar {
    height: var(--status-bar-height);
    width: 100%;
    background-color: #FFF;
}
</style>
- 如果原生导航栏不能满足需求,推荐使用uni ui的
自定义导航栏NavBar。这个前端导航栏自动处理了状态栏高度占位问题。
// 详情介绍自定义导航栏组件:https://ext.dcloud.net.cn/plugin?id=52
<template>
    <view class="nav">
        <uni-nav-bar left-icon="back" title="商品列表" @clickLeft="goBack" :fixed="true" :statusBar="true">
            <view slot="left">返回</view>
            <view slot="right">
                <view class="nav-right">
                    <view class="btn qrcode" @click="onScan">扫一扫</view>
                </view>
            </view>
        </uni-nav-bar>
    </view>
</template>
- 页面禁用原生导航栏后,想要改变状态栏的前景字体样式,仍可设置页面的 navigationBarTextStyle 属性(只能设置为 black或white)。
封装组件库
弹出层组件 uni-popup,在应用中弹出一个消息提示窗口、提示框等,业务场景比较常见,几乎每个界面都会用到,于是考虑封装这个组件,自定义配置 easycom,并且无需引用、注册,直接在页面中就能使用。
首先,在项目的 components 目录下,并符合components/组件名称/组件名称.vue目录结构。弹框组件代码如下:
// hello-modal.vue
<template>
    <view class="modal">
        <uni-popup ref="popup" :mask-click="false">
            <uni-popup-dialog type="info" :title="title" :duration="2000" :before-close="true"
                    @close="close" @confirm="confirm">
                <view default>
                    <view class="modal-content">
                        <slot></slot>
                    </view>
                </view>
            </uni-popup-dialog>
        </uni-popup>
    </view>
</template>

<script>
    export default {
        props: {
            title: {
                type: String,
                defalut: '提示'
            }
        },
        data() {
            return {}
        },
        methods: {
            openModal() {
                this.$refs.popup.open();
            },
            close() {
                this.$refs.popup.close();
            },
            confirm() {
                this.$emit('confirmFn');
            }
        }
    }
</script>

<style lang="scss" scoped>
    .modal {
        /deep/ .uni-popup-dialog {
            width: 520rpx;
            border-radius: 12rpx;
            transform: scale(1.5);
        }

        /deep/ .uni-dialog-content {
            padding: 20rpx 30rpx 30rpx;
            justify-content: flex-start;
        }
    }
</style>
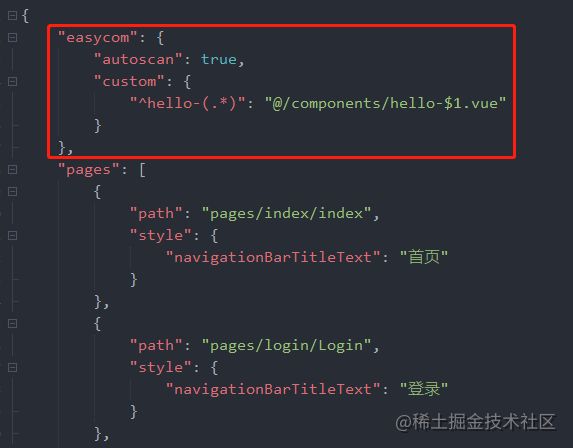
在 pages.json 中配置 easycom,如下图所示:
现在就可以愉快的玩耍了,不管 components 目录下安装了多少组件,easycom 打包后会自动剔除没有使用的组件,对组件库的使用尤为友好。
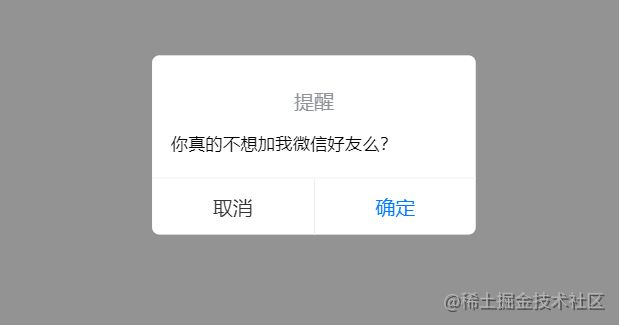
template直接使用示例如下:
<template>
    <view>
        <!-- start 模态框 -->
            <hello-modal ref="onChild" :title="modalTitle" @confirmFn="confirmFn">
                <view>{{ tips }}</view>
            </hello-modal>
        <!-- end 模态框 -->
    </view>
</template>
<script>
    export default {
        data() {
            return {
                modalTitle: '提醒', // 弹框标题
                tips: '你真的不想加我微信好友么?', // 弹框提示内容
            }
        },
        mounted() {
            this.$refs.onChild.openModal(); // 打开弹框
        },
        methods: {
            confirmFn() {
                console.log('点击确认按钮');
                this.$refs.onChild.close(); // 关闭弹框
            }
        }
    }
</script>
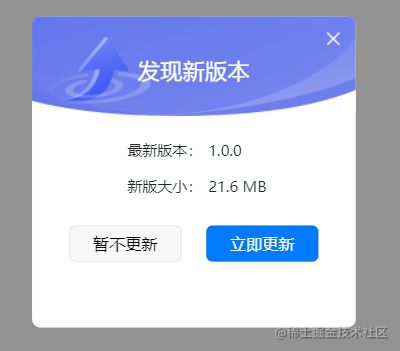
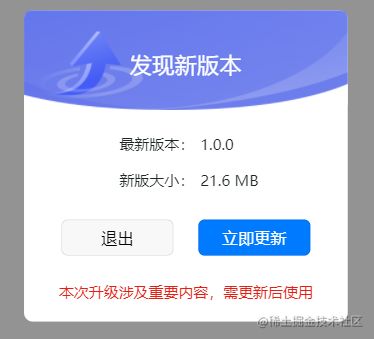
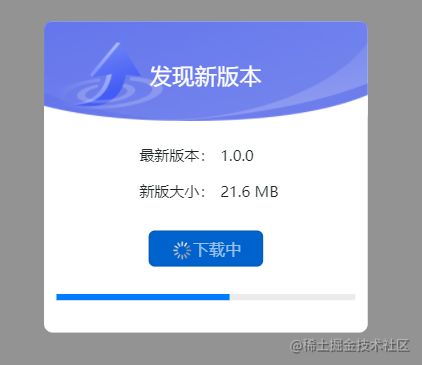
系统版本检测、下载、更新
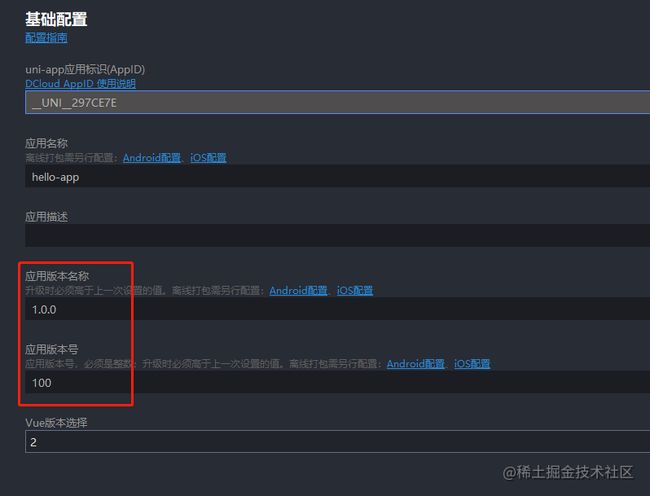
在 manifest.json 中配置版本号、版本名称,如下图所示:
针对 app 端检测系统版本有效,在 app.vue 中全局获取系统版本,使用条件编译进行平台区分,代码如下:
<script>
    export default {
        globalData: {
            version: '1.0.0'
        },
        onLaunch() {
            console.log('App Launch');
            // #ifdef APP-PLUS
                let that = this;
                plus.runtime.getProperty(plus.runtime.appid, function(getInfo) {
                    that.globalData.version = getInfo.version;
                    console.log('getInfo===', getInfo);
                });
            // #endif
        }
</script>
创建自定义弹框组件(版本信息),代码如下:
// hello-update.vue
<template>
    <view class="container">
        <uni-popup ref="popup" :mask-click="false">
            <view class="popup-content">
                <view class="section">
                    <view class="popup-header">
                        <text class="title">发现新版本</text>
                        <text class="close-btn" @click="close" v-if="type === 1 && !isLoading">关闭</text>
                    </view>
                    <view class="popup-main">
                        <uni-forms label-align="right">
                            <uni-forms-item label="最新版本:" name="version">
                                <text class="form-value">{{ childType.version }}</text>
                            </uni-forms-item>
                            <uni-forms-item label="新版大小:" name="size">
                                <text class="form-value">10.6 MB</text>
                            </uni-forms-item>
                        </uni-forms>
                    </view>
                    <view class="popup-footer">
                        <view class="btn-box">
                            <button @click="close" size="mini" v-if="type === 1 && !isLoading">暂不更新</button>
                            <button @click="quit" size="mini" v-if="type === 2">退出</button>
                            <button type="primary" @click="confirm" size="mini" v-if="!isLoading">立即更新</button>
                            <button class="download" type="primary" size="mini" :loading="isLoading" v-if="isLoading">下载中</button>
                            <progress class="progress" :percent="progressVal" stroke-width="5" v-if="isLoading" />
                        </view>
                        <view class="popup-tips" v-if="type === 2">
                            <text>本次升级涉及重要内容,需更新后使用</text>
                        </view>
                    </view>
                </view>
            </view>
        </uni-popup>
    </view>
</template>
<script>
    export default {
        onLoad() {},
        onReady() {},
        props: {
            childType: Object
        },
        data() {
            return {
                type: 1, // 1:非强制更新 2:强制更新
                isLoading: false,
                progressVal: 0 下载进度条初始值
            }
        },
        methods: {
            // 退出安卓应用
            quit() {
                // #ifdef APP-PLUS
                    if (plus.os.name.toLowerCase() === 'android') {
                        plus.runtime.quit();
                    }
                // #endif
            },
            // 检测版本更新弹框
            open(type) {
                this.type = type;
                this.$refs.popup.open();
            },
            // 关闭弹框
            close() {
                this.$refs.popup.close();
            },
            //
            async confirm() {
                // #ifdef APP-PLUS
                // 请求版本信息接口
                if (this.childType.version > getApp().globalData.version) {
                        // console.log(this.childType.url)
                        this.isLoading = true;
                        // 新建下载任务
                        let dtask = plus.downloader.createDownload(this.childType.url, {
                                force: true
                        }, (d, status) => {
                            // 下载完成
                            if (status === 200) {
                                this.isLoading = false;
                                uni.showModal({
                                    title: '下载完成,即将安装',
                                    showCancel: false,
                                    success: () => {
                                        // 下载成功,d.filename是文件在保存在本地的相对路径,使用下面的API可转为平台绝对路径
                                        // let fileSaveUrl = plus.io.convertLocalFileSystemURL(d.filename);
                                        // plus.runtime.openFile(d.filename);
                                        // 由于install只能安装已下载本地的安装包,所以先把下载的地址在本地找到,再调用isntall
                                        plus.runtime.install(d.filename, {}, () => {
                                            console.log('安装成功');
                                            // plus.runtime.restart(); // 安装成功后重启
                                    }, (error) => {
                                            console.log('error===', error.message);
                                            uni.showToast({
                                                icon: 'error',
                                                title: '安装失败'
                                            })
                                        })
                                    }
                                })
                            } else {
                                this.isLoading = false;
                                // 下载失败
                                plus.downloader.clear(); // 清除下载任务
                                uni.showToast({
                                    icon: 'error',
                                    title: '下载失败'
                                })
                            }
                        })

                        dtask.addEventListener('statechanged', (task) => {
                            if (!dtask) {
                                return;
                            }

                            switch (task.state) {
                                case 1:
                                    console.log('开始下载');
                                    break;
                                case 2:
                                    console.log('链接到服务器...');
                                    break;
                                case 3:
                                    this.progressVal = parseInt(parseFloat(task.downloadedSize) / parseFloat(task.totalSize) * 100);
                                    console.log('progressVal===', this.progressVal);
                                    break;
                                case 4:
                                    console.log('监听下载完成');
                                    break;
                            }
                        });

                        // 开始下载
                        dtask.start();
                } else {
                    uni.showModal({
                        title: '当前已是最新版本',
                        showCancel: false
                    })
                }
                // #endif
            }
        }
    }
</script>
<style lang="scss" scoped>
    .popup-content {
        width: 520rpx;
        height: 500rpx;
        background-color: #fff;
        border-radius: 14rpx;
        transform: scale(1.5);
        .section {
            width: 100%;
            height: 100%;
            overflow: hidden;
            .popup-header {
                position: relative;
                height: 160rpx;
                background: url(../../static/imgs/modal-bg.png) no-repeat center;
                background-size: cover;
                text-align: center;
                .close-btn {
                    position: absolute;
                    top: 20rpx;
                    right: 20rpx;
                    z-index: 999;
                    width: 32rpx;
                    height: 32rpx;
                    background: url(../../static/imgs/close.png) no-repeat center;
                    background-size: cover;
                    display: block;
                    font-size: 0;
                }
                .title {
                    font-size: 36rpx;
                    color: #FFFFFF;
                    display: block;
                    padding: 62rpx 0;
                }
            }
            .popup-main {
                margin: 30rpx auto;
                text-align: center;
                display: flex;
                justify-content: center;

                .form-value {
                        line-height: 36rpx;
                }
            }
            .popup-footer {
                .btn-box {
                    text-align: center;
                    .progress {
                        margin: 30rpx 20rpx 0;
                    }
                    /deep/ uni-button {
                        &:first-child {
                            margin-right: 40rpx;
                        }
                        width: 180rpx;
                        &.download {
                            &:first-child {
                                margin-right: 0;
                            }
                            width: auto;
                        }
                    }
                }
                .popup-tips {
                    font-size: 20rpx;
                    color: #E22014;
                    padding-top: 20rpx;
                    text-align: center;
                }
            }
        }

        /deep/ .uni-forms-item__content {
            min-height: 48rpx;
        }
        /deep/ .uni-forms-item__inner {
            padding-bottom: 10rpx;
        }
        /deep/ .uni-forms-item__label {
            height: 48rpx;
        }
        .uni-forms-item,
        /deep/ .uni-forms-item__label .label-text {
            font-size: 24rpx;
            color: #1F2625;
        }
    }
</style>
使用示例代码如下:
<template>
    <view>
        <!-- start 对话框 -->
        <hello-update ref="onChildUpdate" :childType="childType"></hello-update>
        <!-- end 对话框 -->
    </view>
</template>
<script>
    export default {
        data() {
            return {
                childType: {}
            }
        },
        mounted() {
            this.getVersion();
        },
        methods: {
            // 获取版本号
            getVersion() {
                // #ifdef APP-PLUS
                this.$http({
                    url: `${checkStatus}?code=qms_appVersion`,
                }).then(res => {
                    console.log('获取版本信息===', res, getApp().globalData.version);
                    if (res.code === 0) {
                        this.childType = {};
                        if (res.data.version > getApp().globalData.version) {
                            this.childType = {
                                version: res.data.version,
                                url: res.data.downloadApk
                            }
                            this.$refs.onChildUpdate.open(res.data.forceUpdate);
                        } else {
                            uni.switchTab({
                                url: '/pages/index/index'
                            })
                        }
                    }
                })
                // #endif
            }
        }
    }
</script>
效果图如下所示:
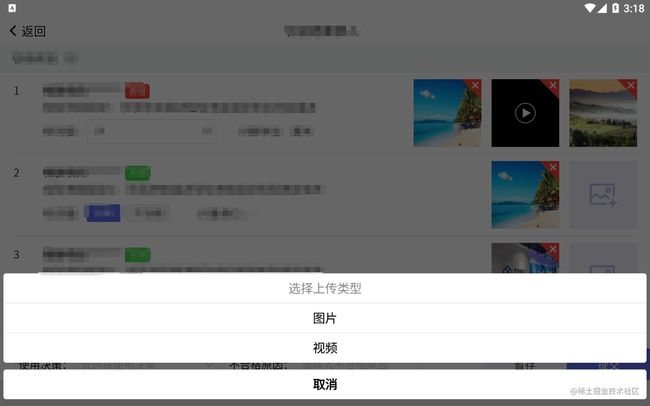
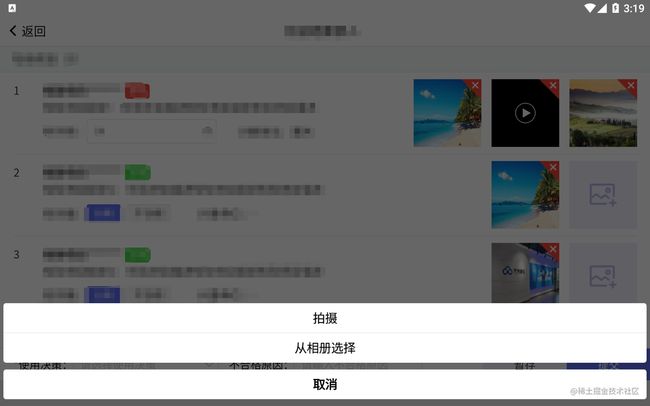
上传图片、视频
除了上传功能,还包括预览、删除操作,直接截取此功能代码含注释如下:
<template>
    <view class="upload-files">
        <view class="upload-item" v-for="(v, i) in item.fileList" :key="i">
            <view v-if="i < 3">
                <video v-if="v.type === 'video'" :id="'myVideo' + item.clientId + '' + i" :src="v.url" :show-center-play-btn="false" :controls="isShowControls" :poster="v.url" @fullscreenchange="onFullScreenChange" class="active-video">
                    <cover-image v-if="isEditPage" class="controls-close img" @click="deleteItem(item.fileList, i)" src="/static/imgs/clean.png">
                    </cover-image>
                    <cover-image class="controls-play img" @click="playVedio(item.clientId, i)" src="/static/imgs/player.png"></cover-image>
                </video>
                <view class="img-box">
                    <view v-if="isEditPage" class="close" @click="deleteItem(item.fileList, i)">关闭</view>
                    <image :src="v.url" @click="previewImg(v, i)" class="active-img"></image>
                </view>
            </view>
        </view>
        <view class="upload-item" v-if="item.fileList && item.fileList.length < 3 && isEditPage">
            <view @click="chooseImages(item)" class="upload-bg"></view>
        </view>
    </view>
</template>
<script>
    export default {
        onLoad(option) {
            console.log('获取url参数===', option);
            this.isEditPage = option.status === '3'; // true:编辑 false:查看
        },
        data() {
            return {
                isEditPage: false, // 是否编辑页面
                imgIndex: -1, // 图片索引
                imageArr: [], // 图片数组
                isShowControls: false, // 是否显示视频控制器
                videoContext: {}, // 视频上下文对象
                operation: -1, // -1:无 0:删除操作 1:提交操作
                imageValue: [],
                imageStyles: {
                  border: false
                }
            }
        },
        methods: {
            // 播放视频全屏
            playVedio(id, index) {
                let that = this;
                // 获取 video 上下文 videoContext 对象
                console.log(`myVideo${id}${index}`)
                that.videoContext = uni.createVideoContext(`myVideo${id}${index}`);
                // 进入全屏状态
                that.videoContext.requestFullScreen();
                that.videoContext.play();
                that.isShowControls = true;
            },
            // 当视频进入和退出全屏时触发
            onFullScreenChange(e) {
                console.log(e);
                let that = this;
                if (!e.detail.fullScreen) {
                    console.log('退出全屏');
                    that.videoContext.pause();
                    that.isShowControls = false;
                    that.videoContext.exitFullScreen();
                }
            },
            // 图片/视频预览
            previewImg(row, index) {
                console.log('预览');
                uni.previewImage({
                    urls: [row.url], // 需要预览的图片http链接列表,多张的时候,url直接写在后面就行
                    current: '', // 当前显示图片的http链接,默认是第一个
                    success: (res) => {
                        console.log('预览成功===', res);
                    }
                })
            },
            // 删除文件
            deleteItem(row, index) {
                console.log('删除===', row);
                this.tips = '删除此图片?';
                this.imgIndex = index;
                this.imageArr = row;
                this.operation = 0;
                this.$refs.onChild.openModal();
            },
            // 选择上传类型
            chooseVideoImage(row) {
                uni.showActionSheet({ // 从底部向上弹出操作菜单
                    title: '选择上传类型',
                    itemList: ['图片', '视频'],
                    success: (res) => {
                        console.log(res)
                        if (res.tapIndex === 0) {
                            // 上传图片
                            this.chooseImages(row);
                        } else {
                            // 上传视频
                            this.chooseVideo(row);
                        }
                    }
                })
            },
            // 上传图片
            chooseImages(row) {
                let count = parseInt(3 - row.fileList.length);
                console.log('count===', count);
                uni.chooseImage({ // 从本地相册选择图片或使用相机拍照
                    count: count, // 限制最多选择三张图片
                    sizeType: ['original', 'compressed'],
                    sourceType: ['album', 'camera'],
                    success: (res) => {
                        // 本地临时文件路径列表
                        console.log('上传图片===', res, row);
                        let tempFilePaths = res.tempFiles;
                        tempFilePaths.forEach((file, index) => {
                            console.log('file===', file);
                            const isSize = file.size / (1024 * 1024) < 200
                            if (!isSize) {
                                uni.showToast({
                                    title: '图片大小不能超过200M',
                                    icon: 'none',
                                })
                                return false
                            }

                            // #ifndef APP-PLUS
                            const isType = file.type === 'image/png' || file.type === 'image/jpeg' || file.type === 'image/gif' || file.type === 'image/webp';
                            // #endif

                            // #ifdef APP-PLUS
                            const isType = file.path.indexOf('.png') !== -1 || file.path.indexOf('.jpg') !== -1 || file.path.indexOf('.jpeg') !== -1 || file.path
                                .indexOf('.gif') !== -1 || file.path.indexOf('.webp') !== -1;
                            // #endif

                            if (!isType) {
                                uni.showToast({
                                    title: '图片格式只支持png/jpg/gif/webp',
                                    icon: 'none',
                                })
                                return false
                            }

                            let form = {}

                            this.$upload({
                                url: uploadFile,
                                filePath: res.tempFilePaths[index],
                                name: 'file',
                                formData: form
                            }).then(res => {
                                let result = JSON.parse(res);
                                console.log('上传===', result);
                                if (result.code === 0) {
                                    result.data.files.map(v => {
                                        row.fileList.push({
                                            clientId: result.data.clientId,
                                            uploadId: v.uploadId,
                                            url: `${serviceUrl}/file/pms/${v.path}`,
                                            type: v.type,
                                            suffix: v.suffix
                                        });
                                    })
                                }

                            })
                        })
                    }
                })
            },
            // 上传视频
            chooseVideo(row) {
                uni.chooseVideo({ // 拍摄视频或从手机相册中选视频,返回视频的临时文件路径
                    maxDuration: 10,
                    count: parseInt(3 - row.fileList.length), // 限制最多选择三个视频
                    compressed: true,
                    sourceType: ['album', 'camera'],
                    success: (res) => {
                        // 本地临时文件路径列表
                        console.log('res===', res);
                        // #ifndef APP-PLUS
                        let file = res.tempFile;
                        const isType = file.type === 'video/mp4' || file.type === 'video/3gp' || file.type === 'video/mov';
                        // #endif

                        //#ifdef APP-PLUS
                        let file = res;
                        const isType = file.tempFilePath.indexOf('.mp4') !== -1 || file.tempFilePath.indexOf('.3gp') !== -1 || file.tempFilePath.indexOf('.mov') !== -1;
                        // #endif

                        const isSize = file.size / (1024 * 1024) < 200;
                        if (!isSize) {
                            uni.showToast({
                                title: '视频大小不能超过200M',
                                icon: 'none',
                            })
                            return false
                        }
                        if (!isType) {
                            uni.showToast({
                                title: '视频格式只支持mp4/3gp/mov',
                                icon: 'none',
                            })
                            return false
                        }
                        console.log('file===', file)
                        row.fileList.push({
                            url: res.tempFilePath,
                            status: 1
                        });
                        console.log('视频===', row.fileList);
                    }
                })
            },
        }
    }
</script>
效果图如下所示:
扫码(二维码、条形码)
uniapp 提供api接口调用客户端扫码界面 uni.scanCode,示例代码如下:
// 详细介绍看这里:https://uniapp.dcloud.io/api/system/barcode?id=scancode
// 允许从相机和相册扫码
uni.scanCode({
    success: (res) => {
        console.log('条码类型:' + res.scanType);
        console.log('条码内容:' + res.result);
    }
});
// 只允许通过相机扫码
uni.scanCode({
    onlyFromCamera: true,
    success: (res) => {
        console.log('条码类型:' + res.scanType);
        console.log('条码内容:' + res.result);
    }
});
// 调起条码扫描
uni.scanCode({
    scanType: ['barCode'],
    success: (res) => {
        console.log('条码类型:' + res.scanType);
        console.log('条码内容:' + res.result);
    }
});
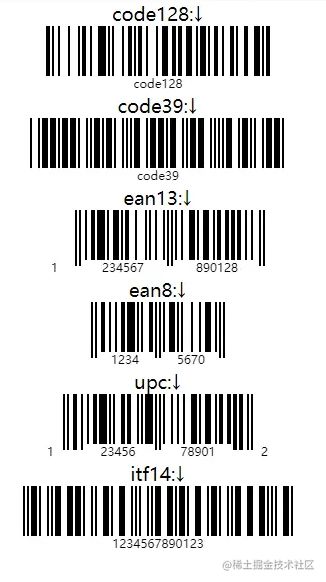
条形码生成器推荐一款直接在插件市场下载即可使用,如下所示:
// 详细介绍看这里:https://ext.dcloud.net.cn/plugin?id=406
<template>
    <view>
        <tki-barcode
        ref="barcode"
        :show="show"
        :format="format"
        :cid="cid"
        :val="val"
        :unit="unit"
        :opations="opations"
        :onval="onval"
        :loadMake="loadMake"
        @result="barresult" />
    </view>
</template>
<script>
import tkiBarcode from "@/components/tki-barcode/tki-barcode.vue"
export default {
    components: { tkiBarcode }
}
</script>
效果图如下所示:
平板横屏锁定
在 pages.json 中新增如下代码:
// 详细配置属性说明看这里:https://uniapp.dcloud.io/collocation/pages?id=globalstyle
"globalStyle": {
    "pageOrientation": "landscape" // 横屏配置,屏幕旋转设置,仅支持 auto / portrait / landscape
}
全局封装拦截器方法
// request.js
/**
 * @Des 请求接口封装
 * @Author Jack Chen @懒人码农
 * @Date 2021-11-22 09:18:51
 * @LastEditors Jack Chen
 * @LastEditTime 2021-11-22 09:45:31
 */

import { getToken, setToken, removeToken } from './validate.js';
// #ifdef H5
let baseUrl = '/api'
// #endif

// #ifdef APP-PLUS
let baseUrl = 'http://192.168.11.59:8000'; // 开发服务器
// #endif

export const myRequest = (options) => { // 暴露一个function:myRequest,使用options接收页面传过来的参数
    return new Promise((resolve, reject) => { // 异步封装接口,使用Promise处理异步请求
        let header = options.header || {};
        if (getToken()) {
            if (options.url.indexOf('/logout') === -1) {
                header['Authorization'] = 'Bearer ' + getToken();
            }
        }

        uni.request({ // 发送请求
            url: baseUrl + options.url, // 接收请求的API
            method: options.method || 'GET', // 接收请求的方式,如果不传默认为GET
            header: header || {},
            data: options.data || {}, // 接收请求的data,不传默认为空
            sslVerify: false,
            success: (res) => { // 数据获取成功
                // console.log('success===', res.statusCode);
                if (res.statusCode === 500) {
                        uni.showToast({
                                title: '网络异常请稍后',
                                icon: 'error'
                        })
                        return;
                }
                if (res.data.code !== 0) { // 因为0是返回成功的状态码,如果不等于0,则代表获取失败
                        if (res.data.code === 5000) {
                                uni.showToast({
                                    title: '网络异常请稍后',
                                    icon: 'error'
                                })
                        } else if (res.data.code === 2000) {
                                uni.showToast({
                                    title: res.data.message,
                                    icon: 'error'
                                })
                                removeToken();
                                setTimeout(() => {
                                    uni.redirectTo({
                                        url: '/pages/login/Login'
                                    });
                                }, 1500)
                        } else {
                            uni.showToast({
                                title: res.data.message,
                                icon: 'error'
                            })
                        }
                }
                resolve(res.data) // 成功,将数据返回
            },
            fail: (err) => { // 失败操作
                console.log('err===', JSON.stringify(err));
                // uni.hideLoading();
                uni.showToast({
                    title: '网络异常请稍后',
                    icon: 'error'
                })
                reject(err);
            }
        })
    })
}
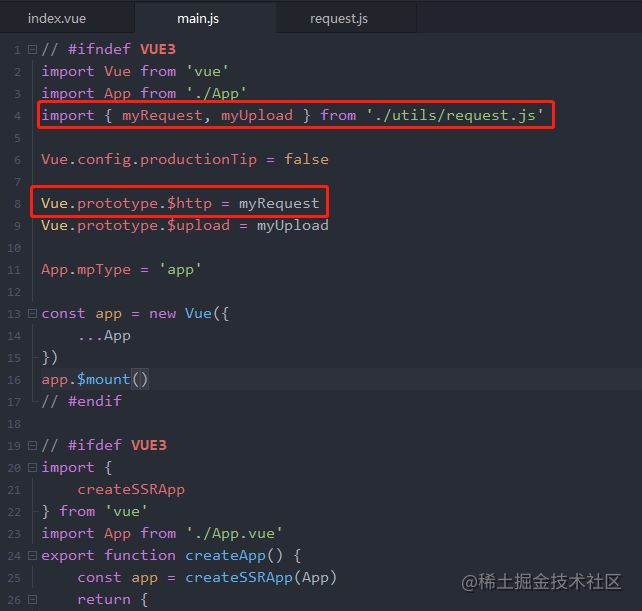
在 main.js 文件引入,如下图所示:
踩坑
密码转 base64 加密
封装一个跨端支持 base64 加解密的 JavaScript 方法,代码如下:
/**
 * @desc base64加密解密
 * @param {string} input
 * @returns {String}
 */
export function Base64() {
 // private property
 let _keyStr = 'ABCDEFGHIJKLMNOPQRSTUVWXYZabcdefghijklmnopqrstuvwxyz0123456789+/=';
 // public method for encoding
 this.encode = (input) => {
  let output = '';
  let chr1, chr2, chr3, enc1, enc2, enc3, enc4;
  let i = 0;
  input = this._utf8_encode(input);
  while (i < input.length) {
   chr1 = input.charCodeAt(i++);
   chr2 = input.charCodeAt(i++);
   chr3 = input.charCodeAt(i++);
   enc1 = chr1 >> 2;
   enc2 = ((chr1 & 3) << 4) | (chr2 >> 4);
   enc3 = ((chr2 & 15) << 2) | (chr3 >> 6);
   enc4 = chr3 & 63;
   if (isNaN(chr2)) {
    enc3 = enc4 = 64;
   } else if (isNaN(chr3)) {
    enc4 = 64;
   }
   output = output +
   _keyStr.charAt(enc1) + _keyStr.charAt(enc2) +
   _keyStr.charAt(enc3) + _keyStr.charAt(enc4);
  }
  return output;
 }
 // public method for decoding
 this.decode = (input) => {
  let output = '';
  let chr1, chr2, chr3;
  let enc1, enc2, enc3, enc4;
  let i = 0;
  input = input.replace(/[^A-Za-z0-9\+\/\=]/g, '');
  while (i < input.length) {
   enc1 = _keyStr.indexOf(input.charAt(i++));
   enc2 = _keyStr.indexOf(input.charAt(i++));
   enc3 = _keyStr.indexOf(input.charAt(i++));
   enc4 = _keyStr.indexOf(input.charAt(i++));
   chr1 = (enc1 << 2) | (enc2 >> 4);
   chr2 = ((enc2 & 15) << 4) | (enc3 >> 2);
   chr3 = ((enc3 & 3) << 6) | enc4;
   output = output + String.fromCharCode(chr1);
   if (enc3 != 64) {
    output = output + String.fromCharCode(chr2);
   }
   if (enc4 != 64) {
    output = output + String.fromCharCode(chr3);
   }
  }
  output = _utf8_decode(output);
  return output;
 }
 // private method for UTF-8 encoding
 this._utf8_encode = (string) => {
  string = string.replace(/\r\n/g, '\n');
  let utftext = '';
  for (let n = 0; n < string.length; n++) {
   let c = string.charCodeAt(n);
   if (c < 128) {
    utftext += String.fromCharCode(c);
   } else if((c > 127) && (c < 2048)) {
    utftext += String.fromCharCode((c >> 6) | 192);
    utftext += String.fromCharCode((c & 63) | 128);
   } else {
    utftext += String.fromCharCode((c >> 12) | 224);
    utftext += String.fromCharCode(((c >> 6) & 63) | 128);
    utftext += String.fromCharCode((c & 63) | 128);
   }
  }
  return utftext;
 }
 // private method for UTF-8 decoding
 this._utf8_decode = (utftext) => {
  let string = '';
  let i = 0;
  let c = c1 = c2 = 0;
  while ( i < utftext.length ) {
   c = utftext.charCodeAt(i);
   if (c < 128) {
    string += String.fromCharCode(c);
    i++;
   } else if((c > 191) && (c < 224)) {
    c2 = utftext.charCodeAt(i+1);
    string += String.fromCharCode(((c & 31) << 6) | (c2 & 63));
    i += 2;
   } else {
    c2 = utftext.charCodeAt(i+1);
    c3 = utftext.charCodeAt(i+2);
    string += String.fromCharCode(((c & 15) << 12) | ((c2 & 63) << 6) | (c3 & 63));
    i += 3;
   }
  }
  return string;
 }
}
页面调用方法:
<script>
import { Base64 } from '@/utils/validate.js';
export default {
    onLoad() {
        // #ifdef H5
        // 只支持H5
        let str64 = window.btoa('12345678');
        console.log('str64===', str64);
        // #endif

        // app端、H5端、微信小程序都支持
        let b = new Base64();
        let base64 = b.encode('12345678'); // 加密
        console.log('base64===', base64);
    }
}
</script>
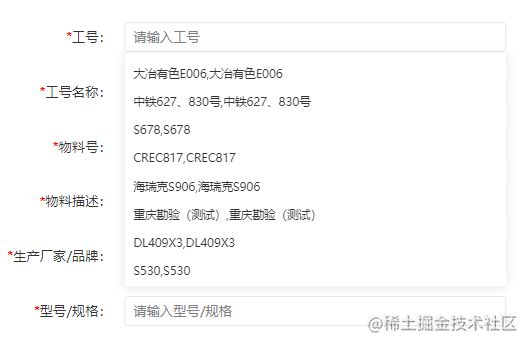
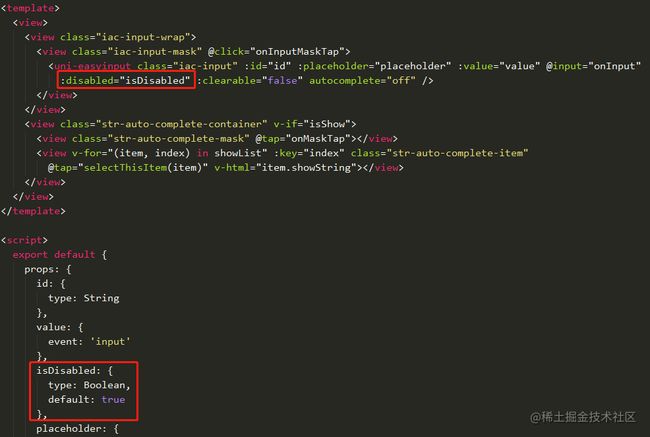
修复input-autocomplete插件
插件地址:https://ext.dcloud.net.cn/plugin?id=441
- 提示框美化
- input输入框改用扩展组件
<uni-easyinput
    class="iac-input"
    :id="id"
    :placeholder="placeholder"
    :value="value"
    @input="onInput"
    autocomplete="off"
/>
<input-autocomplete
    class="content"
    :value="formData.gh"
    v-model="formData.gh"
    placeholder="请输入工号"
    :isDisabled="isDisabled"
    highlightColor="#FF0000"
    :loadData="loadAutocompleteData"
    @selectItem="selectItemGh"
>input-autocomplete>
将基本组件input输入框改成扩展组件好处是:可以统一表单风格,控制校验提示错误信息显示/隐藏。
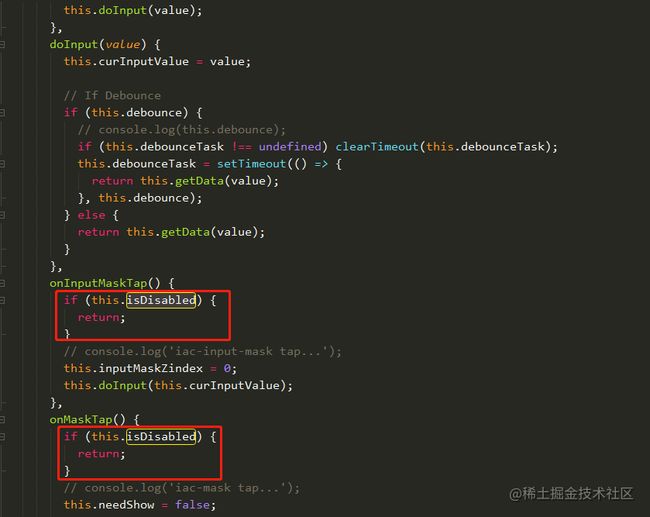
- 新增禁用属性
返回上一页刷新
操作顶部导航返回按钮,返回上一页需区分各端平台,示例代码如下:
<script>
    export default {
        methods: {
            // 返回上一页
            goBack() {
                // #ifdef H5
                history.back();
                // #endif

                // #ifdef APP-PLUS
                uni.navigateBack({
                    delta: 1
                });
                // #endif
            }
        }
    }
</script>
如需返回上一页并刷新数据,示例代码如下:
<script>
    export default {
        methods: {
            onSubmit() {
                const pages = getCurrentPages(); // 获取当前页面的页面栈,是个数组
                let currPage = pages[pages.length - 1]; // 当前页面
                let prevPage = pages[pages.length - 2]; // 上一个页面
                console.log('prevPage===', prevPage);

                // #ifdef H5
                prevPage.submitSearch(); // 可以调用上一个页面submitSearch()方法刷新页面
                // #endif

                // #ifdef APP-PLUS
                prevPage.$vm.submitSearch();
                // #endif
                uni.navigateBack();
            }
        }
    }
</script>
条件编译
条件编译是用特殊的注释作为标记,在编译时根据这些特殊的注释,将注释里面的代码编译到不同平台。
在 pages.json 写条件编译如下图所示:
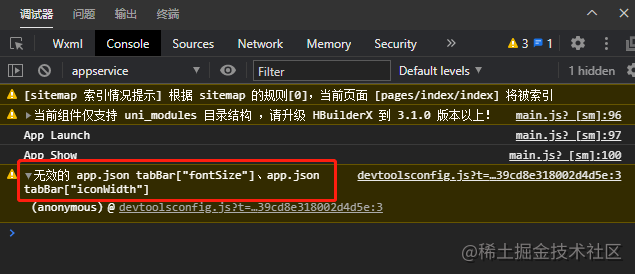
如果不加条件编译,微信小程序开发者工具会显示警告,如下图所示:
写法: 以 #ifdef 或 #ifndef 加 %PLATFORM% 开头,以 #endif 结尾。
- #ifdef:if defined 仅在某平台存在
- #ifndef:if not defined 除了某平台均存在
- %PLATFORM% :平台名称(HBuildex会有提示)
详细介绍请移步到这里:https://uniapp.dcloud.io/platform?id=preprocessor
注意:
- 条件编译是利用注释实现的,在不同语法里注释写法不一样,js使用
// 注释、css 使用/* 注释 */、vue/nvue 模板里使用; - 条件编译APP-PLUS包含APP-NVUE和APP-VUE,APP-PLUS-NVUE和APP-NVUE没什么区别,为了简写后面出了APP-NVUE ;
- 使用条件编译请保证
编译前和编译后文件的正确性,比如json文件中不能有多余的逗号; VUE3需要在项目的manifest.json文件根节点配置"vueVersion" : "3"
rpx单位不适配大屏
在移动设备上也有很多屏幕宽度,UI设计师一般只会按照750px屏幕宽度出图。此时使用rpx的好处在于,各种移动设备的屏幕宽度差异不是很大,相对于750px微调缩放后的效果,尽可能的还原了设计师的设计。
但是,一旦脱离移动设备,在pc屏幕,或者pad横屏状态下,因为屏幕宽度远大于750了。此时rpx根据屏幕宽度变化的结果就严重脱离了预期,大的惨不忍睹。
uniapp 适配平板 在 pages.json 配置 globalStyle 代码如下:
// 方法一
"globalStyle": {
    "rpxCalcMaxDeviceWidth": 960
}

// 方法二
"globalStyle": {
    "rpxCalcMaxDeviceWidth": 0,
}
uni-table
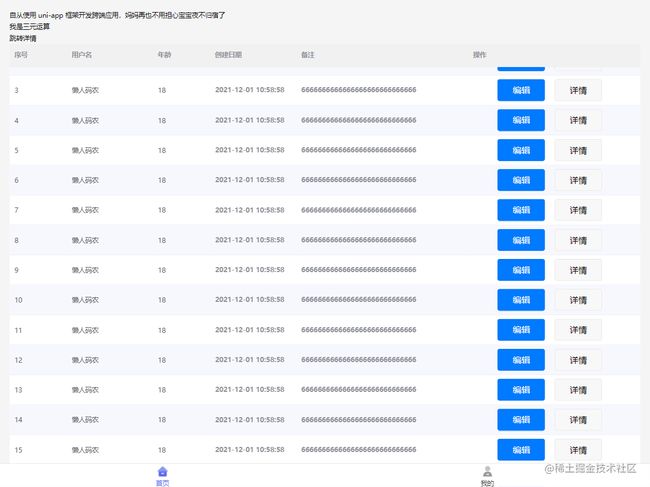
原生 uni-ui 表格组件,用于展示多条结构类似的数据,满足基本业务需求。不足的地方是无法固定表头,对APP端/微信小程序列表项内容不会垂直居中,新增按钮操作也不会垂直居中。
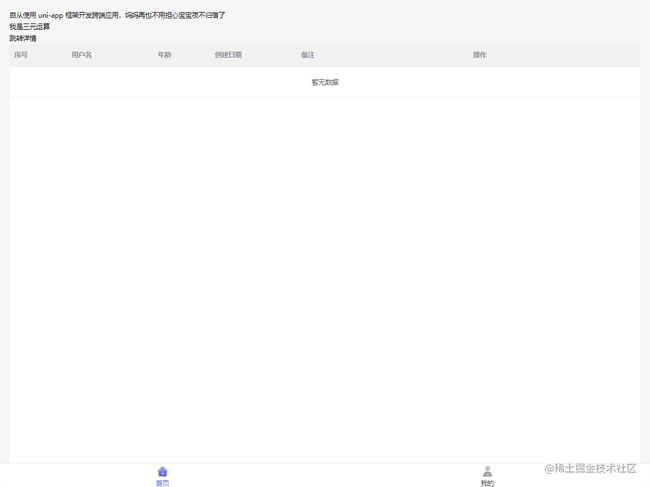
基于 uni-table 表格组件改良后,可以固定表头,隔行换色,效果图如下图所示:
代码如下:
<template>
    <uni-table :loading="isLoading" emptyText="暂无数据" class="table">
        <uni-tr class="theader">
            <uni-th width="100">序号</uni-th>
            <uni-th width="150">用户名</uni-th>
            <uni-th width="100">年龄</uni-th>
            <uni-th width="150">创建日期</uni-th>
            <uni-th width="300">备注</uni-th>
            <uni-th width="300">操作</uni-th>
        </uni-tr>
        <tbody id="hello-tbody" class="tbody">
            <!-- 暂无数据一栏自行设定条件判断 -->
            <uni-tr v-if="false">
		<uni-td style="position: absolute;width: 100%;text-align: center;padding: 20px 10px;">暂无数据</uni-td>
	    </uni-tr>
            <uni-tr v-for="(item, index) in 20" :key="item" class="tbody-tr">
                <uni-td width="100">{{ index + 1 }}</uni-td>
                <uni-td width="150">懒人码农</uni-td>
                <uni-td width="100">18</uni-td>
                <uni-th width="150">2021-12-01 10:58:58</uni-th>
                <uni-th width="300">6666666666666666666666666666</uni-th>
                <uni-td width="300">
                    <view class="btn-group">
                        <button type="primary" @click="handleEdit" class="btn">编辑</button>
                        <button @click="handleDetail" class="btn">详情</button>
                    </view>
                </uni-td>
            </uni-tr>
        </tbody>
    </uni-table>
</template>
<script>
    export default {
        mounted() {
            let wHeight = document.body.clientHeight,
            dom = document.getElementById('hello-tbody'),
            tablePoseY = dom.getBoundingClientRect().y;
            dom.style.height = wHeight - tablePoseY +'px';
        }
    }
</script>
<style lang="scss" scoped>
    .table {
        .theader {
            display: table;
            width: 100%;
            background-color: #F1F1F1;
        }
        .tbody {
            display: block;
            overflow-y: auto;
            &::-webkit-scrollbar {
              display: none;
            }
            &-tr {
                width: 100%;
                display: table;
                table-layout: fixed;
            }
        }
        .btn-group {
            display: flex;
            justify-content: center;

            .btn {
                width: 100px;
                margin: 0 20px 0 0;
            }
        }
    }

    /deep/ .uni-table-tr:nth-of-type(2n) {
        background-color: #F7F8FE;
        &:hover {
            background-color: #F7F8FE !important;
        }
    }

    /deep/ .uni-table-tr:nth-child(n + 2):hover {
        background-color: transparent;
    }
</style>
微信小程序报错
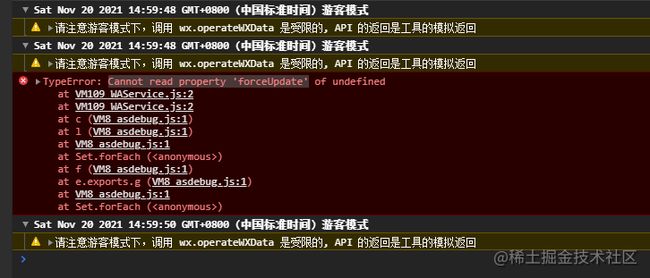
- 运行小程序报错提示:Cannot read property ‘forceUpdate’ of undefined
- 解决方法
uni-app 需要配置微信小程序 AppID,在项目根目录找到 manifest.json 文件打开,选择微信小程序配置,将小程序 ID 填入后,关闭微信开发者工具,重新运行项目即可。
结语
文笔有限就写到这吧,以上是我首次使用 uniapp 框架开发一款小型平板端应用的初体验,自己对流程进行了梳理和总结。如有写得不妥的地方,还请指出。也希望通过这里认识更多志同道合的朋友,如果你也喜欢折腾,欢迎加我好友,一起浪,一起进步。
如果此文对看官们有一丢丢帮助,请给点一个赞或者分享都是对我最大的支持。
关注公众号【懒人码农】,获取更多项目实战经验及各种源码资源。如果你也一样对技术热爱并且为之着迷,欢迎加我微信【lazycode520】,当然也可以加我微信拉你进群,毕竟我也是有趣的前端,认识我也不赖~
相关资料
- 1.Vue 单文件组件 (SFC) 规范–https://vue-loader.vuejs.org/zh/spec.html
- 2.uni-app 组件规范–https://uniapp.dcloud.io/component/README
- 3.uni-app接口规范–https://uniapp.dcloud.io/api/README
- 4.HBuilderX 编辑器工具–https://www.dcloud.io/hbuilderx.html
- 5.微信开发者工具–https://developers.weixin.qq.com/miniprogram/dev/devtools/download
- 6.java jre8官网下载–https://www.oracle.com/java/technologies/javase/javase8-archive-downloads.html
- 7.申请微信小程序AppID–https://developers.weixin.qq.com/miniprogram/dev/framework/quickstart/getstart.html#%E7%94%B3%E8%AF%B7%E5%B8%90%E5%8F%B7
- 8.微信小程序发布上线流程–https://developers.weixin.qq.com/miniprogram/dev/framework/quickstart/release.html#%E5%8F%91%E5%B8%83%E4%B8%8A%E7%BA%BF
