【图文详解】搭建 Spring Authorization oauth2-server-resource-client-gateway-eureka 完整Demo
1、项目概述
1.1、概述
本项目是在前面章节的基础上,进行的升级改造。增加了注册中心、网关,更加贴近于实际需求。
在进行本节之前,请先搭建前面项目:
-
【图文详解】搭建 Spring Authorization Server + Resource + Client 完整Demo
-
【oauth2 客户端模式】Spring Authorization Server + Resource + Client 资源服务间的相互访问
1.2、整体架构图

业务流程解析
1.2.1、总体结构
总体上分为三个部分:
- 前端和第三方授权中心
- 网关:把前后两部分隔离开,所有的请求访问都通过网关转发
- 后端:所有的资源服务(微服务)、注册中心、配置中心等
1.2.2、用户访问
1、用户 访问 客户端 ,准备请求资源
2、客户端 需要用户认证/授权,并请求 授权中心 发放令牌
3、客户端 拿到令牌后,通过 网关, 去 注册中心 查找 资源服务
4、注册中心 把资源服务告之 客户端,客户端 携带令牌去访问 资源服务
5、资源服务 验证令牌后,把资源数据,通过 网关,返回 客户端,再呈现给 用户
12.3、资源服务间调用
资源服务之间的访问也需要经过网关(图中略),减少服务间的耦合
a、资源服务B 希望调用 资源服务A;资源服务B 通过 网关,向 授权中心 申请令牌;授权中心 验证ID/密钥(客户端模式)后,通过 网关,直接发放令牌给 资源服务B
b、资源服务B 通过 网关,向 注册中心 查找 资源服务A
c、注册中心 把 资源服务A,再通过 网关 ,告之 资源服务B,资源服务B 携带令牌访问 资源服务A
d、资源服务A 验证令牌后,把资源数据,通过 网关 ,返给 资源服务B
1.2.4、额外说明
- 所有资源服务 都需要注册到 注册中心,访问者只需要知道 网关地址 和 服务名称,就可以访问;不用关心资源服务的具体部署位置,不管是单机部署还是集群部署,对访问者来说都是一样的。
- 网关 是前后端访问的桥梁,网关也可以注册到注册中心;所有的访问都应该经过网关转发,减少服务间的耦合
- 授权中心 作为第三方存在,不应该注册到注册中心
- 客户端 作为工程的前端,也不用注册到注册中心
1.3、搭建环境
- Spring Security 5.6.3 (Client/Resource)
- Spring Authorization Server 0.2.3
- Spring Boot 2.6.7(gateway、eureka…)
- jdk 1.8
- mysql 5.7
- lombok、log4j、fastjson2 …
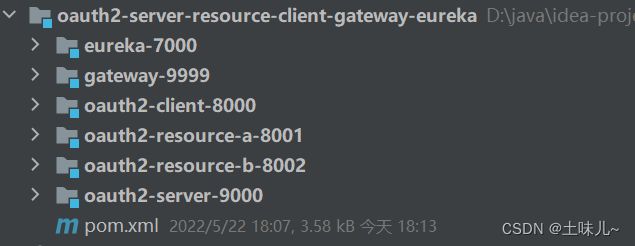
2、结构搭建
| 模块 | 端口 | 说明 |
|---|---|---|
| oauth2-server-resource-client-gateway-eureka | — | 父工程 |
| oauth2-client-8000 | 8000 | 项目前端(oauth2客户端) |
| oauth2-server-9000 | 9000 | 认证授权中心(oauth2服务端) |
| oauth2-resource-a-8001 | 8001 | 微服务A(oauth2资源服务器),受保护对象 |
| oauth2-resource-b-8002 | 8002 | 微服务B(oauth2资源服务器),受保护对象 |
| eureka-7000 | 7000 | 注册中心 |
| gateway-9999 | 9999 | 网关 |
2.1、父工程
创建普通meven工程 oauth2-server-resource-client-gateway-eureka;打包格式pom,删除 src
- pom.xml
<project xmlns="http://maven.apache.org/POM/4.0.0"
         xmlns:xsi="http://www.w3.org/2001/XMLSchema-instance"
         xsi:schemaLocation="http://maven.apache.org/POM/4.0.0 http://maven.apache.org/xsd/maven-4.0.0.xsd">
    <modelVersion>4.0.0modelVersion>

    <groupId>com.tuwergroupId>
    <artifactId>oauth2-server-resource-client-gateway-eurekaartifactId>
    <version>1.0-SNAPSHOTversion>
    <packaging>pompackaging>

    <properties>
        <maven.compiler.source>8maven.compiler.source>
        <maven.compiler.target>8maven.compiler.target>
        <mysql-connector-java.version>8.0.29mysql-connector-java.version>
        <lombok.version>1.18.22lombok.version>
        <log4j.version>1.2.17log4j.version>
        <fastjson2.version>2.0.3fastjson2.version>
        <commons-lang.version>2.6commons-lang.version>
    properties>
    <dependencyManagement>
        <dependencies>

            <dependency>
                <groupId>org.springframework.cloudgroupId>
                <artifactId>spring-cloud-dependenciesartifactId>
                <version>2021.0.0version>
                <type>pomtype>
                <scope>importscope>
            dependency>

            <dependency>
                <groupId>org.springframework.bootgroupId>
                <artifactId>spring-boot-dependenciesartifactId>
                <version>2.6.7version>
                <type>pomtype>

                <scope>importscope>
            dependency>


            <dependency>
                <groupId>org.springframework.securitygroupId>
                <artifactId>spring-security-oauth2-authorization-serverartifactId>
                <version>0.2.3version>
            dependency>

            <dependency>
                <groupId>mysqlgroupId>
                <artifactId>mysql-connector-javaartifactId>
                <version>${mysql-connector-java.version}version>
            dependency>

            <dependency>
                <groupId>com.alibaba.fastjson2groupId>
                <artifactId>fastjson2artifactId>
                <version>${fastjson2.version}version>
            dependency>

            <dependency>
                <groupId>org.projectlombokgroupId>
                <artifactId>lombokartifactId>
                <version>${lombok.version}version>
            dependency>

            <dependency>
                <groupId>log4jgroupId>
                <artifactId>log4jartifactId>
                <version>${log4j.version}version>
            dependency>

            <dependency>
                <groupId>commons-langgroupId>
                <artifactId>commons-langartifactId>
                <version>${commons-lang.version}version>
            dependency>
        dependencies>
    dependencyManagement>

project>
2.2、子模块
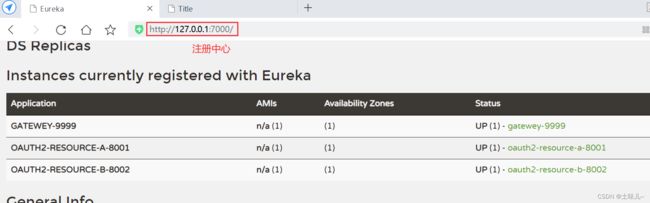
3、注册中心
3.1、pom.xml
<project xmlns="http://maven.apache.org/POM/4.0.0"
         xmlns:xsi="http://www.w3.org/2001/XMLSchema-instance"
         xsi:schemaLocation="http://maven.apache.org/POM/4.0.0 http://maven.apache.org/xsd/maven-4.0.0.xsd">
    <parent>
        <artifactId>oauth2-server-resource-client-gateway-eurekaartifactId>
        <groupId>com.tuwergroupId>
        <version>1.0-SNAPSHOTversion>
    parent>
    <modelVersion>4.0.0modelVersion>

    <artifactId>eureka-7000artifactId>

    <properties>
        <maven.compiler.source>8maven.compiler.source>
        <maven.compiler.target>8maven.compiler.target>
    properties>
    <dependencies>

        <dependency>
            <groupId>org.springframework.cloudgroupId>
            <artifactId>spring-cloud-starter-netflix-eureka-serverartifactId>
        dependency>

        <dependency>
            <groupId>org.springframework.bootgroupId>
            <artifactId>spring-boot-devtoolsartifactId>
            <scope>compilescope>
        dependency>
    dependencies>
project>
3.2、application.yml
server:
  port: 7000

spring:
  application:
    # 注册中心
    name: eureka-server-7000

# Eureka配置
eureka:
  instance:
    # Eureka服务端的实例名字
    hostname: localhost

  client:
    # 表示是否向 Eureka 注册中心注册自己 (这个模块本身是服务器,所以不需要)
    register-with-eureka: false
    # fetch-registry 是否拉取其他的服务;如果为 false,则表示自己为注册中心或服务提供者;服务消费者的话为 true
    fetch-registry: false
    # Eureka监控页面~
    service-url:
      defaultZone: http://${eureka.instance.hostname}:${server.port}/eureka/
3.3、启动类
package com.tuwer;

import org.springframework.boot.SpringApplication;
import org.springframework.boot.autoconfigure.SpringBootApplication;
import org.springframework.cloud.netflix.eureka.server.EnableEurekaServer;

/**
 * @author 土味儿
 * Date 2022/5/21
 * @version 1.0
 */
@SpringBootApplication
@EnableEurekaServer
public class EurekaServer_7000 {
    public static void main(String[] args) {
        SpringApplication.run(EurekaServer_7000.class, args);
    }
}
4、网关
4.1、pom.xml
<project xmlns="http://maven.apache.org/POM/4.0.0"
         xmlns:xsi="http://www.w3.org/2001/XMLSchema-instance"
         xsi:schemaLocation="http://maven.apache.org/POM/4.0.0 http://maven.apache.org/xsd/maven-4.0.0.xsd">
    <parent>
        <artifactId>oauth2-server-resource-client-gateway-eurekaartifactId>
        <groupId>com.tuwergroupId>
        <version>1.0-SNAPSHOTversion>
    parent>
    <modelVersion>4.0.0modelVersion>

    <artifactId>gateway-9999artifactId>

    <properties>
        <maven.compiler.source>8maven.compiler.source>
        <maven.compiler.target>8maven.compiler.target>
    properties>
    <dependencies>
        <dependency>
            <groupId>org.springframework.cloudgroupId>
            <artifactId>spring-cloud-starter-netflix-eureka-clientartifactId>
        dependency>
        <dependency>
            <groupId>org.springframework.cloudgroupId>
            <artifactId>spring-cloud-starter-gatewayartifactId>
        dependency>

        <dependency>
            <groupId>org.springframework.bootgroupId>
            <artifactId>spring-boot-starter-actuatorartifactId>
        dependency>

        <dependency>
            <groupId>org.springframework.bootgroupId>
            <artifactId>spring-boot-devtoolsartifactId>
            <scope>compilescope>
        dependency>
    dependencies>
project>
4.2、application.yml
server:
  port: 9999

spring:
  application:
    # 网关应用名称
    name: gatewey-9999
  # 配置 Spring Cloud 相关属性
  cloud:
    # 配置 Spring Cloud Gateway 相关属性
    gateway:
      # 配置网关发现机制
      discovery:
        # 配置处理机制
        locator:
          # ----------------
          # 只要请求地址符合规则:http://网关地址:端口/微服务名称/微服务请求地址,就自动映射
          # 把请求转发到:http://微服务提供者地址:端口/微服务名称/微服务请求地址
          # ----------------
          # 开启网关自动映射处理机制
          # 商业开发中,一般不设置为 true,使用默认值 false;避免不必要的自动转发规则
          enabled: false
          # 开启服务名称小写转换(默认为false)
          lower-case-service-id: true

# 配置 Eureka
eureka:
  client:
    # 默认值:true 需要从注册中心拉取其他的服务
    #fetch-registry: true
    service-url:
      # 注册中心地址
      defaultZone: http://localhost:7000/eureka/

  instance:
    # 修改Eureka上的默认描述信息
    instance-id: gatewey-9999
    # 以IP地址注册到服务中心
    prefer-ip-address: true

# 监控端口配置
management:
  endpoints:
    web:
      exposure:
        # 开启 info,health;新版本中只默认开启了 health
        include: info,health
4.3、启动类
package com.tuwer;

import org.springframework.boot.SpringApplication;
import org.springframework.boot.autoconfigure.SpringBootApplication;
import org.springframework.cloud.netflix.eureka.EnableEurekaClient;

/**
 * @author 土味儿
 * Date 2022/5/21
 * @version 1.0
 */
@SpringBootApplication
@EnableEurekaClient
public class Gateway_9999 {
    public static void main(String[] args) {
        SpringApplication.run(Gateway_9999.class, args);
    }
}
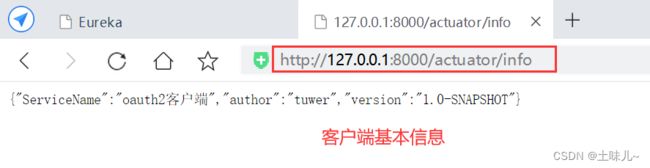
4.4、MyInfo.java
这一步可以省略;作用:给外部一个查看该模块基本信息的接口;
- 需要导入
actuator依赖- application.yml 中配置
- 如果有security安全设置,需要放开端口
/actuator/info
@Component
public class MyInfo implements InfoContributor {
    @Override
    public void contribute(Info.Builder builder) {
        HashMap<String, Object> map = new HashMap<>();
        // 可以从数据库获取信息
        map.put("ServiceName","路由网关");
        map.put("version","1.0-SNAPSHOT");
        map.put("author","tuwer");
        builder.withDetails(map);
    }
}
# 监控端口配置
management:
  endpoints:
    web:
      exposure:
        # 开启 info,health;新版本中只默认开启了 health
        include: info,health
5、整合OAuth2三元素
5.1、复制旧项目中OAuth2三元素模块

5.2、配置资源服务到注册中心等
以
oauth2-resource-a-8001为例,其它资源模块操作方法一样;
- 授权中心不需要添加到注册中心,它作为第三方存在
- 客户端作为工程前端,也不用添加到注册中心
5.2.1、添加依赖
<dependency>
    <groupId>org.springframework.cloudgroupId>
    <artifactId>spring-cloud-starter-netflix-eureka-clientartifactId>
dependency>
5.2.2、配置注册中心
# 配置 Eureka
eureka:
  client:
    # 默认值:true 需要从注册中心拉取其他的服务
    #fetch-registry: true
    service-url:
      # 注册中心地址
      defaultZone: http://localhost:7000/eureka/

  instance:
    # 修改Eureka上的默认描述信息
    instance-id: oauth2-resource-a-8001
    # 以IP地址注册到服务中心
    prefer-ip-address: true
5.2.3、启动类添加 @EnableEurekaClient
@SpringBootApplication
@EnableEurekaClient
public class Resource_a_8001 {
    public static void main(String[] args) {
        SpringApplication.run(Resource_a_8001.class, args);
    }
}
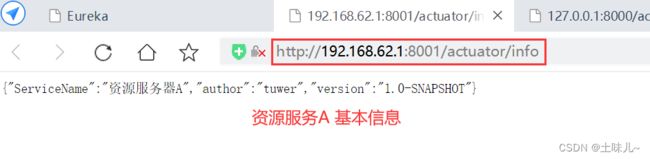
5.2.4、配置MyInfo.java
这一步可以省略;作用:给外部一个查看该模块基本信息的接口;
- 导入依赖
<dependency>
    <groupId>org.springframework.bootgroupId>
    <artifactId>spring-boot-starter-actuatorartifactId>
dependency>
- MyInfo.java
@Component
public class MyInfo implements InfoContributor {
    @Override
    public void contribute(Info.Builder builder) {
        HashMap<String, Object> map = new HashMap<>();
        // 可以从数据库获取信息
        map.put("ServiceName","资源服务器A");
        map.put("version","1.0-SNAPSHOT");
        map.put("author","tuwer");
        builder.withDetails(map);
    }
}
- application.yml
# 监控端口配置
management:
  endpoints:
    web:
      exposure:
        # 开启 info,health;新版本中只默认开启了 health
        include: info,health
- 安全策略中放行端点
// 第一种方法
@Bean
SecurityFilterChain oauth2SecurityFilterChain(HttpSecurity http) throws Exception {
    http.authorizeRequests(requests ->
                           // 任何请求都需要认证
                           requests
                           .antMatchers("/actuator/**").permitAll()
                           .anyRequest().authenticated()
                          )
        // ...
        return http.build();
}
// 第二种方法
@Bean
WebSecurityCustomizer webSecurityCustomizer() {
    return web -> web.ignoring().antMatchers("/actuator/health", "/actuator/info");
}
5.3、配置网关中路由规则
在
spring.cloud.gateway.routes节点下配置
- 资源服务A
        # 资源服务A
        # 把对 【网关/o2_resource_a/**】 的请求,转发到 【lb://oauth2-resource-a-8001】
        # 转发时去掉第1节 o2_resource_a
        # lb: 表示负载均衡 loadbalance
        # oauth2-resource-a-8001 是【资源服务A】在注册中心中的名称
        - id: oauth2-resource-a-8001
          uri: lb://oauth2-resource-a-8001
          predicates:
            - Path=/o2_resource_a/**
            - Method=GET
          filters:
            - name: StripPrefix
              args:
                # 过滤掉第1节
                parts: 1
- 资源服务B
        # 资源服务B
        - id: oauth2-resource-b-8002
          uri: lb://oauth2-resource-b-8002
          predicates:
            - Path=/o2_resource_b/**
            - Method=GET
          filters:
            - name: StripPrefix
              args:
                # 过滤掉第1节
                parts: 1
- 客户端
        # 客户端
        - id: oauth2-client-8000
          uri: http://127.0.0.1:8000
          predicates:
            - Path=/o2_client/**
            - Method=GET
          filters:
            - name: StripPrefix
              args:
                # 过滤掉第1节
                parts: 1
- 认证中心
        # 认证中心
        - id: oauth2-server-9000
          uri: http://os.com:9000
          predicates:
            - Path=/o2_server/**
            - Method=GET,POST
          filters:
            - name: StripPrefix
              args:
                # 过滤掉第1节
                parts: 1
5.4、旧项目部分内容修改
5.4.1、授权中心
- 修改注册的两个客户端ID和名称;为了与旧项目区分。修改完之后,在客户端引用位置也要相应修改
//String clientId_1 = "my_client";
String clientId_1 = "my_client_2";

//String clientId_2 = "micro_service";
String clientId_2 = "micro_service_2";

// 客户端名称:可省略
//.clientName("my_client_name")
.clientName("my_client_name_2")

//.clientName("micro_service")
.clientName("micro_service_2")
5.4.2、客户端
- application.yml
#client-id: my_client
client-id: my_client_2
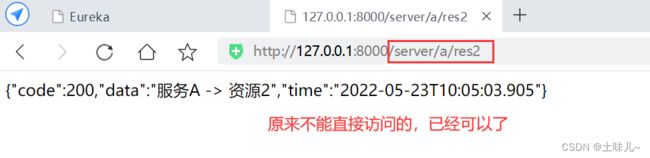
-
ResourceController.java
把对资源的直接调用,改为通过网关调用
// ...
// 网关地址
private String BASE_URL = "http://192.168.62.1:9999";

@GetMapping("/server/a/res1")
public String getServerARes1(@RegisteredOAuth2AuthorizedClient
    OAuth2AuthorizedClient oAuth2AuthorizedClient) {
    // 网关地址/路由路径...
    return getServer(BASE_URL + "/o2_resource_a/res1", oAuth2AuthorizedClient);
}
// ...

- 本地模拟客户
    /**
     * 虚拟一个本地用户
     *
     * @return UserDetailsService
     */
    @Bean
    UserDetailsService userDetailsService() {
        return username -> User.withUsername("local_admin")
                .password("123456")
                .roles("TEST","ABC")
                //.authorities("ROLE_ADMIN", "ROLE_USER")
                .build();
    }
- 本地权限提升
@Controller
public class IndexController {
    @Autowired
    UserDetailsService userDetailsService;

	/**
     * 权限提升
     * 第三方用户进入本系统后,绑定本地用户,获取本地用户的角色和权限
     * @param model
     * @return
     */
    @GetMapping("/")
    public String user(Model model) {
        // 从安全上下文中获取登录信息,返回给model
        Map<String, Object> map = new HashMap<>(5);

        Authentication auth = SecurityContextHolder.getContext().getAuthentication();
        String username = auth.getName();
        map.put("当前用户", username);
        map.put("原来权限", auth.getAuthorities());

        //Set authorities = new ArraySet<>(auth.getAuthorities());
        Set<GrantedAuthority> authorities = new HashSet<>(auth.getAuthorities());

        // 根据三方用户查绑定的本地用户
        String localUser = getLocalUser(username);
        UserDetails userDetails = userDetailsService.loadUserByUsername(localUser);
        map.put("本地用户", localUser);
        // 本地用户权限
        //List authorities1 = new ArrayList<>(userDetails.getAuthorities());
        Set<GrantedAuthority> authorities1 = new HashSet<>(userDetails.getAuthorities());
        map.put("本地用户权限", authorities1);
        // 把本地用户权限加入原来权限集中
        authorities.addAll(authorities1);
        map.put("新的权限", authorities);
        // 生成新的认证信息
        Authentication newAuth = new OAuth2AuthenticationToken(
                (OAuth2User) auth.getPrincipal(),
                authorities,
                "myClient");
        // 重置认证信息
        SecurityContextHolder.getContext().setAuthentication(newAuth);
        model.addAttribute("user", map);
        return "index";
    }

    /**
     * 模拟通过第三方用户,得到本地用户
     * @param remoteUsername
     * @return
     */
    private String getLocalUser(String remoteUsername){
        String u = "";
        // 模拟通过三方用户查本地用户
        if(StringUtils.isNotEmpty(remoteUsername)){
            u = "local_admin";
        }
        return u;
    }

    @GetMapping("/out")
    public void logout(HttpServletRequest request,
                       HttpServletResponse response) {
        // ...
    }
}
5.4.3、资源服务器
本项目中需要 资源服务B 调用 资源服务A;只需要修改
资源服务B
-
ResourceController.java
申请令牌时,认证中心地址可以通过网关转发,地址为:
BASE_URL + '/o2_server/...';客户端模式申请令牌时,不需要认证/授权/授权码等步骤,没有redirect_url转发路径
// ...
// 网关地址
private String BASE_URL = "http://192.168.62.1:9999";

@GetMapping("/res1")
public String getRes1(HttpServletRequest request) {
    //return getServer("http://127.0.0.1:8001/res2", request);
    return getServer(BASE_URL + "/o2_resource_a/res2", request);
    //return JSON.toJSONString(new Result(200, "服务B -> 资源1"));
}

private String getServer(String url,
                             HttpServletRequest request) {
    // ...
    // 对id及密钥加密
    //byte[] userpass = Base64.encodeBase64(("micro_service:123456").getBytes());
    byte[] userpass = Base64.encodeBase64(("micro_service_2:123456").getBytes());
    // ...

    try {
        // 发起申请令牌请求
        responseEntity1 = restTemplate.exchange(BASE_URL + "/o2_server/oauth2/token?grant_type=client_credentials", HttpMethod.POST, httpEntity1, String.class);
    } catch (RestClientException e) {
        //
        System.out.println("令牌申请失败");
    }
    // ...
}
6、测式


权限测试
客户端中需要加入本地用户,第三方用户绑定本地用户,再把本地用户角色/权限赋于给第三方用户,实现客户端的角色管理。
详细设计及说明见:OAuth2在分布式微服务架构下基于角色的权限设计(RBAC)
- 资源服务器放开客户端的访问权限,只要是合法的客户端请求都通过

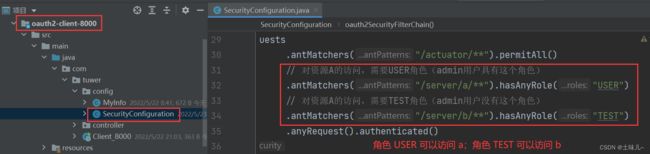
- 客户端根据角色/权限控制访问;修改客户端中安全策略;重启客户端测试
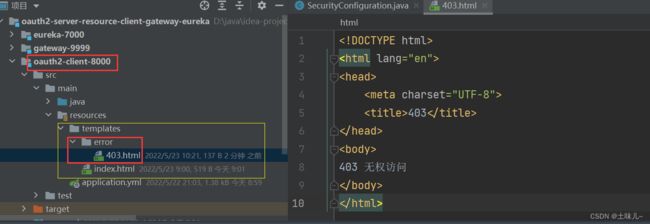
- 添加403页面

Git仓库:https://gitee.com/tuwer/oauth2