Android双屏异显以及原理分析
副屏显示
android设备可以开启模拟副屏,通过Presentation实现模拟副屏的画面绘制。
进入设置的开发者选项,找到绘图-模拟辅助显示设备(英文为Simulate secondary displays)。

选择辅助设备的分辨率。

需要申请显示在其他应用上层的权限,
跳转设置以授权:
        if (!Settings.canDrawOverlays(this)) {
            Intent intent = new Intent(Settings.ACTION_MANAGE_OVERLAY_PERMISSION, Uri.parse(
                    "package:" + getPackageName()));
            startActivityForResult(intent, 520);
        }
接着初始化Presentation,代码如下
private void initPresentation() {
        Display[] displays =
                mDisplayManager.getDisplays(DisplayManager.DISPLAY_CATEGORY_PRESENTATION);
        if (displays != null && displays.length > 0) {
            Display display = displays[0];
            mCustomPresentation = new CustomPresentation(this, display);
            mCustomPresentation.getWindow().setType(WindowManager.LayoutParams.TYPE_APPLICATION_OVERLAY);
            mCustomPresentation.setOnDismissListener(new DialogInterface.OnDismissListener() {
                @Override
                public void onDismiss(DialogInterface dialogInterface) {
                    Log.d(TAG, "onDismiss");
                }
            });
            mCustomPresentation.show();
        } else {
            Toast.makeText(this, "无副屏", Toast.LENGTH_SHORT).show();
        }
    }
完整代码如下:
package com.example.secondarydisplays;

import android.content.Context;
import android.content.DialogInterface;
import android.content.Intent;
import android.hardware.display.DisplayManager;
import android.net.Uri;
import android.os.Bundle;
import android.provider.Settings;
import android.util.Log;
import android.view.Display;
import android.view.View;
import android.view.WindowManager;
import android.widget.Button;
import android.widget.Toast;

import androidx.annotation.Nullable;
import androidx.appcompat.app.AppCompatActivity;

public class MainActivity extends AppCompatActivity implements View.OnClickListener {

    private static final String TAG = MainActivity.class.getSimpleName();

    protected CustomPresentation mCustomPresentation;
    private DisplayManager mDisplayManager;

    @Override
    protected void onCreate(Bundle savedInstanceState) {
        super.onCreate(savedInstanceState);
        setContentView(R.layout.activity_main);
        Button btnShow = findViewById(R.id.btn_show);
        Button btnDismiss = findViewById(R.id.btn_dismiss);
        btnShow.setOnClickListener(this);
        btnDismiss.setOnClickListener(this);
        mDisplayManager = (DisplayManager) getSystemService(Context.DISPLAY_SERVICE);
        checkPermission();
    }

    private void checkPermission() {
        //需要显示在其他应用上层的权限,跳转设置授权
        if (!Settings.canDrawOverlays(this)) {
            Intent intent = new Intent(Settings.ACTION_MANAGE_OVERLAY_PERMISSION, Uri.parse(
                    "package:" + getPackageName()));
            startActivityForResult(intent, 520);
        } else {
            initPresentation();
        }

    }

    @Override
    protected void onActivityResult(int requestCode, int resultCode, @Nullable Intent data) {
        super.onActivityResult(requestCode, resultCode, data);
        if (requestCode == 520 && resultCode == RESULT_OK) {
            if (Settings.canDrawOverlays(this)) {
                initPresentation();
            }
        }
    }

    private void initPresentation() {
        Display[] displays =
                mDisplayManager.getDisplays(DisplayManager.DISPLAY_CATEGORY_PRESENTATION);
        if (displays != null && displays.length > 0) {
            Display display = displays[0];
            mCustomPresentation = new CustomPresentation(this, display);
            mCustomPresentation.getWindow().setType(WindowManager.LayoutParams.TYPE_APPLICATION_OVERLAY);
            mCustomPresentation.setOnDismissListener(new DialogInterface.OnDismissListener() {
                @Override
                public void onDismiss(DialogInterface dialogInterface) {
                    Log.d(TAG, "onDismiss");
                }
            });
            mCustomPresentation.show();
        } else {
            Toast.makeText(this, "无副屏", Toast.LENGTH_SHORT).show();
        }
    }

    @Override
    public void onClick(View view) {
        int id = view.getId();
        if (id == R.id.btn_show) {
            if (mCustomPresentation != null && mCustomPresentation.getDisplay().isValid()) {
                mCustomPresentation.show();
            } else {
                checkPermission();
            }
        } else if (id == R.id.btn_dismiss) {
            if (mCustomPresentation != null) {
                mCustomPresentation.dismiss();
            }
        }
    }
}
通过Presentation.show()和Presentation.dismiss()来控制画面显示,当前副屏是否有效可通过Presentation.getDisplay().isValid()方法判断。
自定义CustomPresentation 代码如下:
package com.example.secondarydisplays;

import android.app.Presentation;
import android.content.Context;
import android.os.Bundle;
import android.util.Log;
import android.view.Display;

public class CustomPresentation extends Presentation {

    private static final String TAG = CustomPresentation.class.getSimpleName();

    public CustomPresentation(Context outerContext, Display display) {
        this(outerContext, display, 0);
    }

    public CustomPresentation(Context outerContext, Display display, int theme) {
        super(outerContext, display, theme);
    }

    @Override
    protected void onCreate(Bundle savedInstanceState) {
        super.onCreate(savedInstanceState);
        setContentView(R.layout.layout_presentation);
    }

    @Override
    protected void onStart() {
        super.onStart();
        Log.d(TAG, "onStart:");
    }

    @Override
    protected void onStop() {
        super.onStop();
        Log.d(TAG, "onStop:");
    }

    @Override
    public void onDisplayChanged() {
        super.onDisplayChanged();
        Log.d(TAG, "onDisplayChanged:");
    }

    @Override
    public void onDisplayRemoved() {
        super.onDisplayRemoved();
        Log.d(TAG, "onDisplayRemoved:");
    }
}
当副屏移除时回调onDisplayRemoved方法,同时Presentation.getDisplay().isValid()返回false。
可自定义布局,副屏将显示自定义布局内容。

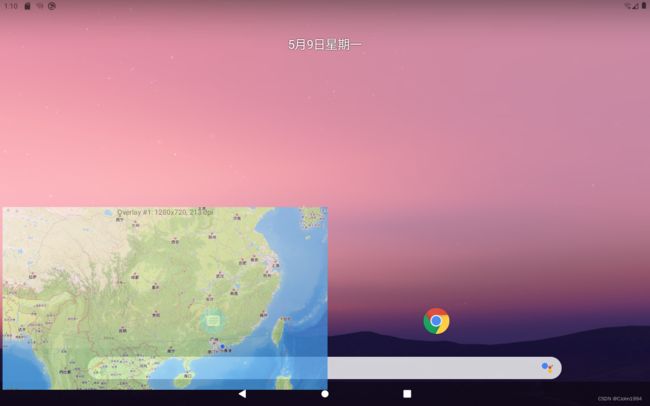
可通过SurfaceView渲染地图资源,显示效果如下:

可显示的内容多样,根据需求显示内容。Presentation继承Dialog,属于特殊的Dialog,它的目的是显示内容到第二屏幕。
Presentation依附在主屏的Activity上,所以Activity被销毁Presentation也不会再显示,主副屏内容会再次恢复成相同的页面。当然也可以依附在Service上,就不会出现Activity销毁后Presentation也销毁的问题。
可应用车载智能座舱多屏交互或者平板与手机设备的背屏显示,依赖系统驱动和芯片实现界面的渲染。
基本原理
DisplayManagerService 启动后从SurfaceFlinger当中获取到系统的Display信息,根据Display得到对应的Context,依附应用程序组件中,通过DisplayContext并获得对应配置Surface,对应于SurfaceFlinger中的Layer。再得到Display对应的WindowManager,通过addWindow函数,WMS首先找到窗口所在的Display,创建WindowState,然后将窗口加到Display中的WindowLst当中。SurfaceFlinger需要利用HWC输出到具体的Display设备中。
Hardware Composer HAL (HWC) 是 SurfaceFlinger 用来将 Surface 合成到屏幕。
SurfaceFlinger是一个系统服务,其作用是接受来自多个源的Buffer数据,对它们进行合成,然后发送到显示设备进行显示。