通义千问本地部署

Hugging Face | ModelScope | Paper | ️ Demo
WeChat (微信) | DingTalk (钉钉) | Discord
目录
一、介绍(Introduction)
1.1 要求(Requirements)
1.2 依赖项(Dependency)
1.3 快速使用(Quickstart)
二、本地部署
2.1 安装需求package
2.2 量化
效果评测
推理速度
显存使用
2.3 页面实现
Web UI
交互式Demo
三、调用Qwen数据增强
安装modelscope
数据增强
一、介绍(Introduction)
**通义千问-14B(Qwen-14B)**是阿里云研发的通义千问大模型系列的140亿参数规模的模型。Qwen-14B是基于Transformer的大语言模型, 在超大规模的预训练数据上进行训练得到。预训练数据类型多样,覆盖广泛,包括大量网络文本、专业书籍、代码等。同时,在Qwen-14B的基础上,我们使用对齐机制打造了基于大语言模型的AI助手Qwen-14B-Chat。本仓库为Qwen-14B-Chat的Int4量化模型的仓库。
如果您想了解更多关于通义千问-14B开源模型的细节,我们建议您参阅Github代码库。
Qwen-14B is the 14B-parameter version of the large language model series, Qwen (abbr. Tongyi Qianwen), proposed by Alibaba Cloud. Qwen-14B is a Transformer-based large language model, which is pretrained on a large volume of data, including web texts, books, codes, etc. Additionally, based on the pretrained Qwen-14B, we release Qwen-14B-Chat, a large-model-based AI assistant, which is trained with alignment techniques. This repository is the one for the Int4 quantized model of Qwen-14B-Chat.
For more details about the open-source model of Qwen-14B, please refer to the Github code repository.
1.1 要求(Requirements)
- python 3.8及以上版本
- pytorch 2.0及以上版本,推荐2.0及以上版本
- 建议使用CUDA 11.4及以上(GPU用户、flash-attention用户等需考虑此选项)
- python 3.8 and above
- pytorch 2.0 and above, 2.0 and above are recommended
- CUDA 11.4 and above are recommended (this is for GPU users, flash-attention users, etc.)
1.2 依赖项(Dependency)
运行Qwen-14B-Chat-Int4,请确保满足上述要求,再执行以下pip命令安装依赖库。如安装auto-gptq遇到问题,我们建议您到官方repo搜索合适的预编译wheel。
另外,推荐安装flash-attention库,以实现更高的效率和更低的显存占用。
pip install modelscope >= 1.9.0 pip install auto-gptq optimumgit clone -b v1.0.8 https://github.com/Dao-AILab/flash-attention
cd flash-attention && pip install .
# 下方安装可选,安装可能比较缓慢。
# Below are optional. Installing them might be slow. # pip install csrc/layer_norm # pip install csrc/rotary安装遇到报错解决方法:
第一种是torch版本不一致,报错如下:
RuntimeError:
The detected CUDA version (12.2) mismatches the version that was used to compile
PyTorch (11.7). Please make sure to use the same CUDA versions.
解决办法是卸载当前torch和torchvision,并安装配套的版本:
pip uninstall torch torchvisionpip3 install torch torchvision torchaudio --index-url https://download.pytorch.org/whl/cu121然后安装 vs_BuildTools
下载地址:
链接:https://pan.baidu.com/s/19pLhq9kOmAxG-Gok8tzlZA?pwd=lf85
提取码:lf85
1.3 快速使用(Quickstart)
下面我们展示了一个使用Qwen-14B-Chat-Int4模型的样例:
We show an example of how to use Qwen-14B-Chat-Int4 in the following code:
from modelscope import AutoTokenizer, AutoModelForCausalLM, snapshot_download
model_dir = snapshot_download("qwen/Qwen-14B-Chat-Int4",revision = 'v1.0.0')
# Note: The default behavior now has injection attack prevention off.
tokenizer = AutoTokenizer.from_pretrained(model_dir, trust_remote_code=True)
model = AutoModelForCausalLM.from_pretrained(
model_dir,
device_map="auto",
trust_remote_code=True ).eval()
response, history = model.chat(tokenizer, "你好", history=None)
print(response)
# 你好!很高兴为你提供帮助。
关于更多的使用说明,请参考我们的Github repo获取更多信息。
For more information, please refer to our Github repo for more information.
二、本地部署
2.1 安装需求package
在开始前,请确保你已经配置好环境并安装好相关的代码包。最重要的是,确保你满足上述要求,然后安装相关的依赖库。
pip install -r requirements.txt如果你的显卡支持fp16或bf16精度,我们还推荐安装flash-attention来提高你的运行效率以及降低显存占用。(flash-attention只是可选项,不安装也可正常运行该项目)
git clone -b v1.0.8 https://github.com/Dao-AILab/flash-attention
cd flash-attention && pip install .
# 下方安装可选,安装可能比较缓慢。
# pip install csrc/layer_norm
# pip install csrc/rotary
2.2 量化
请注意:我们更新量化方案为基于AutoGPTQ的量化,提供Int4量化模型,包括Qwen-7B-Chat Click here和Qwen-14B-Chat Click here。该方案在模型评测效果几乎无损,且存储需求更低,推理速度更优。
以下我们提供示例说明如何使用Int4量化模型。在开始使用前,请先保证满足要求(如torch 2.0及以上,transformers版本为4.32.0及以上,等等),并安装所需安装包:
pip install auto-gptq optimum如安装auto-gptq遇到问题,我们建议您到官方repo搜索合适的wheel。
随后即可使用和上述一致的用法调用量化模型:
# 可选模型包括:"Qwen/Qwen-7B-Chat-Int4", "Qwen/Qwen-14B-Chat-Int4"
model = AutoModelForCausalLM.from_pretrained(
    "Qwen/Qwen-7B-Chat-Int4",
    device_map="auto",
    trust_remote_code=True
).eval()
response, history = model.chat(tokenizer, "Hi", history=None)
效果评测
我们对BF16和Int4模型在基准评测上做了测试,发现量化模型效果损失较小,结果如下所示:
| Quantization | MMLU | CEval (val) | GSM8K | Humaneval |
|---|---|---|---|---|
| Qwen-7B-Chat (BF16) | 53.9 | 54.2 | 41.1 | 24.4 |
| Qwen-7B-Chat (Int4) | 52.6 | 52.9 | 38.1 | 23.8 |
| Qwen-14B-Chat (BF16) | 64.6 | 69.8 | 61.0 | 43.9 |
| Qwen-14B-Chat (Int4) | 63.3 | 69.0 | 59.8 | 45.7 |
推理速度
我们测算了BF16和Int4模型生成2048和8192个token的平均推理速度(tokens/s)。如图所示:
| Quantization | Speed (2048 tokens) | Speed (8192 tokens) |
|---|---|---|
| Qwen-7B-Chat (BF16) | 30.34 | 29.32 |
| Qwen-7B-Chat (Int4) | 43.56 | 33.92 |
| Qwen-14B-Chat (BF16) | 30.70 | 21.73 |
| Qwen-14B-Chat (Int4) | 37.11 | 26.11 |
具体而言,我们记录在长度为1的上下文的条件下生成8192个token的性能。评测运行于单张A100-SXM4-80G GPU,使用PyTorch 2.0.1和CUDA 11.4。推理速度是生成8192个token的速度均值。
显存使用
我们还测算了BF16和Int4模型编码2048个token及生成8192个token的峰值显存占用情况。结果如下所示:
| Quantization | Peak Usage for Encoding 2048 Tokens | Peak Usage for Generating 8192 Tokens |
|---|---|---|
| Qwen-7B-Chat (BF16) | 17.66GB | 22.58GB |
| Qwen-7B-Chat (Int4) | 8.21GB | 13.62GB |
| Qwen-14B-Chat (BF16) | 30.15GB | 38.94GB |
| Qwen-14B-Chat (Int4) | 13.00GB | 21.79GB |
上述性能测算使用此脚本完成。
2.3 页面实现
Web UI
我们提供了Web UI的demo供用户使用 (感谢 @wysaid 支持)。在开始前,确保已经安装如下代码库:
pip install -r requirements_web_demo.txt随后运行如下命令,并点击生成链接:
python web_demo.py注意 !
我的环境安装后的gradio版本为3.40.23,页面无法正常展示(内容显示不全),于是我卸载重装3.40.1,可以正常显示了。
pip uninstall gradio
pip install gradio==3.40.1
页面展示效果如下:

交互式Demo
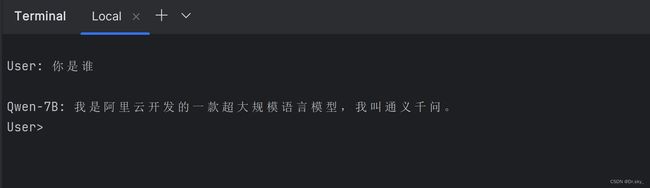
我们提供了一个简单的交互式Demo示例,请查看cli_demo.py。当前模型已经支持流式输出,用户可通过输入文字的方式和Qwen-7B-Chat交互,模型将流式输出返回结果。运行如下命令:
python cli_demo.py实现效果如下:
三、调用Qwen数据增强
通过调用Qwen实现数据增强,提示模型的鲁棒性和效果。
3.1 安装modelscope
pip install modelscope3.2 数据增强
import pandas as pd
from modelscope import AutoModelForCausalLM, AutoTokenizer
from modelscope import GenerationConfig

# 可选的模型包括: "qwen/Qwen-7B-Chat", "qwen/Qwen-14B-Chat"
tokenizer = AutoTokenizer.from_pretrained("E:\Qwen-14B-Chat-Int4", revision='v1.0.5', device_map="cuda", trust_remote_code=True)
model = AutoModelForCausalLM.from_pretrained("E:\Qwen-14B-Chat-Int4", revision='v1.0.5', device_map="cuda", trust_remote_code=True, fp16=True).eval()
model.generation_config = GenerationConfig.from_pretrained("E:\Qwen-14B-Chat-Int4", revision='v1.0.5', device_map="cuda", trust_remote_code=True) # 可指定不同的生成长度、top_p等相关超参

# 读取 TSV 文件
df = pd.read_csv("E:/glue_data/glue_data/SST-2/train_test.tsv", sep="\t")

response, history = model.chat(tokenizer, "你好", history=None)
print(response)
response, history1 = model.chat(tokenizer, "请你帮我给出下面英文句子的同义句,请给出最佳的一个句子,保证至少30%的单词不重复", history=history)
print(response)
print(history1)
# 初始化新的数据框
df_with_synonyms = pd.DataFrame(columns=df.columns)
# 生成同义句并插入到新数据框
for _, row in df.iterrows():
    print(row.iloc[0],row.iloc[1])
    response, history = model.chat(tokenizer, row.iloc[0], history=history1)
    print(response)