SpringBoot3.x原生镜像-Native Image尝鲜
前提
Spring团队致力于为Spring应用程序提供原生映像支持已经有一段时间了。在SpringBoo2.x的Spring Native实验项目中酝酿了3年多之后,随着Spring Framework 6和Spring Boot 3的发布,对应的项目就是Spring Native,原生镜像支持将会发布GA版本(换言之就是,Native Image相关支持会在Spring Boot 3的GA版本中一起发布)。
❝前面这一段简介摘抄自参考资料中的《Native Support in Spring Boot 3.0.0-M5》
❞
笔者在写这篇文章(2022-10-28)前后SpringBoot尚未发布3.x GA,版本3.0.0-M5+算是GA前相对稳定的版本,这里选用当前3.x的最新非GA版本3.0.0-RC1进行调研。
 spring-boot-native-image-1
什么是Native Image
Native Image,这里直译为原生镜像或者本地镜像,是一种提前将(Java)代码编译为二进制文件(原生可执行文件,native executable)的技术。原生可执行文件只包含运行时所需要的代码,即应用程序类、标准库类、语言运行时和来自JDK的静态链接的原生代码(也就是**这样的二进制文件可以直接运行,不需要额外安装JDK**)。由原生镜像生成的可执行文件有几个重要的优点:
使用
Java虚拟机所需资源的一小部分,因此运行成本更低启动时间大幅度下降,以毫秒为单位
不需要进行预热即可提供最佳性能
可以打包到轻量级容器映像中以便快速有效地部署
减少了攻击面(这个和网络安全相关)
Spring Boot 3中「使用GraalVM方案提供Native Image支持」。
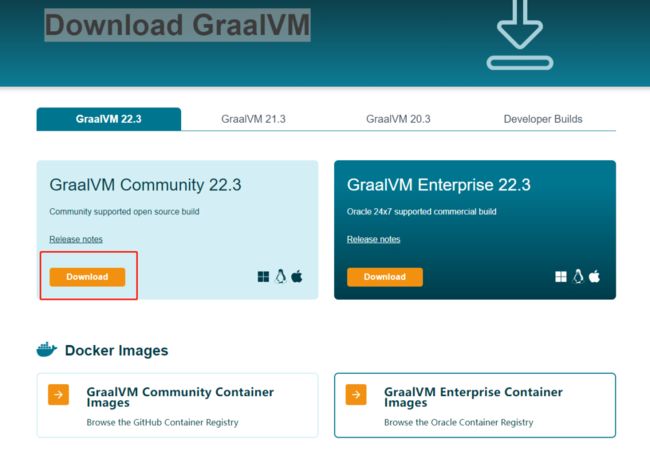
安装GraalVM
在https://www.graalvm.org/downloads - Download GraalVM页面中下载对应操作系统的GraalVM:
 spring-boot-native-image-2
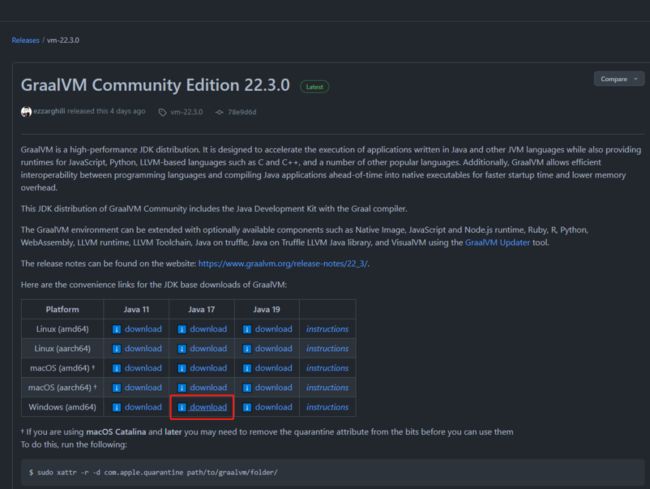
笔者开发环境使用的操作系统是Windows10,下载和选用下图中的安装包:
 spring-boot-native-image-3
解压完成后配置一下JAVA_HOME、GRAALVM_HOME并且把GRAALVM_HOME\bin添加到PATH中。完成后可以执行一下java -version进行验证:
 spring-boot-native-image-4
❝如果已经安装了其他版本的JDK,先暂时全局替换为GraalVM,也就是JAVA_HOME、GRAALVM_HOME同时配置为GraalVM的解压目录,因为目前看来这样做才能正常打包原生镜像
❞
确定GraalVM版本无误,到此安装完成。另外,需要配置好了Maven,建议重新安装一个3.6.x+版本的Maven并且把MAVEN_HOME\bin添加到PATH中。
编写应用程序
新建一个命名为spring-boot-native-image的Maven项目或者模块,选用刚才下载好的GraalVM:
 spring-boot-native-image-5
项目的POM文件引入下面几组依赖:
spring的快照repository,因为需要下载RC1版本依赖,暂时不能从中央仓库拉取spring-boot-starter-parent,定义版本为RC1native-maven-plugin插件,用于原生镜像打包spring-boot-starter-web,用于构建一个简单的web项目
    org.springframework.boot
    spring-boot-starter-parent
    3.0.0-RC1


        spring-snapshots
        https://repo.spring.io/snapshot

            true


        spring-milestones
        https://repo.spring.io/milestone


        spring-snapshots
        https://repo.spring.io/snapshot


        spring-milestones
        https://repo.spring.io/milestone


        org.springframework.boot
        spring-boot-starter-web


        org.graalvm.buildtools
        native-maven-plugin
        0.9.16
        true


                build-native

                    compile-no-fork

                package


                test-native

                    test

                test


            cn.vlts.NativeApplication
            native-app

                --verbose
最终的POM文件看起来如下:
 spring-boot-native-image-6
项目中只有一个启动类cn.vlts.NativeApplication,编写了main方法和一个用于集成测试的控制器方法:
@RestController
@SpringBootApplication
public class NativeApplication {

    public static void main(String[] args) {
        SpringApplication.run(NativeApplication.class, args);
    }

    @GetMapping(path = "/hello")
    public ResponseEntity hello() {
        return ResponseEntity.ok("world");
    }
}
打包和调试
完成项目配置和代码编写后,执行下面的Maven命令进行打包:
mvn package -Pnative打包过程可能会遇到下面的问题:
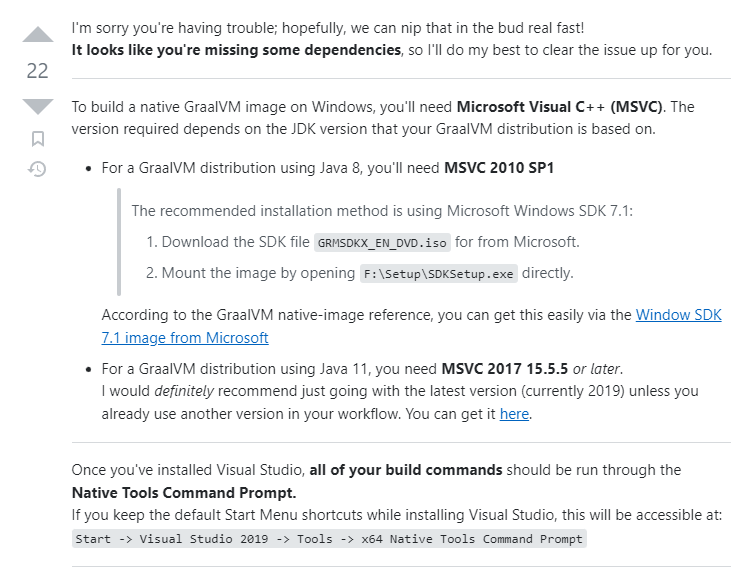
最有可能的问题:
Default native-compiler executable 'cl.exe' not found via environment variable PATH
解决方案在Stackoverflow对应的问题回答中找到:
 spring-boot-native-image-7
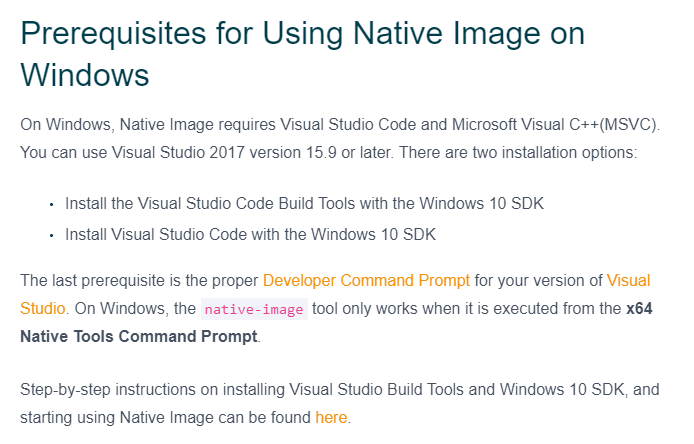
其实就是在Window操作系统开发环境下基于GraalVM构建原生镜像依赖Microsoft Visual C++ (MSVC),建议安装MSVC 2017 15.5.5+,可以安装Visual Studio (2019)并且安装对应的MSVC。
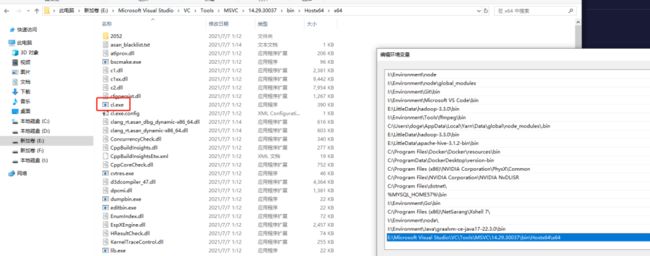
因为很早之前笔者在调试Rust时候已经安装过Visual Studio 2019用于其debug工具链,这里无须进行安装。在安装Visual Studio勾选MSVC vXXX的组件进行安装即可,然后需要把对应的MSVC工具的bin目录添加到PATH中(这个目录一般是VS_HOME\VC\Tools\MSVC\版本号\bin\Hostx64\x64):
 spring-boot-native-image-8
其次可能遇到的问题:打包过程出现
stdio.h库文件报错或者找不到主类Main entry point class 'app.jar' not found x.y.Application
其实还是因为MSVC的问题,在GraalVM文档中有提示如下:
 spring-boot-native-image-9
简单来说就是「必须在Visual Studio自带的命令行工具x64 Native Tools Command Prompt中执行native image相关命令」,这个命令行工具初始化如下:
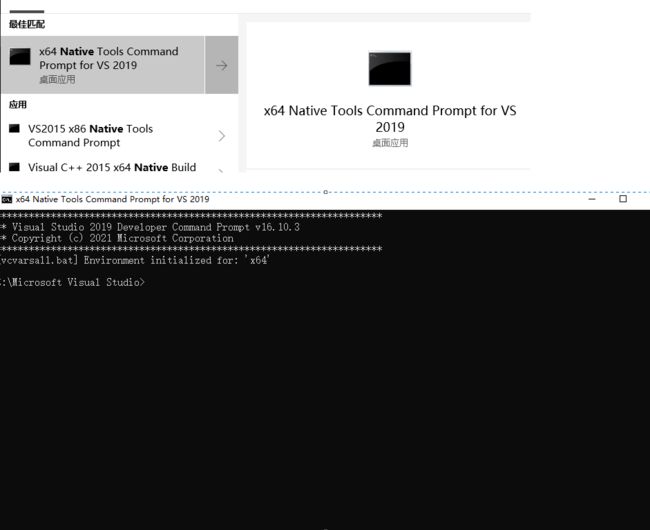 spring-boot-native-image-10
在x64 Native Tools Command Prompt中先进入目标项目根目录,然后执行mvn -Pnative package:
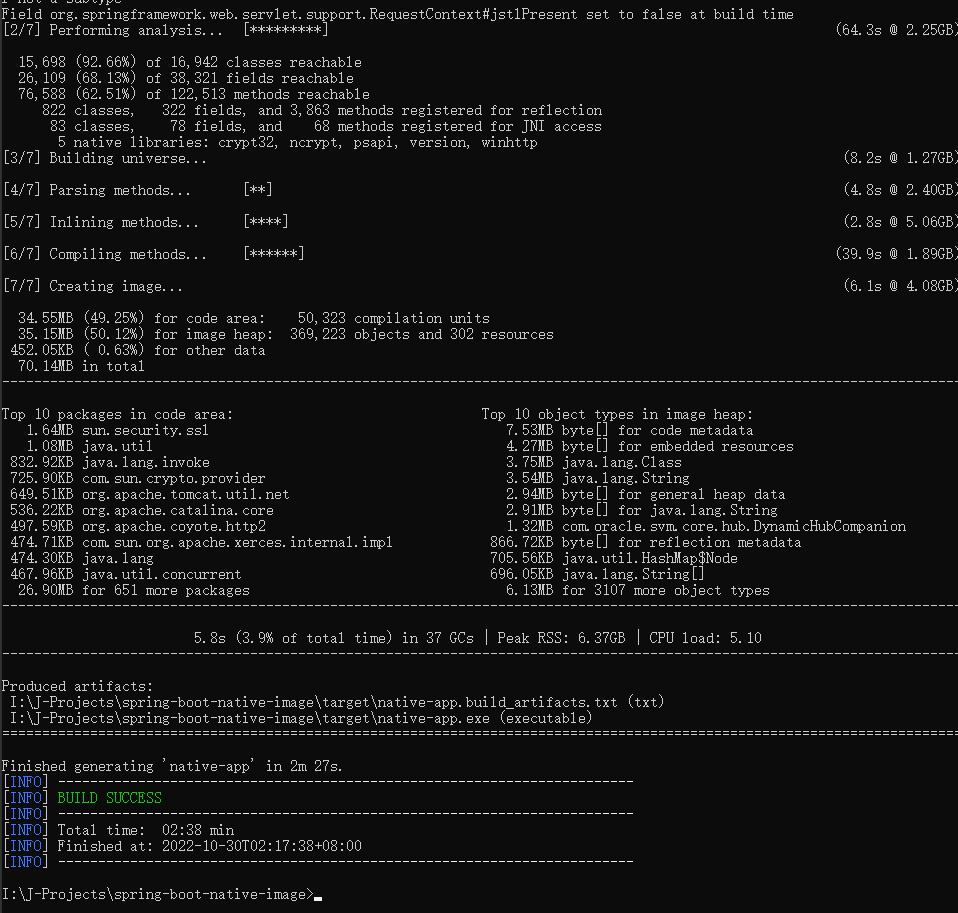 spring-boot-native-image-11
最终看到BUILD SUCCESS字眼,项目的target目录下可以看到一个.exe和一个.jar文件,而.exe文件就是前面一直提到的「可执行的二进制文件」:
 spring-boot-native-image-14
直接运行它:
 spring-boot-native-image-12
可以看到这个文件运行完全不依赖外部Java虚拟机,并且启动速度极快(600毫秒左右),可以用POSTMAN等工具测试程序接口:
 spring-boot-native-image-13
到此可以验证程序功能正常。
小结
SpringBoot3.x原生镜像正式发布后会是SpringBoot在云原生领域的一个巨大进步,让我们拭目以待。但是就目前来看,常用的Windows开发环境下想要尝试native image技术需要解决比较多的问题,Linux和Unix平台下尚未验证,希望后面的版本迭代能够降低使用难度并且支持一个命令多平台打包的功能。
参考资料:
Native Support in Spring Boot 3.0.0-M5
GraalVM - Quick Start Guide
(本文完 c-2-d e-a-20221030 封面自剃须)