前言介绍
wireshark是一个很好的网络数据包抓取和分析软件。是一个跨平台的软件。可以在windows,mac,linux多种操作系统下安装使用。本篇博文主要是介绍如何在mac操作系统下安装。
安装环境
软件版本:wireshark Stable Release (1.12.2)
操作系统:mac OS X Yosemite,版本 10.10。

<img class="alignnone" src="http://www.bo56.com/wp-content/uploads/2014/11/mac_os_10.10.png" alt="mac_os_10.10" width="467" height="254" /></a></p>
安装步骤
第一步:到官方网站下载软件包。
- 打开地址 https://www.wireshark.org/download.html
- 下载 OS X 10.6 and later Intel 64-bit .dmg
第二步:安装软件包。
1. 双击刚才下载的软件包,会打开软件安装界面。如下图:

<img class="" src="http://www.bo56.com/wp-content/uploads/2014/11/wireshark_install_1.png" alt="wireshark_install_1" width="460" height="375" /></a></p>
2. 然后双击左上角的图标,开始安装。安装过程中按提示点击按钮即可。安装过程中可能需要你输入用户密码。界面如下:
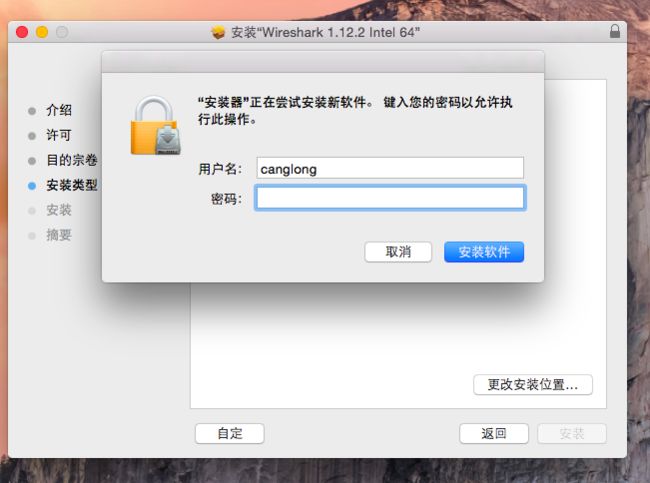
<img class="" src="http://www.bo56.com/wp-content/uploads/2014/11/wireshark_install_pwd.png" alt="wireshark_install_pwd" width="456" height="339" /></a><br /> 3. 输入密码后,就可以看到安装成功的界面。

<img class="" src="http://www.bo56.com/wp-content/uploads/2014/11/wireshark_install_ok.png" alt="wireshark_install_ok" width="458" height="323" /></a></p>
第三步:安装X11。
1. 如果机器上没有安装X11,在点击wireshark图标启动软件时,会有如下提示。
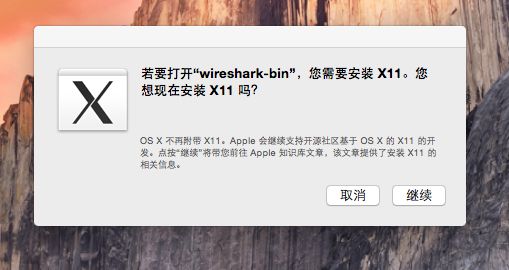
<img class="" src="http://www.bo56.com/wp-content/uploads/2014/11/wireshark_x11.png" alt="wireshark_x11" width="466" height="247" /></a></p>
2. 打开网址 http://xquartz.macosforge.org/landing/ 下载 XQuartz-2.7.7.dmg。 安装过程中会出现如下提示框,点ok按钮即可。

<img class="" src="http://www.bo56.com/wp-content/uploads/2014/11/wireshark_x11_install.png" alt="wireshark_x11_install" width="457" height="290" /></a></p>
3. 点击ok按钮后,就会出现软件安装成功的界面。

<img class="" src="http://www.bo56.com/wp-content/uploads/2014/11/wireshark_x11_install_ok.png" alt="wireshark_x11_install_ok" width="459" height="272" /></a></p>
4. 再次点击wireshark图标启动时,可能会出现如下提示框。

<img class="" src="http://www.bo56.com/wp-content/uploads/2014/11/wireshark_x11_select.png" alt="wireshark_x11_select" width="474" height="329" /></a></p>
5. 点击右下角的browse按钮,可以选择x11。点击按钮后,出现如下界面:
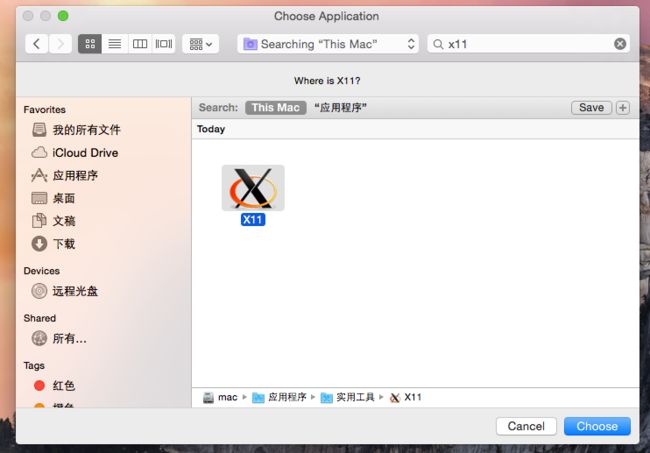
<img class="" src="http://www.bo56.com/wp-content/uploads/2014/11/wireshark_x11_choose.png" alt="wireshark_x11_choose" width="466" height="325" /></a></p>
6. 在左侧选择应用程序,在右上角的搜索框中搜索“x11”,就可以看到x11的图标了。点击图标,然后点击“choose”按钮。之后点击wireshark的图标,就可以正常打开。打开的界面如下:
