Apache RocketMQ5.x-消息队列体验
Apache RocketMQ5.x-消息队列体验
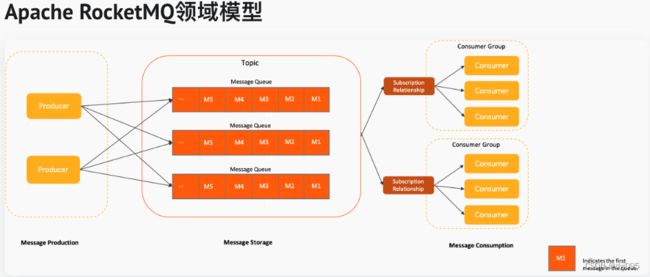
Apache RocketMQ 是一款低延迟、高并发、高可用、高可靠的分布式消息中间件,由阿里开源,后由阿里捐赠给Apache基金会。
本次体验的目的是从技术角度验证一下在微服架构中,用Apache RocketMQ做为消息队列,做为模块之间解耦,以及主要验证是否要以做为异步消息队列进行投递消息。
【Apache RocketMQ官方网站】
目录
- Apache RocketMQ5.x-消息队列体验
- 一、各组件版本说明
- 二、安装Apache RocketMQ 5.1.3
-
- 1、下载Apache RocketMQ 5.1.3
- 2、解压后修改配置
- 3、启动NameServer
- 3、启动Broker+Proxy
- 三、安装RocketMQ Dashboard
-
- 1、下载 RocketMQ Dashboard 源码
- 2、修改rocketmq的namesrv地址
- 3、编译RocketMQ Dashboard 源码
- 4、运行RocketMQ Dashboard
- 4、通过浏览器访问RocketMQ Dashboard
- 四、创建Demo工程,编写代码
-
- 1、新建rocketmqDemo工程
- 2、编辑pom.xml和application.properties
- 3、编写消息生产者服务类
- 4、编写消息消费者服务类
- 5、编写消息生产者Controller接口类
- 6、启动类
- 五、运行代码
-
- 1、创建topic
- 2、启动程序
- 3、访问消息生产接口
- 4、确认发送消息的数量
- 5、确认tag=consumer1的消费者收到的消息数量
- 5、确认tag=consumer2的消费者收到的消息数量
- 六、验证向consumer1和consumer2发送了 1000条消息
-
- 1、Producer发送消息数量截图
- 2、consumer1收到消息数量截图
- 3、consumer2收到消息数量截图
- 4、RocketMQ监控截图
- 七、一个订阅关系下有多个节点时的负载
-
- 1、Producer发送消息数量截图
- 2、consumer1收到消息数量截图
- 3、consumer1收到消息数量截图
- 八、停止RocketMQ服务
-
- 1、显示所有java进程
- 2、停止RocketMQ Dashboard
- 3、停止RocketMQ NameSrv
- 4、停止RocketMQ Proxy
一、各组件版本说明
| 序号 | 技术框架 | 说明 |
|---|---|---|
| 1 | Spring boot | Spring boot 2.7.13 |
| 2 | Apache RocketMQ | 5.1.3 |
| 3 | rocketmq-clients-java | 5.0.5 |
| 4 | RocketMQ Dashboard | 需要下载源码自行编译 |
二、安装Apache RocketMQ 5.1.3
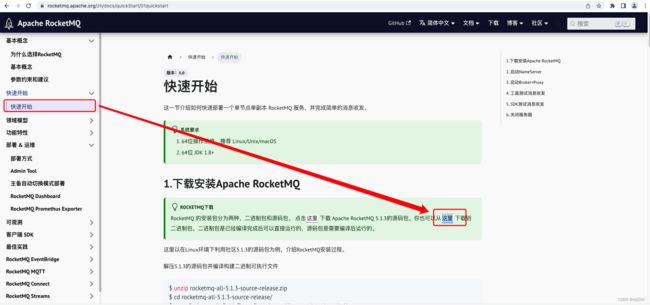
1、下载Apache RocketMQ 5.1.3
我们直接下载二进制版本,【当前版本下载地址】,最新版本需要去官方网站根据文档中说明的链接进行下载
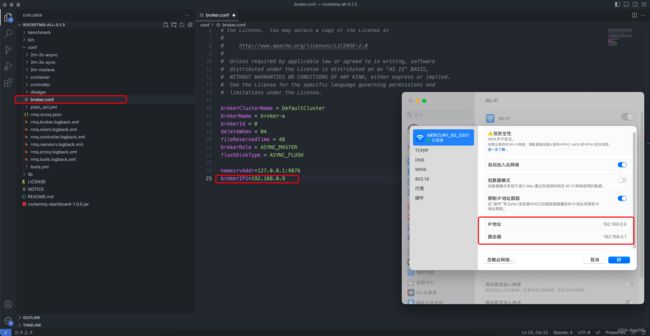
2、解压后修改配置
将rocketmq-all-5.1.3-bin-release.zip下载并解压到了我本地/Users/duyanjun/Downloads/rocketmq-all-5.1.3,我本机是macos,windows或Linux系统上的操作也是一样的
1)、修改broker配置
cd /Users/duyanjun/Downloads/rocketmq-all-5.1.3
## 编辑broker配置配置文件
vim conf/broker.conf
2)、修改rmq-proxy端口
默认rmq-proxy的监听端口是8080,如果端口有冲突的话可以通过conf/rmq-proxy.json配置文件中的参数,这里我们改为了9080
vim conf/rmq-proxy.json
rmq-proxy.json配置文件
{
  "rocketMQClusterName": "DefaultCluster",
  "remotingListenPort": 9080
}
3、启动NameServer
### 启动namesrv
nohup sh bin/mqnamesrv &

### 验证namesrv是否启动成功
tail -f ~/logs/rocketmqlogs/namesrv.log
3、启动Broker+Proxy
### 先启动broker
nohup sh bin/mqbroker -n 192.168.0.9:9876 --enable-proxy &

### 验证broker是否启动成功, 比如, broker的ip是192.168.0.9 然后名字是broker-a
tail -f ~/logs/rocketmqlogs/proxy.log
三、安装RocketMQ Dashboard
RocketMQ Dashboard 是 RocketMQ 的管控利器,为用户提供客户端和应用程序的各种事件、性能的统计信息,支持以可视化工具代替 Topic 配置、Broker 管理等命令行操作。
1、下载 RocketMQ Dashboard 源码
源码地址:apache/rocketmq-dashboard
下载并解压到本地目录
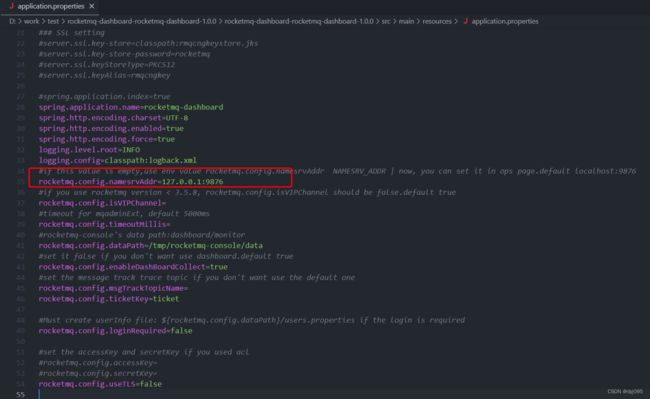
2、修改rocketmq的namesrv地址
说明:
- 修改application.properties配置文件中的rocketmq.config.namesrvAddr为RocketMQ nameSrv服务所在服务器的ip和端口。
- 由于rocketmq-dashboard-rocketmq-dashboard我准备就在RocketMQ所在的服务器上运行,所以将ip改为了127.0.0.1
cd 本地解压后的目录/rocketmq-dashboard-rocketmq-dashboard-1.0.0
vim application.properties
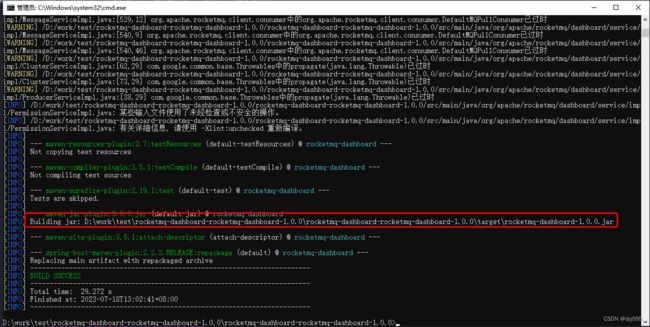
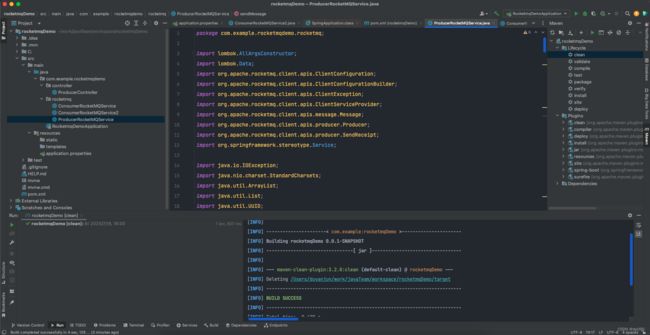
3、编译RocketMQ Dashboard 源码
mvn clean package -Dmaven.test.skip=true
说明:
编译成功后,目标文件rocketmq-dashboard-1.0.0.jar输出到了target/目录下了。
4、运行RocketMQ Dashboard
将编译好的rocketmq-dashboard-1.0.0.jar复制到RocketMQ服务器所在的目录下
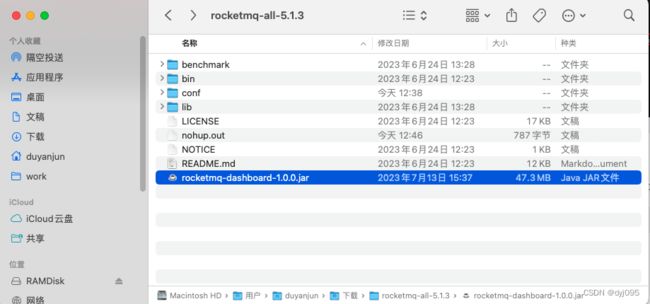
启动RocketMQ Dashboard
nohup java -jar rocketmq-dashboard-1.0.0.jar &
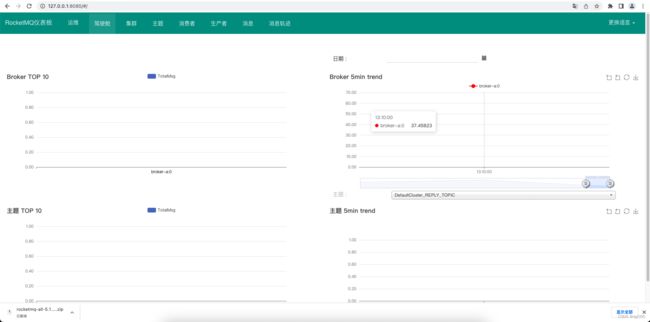
4、通过浏览器访问RocketMQ Dashboard
说明:
通过application.properties中server.port=8085得知,RocketMQ Dashboard的web服务端口是8085,所以通过浏览器输入http://ip:8085
四、创建Demo工程,编写代码
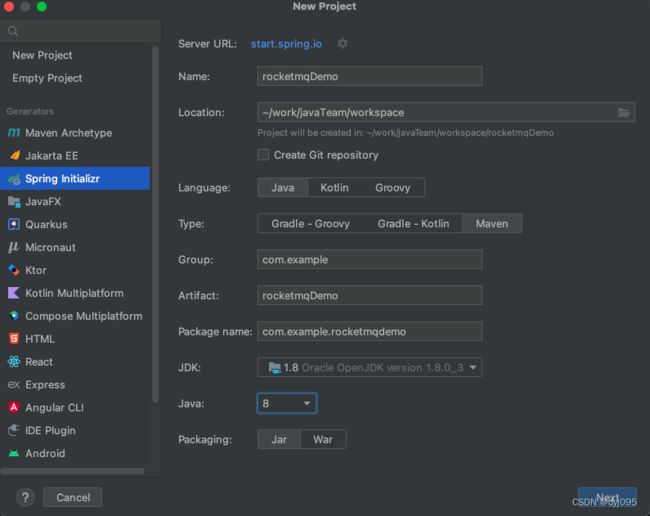
1、新建rocketmqDemo工程
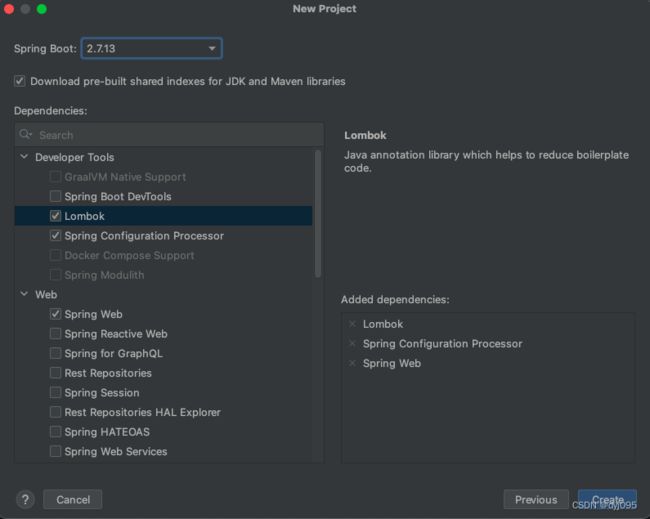
2、编辑pom.xml和application.properties
<project xmlns="http://maven.apache.org/POM/4.0.0" xmlns:xsi="http://www.w3.org/2001/XMLSchema-instance"
         xsi:schemaLocation="http://maven.apache.org/POM/4.0.0 https://maven.apache.org/xsd/maven-4.0.0.xsd">
    <modelVersion>4.0.0modelVersion>
    <parent>
        <groupId>org.springframework.bootgroupId>
        <artifactId>spring-boot-starter-parentartifactId>
        <version>2.7.13version>
        <relativePath/>
    parent>
    <groupId>com.examplegroupId>
    <artifactId>rocketmqDemoartifactId>
    <version>0.0.1-SNAPSHOTversion>
    <name>rocketmqDemoname>
    <description>rocketmqDemodescription>
    <properties>
        <java.version>1.8java.version>
        <rocketmq-client-java-version>5.0.5rocketmq-client-java-version>
    properties>
    <dependencies>
        <dependency>
            <groupId>org.springframework.bootgroupId>
            <artifactId>spring-boot-starter-webartifactId>
        dependency>
        <dependency>
            <groupId>org.springframework.bootgroupId>
            <artifactId>spring-boot-configuration-processorartifactId>
            <optional>trueoptional>
        dependency>
        <dependency>
            <groupId>org.projectlombokgroupId>
            <artifactId>lombokartifactId>
            <optional>trueoptional>
        dependency>
        <dependency>
            <groupId>org.apache.rocketmqgroupId>
            <artifactId>rocketmq-client-javaartifactId>
            <version>${rocketmq-client-java-version}version>
        dependency>

    dependencies>

    <build>
        <plugins>
            <plugin>
                <groupId>org.springframework.bootgroupId>
                <artifactId>spring-boot-maven-pluginartifactId>
                <configuration>
                    <excludes>
                        <exclude>
                            <groupId>org.projectlombokgroupId>
                            <artifactId>lombokartifactId>
                        exclude>
                    excludes>
                configuration>
            plugin>
        plugins>
    build>
project>
application.properties
server.port=9090
# 应用名
spring.application.name=rocketmq-demo
3、编写消息生产者服务类
ProducerRocketMQService.java
package com.example.rocketmqdemo.rocketmq;

import lombok.AllArgsConstructor;
import lombok.Data;
import org.apache.rocketmq.client.apis.ClientConfiguration;
import org.apache.rocketmq.client.apis.ClientConfigurationBuilder;
import org.apache.rocketmq.client.apis.ClientException;
import org.apache.rocketmq.client.apis.ClientServiceProvider;
import org.apache.rocketmq.client.apis.message.Message;
import org.apache.rocketmq.client.apis.producer.Producer;
import org.apache.rocketmq.client.apis.producer.SendReceipt;
import org.springframework.stereotype.Service;

import java.io.IOException;
import java.nio.charset.StandardCharsets;
import java.util.ArrayList;
import java.util.List;
import java.util.UUID;
import java.util.concurrent.*;
import java.util.logging.Level;
import java.util.logging.Logger;

@Service
public class ProducerRocketMQService {
    // 日志对象
    private final Logger logger = Logger.getLogger(ProducerRocketMQService.class.getName());

    private final ExecutorService sendCallbackExecutor = Executors.newCachedThreadPool();

    private static final Object lock = new Object();

    private String endpoint;

    private String topic;

    private boolean isRunning;

    private final ConcurrentLinkedQueue<SendMessage> sendMessageQueue = new ConcurrentLinkedQueue<>();

    private Thread producerThread = null;


    /**
     * 初始化RocketMQ消息生产者
     *
     * @param endpoint
     *          接入点地址,需要设置成Proxy的地址和端口列表,一般是xxx:8081;xxx:8081。
     * @param topic
     *          订阅主题
     */
    public void startInitProducer(String endpoint, String topic) {
        this.endpoint = endpoint;
        this.topic = topic;
        if (producerThread == null) {
            producerThread = new Thread(new ProducerSendMsgTask());
        }
        if (!producerThread.isAlive()) {
            isRunning = true;
            producerThread.start();
        }
    }

    /**
     * 停止订阅
     */
    public void stopProducer() {
        isRunning = false;
        if (producerThread != null && producerThread.isInterrupted()) {
            producerThread.interrupt();
            producerThread = null;
        }
    }

    public void sendMessage(String tag, String message) {
        SendMessage sendMessage = new SendMessage(tag, message);
        sendMessageQueue.offer(sendMessage);
        synchronized (lock) {
            lock.notifyAll();
        }
    }

    /**
     * 生产者发送消息任务类
     */
    private class ProducerSendMsgTask implements Runnable {
        @Override
        public void run() {
            while (isRunning) {
                try {
                    if (sendMessageQueue.isEmpty()) {
                        synchronized (lock) {
                            lock.wait();
                        }
                    } else {
                        sendMsg();
                    }
                } catch (Exception ignored) {

                }
            }
        }

        private void sendMsg() {
            List<SendMessage> sendMessageList = new ArrayList<>();
            SendMessage sendMessage = null;
            while ((sendMessage = sendMessageQueue.poll()) != null) {
                sendMessageList.add(sendMessage);
            }

            ClientServiceProvider provider = ClientServiceProvider.loadService();
            ClientConfigurationBuilder builder = ClientConfiguration.newBuilder().setEndpoints(endpoint);
            ClientConfiguration configuration = builder.build();
            try {
                // 初始化Producer时需要设置通信配置以及预绑定的Topic。
                Producer producer = provider.newProducerBuilder()
                        .setTopics(topic)
                        .setClientConfiguration(configuration)
                        .build();

                for (SendMessage msg : sendMessageList) {
                    String msgKey = UUID.randomUUID().toString();
                    // 普通消息发送。
                    Message message = provider.newMessageBuilder()
                            .setTopic(topic)
                            // 设置消息索引键,可根据关键字精确查找某条消息。
                            .setKeys(msgKey)
                            // 设置消息Tag,用于消费端根据指定Tag过滤消息。
                            .setTag(msg.getTag())
                            // 消息体。
                            .setBody(msg.getMessage().getBytes(StandardCharsets.UTF_8))
                            .build();
                    // 发送消息,需要关注发送结果,并捕获失败等异常。
                    SendReceipt sendReceipt = producer.send(message);
                    logger.info("Send message successfully, messageId=" + sendReceipt.getMessageId());
                }
                if (producer != null) {
                    try {
                        // Close the producer when you don't need it anymore.
                        producer.close();
                        producer = null;
                    } catch (IOException e) {
                        logger.log(Level.WARNING, "", e);
                    }
                }
            } catch (ClientException e) {
                logger.log(Level.WARNING, "Failed to send message", e);
            }
            sendMessageList.clear();
            sendMessageList = null;
        }
    }

    /**
     * 需要发送的消息实体类
     */
    @Data
    @AllArgsConstructor
    private class SendMessage {
        private String tag;

        private String message;
    }

}
4、编写消息消费者服务类
ConsumerRocketMQService.java
package com.example.rocketmqdemo.rocketmq;

import lombok.NoArgsConstructor;
import org.apache.rocketmq.client.apis.*;
import org.apache.rocketmq.client.apis.consumer.FilterExpression;
import org.apache.rocketmq.client.apis.consumer.FilterExpressionType;
import org.apache.rocketmq.client.apis.consumer.SimpleConsumer;
import org.apache.rocketmq.client.apis.message.MessageId;
import org.apache.rocketmq.client.apis.message.MessageView;
import org.springframework.stereotype.Service;

import java.io.IOException;
import java.nio.charset.StandardCharsets;
import java.time.Duration;
import java.util.Collections;
import java.util.List;
import java.util.logging.Level;
import java.util.logging.Logger;

@Service
@NoArgsConstructor
public class ConsumerRocketMQService {
    private final Logger log = Logger.getLogger(ConsumerRocketMQService.class.getName());

    private static Thread subscribeRocketMQThread;

    private static boolean isRunning = false;

    private SimpleConsumer consumer;

    /**
     * 开始订阅消息
     *
     * @param endpoints
     *          接入点地址,需要设置成Proxy的地址和端口列表,一般是xxx:8081;xxx:8081。
     * @param topic
     *          订阅消息主题
     * @param tag
     *          消息Tag,用于消费端根据指定Tag过滤消息
     * @param consumerGroup
     *          消费端分组
     */
    public void startSubscribeRocketMQ(String endpoints, String topic, String tag,String consumerGroup) {
        if (subscribeRocketMQThread == null) {
            final ClientServiceProvider provider = ClientServiceProvider.loadService();

            // Credential provider is optional for client configuration.
            /*
            String accessKey = "yourAccessKey";
            String secretKey = "yourSecretKey";
            SessionCredentialsProvider sessionCredentialsProvider =
                    new StaticSessionCredentialsProvider(accessKey, secretKey);
             */
            ClientConfiguration clientConfiguration = ClientConfiguration.newBuilder()
                    .setEndpoints(endpoints)
                    //.setCredentialProvider(sessionCredentialsProvider)
                    .build();
            Duration awaitDuration = Duration.ofSeconds(30);
            FilterExpression filterExpression = new FilterExpression(tag, FilterExpressionType.TAG);
            try {
                consumer = provider.newSimpleConsumerBuilder()
                        .setClientConfiguration(clientConfiguration)
                        // Set the consumer group name.
                        .setConsumerGroup(consumerGroup)
                        // set await duration for long-polling.
                        .setAwaitDuration(awaitDuration)
                        // Set the subscription for the consumer.
                        .setSubscriptionExpressions(Collections.singletonMap(topic, filterExpression))
                        .build();
            } catch (ClientException e) {
                log.log(Level.WARNING, "", e);
            }
            subscribeRocketMQThread = new Thread(new SubscribeRocketMQTask());
        }
        if (!subscribeRocketMQThread.isAlive()) {
            subscribeRocketMQThread.start();
        }
    }

    /**
     * 停止订阅
     */
    public void stopSubscribeRocketMQ() {
        isRunning = false;
        if (subscribeRocketMQThread != null && subscribeRocketMQThread.isInterrupted()) {
            subscribeRocketMQThread.interrupt();
            subscribeRocketMQThread = null;
        }
    }

    private class SubscribeRocketMQTask implements Runnable {
        @Override
        public void run() {
            isRunning = true;
            try {
                // Max message num for each long polling.
                int maxMessageNum = 30;
                // Set message invisible duration after it is received.
                Duration invisibleDuration = Duration.ofSeconds(15);
                // Receive message, multi-threading is more recommended.
                while (isRunning) {
                    final List<MessageView> messages = consumer.receive(maxMessageNum, invisibleDuration);
                    log.info("RocketMQ Consumer收到 [" + messages.size() + "] 条消息");
                    for (MessageView message : messages) {
                        final MessageId messageId = message.getMessageId();
                        try {
                            consumer.ack(message);
                            System.out.println("==== Consumber收到来自RocketMQ的消息 =======");
                            System.out.println("messageID:" + message.getMessageId());
                            System.out.println("body:" + StandardCharsets.UTF_8.decode(message.getBody()).toString());
                            System.out.println("topic:" + message.getTopic());
                            System.out.println("tag:" + message.getTag());
                            log.info("Message is acknowledged successfully, messageId=" +  messageId);
                        } catch (Throwable t) {
                            log.log(Level.WARNING, "Message is failed to be acknowledged, messageId="+ messageId, t);
                        }
                    }
                }
                // Close the simple consumer when you don't need it anymore.
                consumer.close();
            } catch (ClientException | IOException e) {
                log.log(Level.WARNING, "", e);
            }
        }
    }
}
ConsumerRocketMQService2.java
package com.example.rocketmqdemo.rocketmq;

import lombok.NoArgsConstructor;
import org.apache.rocketmq.client.apis.ClientConfiguration;
import org.apache.rocketmq.client.apis.ClientException;
import org.apache.rocketmq.client.apis.ClientServiceProvider;
import org.apache.rocketmq.client.apis.consumer.FilterExpression;
import org.apache.rocketmq.client.apis.consumer.FilterExpressionType;
import org.apache.rocketmq.client.apis.consumer.SimpleConsumer;
import org.apache.rocketmq.client.apis.message.MessageId;
import org.apache.rocketmq.client.apis.message.MessageView;
import org.springframework.stereotype.Service;

import java.io.IOException;
import java.nio.charset.StandardCharsets;
import java.time.Duration;
import java.util.Collections;
import java.util.List;
import java.util.logging.Level;
import java.util.logging.Logger;

@Service
@NoArgsConstructor
public class ConsumerRocketMQService2 {
    private final Logger log = Logger.getLogger(ConsumerRocketMQService2.class.getName());

    private static Thread subscribeRocketMQThread;

    private static boolean isRunning = false;

    private SimpleConsumer consumer;

    /**
     * 开始订阅消息
     *
     * @param endpoints
     *          接入点地址,需要设置成Proxy的地址和端口列表,一般是xxx:8081;xxx:8081。
     * @param topic
     *          订阅消息主题
     * @param tag
     *          消息Tag,用于消费端根据指定Tag过滤消息
     * @param consumerGroup
     *          消费端分组
     */
    public void startSubscribeRocketMQ(String endpoints, String topic, String tag,String consumerGroup) {
        if (subscribeRocketMQThread == null) {
            final ClientServiceProvider provider = ClientServiceProvider.loadService();

            // Credential provider is optional for client configuration.
            /*
            String accessKey = "yourAccessKey";
            String secretKey = "yourSecretKey";
            SessionCredentialsProvider sessionCredentialsProvider =
                    new StaticSessionCredentialsProvider(accessKey, secretKey);
             */
            ClientConfiguration clientConfiguration = ClientConfiguration.newBuilder()
                    .setEndpoints(endpoints)
                    //.setCredentialProvider(sessionCredentialsProvider)
                    .build();
            Duration awaitDuration = Duration.ofSeconds(30);
            FilterExpression filterExpression = new FilterExpression(tag, FilterExpressionType.TAG);
            try {
                consumer = provider.newSimpleConsumerBuilder()
                        .setClientConfiguration(clientConfiguration)
                        // Set the consumer group name.
                        .setConsumerGroup(consumerGroup)
                        // set await duration for long-polling.
                        .setAwaitDuration(awaitDuration)
                        // Set the subscription for the consumer.
                        .setSubscriptionExpressions(Collections.singletonMap(topic, filterExpression))
                        .build();
            } catch (ClientException e) {
                log.log(Level.WARNING, "", e);
            }
            subscribeRocketMQThread = new Thread(new SubscribeRocketMQTask());
        }
        if (!subscribeRocketMQThread.isAlive()) {
            subscribeRocketMQThread.start();
        }
    }

    /**
     * 停止订阅
     */
    public void stopSubscribeRocketMQ() {
        isRunning = false;
        if (subscribeRocketMQThread != null && subscribeRocketMQThread.isInterrupted()) {
            subscribeRocketMQThread.interrupt();
            subscribeRocketMQThread = null;
        }
    }

    private class SubscribeRocketMQTask implements Runnable {
        @Override
        public void run() {
            isRunning = true;
            try {
                // Max message num for each long polling.
                int maxMessageNum = 30;
                // Set message invisible duration after it is received.
                Duration invisibleDuration = Duration.ofSeconds(15);
                // Receive message, multi-threading is more recommended.
                while (isRunning) {
                    final List<MessageView> messages = consumer.receive(maxMessageNum, invisibleDuration);
                    log.info("RocketMQ Consumer2收到 [" + messages.size() + "] 条消息");
                    for (MessageView message : messages) {
                        final MessageId messageId = message.getMessageId();
                        try {
                            consumer.ack(message);
                            System.out.println("==== Consumber2收到来自RocketMQ的消息 =======");
                            System.out.println("messageID:" + message.getMessageId());
                            System.out.println("body:" + StandardCharsets.UTF_8.decode(message.getBody()).toString());
                            System.out.println("topic:" + message.getTopic());
                            System.out.println("tag:" + message.getTag());
                            log.info("Message is acknowledged successfully, messageId=" +  messageId);
                        } catch (Throwable t) {
                            log.log(Level.WARNING, "Message is failed to be acknowledged, messageId="+ messageId, t);
                        }
                    }
                }
                // Close the simple consumer when you don't need it anymore.
                consumer.close();
            } catch (ClientException | IOException e) {
                log.log(Level.WARNING, "", e);
            }
        }
    }
}
说明:
ConsumerRocketMQService类和ConsumerRocketMQService2类基本上是一样的,这样做只是为了模拟两个消费者才这样做的。
5、编写消息生产者Controller接口类
ProducerController.java,对应的接口是http://ip:9090/t1/1?num=100
package com.example.rocketmqdemo.controller;

import com.example.rocketmqdemo.rocketmq.ProducerRocketMQService;
import org.springframework.beans.factory.annotation.Autowired;
import org.springframework.stereotype.Controller;
import org.springframework.web.bind.annotation.*;

@Controller
@RequestMapping("/t1")
public class ProducerController {

    @Autowired
    private ProducerRocketMQService producerRocketMQService;

    @RequestMapping("/1")
    @ResponseBody
    public String asyncHello(@RequestParam("num") int num){
        try {
            System.out.println("========== 消息生产者开始发送消息=============");
            for (int i = 0; i < num; i++) {
                producerRocketMQService.sendMessage("consumer1", "消息-to-consumer1:" + "hello" + ( i +1 ) );
                producerRocketMQService.sendMessage("consumer2", "消息-to-consumer2:" + "hello" + ( i  +1));
            }
        } catch (Exception e) {
            e.printStackTrace();
        }
        return "ok";
    }
}
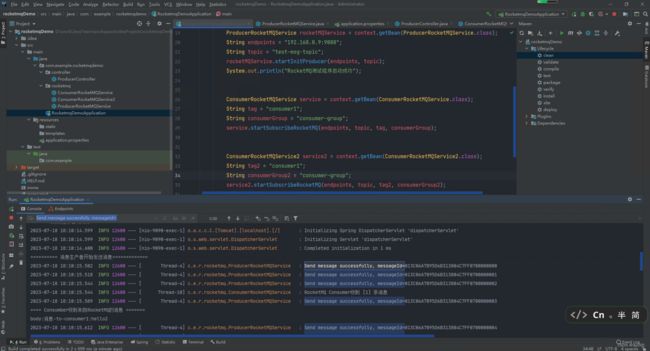
6、启动类
RocketmqDemoApplication.java
package com.example.rocketmqdemo;
import com.example.rocketmqdemo.rocketmq.ConsumerRocketMQService;
import com.example.rocketmqdemo.rocketmq.ConsumerRocketMQService2;
import com.example.rocketmqdemo.rocketmq.ProducerRocketMQService;
import org.springframework.boot.SpringApplication;
import org.springframework.boot.autoconfigure.SpringBootApplication;
import org.springframework.context.ConfigurableApplicationContext;
import org.springframework.context.annotation.ComponentScan;
@SpringBootApplication
@ComponentScan(basePackageClasses = ProducerRocketMQService.class)
@ComponentScan(basePackageClasses = ConsumerRocketMQService.class)
@ComponentScan(basePackageClasses = ConsumerRocketMQService2.class)
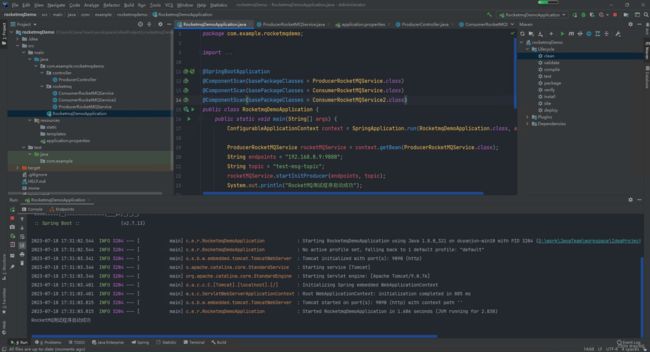
public class RocketmqDemoApplication {
public static void main(String[] args) {
ConfigurableApplicationContext context = SpringApplication.run(RocketmqDemoApplication.class, args);
ProducerRocketMQService rocketMQService = context.getBean(ProducerRocketMQService.class);
String endpoints = "192.168.0.9:9080";
String topic = "test-msg-topic";
rocketMQService.startInitProducer(endpoints, topic);
System.out.println("RocketMQ测试程序启动成功");
ConsumerRocketMQService service = context.getBean(ConsumerRocketMQService.class);
String tag = "consumer1";
String consumerGroup = "consumer-group";
service.startSubscribeRocketMQ(endpoints, topic, tag, consumerGroup);
ConsumerRocketMQService2 service2 = context.getBean(ConsumerRocketMQService2.class);
String tag2 = "consumer2";
String consumerGroup2 = "consumer-group2";
service2.startSubscribeRocketMQ(endpoints, topic, tag2, consumerGroup2);
}
}
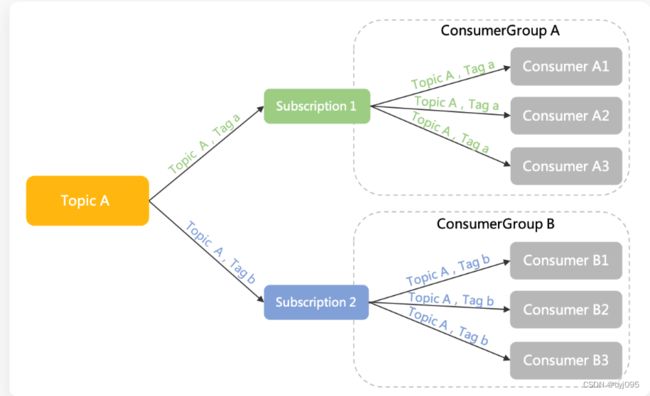
说明:
上述消息者有多个时,每个订阅关系的tag要写一个对应唯一的名称,刚开始由于我理解错误,我认为为tag只是用于过滤消息的一个标签,所以我将两个订阅关系的tag写成了一样的了(consumer分组名也写成一样了),结果每个订阅只能收到1/2的消息,后来通过查阅资料,RocketMQ将这两个consumer认为是一个分组中的两个节点了,会自动通过负载均衡,轮着为每个节点推送消息,例如消息M1推给了第一个节点,就不给其它节点推了; 下一条消息M2就推给了第二个节点…
【演示效果可以参见本文章第七节】
五、运行代码
1、创建topic
test-msg-topic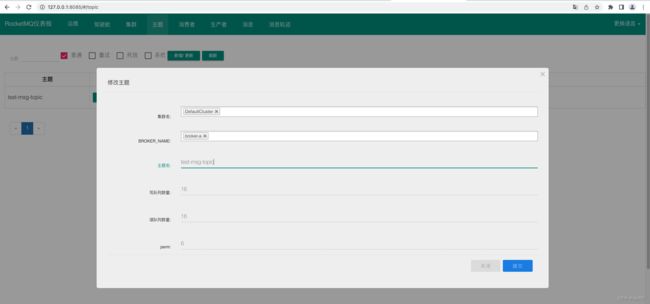
2、启动程序
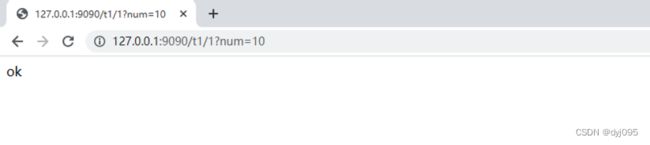
3、访问消息生产接口
说明:
- 1、在浏览器中访问请求接口:http://ip:9090/t1/1?num=10
- 2、确认发送消息的数量,各向consumer1和consumer2发送了 10条消息
- 3、确认tag=consumer1消息订阅者收到的消息的数量
- 4、确认tag=consumer2消息订阅者收到的消息的数量
- 5、正常情况下tag=consumer1消息订阅者收到的消息数量 + tag=consumer2消息订阅者收到的消息的数量 = 发送消息的数量
4、确认发送消息的数量
消息发达了20条
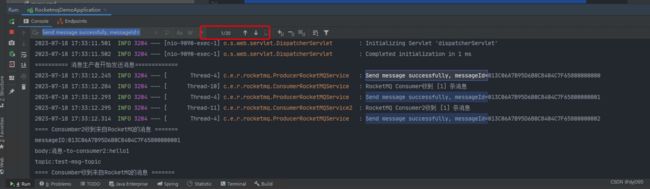
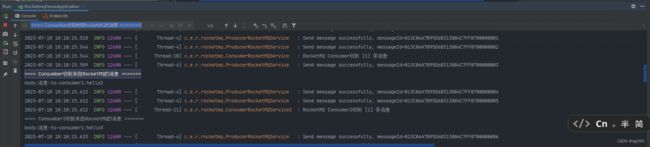
5、确认tag=consumer1的消费者收到的消息数量
通过检索日志中==== Consumber收到来自RocketMQ的消息 =======的数量是10
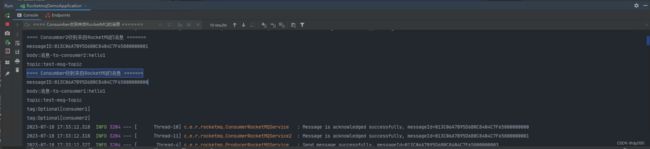
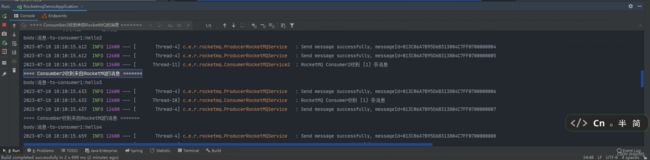
5、确认tag=consumer2的消费者收到的消息数量
通过检索日志中==== Consumber2收到来自RocketMQ的消息 =======的数量也是10
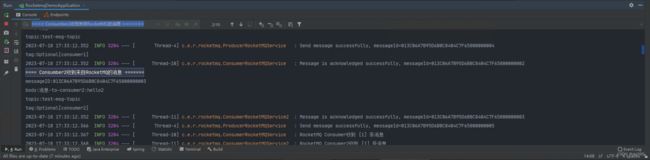
说明:
通过上述过程已验证了RocketMQ可以根据tag进行路由消息。
六、验证向consumer1和consumer2发送了 1000条消息
1、Producer发送消息数量截图
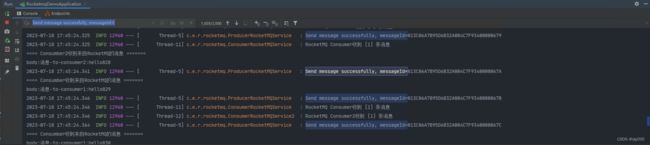
2、consumer1收到消息数量截图

3、consumer2收到消息数量截图
4、RocketMQ监控截图
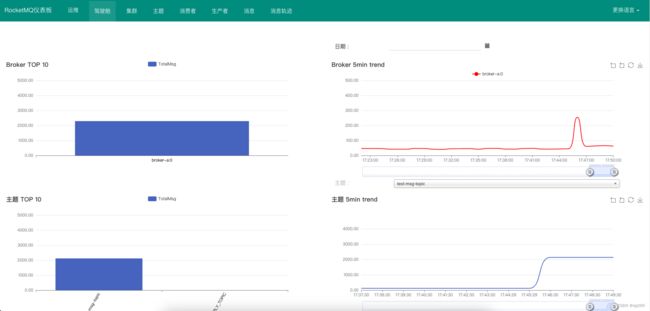
说明:
- 通过上述过程Producer向向consumer1和consumer2发送了 1000条消息,一共2000条;
- consumer1收到1000条消息;
- consumer2收到1000条消息;
- 1000条消息未出现消息丢失的情况,运行平稳;
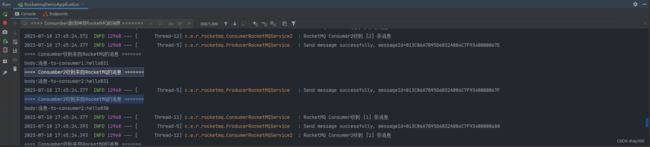
七、一个订阅关系下有多个节点时的负载
说明:
下面是多个节点订阅相同的tag和consumer组名,虽然发送了20条消息,但是我们只订阅了consumer1这个关系,而Producer为这个订阅发送了10条,所以通过负载均衡后,两个节点,每个会拉到5条消息
1、Producer发送消息数量截图
2、consumer1收到消息数量截图
3、consumer1收到消息数量截图
八、停止RocketMQ服务
1、显示所有java进程
jps
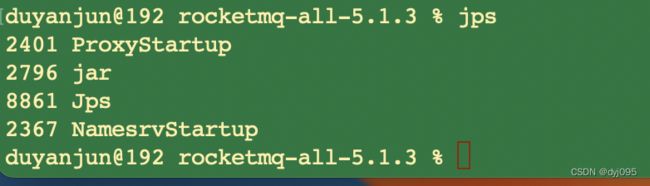
2、停止RocketMQ Dashboard
kill -9 2796
jps

3、停止RocketMQ NameSrv
cd /Users/duyanjun/Downloads/rocketmq-all-5.1.3
sh bin/mqshutdown namesrv
![]()
4、停止RocketMQ Proxy
cd /Users/duyanjun/Downloads/rocketmq-all-5.1.3
sh bin/mqshutdown proxy
