(多线程)并发编程的三大基础应用——阻塞队列、定时器、线程池【手搓源码】
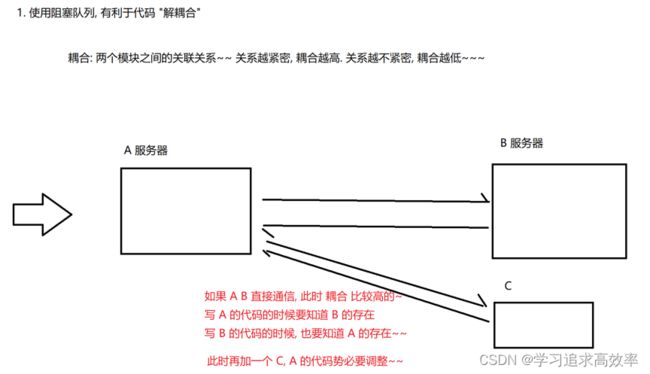
9.2 阻塞式队列


BlockingQueue<Integer> blockingQueue = new LinkedBlockingQueue<Integer>();
BlockingQueue<String> queue = new LinkedBlockingQueue<>();
// 入队列
queue.put("abc");
// 出队列. 如果没有 put 直接 take, 就会阻塞.
String elem = queue.take();
public static void main(String[] args) throws InterruptedException {
    BlockingQueue<Integer> blockingQueue = new LinkedBlockingQueue<Integer>();
    Thread customer = new Thread(() -> {
        while (true) {
            try {
                int value = blockingQueue.take();
                System.out.println("消费元素: " + value);
           } catch (InterruptedException e) {
                e.printStackTrace();
           }
       }
   }, "消费者");
    customer.start();
    Thread producer = new Thread(() -> {
        Random random = new Random();
        while (true) {
            try {
                int num = random.nextInt(1000);
                System.out.println("生产元素: " + num);
                blockingQueue.put(num);
                Thread.sleep(1000);
           } catch (InterruptedException e) {
                e.printStackTrace();
           }
       }
   }, "生产者");
    producer.start();
    customer.join();
    producer.join();
}
阻塞队列实现
// 名字还是不要和标准库的混淆
class MyBlockingQueue {
    private int[] items = new int[1000];
    private volatile int head = 0;
    private volatile int tail = 0;
    private volatile int size = 0;

    // 入队列
    public void put(int elem) throws InterruptedException {
        synchronized (this) {
            // 判定队列是否满了, 满了则不能插入.
            while (size >= items.length) {
                this.wait();
            }
            // 进行插入操作, 把 elem 放到 items 里, 放到 tail 指向的位置.
            items[tail] = elem;
            tail++;
            if (tail >= items.length) {
                tail = 0;
            }
            size++;
            this.notify();
        }
    }

    // 出队列, 返回删除的元素内容
    public Integer take() throws InterruptedException {
        synchronized (this) {
            // 判定队列是否空, 如果空了, 则不能出队列
            while (size == 0) {
                this.wait();
            }
            // 进行取元素操作.
            int ret = items[head];
            head++;
            if (head >= items.length) {
                head = 0;
            }
            size--;
            this.notify();
            return ret;
        }
    }
}

public class TestMyBlockingQueue {
    public static void main(String[] args) {
        MyBlockingQueue queue = new MyBlockingQueue();

        Thread producer = new Thread(() -> {
            int n = 1;
            while (true) {
                try {
                    queue.put(n);
                    System.out.println("生产元素 " + n);
                    n++;
                } catch (InterruptedException e) {
                    e.printStackTrace();
                }
            }
        });

        Thread customer = new Thread(() -> {
            while (true) {
                try {
                    int n = queue.take();
                    System.out.println("消费元素 " + n);
                    Thread.sleep(500);
                } catch (InterruptedException e) {
                    e.printStackTrace();
                }
            }
        });

        producer.start();
        customer.start();
    }
}
9.3 定时器
定时器的使用样例
public class ThreadTimer {
    public static void main(String[] args) {
        // 标准库的定时器.
        Timer timer = new Timer();
        timer.schedule(new TimerTask() {
            @Override
            public void run() {
                System.out.println("时间到, 快起床!");
            }
        }, 3000);

        timer.schedule(new TimerTask() {
            @Override
            public void run() {
                System.out.println("时间到2!");
            }
        }, 4000);

        timer.schedule(new TimerTask() {
            @Override
            public void run() {
                System.out.println("时间到3!");
            }
        }, 5000);

        System.out.println("开始计时!");
    }
}
Timer timer = new Timer();
timer.schedule(new TimerTask() {
    @Override
    public void run() {
        System.out.println("hello");
   }
}, 3000);
实现定时器
定时器的构成:
- 一个带优先级的阻塞队列
为啥要带优先级呢?
因为阻塞队列中的任务都有各自的执行时刻 (delay). 最先执行的任务一定是 delay 最小的. 使用带优先级的队列就可以高效的把这个 delay 最小的任务找出来.
- 队列中的每个元素是一个 Task 对象.
- Task 中带有一个时间属性, 队首元素就是即将
- 同时有一个 worker 线程一直扫描队首元素, 看队首元素是否需要执行
定时器完整代码
package threading;

import java.util.ArrayDeque;
import java.util.PriorityQueue;
import java.util.concurrent.BlockingQueue;
import java.util.concurrent.PriorityBlockingQueue;

// 这个类表示一个任务
class MyTask implements Comparable<MyTask> {
    // 要执行的任务
    private Runnable runnable;
    // 什么时间来执行任务. (是一个时间戳)
    private long time;

    public MyTask(Runnable runnable, long delay) {
        this.runnable = runnable;
        this.time = System.currentTimeMillis() + delay;
    }

    public Runnable getRunnable() {
        return runnable;
    }

    public long getTime() {
        return time;
    }

    @Override
    public int compareTo(MyTask o) {
        return (int) (this.time - o.time);
    }
}

class MyTimer {
    private BlockingQueue<MyTask> queue = new PriorityBlockingQueue<>();

    private Object locker = new Object();

    public MyTimer() {
        // 创建一个扫描线程.
        Thread t = new Thread(() -> {
            while (true) {
                try {
                    synchronized (locker) {
                        // 取出队首元素
                        MyTask task = queue.take();
                        // 假设当前时间是 2:30, 任务设定的时间是 2:30, 显然就要执行任务了.
                        // 假设当前时间是 2:30, 任务设定的时间是 2:29, 也是到点了, 也要执行任务.
                        long curTime = System.currentTimeMillis();
                        if (curTime >= task.getTime()) {
                            // 到点了, 改执行任务了!!
                            task.getRunnable().run();
                        } else {
                            // 还没到点
                            queue.put(task);
                            // 没到点, 就等待
                            locker.wait(task.getTime() - curTime);
                        }
                    }
                } catch (InterruptedException e) {
                    e.printStackTrace();
                }
            }
        });
        t.start();
    }

    public void schedule(Runnable runnable, long after) throws InterruptedException {
        synchronized (locker) {
            MyTask myTask = new MyTask(runnable, after);
            queue.put(myTask);
            locker.notify();
        }
    }

}

public class ThreadMyTimer {
    public static void main(String[] args) throws InterruptedException {
        MyTimer timer = new MyTimer();
        timer.schedule(new Runnable() {
            @Override
            public void run() {
                System.out.println("时间到1!");
            }
        }, 3000);
        timer.schedule(new Runnable() {
            @Override
            public void run() {
                System.out.println("时间到2!");
            }
        }, 4000);
        timer.schedule(new Runnable() {
            @Override
            public void run() {
                System.out.println("时间到3!");
            }
        }, 5000);
        System.out.println("开始计时");

        ArrayDeque<String> a = new ArrayDeque<>();
        a.peekLast();
    }
}
9.4 线程池
线程池是什么
虽然创建线程 / 销毁线程 的开销
想象这么一个场景:
在学校附近新开了一家快递店,老板很精明,想到一个与众不同的办法来经营。店里没有雇人,
而是每次有业务来了,就现场找一名同学过来把快递送了,然后解雇同学。这个类比我们平时来
一个任务,起一个线程进行处理的模式。
很快老板发现问题来了,每次招聘 + 解雇同学的成本还是非常高的。老板还是很善于变通的,知道了为什么大家都要雇人了,所以指定了一个指标,公司业务人员会扩张到 3 个人,但还是随着业务逐步雇人。于是再有业务来了,老板就看,如果现在公司还没 3 个人,就雇一个人去送快递,否则只是把业务放到一个本本上,等着 3 个快递人员空闲的时候去处理。这个就是我们要带出的线程池的模式。
线程池最大的好处就是减少每次启动、销毁线程的损耗
标准库中的线程池
- 使用 Executors.newFixedThreadPool(10) 能创建出固定包含 10 个线程的线程池.
- 返回值类型为 ExecutorService
- 通过 ExecutorService.submit 可以注册一个任务到线程池中
ExecutorService pool = Executors.newFixedThreadPool(10);
pool.submit(new Runnable() {
    @Override
    public void run() {
        System.out.println("hello");
   }
});
Executors 创建线程池的几种方式
- newFixedThreadPool: 创建固定线程数的线程池
- newCachedThreadPool: 创建线程数目动态增长的线程池.
- newSingleThreadExecutor: 创建只包含单个线程的线程池.
- newScheduledThreadPool: 设定 延迟时间后执行命令,或者定期执行命令. 是进阶版的 Timer.
Executors 本质上是 ThreadPoolExecutor 类的封装.
ThreadPoolExecutor 提供了更多的可选参数, 可以进一步细化线程池行为的设定. (后面再介绍)
实现线程池
- 核心操作为 submit, 将任务加入线程池中
- 使用 Worker 类描述一个工作线程. 使用 Runnable 描述一个任务.
- 使用一个 BlockingQueue 组织所有的任务
- 每个 worker 线程要做的事情: 不停的从 BlockingQueue 中取任务并执行.
- 指定一下线程池中的最大线程数 maxWorkerCount; 当当前线程数超过这个最大值时, 就不再新增线程了.
线程池的实现
class Worker extends Thread {
    private LinkedBlockingQueue<Runnable> queue = null;
    public Worker(LinkedBlockingQueue<Runnable> queue) {
        super("worker");
        this.queue = queue;
   }
    @Override
    public void run() {
        // try 必须放在 while 外头, 或者 while 里头应该影响不大
        try {
            while (!Thread.interrupted()) {
                Runnable runnable = queue.take();
                runnable.run();
           }
       } catch (InterruptedException e) {
       }
   }
}

public class MyThreadPool {
    private int maxWorkerCount = 10;
    private LinkedBlockingQueue<Runnable> queue = new LinkedBlockingQueue();
    public void submit(Runnable command) {
        if (workerList.size() < maxWorkerCount) {
            // 当前 worker 数不足, 就继续创建 worker
            Worker worker = new Worker(queue);
            worker.start();
       }
        // 将任务添加到任务队列中
        queue.put(command);
   }
    public static void main(String[] args) throws InterruptedException {
        MyThreadPool myThreadPool = new MyThreadPool();
        myThreadPool.execute(new Runnable() {
            @Override
            public void run() {
                System.out.println("吃饭");
           }
       });
        Thread.sleep(1000);
   }
}
package threading;

import java.util.concurrent.BlockingQueue;
import java.util.concurrent.LinkedBlockingQueue;

class MyThreadPool {
    private BlockingQueue<Runnable> queue = new LinkedBlockingQueue<>();

    public void submit(Runnable runnable) throws InterruptedException {
        queue.put(runnable);
    }

    public MyThreadPool(int m) {
        // 在构造方法中, 创建出 M 个线程. 负责完成工作.
        for (int i = 0; i < m; i++) {
            Thread t = new Thread(() -> {
                while (true) {
                    try {
                        Runnable runnable = queue.take();
                        runnable.run();
                    } catch (InterruptedException e) {
                        e.printStackTrace();
                    }
                }
            });
            t.start();
        }
    }
}

public class Demo28 {
    public static void main(String[] args) throws InterruptedException {
        MyThreadPool pool = new MyThreadPool(10);
        for (int i = 0; i < 1000; i++) {
            int taskId = i;
            pool.submit(new Runnable() {
                @Override
                public void run() {
                    System.out.println("执行当前任务: " + taskId + " 当前线程: " + Thread.currentThread().getName());
                }
            });
        }
    }
}
线程池的使用
import java.util.concurrent.ExecutorService;
import java.util.concurrent.Executors;

public class Demo26 {
    public static void main(String[] args) {
        ExecutorService pool = Executors.newCachedThreadPool();
        pool.submit(new Runnable() {
            @Override
            public void run() {
                System.out.println("这是任务");
            }
        });
    }
}