go+mysql+redis+vue3简单聊室,第6弹:使用vue3和element-plus调用接口
文章目录
- 项目结构
- 页面效果
- 项目初始化配置
-
- main.ts
- App.vue
- router/index.js
- 页面和组件
我们使用go实现了聊天应用的接口和数据同步后,就可以开始着手使用vue搭建前端页面,并且调用接口了。本篇文章不会详细说明vue3和相关组件的使用方法,有需求的可以直接查看官方文档接口即可
首先安装node.js,安装成功后,使用npm命令行安装vue3。安装完vue3后,在指定目录使用vue命令创建一个项目脚手架。node.js和vue的安装问题可以查看这里
vue create chat
项目结构
该命令创建了一个目录chat,并在chat中创建了项目的相关目录和文件,如下

- node_modules 存放项目依赖的各种模块和工具
- public 是项目的入口目录,访问url默认访问该路径下的资源
- src 项目的业务逻辑目录
main.ts 是入口文件调用的js文件
App.vue 是入main.ts文件中调用的组件 - package.json 项目的依赖配置文件,用于项目的编译
- vue.config.js vue应用的配置文件
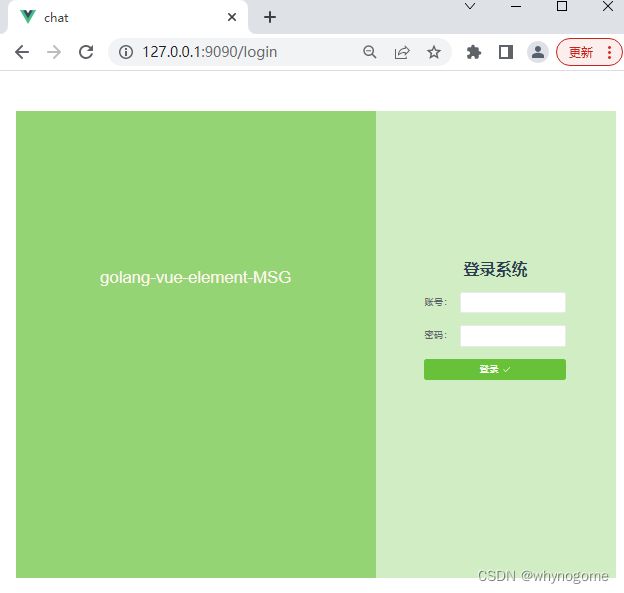
页面效果
项目初始化配置
main.ts
主要用于引入项目需要用到的组件、模块和css文件,然后实例化一个vue应用
import { createApp } from 'vue' // 引入vue,解构初始化方法
import App from './App.vue'     // 引入 App.vue 组件
import router from './router'	// 引入路由
import store from './store'		// 引入页面存储
import ElementPlus from 'element-plus'	// 引入element-plus
import 'element-plus/dist/index.css'	// 引入element-plus的css文件
import axios from 'axios'		// 引入 axios
// 使用App基础组件,创建一个vue应用
const app = createApp(App)
// 创建一个axios实例
const $axios = axios.create({
  // baseURL:'/api',// 设置代理后,这里填写代理的名称
  baseURL: 'http://127.0.0.1:8080/', //请求接口的host
  timeout:2000,
  withCredentials:true // 跨域请求时是否携带cookie验证
})
//把axios实例注入全局,方便之后使用
app.provide('$axios',$axios)
//vue应用加载各种组件实例,并挂载到id为app的dom上。#app的doum在public中的index.html
app.use(store).use(router).use(ElementPlus).mount('#app')
App.vue
是项目的展示页面,提供一个路由容器,供其他组件l展示即可
<template>
  <router-view></router-view>
</template>

<script setup>

import { onMounted } from 'vue'
import { useRouter } from 'vue-router'
const router = useRouter()
const goLogin = () => {
  router.push({ name: 'login-index' })
}
// 当组件加载成功时,执行goLogin方法,跳转到login-index组件
onMounted(goLogin)
</script>

<style>
  #app {
    font-family: Avenir, Helvetica, Arial, sans-serif;
    -webkit-font-smoothing: antialiased;
    -moz-osx-font-smoothing: grayscale;
    text-align: center;
    color: #2c3e50;
    margin: 60px auto;
    width:900px;
    height:700px;
  }
</style>
router/index.js
该文件用于配置url路由,并指定路由绑定的组件
import { createRouter, createWebHistory, RouteRecordRaw } from 'vue-router'

// 引入用到的组件
import LoginIndex from '@/views/LoginIndex.vue'
import ChatWin from '@/views/ChatWin.vue'
// 初始化一个路由和组件的关系数组
const routes: Array<RouteRecordRaw> = [
  {name:'login-index',path:'/login',component:LoginIndex},
  {name:'chat-win',path:'/chat',component:ChatWin}
]
// 创建路由
const router = createRouter({
  history: createWebHistory(process.env.BASE_URL),
  routes
})
// 暴露路由
export default router
页面和组件
vue中,页面都是以组件的形式出现的,但是我们仍然可以把他们区分
登录注册这些复用率比较低的,占据整个网页的布局组件,我们把它们当做页面,统一存放在src/views 目录下
消息展示、轮播这些小块儿的组件,可以把它们当做组件,统一存放在src/components目录下
这样方便我们对组件和页面的管理
我们先zaiviews目录下创建登录和聊天这两个页面的组件
LoginIndex.vue
<template>
  <el-container style="height:100%;">
    <el-aside style="width:60%;height:100%;background: #95d475;text-align: center;line-height:500px;color: #fdf6ec;font-size: 25px;">
      golang-vue-element-MSG
    </el-aside>
    <el-main  style="height:100%;background: #d1edc4;padding-top:200px;">
      <el-row :gutter="1" align="middle">
        <el-col :span="4"><div class="grid-content ep-bg-purple" /></el-col>
        <el-col :span="16"><div class="grid-content ep-bg-purple" /><h1>登录系统</h1></el-col>
        <el-col :span="4"><div class="grid-content ep-bg-purple" /></el-col>
      </el-row>
      <el-row :gutter="1" align="middle">
        <el-col :span="4"><div class="grid-content ep-bg-purple" /></el-col>
        <el-col :span="16"><div class="grid-content ep-bg-purple" />
          <el-form :model="form" >
            <el-form-item label="账号:">
              <el-input v-model="form.phone" />
            </el-form-item>
            <el-form-item label="密码:">
              <el-input v-model="form.password" />
            </el-form-item>
            <el-form-item>
              <el-button style="width:100%;" type="success" @click="onSubmit">
                登录<el-icon class="el-icon--right"><Check /></el-icon>
              </el-button>
            </el-form-item>
          </el-form>
        </el-col>
        <el-col :span="4"><div class="grid-content ep-bg-purple" /></el-col>
      </el-row>

    </el-main>
  </el-container>
</template>

<script setup>
import { inject, reactive } from 'vue'
import { Check } from '@element-plus/icons-vue'
import { ElMessage } from 'element-plus'
import { useRouter } from 'vue-router'
const router = useRouter()
const form = reactive({
  phone: '',
  password: ''
})
const $axios = inject('$axios')
const onSubmit = ()=> {
  //访问登录接口
  $axios.post('/user/login', form).then((response) => {
    console.log(response.data)
    if(response.data.status == 200){
      ElMessage({message:'登录成功',type:'success'})
      // 登录成功,调整到chat-win组件
      router.push({name: 'chat-win'})
    }else{
      ElMessage.error(response.data.msg)
    }
  })
}
</script>
ChatWin.vue
<template>
  <el-container style="height:100%;">
    <el-aside >
      <el-menu
              active-text-color="#ffd04b"
              background-color="#545c64"
              class="el-menu-vertical-demo"
              default-active="2"
              text-color="#fff"
              @open="handleOpen"
              @close="handleClose"
      >
        <el-sub-menu index="1">
          <template #title>
            <span>折叠菜单1</span>
          </template>
          <el-sub-menu index="1-2">
            <template #title>折叠菜单2</template>
            <el-sub-menu index="1-2-3">
              <template #title>折叠菜单3</template>
              <el-menu-item-group title="Group One">
                <el-menu-item index="1-2-3-1">item one</el-menu-item>
                <el-menu-item index="1-2-3-2">item two</el-menu-item>
              </el-menu-item-group>
            </el-sub-menu>

          </el-sub-menu>
        </el-sub-menu>
        <el-menu-item index="2">
          <span>单聊</span>
        </el-menu-item>
        <el-menu-item index="3" disabled>
          <span>群聊</span>
        </el-menu-item>
      </el-menu>

    </el-aside>

    <el-main style="padding: 0;height:100%;border: 1px solid #A8ABB2;">
      <el-header style="height:5%;line-height:30px;border-bottom: 1px solid #C0C4CC;">当前聊天对象</el-header>
      <el-main style="background-color: #F2F6FC;height:75%;border-bottom: 1px solid #C0C4CC;">
        <chat-list
          v-for="item in contentList.arr"
          :user-id = "item.userid"
          :content="item.msg"
          :key = "item.id"
        ></chat-list>

      </el-main>
      <el-footer style="height:20%;">
        <el-form >
            <el-input
              v-model="textarea"
              type="textarea"
              placeholder=""
              :autosize="{minRows:3,maxRows:10}"
              style="height:90px;width:100%;overflow: auto;"
            />
          <el-row>
            <el-col :span=18 ></el-col>
            <el-col :span=6 >
              <el-tooltip
                v-model:visible="visible"
                placement="left"
                :auto-close=1000
                effect="light"
              >
                <template #content>
                  <span>不能发送空白内容</span>
                </template>
                <el-button  type="success" @click="onSubmit">
                  发送<el-icon class="el-icon--right"><Check /></el-icon>
                </el-button>
              </el-tooltip>
            </el-col>
          </el-row>
        </el-form>
      </el-footer>
    </el-main>
  </el-container>
</template>

<script setup>
  import { reactive, ref, inject, onMounted} from 'vue'
  import { Check } from '@element-plus/icons-vue'
  // 引入自定义ChatList组件
  import ChatList from '@/components/ChatList.vue'
  // 伸缩菜单监听事件
  const handleOpen = (key, keyPath) => {
    console.log(key, keyPath)
  }
  const handleClose = (key, keyPath) => {
    console.log(key, keyPath)
  }
  // 从全局依赖中取出axios 实例
  const $axios = inject('$axios')
  const contentList = reactive({ arr: [] })
  let websocket
  const data = {username:'',userid:'0',msg:'',id:'0'}
  // 页面加载时,请求一次消息记录接口
  onMounted(() => {
     $axios.get('/index').then((response) => {
       if(response.data.status == 200){
         if(response.data.logs.length > 0){
           const msgLog = response.data.logs
           for(const step in msgLog){
             contentList.arr.push({
               id:msgLog[step].ID,
               userid:msgLog[step].UserID,
               msg:msgLog[step].Content
             })
           }
         }
         data.userid = String(response.data.userInfo.ID)
         data.username = response.data.userInfo.Name
       }
    })
    // 建立websocket链接
    websocket = new WebSocket('ws://127.0.0.1:8080/index')
    websocket.onopen = function (){
      console.log('connected')
      data.msg = '我上线了'
      websocket.send(JSON.stringify(data))
    }
    websocket.onmessage = function (e){
      console.log('接收消息', e.data)
      contentList.arr.push(JSON.parse(e.data))
      console.log(contentList.arr)
    }
    websocket.onclose = function (e){
      console.log('closed',e)
    }
  })
  const textarea = ref('')
  const visible = ref(false)
  // 发送消息
  const onSubmit = ()=>{
    if(textarea.value == ''){
      visible.value = true
      return false
    }
    visible.value = false
    data.msg = textarea.value
    // contentList.arr.push(data)
    console.log(data)
    websocket.send(JSON.stringify(data))
    textarea.value = ''
  }
</script>
<!-- Add "scoped" attribute to limit CSS to this component only -->

<style scoped>
  >>>.el-textarea__inner{ border:0;resize: none;box-shadow:none;}
  .el-aside{
    width:30%;height:100%;background: #545c64;
  }
  .el-header{
    height:10%;background-color: #F2F6FC;
  }
  .el-menu{width:100%;}
</style>
上面文件中引用了ChatList组件,用于展示聊天记录
components/ChatList.vue
<template>
  <el-row :gutter="20" v-if="userId == 1">
    <el-col :span="3"><img style="width:35px;height:35px;" :src="headImg"/></el-col>
    <el-col :span="12" class="content-div">{{content}}</el-col>
  </el-row>
  <el-row :gutter="20" v-else>
    <el-col :span="9"></el-col>
    <el-col :span="12" class="content-div" style="text-align: right;">{{content}}</el-col>
    <el-col :span="3"><img style="width:35px;height:35px;" :src="headImg"/></el-col>
  </el-row>
</template>

<script lang="ts" setup>
  import {defineProps, ref} from 'vue'
  const props = defineProps({
    userId:{type:Number, required:true},
    content:{type:String, required:true}
  })
  const headImg = ref<string>('')
  if(props.userId == 1){
    headImg.value = 'imgs/default_head.jpg'
  }else{
    headImg.value = 'imgs/my_head.jpg'
  }
</script>

<!-- Add "scoped" attribute to limit CSS to this component only -->
<style scoped>
.content-div{
  text-align: left;
  background-color: #fff;
  line-height: 39px;
  padding: 0 3px;
}
.el-row {
  margin-bottom: 10px;
}
</style>

