Standard CS144 Lab Checkpoint 0: networking warmup

Lab Checkpoint 0: networking warmup

本文依托于Stanford的CS144课程,根据Lab 0实验文档所编写的中文实验过程,附有完整可运行代码


1 Set up GNU/Linux on your computer

  1. 安装CS144提供的虚拟机软件和虚拟镜像(安装指导https://stanford.edu/class/cs144/vm_howto/vm-howto-image.html)

  2. 使用VMware安装镜像后,可能会连不上网络,请在终端运行sudo vim /etc/network/interfaces来编辑配置文件,并在文件末尾添加如下两行,保存退出然后运行reboot命令重启虚拟机

    auto ens33
    iface enss33 inet dhcp
    

2 Networking by hand

这一节需要完成动手实现检索网页的任务。此任务依赖于称为可靠双向有序字节流的网络抽象:您将在终端中键入字节序列,并且最终将以相同的顺序将相同的字节序列传递给程序。 在另一台计算机(服务器)上运行。 服务器以自己的字节序列进行响应,并返回给终端。

2.1 Fetch a Web page

  1. 打开浏览器,访问http://cs144.keithw.org/hello并观察结果

  2. 手动执行与浏览器相同的操作

    1. 打开虚拟机,执行 telnet cs144.keithw.org http 回车,如果你的虚拟机安装成功,那么你将看到一下内容Standard CS144 Lab Checkpoint 0: networking warmup_第1张图片

    2. 输入 GET /hello HTTP/1.1 回车,这告诉服务器URL的path部分

    3. 输入 Host: cs144.keithw.org 回车,这告诉服务器URL的host部分

    4. 输入 Connection: close 回车,这告诉服务器你完成了请求,并且只要完成了回应就将关闭连接

    5. 再一次输入回车,这发送一个空行到服务器,告诉服务器已经完成了HTTP请求

    6. 如果一切正常,你将可以看到与浏览器页面一样的结果

      Standard CS144 Lab Checkpoint 0: networking warmup_第2张图片

  3. 通过上述步骤,我们可以手动访问一个网页。我们可以使用这个方法去访问http://cs144.keithw.org/lab0/sunetid,其中sunetid为个人私有的SUNET ID,我并没有它,所以这里我们可以使用114514代替。如果步骤正确,将得到下面的结果。

    Standard CS144 Lab Checkpoint 0: networking warmup_第3张图片

2.3 Listening and connecting

我们可以了解到telnet可以作为一个可以与其他计算机上运行的程序建立了外向连接的客户端程序。接下来我们制作一个简单的服务器程序,

  1. 打开一个终端ssh进入你的虚拟机里,输入netcat -v -l -p 9090,你将看到如下内容image-20220412185621492

  2. 打开另一个终端ssh进入虚拟机,输入telnet localhost 9090

  3. 运行成功的话,netcat将会输出类似如下的语句

    image-20220412185851220

  4. 此时netcat作为一个服务器,而telnet作为客户端。任何一个窗口输入的任何内容就会在另一个窗口显示出来,如下。

  5. 在netcat里面使用快捷键Ctrl C退出,此时telnet也会迅速退出。

3 Writing a network program using an OS stream socket

这一部分需要编写一个名为webget的程序,该程序将创建一个TCP流套接字,连接到Web服务器并获取一个页面。尽可能的利用Linux内核和大多数其他操作系统提供的功能。

3.1 Let’s get started—fetching and building the starter code

  1. 进入虚拟机,输入git clone https://github.com/cs144/sponge指令获取初始代码
  2. 进入Lab 0目录:cd sponge
  3. 创建一个目录用于编译:mkdir build,并进入:cd build
  4. 构建编译系统:cmake ..
  5. 编译源代码:make(也可以运行make -j4使用4个处理器加快编译速度)

3.2 Reading the Sponge documentation

Sponge的类将操作系统功能(可以从C调用)包装为“现代” C ++

  1. 打开浏览器,在https://cs144.github.io/doc/lab0上阅读了初始代码的文档。
  2. 特别注意FileDescriptor,Socket,TCPSocket和Address类。 (请注意,Socket是FileDescriptor的一种,而TCPSocket是Socket的一种。)
  3. libsponge/util目录中找到并读取描述这些类的接口的头文件:descriptor.hhsocket.hhaddress.hh

3.3 Writing webget

是时候去实现webget了,这是一个使用操作系统的TCP支持和流套接字抽象在Internet上提取网页的程序,就像之前实验之前所进行的操作一样。

  1. 进入build目录,用文本编辑器打开文件../apps/webget.cc

  2. 在函数get_URL中,找到以// code here开头的注释

  3. 使用在2.1中使用的HTTP(Web)请求的格式,按照此文件中所述实现简单的Web客户端。 使用TCPSocket和Address类

  4. 使用make来编译程序,如有错误,及时修复

  5. build文件夹下运行./apps/webget cs144.keithw.org /hello测试程序,也可以测试任何网页

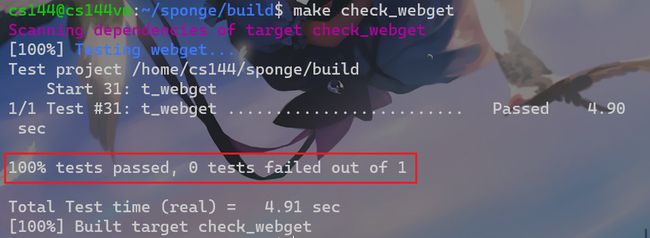
  6. build文件夹下运行make check_webget来自动化测试程序,若全部成功则会显示如下内容

    Standard CS144 Lab Checkpoint 0: networking warmup_第4张图片

4 An in-memory reliable byte stream

到目前为止,我们已经看到了可靠的字节流是如何在 Internet 上进行通信的,尽管 Internet 本身只提供 “尽力而为”(不可靠的)数据报的服务。

接下来将在计算机的内存中实现一个提供此功能的对象。字节被写入“输入”端,并且可以以相同的顺序从“输出”端读取。字节流是有限的:写入器可以结束输入,然后就不能再写入字节了。当读取器已读取到流的末尾时,它将到达“EOF”(文件结尾)并且无法读取更多字节。

字节流也将受到流控制:它具有特定的容量进行初始化:它愿意存储在自己的内存中的最大字节数。 字节流将限制写入者可以写入字符串的时间,以确保该字节流不会超出其存储容量。 当读取器读取字节并将其从流中清空时,允许写入器写入更多字节

  1. 写入器的接口:
// Write a string of bytes into the stream. Write as many
// as will fit, and return the number of bytes written.
size_t write(const std::string &data);
// Returns the number of additional bytes that the stream has space for
size_t remaining_capacity() const;
// Signal that the byte stream has reached its ending
void end_input();
// Indicate that the stream suffered an error
void set_error();
  1. 读入器的接口
// Peek at next "len" bytes of the stream
std::string peek_output(const size_t len) const;
// Remove ``len'' bytes from the buffer
void pop_output(const size_t len);
// Read (i.e., copy and then pop) the next "len" bytes of the stream
std::string read(const size_t len);
bool input_ended() const; // `true` if the stream input has ended
bool eof() const; // `true` if the output has reached the ending
bool error() const; // `true` if the stream has suffered an error
size_t buffer_size() const; // the maximum amount that can currently be peeked/read
bool buffer_empty() const; // `true` if the buffer is empty
size_t bytes_written() const; // Total number of bytes written
size_t bytes_read() const; // Total number of bytes popped
  1. 打开libsponge目录下的byte_stream.hhbyte_stream.cc文件实现上述功能。

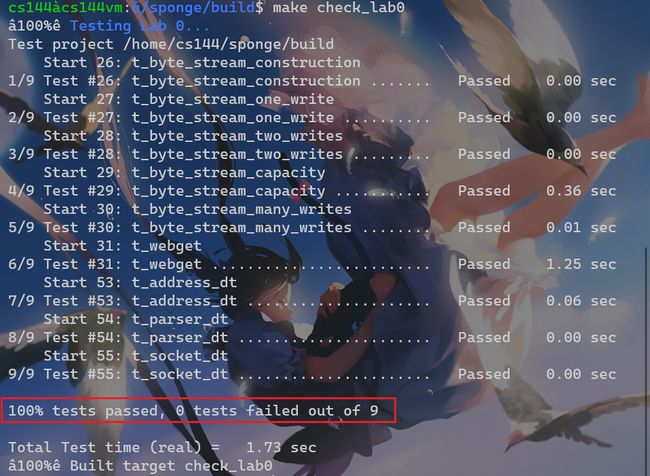
  2. build目录下make编译,然后运行make check_lab0自动化测试程序,如果全部成功则会显示如下内容

    Standard CS144 Lab Checkpoint 0: networking warmup_第5张图片

5 Source Code

  1. 下面代码仅供参考,请读者独立完成
  2. webget.cc
#include "socket.hh"
#include "util.hh"

#include 
#include 

using namespace std;

void get_URL(const string &host, const string &path) {
    // Your code here.
    TCPSocket socket;

    // connect to host by http request
    socket.connect(Address(host, "http"));

    // Similar to what was learned in 2.1: Fetch a Web page
    socket.write("GET " + path + " HTTP/1.1\r\n");
    socket.write("Host: " + host + "\r\n");
    socket.write("Connection: close\r\n");
    socket.write("\r\n");

    // read until eof
    while (!socket.eof()) {
        auto recvd = socket.read();
        cout << recvd;
    }
    socket.close();

    // You will need to connect to the "http" service on
    // the computer whose name is in the "host" string,
    // then request the URL path given in the "path" string.

    // Then you'll need to print out everything the server sends back,
    // (not just one call to read() -- everything) until you reach
    // the "eof" (end of file).

    cerr << "Function called: get_URL(" << host << ", " << path << ").\n";
    cerr << "Warning: get_URL() has not been implemented yet.\n";
}

int main(int argc, char *argv[]) {
    try {
        if (argc <= 0) {
            abort();  // For sticklers: don't try to access argv[0] if argc <= 0.
        }

        // The program takes two command-line arguments: the hostname and "path" part of the URL.
        // Print the usage message unless there are these two arguments (plus the program name
        // itself, so arg count = 3 in total).
        if (argc != 3) {
            cerr << "Usage: " << argv[0] << " HOST PATH\n";
            cerr << "\tExample: " << argv[0] << " stanford.edu /class/cs144\n";
            return EXIT_FAILURE;
        }

        // Get the command-line arguments.
        const string host = argv[1];
        const string path = argv[2];

        // Call the student-written function.
        get_URL(host, path);
    } catch (const exception &e) {
        cerr << e.what() << "\n";
        return EXIT_FAILURE;
    }

    return EXIT_SUCCESS;
}
  1. byte_stream.hh
#ifndef SPONGE_LIBSPONGE_BYTE_STREAM_HH
#define SPONGE_LIBSPONGE_BYTE_STREAM_HH

#include 

//! \brief An in-order byte stream.

//! Bytes are written on the "input" side and read from the "output"
//! side.  The byte stream is finite: the writer can end the input,
//! and then no more bytes can be written.
class ByteStream {
private:
    // Your code here -- add private members as necessary.
    std::string _buffer = "";
    size_t _capacity = 0;
    size_t _written_cnt = 0;
    size_t _read_cnt = 0;
    bool _is_end = false;

    // Hint: This doesn't need to be a sophisticated data structure at
    // all, but if any of your tests are taking longer than a second,
    // that's a sign that you probably want to keep exploring
    // different approaches.

    bool _error{};  //!< Flag indicating that the stream suffered an error.

public:
    //! Construct a stream with room for `capacity` bytes.
    ByteStream(const size_t capacity);

    //! \name "Input" interface for the writer
    //!@{

    //! Write a string of bytes into the stream. Write as many
    //! as will fit, and return how many were written.
    //! \returns the number of bytes accepted into the stream
    size_t write(const std::string &data);

    //! \returns the number of additional bytes that the stream has space for
    size_t remaining_capacity() const;

    //! Signal that the byte stream has reached its ending
    void end_input();

    //! Indicate that the stream suffered an error.
    void set_error() { _error = true; }
    //!@}

    //! \name "Output" interface for the reader
    //!@{

    //! Peek at next "len" bytes of the stream
    //! \returns a string
    std::string peek_output(const size_t len) const;

    //! Remove bytes from the buffer
    void pop_output(const size_t len);

    //! Read (i.e., copy and then pop) the next "len" bytes of the stream
    //! \returns a string
    std::string read(const size_t len);

    //! \returns `true` if the stream input has ended
    bool input_ended() const;

    //! \returns `true` if the stream has suffered an error
    bool error() const { return _error; }

    //! \returns the maximum amount that can currently be read from the stream
    size_t buffer_size() const;

    //! \returns `true` if the buffer is empty
    bool buffer_empty() const;

    //! \returns `true` if the output has reached the ending
    bool eof() const;
    //!@}

    //! \name General accounting
    //!@{

    //! Total number of bytes written
    size_t bytes_written() const;

    //! Total number of bytes popped
    size_t bytes_read() const;
    //!@}
};

#endif  // SPONGE_LIBSPONGE_BYTE_STREAM_HH
  1. byte_stream.cc
#include "socket.hh"
#include "util.hh"

#include 
#include 

using namespace std;

void get_URL(const string &host, const string &path) {
    // Your code here.
    TCPSocket socket;

    // connect to host by http request
    socket.connect(Address(host, "http"));

    // Similar to what was learned in 2.1: Fetch a Web page
    socket.write("GET " + path + " HTTP/1.1\r\n");
    socket.write("Host: " + host +"\r\n");
    socket.write("Connection: close\r\n");
    socket.write("\r\n");

    // read until eof
    while (!socket.eof()){
        auto recvd = socket.read();
        cout<< recvd;
    }
    socket.close();

    // You will need to connect to the "http" service on
    // the computer whose name is in the "host" string,
    // then request the URL path given in the "path" string.

    // Then you'll need to print out everything the server sends back,
    // (not just one call to read() -- everything) until you reach
    // the "eof" (end of file).

    cerr << "Function called: get_URL(" << host << ", " << path << ").\n";
    cerr << "Warning: get_URL() has not been implemented yet.\n";
}

int main(int argc, char *argv[]) {
    try {
        if (argc <= 0) {
            abort();  // For sticklers: don't try to access argv[0] if argc <= 0.
        }

        // The program takes two command-line arguments: the hostname and "path" part of the URL.
        // Print the usage message unless there are these two arguments (plus the program name
        // itself, so arg count = 3 in total).
        if (argc != 3) {
            cerr << "Usage: " << argv[0] << " HOST PATH\n";
            cerr << "\tExample: " << argv[0] << " stanford.edu /class/cs144\n";
            return EXIT_FAILURE;
        }

        // Get the command-line arguments.
        const string host = argv[1];
        const string path = argv[2];

        // Call the student-written function.
        get_URL(host, path);
    } catch (const exception &e) {
        cerr << e.what() << "\n";
        return EXIT_FAILURE;
    }

    return EXIT_SUCCESS;
}

你可能感兴趣的:(CS144,Lab,Assignment,网络,c++,tcp/ip)