Spring Cloud之ElasticSearch的学习【详细】
目录
ElasticSearch
正向索引与倒排索引
数据库与elasticsearch概念对比
安装ES、Kibana与分词器
分词器作用
自定义字典
拓展词库
禁用词库
索引库操作
Mapping属性
创建索引库
查询索引库
删除索引库
修改索引库
文档操作
新增文档
查找文档
修改文档
全量修改
增量修改
删除文档
RestClient操作索引库
RestClient操作文档
新增文档
根据Id查询文档数据
更新文档
删除文档
批量新增
DSL查询语法
查询所有
全文检索
精确查询
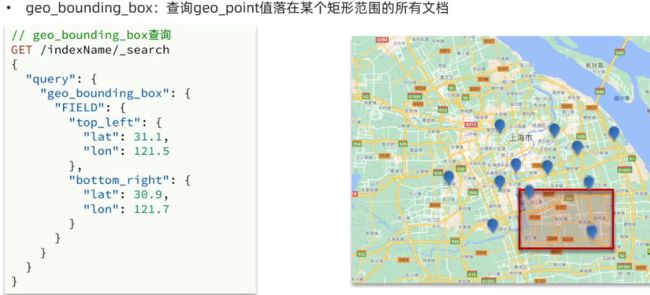
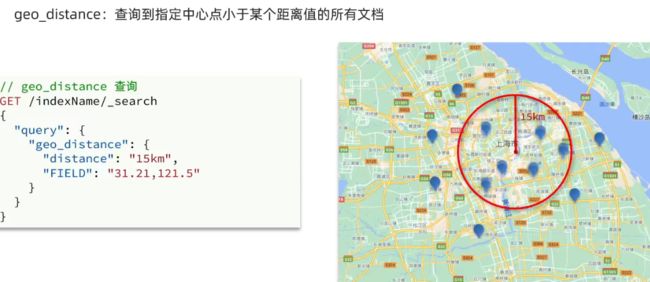
地理查询
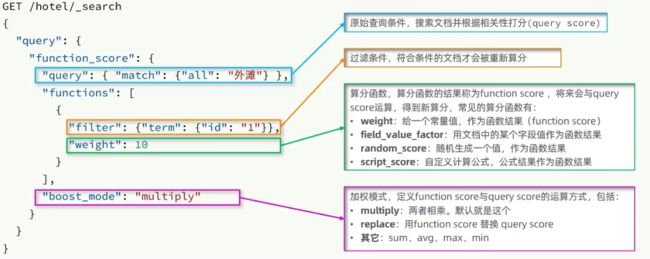
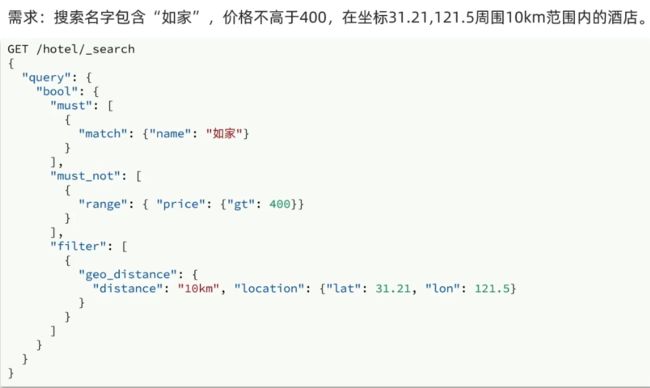
复合查询
搜索结果处理
排序
分页
高亮
RestClient查询文档
查询全部
查询文档
解析数据
全文检索查询
精确查询
复合查询
排序和分页
高亮
ElasticSearch
q:什么是elasticsearch?
a:一个开源的分布式搜索引擎,可以用来实现搜索、日志统计、分析、系统监控等功能
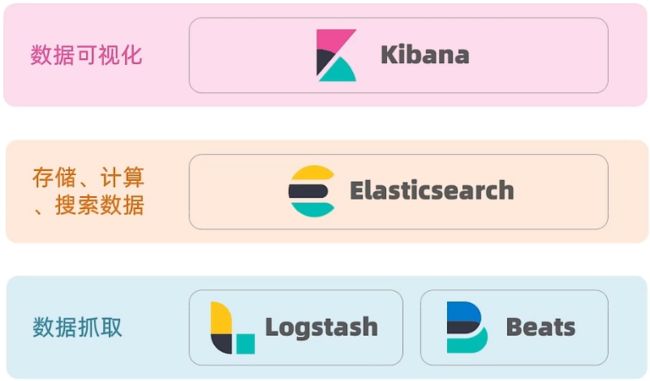
q:什么是elastic stack (ELK) ?
a:是以elasticsearch为核心的技术栈,包括beats、Logstash、kibana、elasticsearch
q:什么是Lucene?
a:是Apache的开源搜索引擎类库,提供了搜索引擎的核心API
正向索引与倒排索引
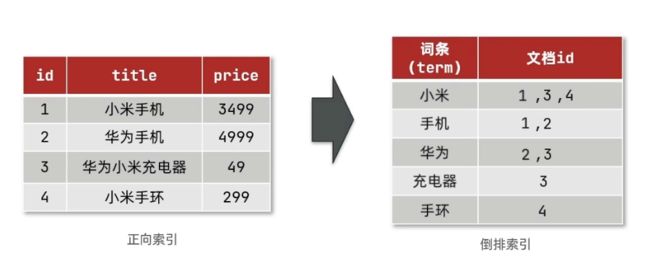
在理解正向索引与倒排索引之前,先理解文档与词条的概念
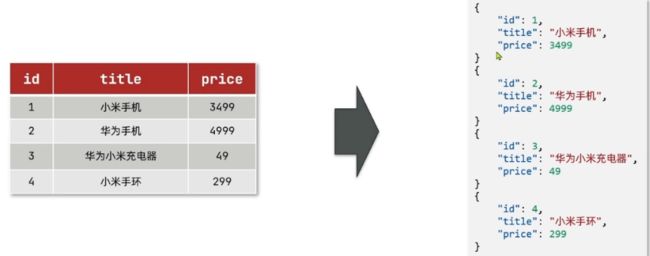
- 文档(document):每条数据就是一个文档
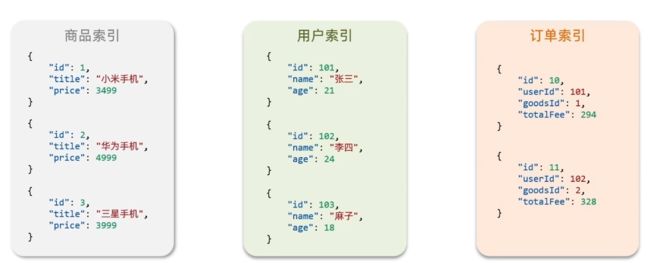
elasticsearch是面向文档存储的,可以是数据库中的一条商品数据,一个订单信息文档数据会被序列化为json格式后存储在elasticsearch中。
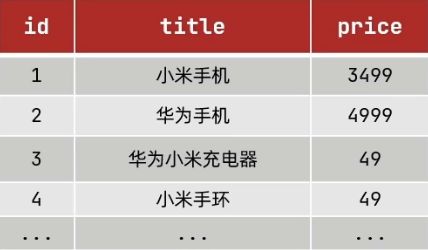
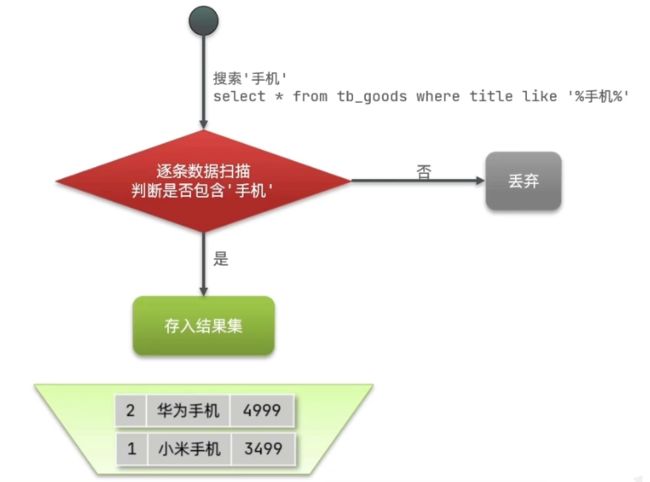
传统数据库比如MySQL使用的是正向索引。通常使用id作为索引
在搜索手机时,如果使用select * from 表 where title like '%手机%';语句进行查找,它会逐条扫描数据,然后找到title中的数据后,判断是否保存”手机“词条。这样的效率很慢.
而elasticsearch采用倒排索引
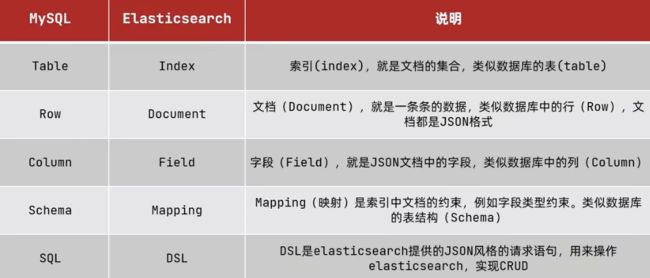
数据库与elasticsearch概念对比
安装ES、Kibana与分词器
这里是基于Docker的安装,ES也支持windows的安装,具体安装方法请参考其他教程。
首先我们需要将ES与Kibana(为ES提供一个可视化界面)容器互联,因此需要先创建一个网络
输入docker命令
docker network create es-net(es-net网络名称,自己随便起名)
docker pull elasticsearch:版本号
docker pull kibana:版本号(两个版本号需要一致)

docker run -d \
--name es \
-e "ES_JAVA_OPTS=-Xms512m -Xmx512m" \
-e "discovery.type=single-node" \
-v es-data:/usr/share/elasticsearch/data \
-v es-plugins:/usr/share/elasticsearch/plugins \
--privileged \
--network es-net \
-p 9200:9200 \
-p 9300:9300 \
elasticsearch:版本号
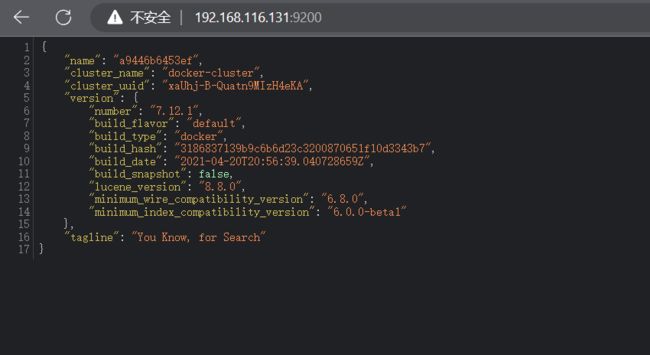
之后访问9200端口
出现如下格式证明启动成功。
接下来启动kibana
docker run -d \
--name kibana \
-e ELASTICSEARCH_HOSTS=http://es:9200 \
--network=es-net \
-p 5601:5601 \
kibana:版本号
启动成功后访问5601端口,出现如下界面
ES默认的分词器对中文分词并不友好。因此我们需要下载IK分词器
下载地址:GitHub - medcl/elasticsearch-analysis-ik: The IK Analysis plugin integrates Lucene IK analyzer into elasticsearch, support customized dictionary.
下在对应版本并解压到刚刚指定的数据卷。
重启容器
docker restart esIK分词器有两种拆分模式
- ik_smart:最少切分(空间占用更少)
- ik_max_word:最细切分(切分力度最大,文档搜索到的概率更大)
下面是两种示例
POST /_analyze
{
  "text":"观察ik分词器的两种模式",
  "analyzer": "ik_max_word"
}
{
"tokens" : [
{
"token" : "观察",
"start_offset" : 0,
"end_offset" : 2,
"type" : "CN_WORD",
"position" : 0
},
{
"token" : "ik",
"start_offset" : 2,
"end_offset" : 4,
"type" : "ENGLISH",
"position" : 1
},
{
"token" : "分词器",
"start_offset" : 4,
"end_offset" : 7,
"type" : "CN_WORD",
"position" : 2
},
{
"token" : "分词",
"start_offset" : 4,
"end_offset" : 6,
"type" : "CN_WORD",
"position" : 3
},
{
"token" : "器",
"start_offset" : 6,
"end_offset" : 7,
"type" : "CN_CHAR",
"position" : 4
},
{
"token" : "的",
"start_offset" : 7,
"end_offset" : 8,
"type" : "CN_CHAR",
"position" : 5
},
{
"token" : "两种",
"start_offset" : 8,
"end_offset" : 10,
"type" : "CN_WORD",
"position" : 6
},
{
"token" : "两",
"start_offset" : 8,
"end_offset" : 9,
"type" : "COUNT",
"position" : 7
},
{
"token" : "种",
"start_offset" : 9,
"end_offset" : 10,
"type" : "CN_CHAR",
"position" : 8
},
{
"token" : "模式",
"start_offset" : 10,
"end_offset" : 12,
"type" : "CN_WORD",
"position" : 9
}
]
}
POST /_analyze
{
  "text":"观察ik分词器的两种模式",
  "analyzer": "ik_smart"
}
{
"tokens" : [
{
"token" : "观察",
"start_offset" : 0,
"end_offset" : 2,
"type" : "CN_WORD",
"position" : 0
},
{
"token" : "ik",
"start_offset" : 2,
"end_offset" : 4,
"type" : "ENGLISH",
"position" : 1
},
{
"token" : "分词器",
"start_offset" : 4,
"end_offset" : 7,
"type" : "CN_WORD",
"position" : 2
},
{
"token" : "的",
"start_offset" : 7,
"end_offset" : 8,
"type" : "CN_CHAR",
"position" : 3
},
{
"token" : "两种",
"start_offset" : 8,
"end_offset" : 10,
"type" : "CN_WORD",
"position" : 4
},
{
"token" : "模式",
"start_offset" : 10,
"end_offset" : 12,
"type" : "CN_WORD",
"position" : 5
}
]
}
分词器作用
- 创建倒排索引时对文档分词
- 用户搜索时,对输入的内容分词
自定义字典
ik分词器之所以可以实现分词,是内部存在一个字典,根据字典会进行划分。但是有的是时候需要排除某些词语,比如说”嗯“,”哦“等词语,没有划分的意义。又比如说网络梗”打个胶先“等这些不会被识别为一个词语。这个时候我们可以自定义我们的词典。具体修改方式如下。
拓展词库
修改ik分词器插件中的confg目录下的IKAnalyzer.cfg.xml文件
	IK Analyzer 扩展配置

	ext.dic
禁用词库
	IK Analyzer 扩展配置

  stopword.dic
配置的文件都需要和IKAnalyzer.cfg.xml在同一目录下。如果不存在就自己创建
索引库操作
Mapping属性
mapping是对索引库中文档的约束,常见的mapping属性包括:
- type:字段数据类型,常见的简单类型有:
- 字符串: text (可分词的文本)、keyword (精确值,例如:品牌、国家、ip地址)
- 数值:long、integer、short、byte、double、float
- 布尔:boolean
- 日期:date
- 对象:object
- index:是否创建索引,默认为true
- analyzer:使用哪种分词器
- properties:该字段的子字段
ES还支持两种地理坐标数据类型:
- geo_point:由维度和经度确定的一个点
- geo_shape:由多个geo_ponit组成的复杂图形
创建索引库
创建索引库的语法示例如下
PUT /zmbwcx
{
  "mappings": {
    "properties": {
        "info":{
          "type": "text",
          "analyzer": "ik_smart"
        },
        "people":{
          "properties": {
            "name":{
              "type":"keyword"
            },
            "sex":{
              "type":"keyword"
            }
          }
        }
    }
  }
}
查询索引库
GET /索引库名删除索引库
DELETE /索引库名修改索引库
索引库和mapping一旦创建无法进行修改(修改会导致原有的倒排索引发生改变,影响较大,因此无法修改),但是可以向其中添加新的字段
文档操作
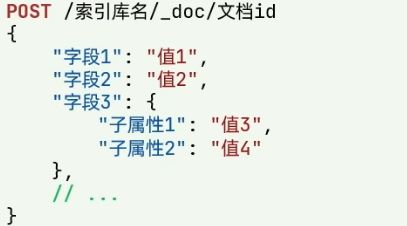
新增文档
文档id如果不指定,会随机生成一个文档id
POST /zmbwcx/_doc/1
{
  "info":"成功人士",
  "people":{
    "name":"zmbwcx",
    "sex":"男"
  }
}
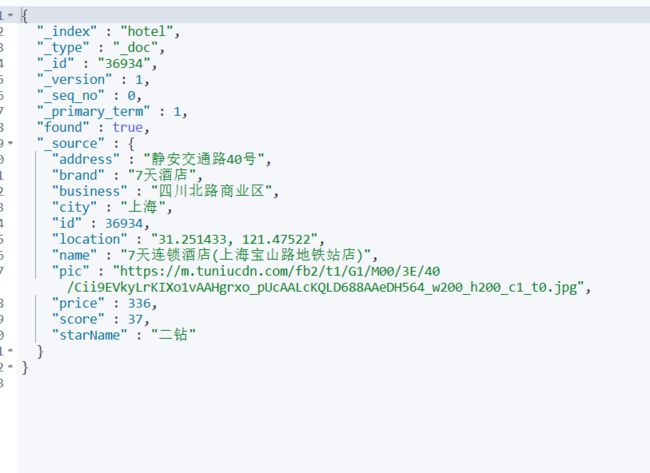
查找文档
GET /索引库名/_doc/文档id字段解读:
- _index:索引库名
- _type:查询类型
- _id:文档id
- _version:查询次数
- _source:文档内容
修改文档
全量修改
删除旧文档,添加新文档。具体操作和新增文档相同,只有请求由POST变为PUT。如果修改的文档id不存在,则相当于新增
PUT /索引库名/_doc/文档id
{
  "字段1":"值1",
  "字段2":"值2",
	// ...略
}
增量修改
POST /索引库名/_update/文档id
{
	"doc":{
      "字段名":"新的值"
	}
}
删除文档
DELETE /索引库名/_doc/文档idRestClient操作索引库
资料下载:https://pan.baidu.com/s/1ORJ-jERwZzJMoyWpCrgafw?pwd=zmbw
mapping要考虑的问题:字段名、数据类型、是否参与搜索、是否分词、如果分词,分词器是什么?
字段名与数据类型的设计与数据库一样就可以。其余的部分要联合业务决定
具体DSL语句如下,我们可以选择在视图界面直接运行如下代码也可以在Java中创建索引库。
PUT /hotel
{
  "mappings":{
    "properties":{
      "id":{
        "type":"keyword"
      },
      "name":{
        "type":"text",
        "analyzer":"ik_max_word",
        "copy_to": "all"
      },
      "address":{
        "type":"keyword",
        "index": false
      },
      "price":{
        "type":"integer"
      },
      "score":{
        "type":"integer"
      },
      "brand":{
        "type":"keyword",
        "copy_to": "all"
      },
      "city":{
      "type":"keyword"
      },
      "starName":{
        "type":"keyword"
      },
      "business":{
        "type":"keyword",
        "copy_to": "all"
      },
      "location":{
        "type": "geo_point"
      },
      "pic":{
        "type":"keyword",
        "index": false
      },
      "all":{
        "type": "text",
        "analyzer": "ik_max_word"
      }
    }
  }
}
如果需要实现搜索一个字段可以查询到多个字段的内容需要使用字段拷贝。
"拷贝字段":{
	"type":"test",
  "analyzer":"ik_max_word"
},
"被拷贝字段":{
	"copy_to":"拷贝字段"
}
创建好mapping映射后,编写Java部分的代码
首先引入依赖,这里的版本一定要和docker中安装的版本一样
    1.8
    7.12.1


    org.elasticsearch.client
    elasticsearch-rest-high-level-client
创建客户端对象,并使用该对象创建索引库。
@SpringBootTest
class HotelDemoApplicationTests {
    private RestHighLevelClient client;

    @BeforeEach//初始化客户端
    void setUp() {
        this.client = new RestHighLevelClient(RestClient.builder(
                HttpHost.create("http://192.168.116.131:9200")
        ));
    }

    @AfterEach
    void tearDown() throws IOException {
        this.client.close();
    }

    @Test//创建索引库
    public void testCreateIndex() throws Exception {
        CreateIndexRequest request = new CreateIndexRequest("hotel");
        request.source(MAPPING_TEMPLATE, XContentType.JSON);
        client.indices().create(request, RequestOptions.DEFAULT);
    }

    @Test//删除索引库
    public void testDeleteIndex() throws Exception {
        DeleteIndexRequest request = new DeleteIndexRequest("hotel");
        client.indices().delete(request,RequestOptions.DEFAULT);
    }

    @Test//判断索引库是否存在
    public void testGetIndex() throws Exception {
        GetIndexRequest request = new GetIndexRequest("hotel");
        boolean exists = client.indices().exists(request, RequestOptions.DEFAULT);
        System.out.println(exists?"索引库存在":"索引库不存在");
    }
}
RestClient操作文档
新增文档
@SpringBootTest
class TestDoc {
    private RestHighLevelClient client;
    @Autowired
    private IHotelService service;

    @BeforeEach
    void setUp() {
        this.client = new RestHighLevelClient(RestClient.builder(
                HttpHost.create("http://192.168.116.131:9200")
        ));
    }

    @AfterEach
    void tearDown() throws IOException {
        this.client.close();
    }

    @Test
    public void testInsertDoc() throws Exception {
        //从数据库中查找数据
        Hotel hotel = service.getById(36934);
        //转换为Mapping相对应的格式
        HotelDoc hotelDoc = new HotelDoc(hotel);
        //创建添加请求
        IndexRequest request = new IndexRequest("hotel").id(hotelDoc.getId().toString());
        //准备JSON文档
        request.source(JSON.toJSONString(hotelDoc),XContentType.JSON);
        //添加文档
        client.index(request,RequestOptions.DEFAULT);
    }
}
去可视化界面查询是否插入成功
根据Id查询文档数据
    @Test
    public void testGetResultById() throws Exception {
        GetRequest request = new GetRequest("hotel","36934");
        GetResponse response = client.get(request, RequestOptions.DEFAULT);
        String jsonStr = response.getSourceAsString();
        HotelDoc hotelDoc = JSON.parseObject(jsonStr, HotelDoc.class);
        System.out.println(hotelDoc);
    }
更新文档
更新文档有两种,一种是全量更新,更改方式与新增文档一模一样。
另一种是局部更新,代码如下
    @Test
    public void testUpdateDoc() throws Exception {
        UpdateRequest request = new UpdateRequest("hotel","36934");
        //参数类似于k:v,但不同的是,不是使用:而是,分割,每两个作为一个kv。第三个参数作为k
        request.doc(
                "price","300"
        );
        client.update(request,RequestOptions.DEFAULT);
    }
删除文档
    @Test
    public void testDeleteDoc() throws Exception {
        DeleteRequest request = new DeleteRequest("hotel","36934");
        client.delete(request,RequestOptions.DEFAULT);
    }
批量新增
    @Test
    public void testInsertDocs() throws Exception {
        List list = service.list();
        List listHotelDocs = list.stream().map(hotel -> new HotelDoc(hotel)).collect(Collectors.toList());
        BulkRequest bulkRequest = new BulkRequest();
        for (HotelDoc hotelDoc : listHotelDocs) {
            bulkRequest.add(new IndexRequest("hotel")
                    .id(hotelDoc.getId().toString())
                    .source(JSON.toJSONString(hotelDoc),XContentType.JSON));
        }
        client.bulk(bulkRequest,RequestOptions.DEFAULT);
    }
DSL查询语法
查询所有
但实际上有条数限制,为10条
GET /hotel/_search
{
  "query": {
    "match_all": {}
  }
}
全文检索
会对用户输入的数据经过分词器处理后搜索文档,常用于搜索框
一种是match搜索
GET /hotel/_search
{
  "query": {
    "match": {
      "all": "北京"
    }
  }
}
一种是multi_match,可以查询多个字段
GET /hotel/_search
{
  "query": {
    "multi_match": {
      "query": "北京如家",
      "fields": ["brand","name","business"]
    }
  }
}
两种查询效果基本相同,但第二种查询的索引更多,速度更慢些,所以更推荐通过拷贝的方式只查询一个索引。
精确查询
精确查询一般是查找keyword、数值、日期、boolean等类型字段。所以不会对搜索条件分词。
- term:根据词条精确值查询
- range:根据值的范围查询
查询北京地区的旅店信息
GET /hotel/_search
{
  "query": {
    "term": {
      "city": {
        "value": "北京"
      }
    }
  }
}
查询价格区间的旅店信息
GET /hotel/_search
{
  "query": {
    "range": {
      "price": {
        "gte": 100,
        "lte": 200
      }
    }
  }
}
地理查询
geo_bounding_box查询方式。
geo_distance查询方式
复合查询
复合查询可以将其他简单的查询组合起来,实现更复杂的搜索逻辑
fuction score:算分函数查询,可以控制文档相关性算分,控制文档排名
boolean query:布尔查询是一个或多个查询子句的组合。子查询的组合方式有
- must:必须匹配每个子查询,类似”与“
- should:选择性匹配子查询,类似”或“
- must_not:必须不匹配,不参与算分,类似”非“
- filter:必须匹配,不参与算分
参与算分的条件越多,性能越差
搜索结果处理
排序
默认根据相关度算分(_score)排序,但是可以自定义排序规则,比如说价格,或是日期,如果指定其他排序,则放弃算分,性能更好
按用户评分降序,价格升序查询
GET /hotel/_search
{
  "query": {
    "match_all": {}
  },
  "sort": [
    {
      "score": "desc"
    },
    {
      "price": "asc"
    }
  ]
}
分页
ES中默认一次查询出10条数据。如果需要获取更多的数据,需要修改分页参数
#分页查询
GET /hotel/_search
{
  "query": {
    "match_all": {}
  },
  "from": 10, //从第十条开始查找
  "size": 20 //查询20条数据
}
分页存在的问题:
ES和数据库不同,ES做的是逻辑分页,也就是查询出前30条数据,然后截取10之后的20条数据。其次,ES通常为了存储更多文档都是集群工作,会将文档拆分到不同节点上。如果我们以价格升序排序后,截取50-60的文档,那么实际上是每个节点都进行排序后,每个节点数据集合到内存后再次重新排序后再去截取50-60的数据。
如果搜索的页数过深,或者结果集(from+size)过大,对内存和CPU消耗越高,因此ES设定结果集上限为1000
高亮
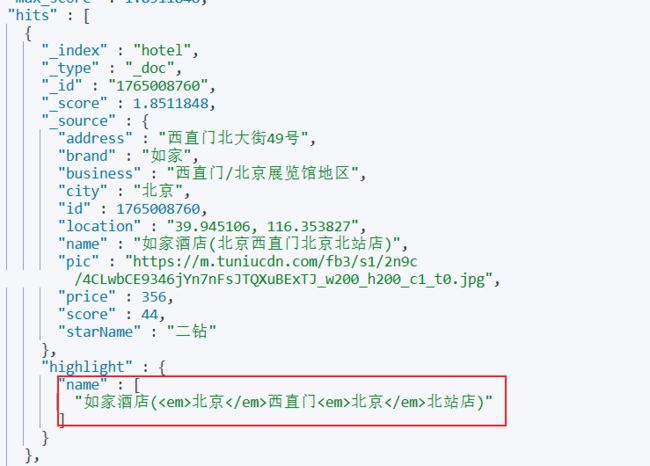
GET /hotel/_search
{
  "query": {
    "match": {
      "all": "北京"
    }
  },
  "highlight": {
    "fields": {
      "name": {
        "require_field_match": "false" //取消字段匹配
      }
    }
  }
}
ES默认情况下ES的搜索字段必须与高亮字段名一致。如果不需要一致,则需要添加配置
RestClient查询文档
查询全部
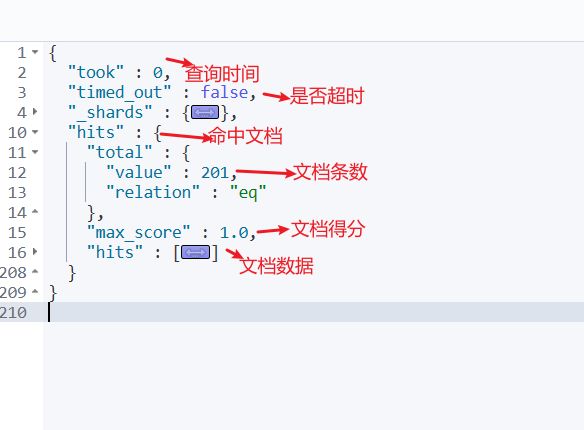
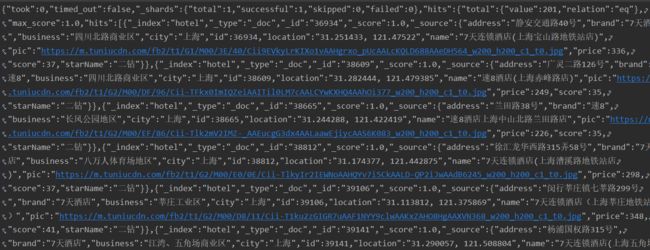
查询文档
    @Test
    public void testSearchMatchAll() throws Exception {
        SearchRequest request = new SearchRequest("hotel");
        //准备DSL
        request.source().query(QueryBuilders.matchAllQuery());
        SearchResponse response = client.search(request, RequestOptions.DEFAULT);
        System.out.println(response);
    }
解析数据
结合JSON格式进行解析数据
    @Test
    public void testSearchMatchAll() throws Exception {
        SearchRequest request = new SearchRequest("hotel");
        //准备DSL
        request.source().query(QueryBuilders.matchAllQuery());
        SearchResponse response = client.search(request, RequestOptions.DEFAULT);
        System.out.println(response);
        SearchHits searchHits = response.getHits();
        long totalNum = searchHits.getTotalHits().value;
        SearchHit[] hits = searchHits.getHits();
        for (SearchHit hit : hits) {
            HotelDoc hotelDoc = JSON.parseObject(hit.getSourceAsString(), HotelDoc.class);
            System.out.println(hotelDoc);
        }
        System.out.println("一共查询到:"+totalNum+"条");
    }
全文检索查询
    @Test
    public void testSearchMatch() throws Exception {
        SearchRequest request = new SearchRequest("hotel");
        request.source().query(QueryBuilders.matchQuery("all","北京"));
        SearchResponse response = client.search(request, RequestOptions.DEFAULT);
        SearchHits searchHits = response.getHits();
        long totalNum = searchHits.getTotalHits().value;
        SearchHit[] hits = searchHits.getHits();
        for (SearchHit hit : hits) {
            HotelDoc hotelDoc = JSON.parseObject(hit.getSourceAsString(), HotelDoc.class);
            System.out.println(hotelDoc);
        }
        System.out.println("一共查询到:"+totalNum+"条");
    }
与MatchAll的查询方式基本无异。多了个指定字段与查询内容
精确查询
复合查询
排序和分页
    @Test
    public void testSearchPage() throws Exception {
        SearchRequest request = new SearchRequest("hotel");
        request.source().query(QueryBuilders.matchQuery("all","北京"));
        request.source().from(10).size(5);
        request.source().sort("price", SortOrder.ASC);
        SearchResponse response = client.search(request, RequestOptions.DEFAULT);
        SearchHits searchHits = response.getHits();
        long totalNum = searchHits.getTotalHits().value;
        SearchHit[] hits = searchHits.getHits();
        for (SearchHit hit : hits) {
            HotelDoc hotelDoc = JSON.parseObject(hit.getSourceAsString(), HotelDoc.class);
            System.out.println(hotelDoc);
        }
        System.out.println("一共查询到:"+totalNum+"条");
    }
高亮
    @Test
    public void testHighLight() throws Exception {
        SearchRequest request = new SearchRequest("hotel");
        request.source().query(QueryBuilders.matchQuery("all","北京"));
        request.source().highlighter(new HighlightBuilder().field("name").requireFieldMatch(false));
        SearchResponse response = client.search(request, RequestOptions.DEFAULT);
        SearchHits searchHits = response.getHits();
        SearchHit[] hits = searchHits.getHits();
        for (SearchHit hit : hits) {
            HotelDoc hotelDoc = JSON.parseObject(hit.getSourceAsString(), HotelDoc.class);
            Map highlightFields = hit.getHighlightFields();
            if (!CollectionUtils.isEmpty(highlightFields)){
                HighlightField field = highlightFields.get("name");
                if (field!=null){
                    String value = field.getFragments()[0].string();
                    hotelDoc.setName(value);
                }
            }
            System.out.println(hotelDoc);
        }
} 