postgresql 数据库 常用命令
postgresql 数据库 常用命令
文章目录
- postgresql 数据库 常用命令
-
- 创建数据库
-
- CREATE DATABASE 创建数据库
- createdb 命令创建数据库
- pgAdmin 工具创建数据库
- 选择数据库
-
- 数据库的命令窗口
- 系统命令行窗口
- pgAdmin 工具
- 删除数据库
-
- DROP DATABASE 删除数据库
- dropdb 命令删除数据库
- pgAdmin 工具删除据库
- 查询
- 表空间
-
- 创建表空间
- 删除表空间
- 查询
- 用户和角色
-
- 创建用户
- 删除用户
- 查询
- 模式(schema)
-
- 创建SCHEMA
- 删除模式
- 查询
- 后记
创建数据库
PostgreSQL 创建数据库可以用以下三种方式:
- 1、使用 CREATE DATABASE SQL 语句来创建。
- 2、使用 createdb 命令来创建。
- 3、使用 pgAdmin 工具。
CREATE DATABASE 创建数据库
CREATE DATABASE 命令需要在 PostgreSQL 命令窗口来执行,语法格式如下:
postgres=# \h create database;
Command:     CREATE DATABASE
Description: create a new database
Syntax:
CREATE DATABASE name
    [ [ WITH ] [ OWNER [=] user_name ]
           [ TEMPLATE [=] template ]
           [ ENCODING [=] encoding ]
           [ LOCALE [=] locale ]
           [ LC_COLLATE [=] lc_collate ]
           [ LC_CTYPE [=] lc_ctype ]
           [ TABLESPACE [=] tablespace_name ]
           [ ALLOW_CONNECTIONS [=] allowconn ]
           [ CONNECTION LIMIT [=] connlimit ]
           [ IS_TEMPLATE [=] istemplate ] ]

URL: https://www.postgresql.org/docs/13/sql-createdatabase.html
例如,我们创建一个ceshi 的数据库:
postgres=# CREATE DATABASE ceshi;
CREATE DATABASE "ceshi"
WITH
  OWNER = "postgres"
  ENCODING = 'UTF8'
  TABLESPACE = "pg_default"
  CONNECTION LIMIT = -1
;
createdb 命令创建数据库
createdb 是一个 SQL 命令 CREATE DATABASE 的封装。
createdb 命令语法格式如下:
createdb [option...] [dbname [description]]
参数说明:
dbname:要创建的数据库名。
description:关于新创建的数据库相关的说明。
options:参数可选项,可以是以下值:
| 序号 | 选项 & 描述 |
|---|---|
| 1 | -D tablespace指定数据库默认表空间。 |
| 2 | -e将 createdb 生成的命令发送到服务端。 |
| 3 | -E encoding指定数据库的编码。 |
| 4 | -l locale指定数据库的语言环境。 |
| 5 | -T template指定创建此数据库的模板。 |
| 6 | –help显示 createdb 命令的帮助信息。 |
| 7 | -h host指定服务器的主机名。 |
| 8 | -p port指定服务器监听的端口,或者 socket 文件。 |
| 9 | -U username连接数据库的用户名。 |
| 10 | -w忽略输入密码。 |
| 11 | -W连接时强制要求输入密码。 |
接下来我们打开一个命令窗口,进入到 PostgreSQL 的安装目录,并进入到 bin 目录,createdb 命令位于 PostgreSQL安装目录/bin 下,执行创建数据库的命令:
$ cd /Library/PostgreSQL/11/bin/
$ createdb -h localhost -p 5432 -U postgres ceshi
password ******
以上命令我们使用了超级用户 postgres 登录到主机地址为 localhost,端口号为 5432 的 PostgreSQL 数据库中并创建 lhrpgdb 数据库。
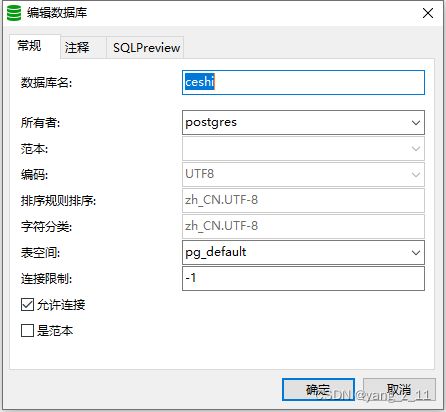
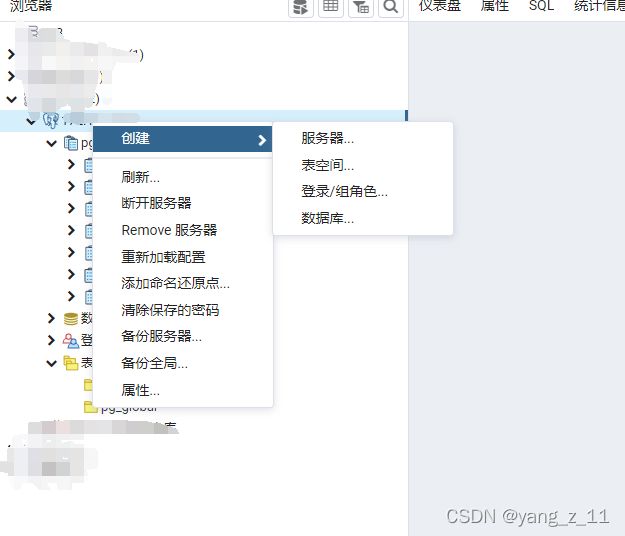
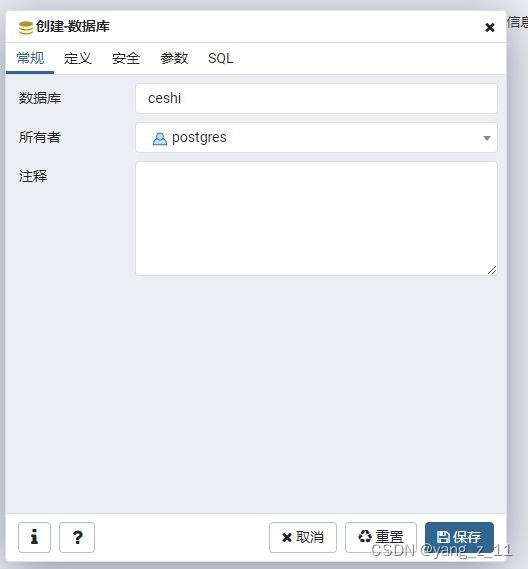
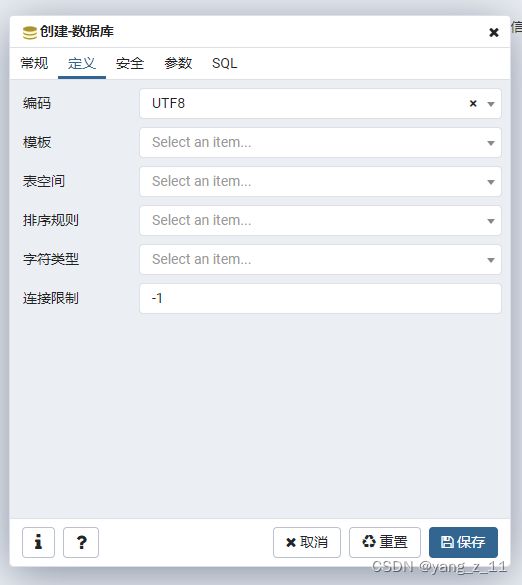
pgAdmin 工具创建数据库
选择数据库
数据库的命令窗口
PostgreSQL 命令窗口中,我们可以命令提示符后面输入 SQL 语句:
postgres=#
使用 \l 用于查看已经存在的数据库:
postgres=# \l
                             List of databases
   Name    |  Owner   | Encoding | Collate | Ctype |   Access privileges
-----------+----------+----------+---------+-------+-----------------------
 postgres  | postgres | UTF8     | C       | C     |
 ceshi  | postgres | UTF8     | C       | C     |
 template0 | postgres | UTF8     | C       | C     | =c/postgres          +
           |          |          |         |       | postgres=CTc/postgres
 template1 | postgres | UTF8     | C       | C     | =c/postgres          +
           |          |          |         |       | postgres=CTc/postgres
(4 rows)
接下来我们可以使用 \c + 数据库名 来进入数据库:
postgres=# \c ceshi
You are now connected to database "ceshi" as user "postgres".
ceshi=#
ceshi=# select current_user,current_database(),pg_backend_pid();
 current_user | current_database | pg_backend_pid
--------------+------------------+----------------
 postgres     | ceshi          |           2715
(1 row)
系统命令行窗口
在系统的命令行查看,我么可以在连接数据库后面添加数据库名来选择数据库:
$ psql -h localhost -p 5432 -U postgress ceshi
Password for user postgress: ****
psql (11.3)
Type "help" for help.
You are now connected to database "ceshi" as user "postgres".
ceshi=#
pgAdmin 工具
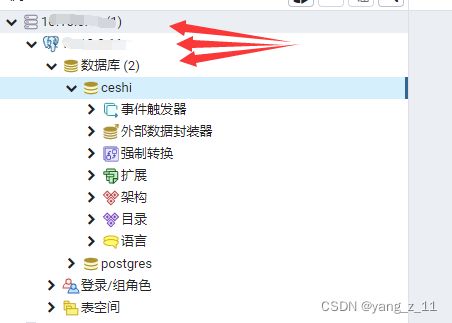
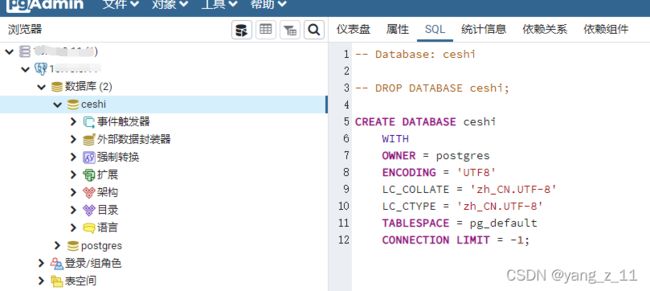
pgAdmin 工具更简单了,直接点击数据库选择就好了,还可以查看一些数据库额外的信息:
删除数据库
PostgreSQL 删除数据库可以用以下三种方式:
- 1、使用 DROP DATABASE SQL 语句来删除。
- 2、使用 dropdb 命令来删除。
- 3、使用 pgAdmin 工具。
**注意:**删除数据库要谨慎操作,一旦删除,所有信息都会消失。
DROP DATABASE 删除数据库
DROP DATABASE 会删除数据库的系统目录项并且删除包含数据的文件目录。
DROP DATABASE 只能由超级管理员或数据库拥有者执行。
DROP DATABASE 命令需要在 PostgreSQL 命令窗口来执行,语法格式如下:
DROP DATABASE [ IF EXISTS ] name
参数说明:
- IF EXISTS:如果数据库不存在则发出提示信息,而不是错误信息。
- name:要删除的数据库的名称。
例如,我们删除一个 lhrpgdb 的数据库:
postgres=# DROP DATABASE ceshi;
dropdb 命令删除数据库
dropdb 是 DROP DATABASE 的包装器。
dropdb 用于删除 PostgreSQL 数据库。
dropdb 命令只能由超级管理员或数据库拥有者执行。
dropdb 命令语法格式如下:
dropdb [connection-option...] [option...] dbname
参数说明:
dbname:要删除的数据库名。
options:参数可选项,可以是以下值:
| 序号 | 选项 & 描述 |
|---|---|
| 1 | -e显示 dropdb 生成的命令并发送到数据库服务器。 |
| 2 | -i在做删除的工作之前发出一个验证提示。 |
| 3 | -V打印 dropdb 版本并退出。 |
| 4 | –if-exists如果数据库不存在则发出提示信息,而不是错误信息。 |
| 5 | –help显示有关 dropdb 命令的帮助信息。 |
| 6 | -h host指定运行服务器的主机名。 |
| 7 | -p port指定服务器监听的端口,或者 socket 文件。 |
| 8 | -U username连接数据库的用户名。 |
| 9 | -w连接数据库的用户名。 |
| 10 | -W连接时强制要求输入密码。 |
| 11 | –maintenance-db=dbname删除数据库时指定连接的数据库,默认为 postgres,如果它不存在则使用 template1。 |
接下来我们打开一个命令窗口,进入到 PostgreSQL 的安装目录,并进入到 bin 目录,dropdb 名位于 PostgreSQL安装目录/bin 下,执行删除数据库的命令:
$ cd /Library/PostgreSQL/11/bin/
$ dropdb -h localhost -p 5432 -U postgres ceshi
password ******
以上命令我们使用了超级用户 postgres 登录到主机地址为 localhost,端口号为 5432 的 PostgreSQL 数据库中并删除 lhrpgdb 数据库。
pgAdmin 工具删除据库
pgAdmin 工具提供了完整操作数据库的功能:
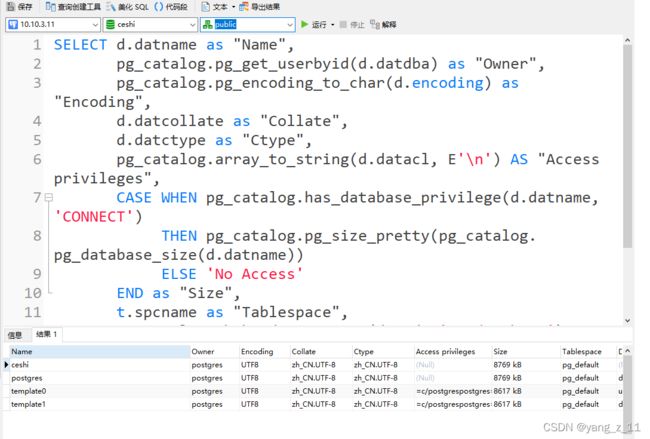
查询
-- \l+

SELECT d.datname as "Name",
       pg_catalog.pg_get_userbyid(d.datdba) as "Owner",
       pg_catalog.pg_encoding_to_char(d.encoding) as "Encoding",
       d.datcollate as "Collate",
       d.datctype as "Ctype",
       pg_catalog.array_to_string(d.datacl, E'\n') AS "Access privileges",
       CASE WHEN pg_catalog.has_database_privilege(d.datname, 'CONNECT')
            THEN pg_catalog.pg_size_pretty(pg_catalog.pg_database_size(d.datname))
            ELSE 'No Access'
       END as "Size",
       t.spcname as "Tablespace",
       pg_catalog.shobj_description(d.oid, 'pg_database') as "Description"
FROM pg_catalog.pg_database d
  JOIN pg_catalog.pg_tablespace t on d.dattablespace = t.oid
ORDER BY 1;


-- 查看各数据库数据创建时间
SELECT
	datname,
	(
	pg_stat_file (
	format ( '%s/%s/PG_VERSION', CASE WHEN spcname = 'pg_default' THEN 'base' ELSE'pg_tblspc/' || t2.oid || '/PG_11_201804061/' END, t1.oid ))).*
FROM
	pg_database t1,
	pg_tablespace t2
WHERE
	t1.dattablespace = t2.oid;
表空间
用户必须有表空间所在目录访问权限,所以在创建表空间之前需要在对应分区下创建相应的目录,并为其分配权限。
PostgreSQL中的表空间允许在文件系统中定义用来存放表示数据库对象的文件的位置。在PostgreSQL中表空间实际上就是给表指定一个存储目录,能合理利用磁盘性能和空间,制定最优的物理存储方式来管理数据库表和索引。
在DB2和Oracle数据库中;一个表空间只属于一个数据库使用;而一个数据库可以拥有多个表空间。属于"一对多"的关系。
在PostgreSQL集群中;一个表空间可以让多个数据库使用;而一个数据库可以使用多个表空间。属于"多对多"的关系。用户下面拥有表,拥有模式。模式下面拥有表空间。
- initdb()后马上创建pg_default和pg_global表空间
- 建表时如果没有指定特定的表空间,表默认被存在pg_default表空间中。
- 用于管理整个数据库集群的表默认被存储在pg_global表空间中。
- pg_default表空间的物理位置为$PGDATA\base目录。
- pg_global表空间的物理位置为$PGDATA\global目录。
- 一个表空间可以被多个数据库同时使用。此时,每一个数据库都会在表空间路径下创建为一个新的子路径。
- 创建一个用户表空间会在$PGDATA\pg_tblspc目录下面创建一个软连接,连接到表空间制定的目录位置。
创建表空间
mkdir -p /postgresql/pgdata/ts_test1
mkdir -p /postgresql/pgdata/ts_test2


psql
\h create tablespace
create tablespace ts_test1 location '/postgresql/pgdata/ts_test1';
create tablespace ts_test2 location '/postgresql/pgdata/ts_test2';
\db
create table ceshi (id int) tablespace ts_test1;
\d+ lhrtest
alter table ceshi set tablespace ts_test2;

select pg_relation_filepath('ceshi');
执行过程:
[pgsql@lhrpg pgdata]$ mkdir -p /postgresql/pgdata/ts_test1
[pgsql@lhrpg pgdata]$ mkdir -p /postgresql/pgdata/ts_test2
[pgsql@lhrpg pgdata]$ psql
psql (11.5)
Type "help" for help.

postgres=# \h create tablespace;
Command:     CREATE TABLESPACE
Description: define a new tablespace
Syntax:
CREATE TABLESPACE tablespace_name
    [ OWNER { new_owner | CURRENT_USER | SESSION_USER } ]
    LOCATION 'directory'
    [ WITH ( tablespace_option = value [, ... ] ) ]

URL: https://www.postgresql.org/docs/13/sql-createtablespace.html

postgres=# \db+
                                  List of tablespaces
    Name    |  Owner   | Location | Access privileges | Options |  Size  | Description
------------+----------+----------+-------------------+---------+--------+-------------
 pg_default | postgres |          |                   |         | 295 MB |
 pg_global  | postgres |          |                   |         | 559 kB |
(2 rows)

postgres=#
postgres=# create tablespace ts_test1 location '/postgresql/pgdata/ts_test1';
WARNING:  tablespace location should not be inside the data directory
CREATE TABLESPACE
postgres=# create tablespace ts_test2 location '/postgresql/pgdata/ts_test2';
WARNING:  tablespace location should not be inside the data directory
CREATE TABLESPACE
postgres=# \db
                 List of tablespaces
    Name    |  Owner   |          Location
------------+----------+-----------------------------
 pg_default | postgres |
 pg_global  | postgres |
 ts_test1   | postgres | /postgresql/pgdata/ts_test1
 ts_test2   | postgres | /postgresql/pgdata/ts_test2
(4 rows)

postgres=#
postgres=# create table ceshi (id int) tablespace ts_test1;
CREATE TABLE
postgres=# \d+ ceshi
                                  Table "public.ceshi"
 Column |  Type   | Collation | Nullable | Default | Storage | Stats target | Description
--------+---------+-----------+----------+---------+---------+--------------+-------------
 id     | integer |           |          |         | plain   |              |
Tablespace: "ts_test1"
Access method: heap

postgres=#
postgres=# alter table ceshi set tablespace ts_test2;
ALTER TABLE
postgres=# \d+ ceshi
                                  Table "public.ceshi"
 Column |  Type   | Collation | Nullable | Default | Storage | Stats target | Description
--------+---------+-----------+----------+---------+---------+--------------+-------------
 id     | integer |           |          |         | plain   |              |
Tablespace: "ts_test2"
Access method: heap

postgres=# \d
          List of relations
 Schema |  Name   | Type  |  Owner
--------+---------+-------+----------
 public | ceshi | table | postgres
 public | sbtest  | table | postgres
(2 rows)


[pgsql@lhrpg pgdata]$ ll pg_tblspc/
total 0
lrwxrwxrwx 1 pgsql pgsql 27 May 28 09:13 16534 -> /postgresql/pgdata/ts_test1
lrwxrwxrwx 1 pgsql pgsql 27 May 28 09:21 16535 -> /postgresql/pgdata/ts_test2
删除表空间
postgres=# drop table if exists test;
DROP TABLE
postgres=# drop tablespace if exists tbs_test;
DROP TABLESPACE
查询
SELECT oid,spcname AS "Name",
  pg_catalog.pg_get_userbyid(spcowner) AS "Owner",
  pg_catalog.pg_tablespace_location(oid) AS "Location",
  pg_catalog.array_to_string(spcacl, E'\n') AS "Access privileges",
  spcoptions AS "Options",
  pg_catalog.pg_size_pretty(pg_catalog.pg_tablespace_size(oid)) AS "Size",
  pg_catalog.shobj_description(oid, 'pg_tablespace') AS "Description"
FROM pg_catalog.pg_tablespace
ORDER BY 1;

\db+
用户和角色
用户和角色在PostgreSQL中是一个概念。 但是, CREATE ROLE创建的用户默认不带LOGIN属性,而CREATE USER创建的用户默认带有LOGIN属性。如果给role授权login则等同user。
创建用户
create user lhr with password 'lhr';
GRANT ALL PRIVILEGES ON DATABASE  postgres to lhr;

CREATE USER lhr2 WITH
LOGIN SUPERUSER CREATEDB CREATEROLE
INHERIT REPLICATION
CONNECTION LIMIT -1
PASSWORD 'lhr';


CREATE ROLE username WITH LOGIN password 'l';
ALTER ROLE username WITH NOLOGIN;
ALTER ROLE username WITH login;
查:
postgres=# \du+
                                          List of roles
 Role name |                         Attributes                         | Member of | Description
-----------+------------------------------------------------------------+-----------+-------------
 lhr       |                                                            | {}        |
 lhr2      | Superuser, Create role, Create DB, Replication             | {}        |
 postgres  | Superuser, Create role, Create DB, Replication, Bypass RLS | {}        |


postgres=# select * from pg_user;
 usename  | usesysid | usecreatedb | usesuper | userepl | usebypassrls |  passwd  | valuntil | useconfig
----------+----------+-------------+----------+---------+--------------+----------+----------+-----------
 postgres |       10 | t           | t        | t       | t            | ******** |          |
 lhr      |    16540 | f           | f        | f       | f            | ******** |          |
 lhr2     |    16541 | t           | t        | t       | f            | ******** |          |
(3 rows)
删除用户
-- ERROR:  role "lhr" cannot be dropped because some objects depend on it
drop owned by lhr cascade;

-- 若有数据库,那么还需要删掉数据库
drop user lhr;
执行:
sbtest=# drop user lhr ;
ERROR:  role "lhr" cannot be dropped because some objects depend on it
DETAIL:  privileges for database postgres
sbtest=# drop owned by lhr cascade;
DROP OWNED
sbtest=# drop user lhr ;
DROP ROLE
查询
\du+
select * from pg_user;
模式(schema)
模式(schema):我们在pg数据库中创建的任何对象(表,索引,视图等)都会在一个模式下被创建。
当创建对象时,如果未指定模式,这些对象将会在默认的模式下被创建.这个模式叫做public。public模式,代表所有人的意思。 一个例外情况是另一个模式首先出现在search_path中。
PostgreSQL 模式(SCHEMA)可以看着是一个表的集合。
一个模式可以包含视图、索引、数据类型、函数和操作符等。
相同的对象名称可以被用于不同的模式中而不会出现冲突,例如 schema1 和 myschema 都可以包含名为 mytable 的表。
使用模式的优势:
- 允许多个用户使用一个数据库并且不会互相干扰。
- 将数据库对象组织成逻辑组以便更容易管理。
- 第三方应用的对象可以放在独立的模式中,这样它们就不会与其他对象的名称发生冲突。
模式类似于操作系统层的目录,但是模式不能嵌套。
创建SCHEMA
我们可以使用 CREATE SCHEMA 语句来创建模式,语法格式如下:
postgres=# \h create schema;
Command:     CREATE SCHEMA
Description: define a new schema
Syntax:
CREATE SCHEMA schema_name [ AUTHORIZATION role_specification ] [ schema_element [ ... ] ]
CREATE SCHEMA AUTHORIZATION role_specification [ schema_element [ ... ] ]
CREATE SCHEMA IF NOT EXISTS schema_name [ AUTHORIZATION role_specification ]
CREATE SCHEMA IF NOT EXISTS AUTHORIZATION role_specification

where role_specification can be:

    user_name
  | CURRENT_USER
  | SESSION_USER
接下来我们连接到 lhrpgdb 来创建模式 myschema:
ceshi=# create schema myschema;
CREATE SCHEMA

ceshi=#  \dn
   List of schemas
   Name   |  Owner
----------+----------
 lhr      | postgres
 myschema | postgres
 public   | postgres
(3 rows)


ceshi=#  \dnS
        List of schemas
        Name        |  Owner
--------------------+----------
 information_schema | postgres
 lhr                | postgres
 myschema           | postgres
 pg_catalog         | postgres
 pg_temp_1          | postgres
 pg_toast           | postgres
 pg_toast_temp_1    | postgres
 public             | postgres
(8 rows)


ceshi=#  \dnS+
                                     List of schemas
        Name        |  Owner   |  Access privileges   |           Description
--------------------+----------+----------------------+----------------------------------
 information_schema | postgres | postgres=UC/postgres+|
                    |          | =U/postgres          |
 lhr                | postgres |                      |
 myschema           | postgres |                      |
 pg_catalog         | postgres | postgres=UC/postgres+| system catalog schema
                    |          | =U/postgres          |
 pg_temp_1          | postgres |                      |
 pg_toast           | postgres |                      | reserved schema for TOAST tables
 pg_toast_temp_1    | postgres |                      |
 public             | postgres | postgres=UC/postgres+| standard public schema
                    |          | =UC/postgres         |
(8 rows)
输出结果 “CREATE SCHEMA” 就代表模式创建成功。
接下来我们再创建一个表格:
ceshi=# create table myschema.company(
   ID   INT              NOT NULL,
   NAME VARCHAR (20)     NOT NULL,
   AGE  INT              NOT NULL,
   ADDRESS  CHAR (25),
   SALARY   DECIMAL (18, 2),
   PRIMARY KEY (ID)
);
以上命令创建了一个空的表格,我们使用以下 SQL 来查看表格是否创建:
ceshi=# select * from myschema.company;
 id | name | age | address | salary
----+------+-----+---------+--------
(0 rows)
删除模式
删除一个为空的模式(其中的所有对象已经被删除):
DROP SCHEMA myschema;
删除一个模式以及其中包含的所有对象:
DROP SCHEMA myschema CASCADE;
查询
select * from pg_catalog.pg_namespace;


SELECT n.nspname AS "Name",
  pg_catalog.pg_get_userbyid(n.nspowner) AS "Owner",
  pg_catalog.array_to_string(n.nspacl, E'\n') AS "Access privileges",
  pg_catalog.obj_description(n.oid, 'pg_namespace') AS "Description"
FROM pg_catalog.pg_namespace n
ORDER BY 1;
后记
如果本文章有何错误,请您评论中指出,或联系我,我会改正,如果您觉得这篇文章有用,请帮忙一键三连,让更多的人看见,谢谢
作者 yang_z_1 csdn博客地址: https://blog.csdn.net/yang_z_1?type=blog
