spring boot整合spring security和jwt实现分布式认证和权限处理
spring security是spring官方比较推荐的用于认证和权限的解决方案,市面上做认证和权限的开发框架还有shiro,spring boot也提供了shiro的解决方案,本人在之前的开发中大多使用了shiro,但是spring security也是值得一学的,除了官方推荐的原因像spring oauth2.0也会用到它,所以学习一下还是很有必要的,本次将围绕spring security的认证授权、jwt进行学习分享
1 依赖的引入
   org.springframework.boot
   spring-boot-starter-security


   io.jsonwebtoken
   jjwt
   0.9.0
2 编写认证授权的处理类,主要用于未登录、没有权限的信息的处理逻辑
package com.debug.security;

import com.fasterxml.jackson.databind.ObjectMapper;
import org.springframework.beans.factory.annotation.Autowired;
import org.springframework.security.access.AccessDeniedException;
import org.springframework.security.web.access.AccessDeniedHandler;
import org.springframework.stereotype.Component;

import javax.servlet.ServletException;
import javax.servlet.http.HttpServletRequest;
import javax.servlet.http.HttpServletResponse;
import java.io.IOException;
import java.util.HashMap;
import java.util.Map;

/**
 * 处理没有权限的类
 */
@Component
public class RestAuthAccessDeniedHandler implements AccessDeniedHandler {

    @Autowired
    private ObjectMapper objectMapper;

    @Override
    public void handle(HttpServletRequest request, HttpServletResponse response, AccessDeniedException e) throws IOException, ServletException {
        Map map = new HashMap<>(2);
        map.put("code", "403");
        map.put("msg", "你没有操作权限");
        response.setContentType("application/json;charset=UTF-8");
        response.getWriter().write(objectMapper.writeValueAsString(map));
    }
}
package com.debug.security;
import com.fasterxml.jackson.databind.ObjectMapper;
import org.springframework.beans.factory.annotation.Autowired;
import org.springframework.security.core.AuthenticationException;
import org.springframework.security.web.AuthenticationEntryPoint;
import org.springframework.stereotype.Component;
import javax.servlet.http.HttpServletRequest;
import javax.servlet.http.HttpServletResponse;
import java.io.IOException;
import java.util.HashMap;
import java.util.Map;
/**
* 自定401返回值
*/
@Component
public class RestAuthUnauthorizedHandler implements AuthenticationEntryPoint {
@Autowired
private ObjectMapper objectMapper;
@Override
public void commence(HttpServletRequest request, HttpServletResponse response, AuthenticationException e) throws IOException {
Map map = new HashMap<>(2);
map.put("code", "401");
map.put("msg", "请先进行认证");
response.setContentType("application/json;charset=UTF-8");
response.getWriter().write(objectMapper.writeValueAsString(map));
}
} 3 编写springsecurity的主要配置类
该配置类主要编写security的相关配置如哪些资源需要经过security处理、认证和授权的逻辑、认证或授权失败的处理、认证密码的加密配置等
需要注意的是要开启bean的重写,原因是有的spring boot版本bean的重写默认是不允许的(如本人使用的2.1.3版本),该配置写在spring节点下面
  main:
    allow-bean-definition-overriding: true
下面是该配置类的全部代码,先上代码后面再解释与之关联的类
package com.debug.security;

import com.debug.service.SecurityUserService;
import org.springframework.beans.factory.annotation.Autowired;
import org.springframework.context.annotation.Bean;
import org.springframework.context.annotation.Configuration;
import org.springframework.security.config.annotation.authentication.builders.AuthenticationManagerBuilder;
import org.springframework.security.config.annotation.method.configuration.EnableGlobalMethodSecurity;
import org.springframework.security.config.annotation.web.builders.HttpSecurity;
import org.springframework.security.config.annotation.web.configuration.EnableWebSecurity;
import org.springframework.security.config.annotation.web.configuration.WebSecurityConfigurerAdapter;
import org.springframework.security.config.http.SessionCreationPolicy;
import org.springframework.security.crypto.bcrypt.BCryptPasswordEncoder;
import org.springframework.security.web.access.expression.DefaultWebSecurityExpressionHandler;
import org.springframework.security.web.authentication.UsernamePasswordAuthenticationFilter;

@Configuration
@EnableWebSecurity
@EnableGlobalMethodSecurity(prePostEnabled = true)
public class WebSecurityConfig extends WebSecurityConfigurerAdapter {
    @Autowired
    private SecurityUserService securityUserService;

    @Autowired
    private JwtAuthenticationTokenFilter jwtAuthenticationTokenFilter;

    @Autowired
    private RestAuthUnauthorizedHandler restAuthUnauthorizedHandler;

    @Autowired
    private RestAuthAccessDeniedHandler restAuthAccessDeniedHandler;


    @Autowired
    public void configureAuthentication(AuthenticationManagerBuilder authenticationManagerBuilder) throws Exception {
        authenticationManagerBuilder.userDetailsService(this.securityUserService).passwordEncoder(new BCryptPasswordEncoder());
    }

    /***注入自定义的CustomPermissionEvaluator*/
    @Bean
    public DefaultWebSecurityExpressionHandler webSecurityExpressionHandler() {
        DefaultWebSecurityExpressionHandler handler = new DefaultWebSecurityExpressionHandler();
        handler.setPermissionEvaluator(new CustomPermissionEvaluator());

        return handler;
    }

    /*@Override
    protected void configure(AuthenticationManagerBuilder auth) throws Exception {
        //这里可启用我们自己的登陆验证逻辑
        auth.authenticationProvider(authenticationProvider);
    }*/

    @Override
    protected void configure(HttpSecurity httpSecurity) throws Exception {
        httpSecurity.csrf().disable().sessionManagement().sessionCreationPolicy(SessionCreationPolicy.STATELESS)
                .and().authorizeRequests()
                .antMatchers("/auth/**").permitAll()
                .anyRequest().authenticated()
                .and()
                .exceptionHandling().authenticationEntryPoint(restAuthUnauthorizedHandler)
                .and()
                //配置没有权限的自定义处理类
                .exceptionHandling().accessDeniedHandler(restAuthAccessDeniedHandler)
                .and().headers().cacheControl();
        httpSecurity.addFilterBefore(jwtAuthenticationTokenFilter, UsernamePasswordAuthenticationFilter.class);
        //httpSecurity.exceptionHandling().authenticationEntryPoint(entryPointUnauthorizedHandler).accessDeniedHandler(restAccessDeniedHandler);

    }
}
其中SecurityUserServiceImpl主要用于处理认证、权限分配、刷新token等,代码如下:
package com.debug.service.impl;

import com.baomidou.mybatisplus.core.conditions.query.QueryWrapper;
import com.debug.entity.TSystemPermission;
import com.debug.entity.TSystemRole;
import com.debug.entity.TSystemUser;
import com.debug.jwt.JwtTokenUtil;
import com.debug.security.MyAuthenticationProvider;
import com.debug.service.SecurityUserService;
import com.debug.service.TSystemPermissionService;
import com.debug.service.TSystemRoleService;
import com.debug.service.TSystemUserService;
import org.springframework.beans.factory.annotation.Autowired;
import org.springframework.security.authentication.BadCredentialsException;
import org.springframework.security.core.GrantedAuthority;
import org.springframework.security.core.authority.AuthorityUtils;
import org.springframework.security.core.userdetails.User;
import org.springframework.security.core.userdetails.UserDetails;
import org.springframework.security.core.userdetails.UsernameNotFoundException;
import org.springframework.security.crypto.bcrypt.BCryptPasswordEncoder;
import org.springframework.stereotype.Service;

import java.util.List;

@Service
public class SecurityUserServiceImpl implements SecurityUserService {

    @Autowired
    private TSystemUserService tSystemUserService;


    @Autowired
    private TSystemRoleService tSystemRoleService;

    @Autowired
    private TSystemPermissionService tSystemPermissionService;

    @Autowired
    private JwtTokenUtil jwtTokenUtil;


    public UserDetails loadUserByUsername(String username) throws UsernameNotFoundException {
        QueryWrapper qw = new QueryWrapper();
        qw.eq("login_name", username);
        TSystemUser user = tSystemUserService.getOne(qw);
        if (user == null) {
            throw new UsernameNotFoundException("用户名不存在");
        }
        List permissionList = tSystemPermissionService.getRolePermission(user.getId(), "1");
        List roleList = tSystemRoleService.getUserRole(user.getId());

        String roleName = roleList.get(0).getName();

        StringBuffer buf = new StringBuffer();
        for (TSystemPermission permission : permissionList) {
            String per = permission.getPermission();
            buf.append(per + ",");

        }

        String sp = buf.toString().substring(0, buf.toString().lastIndexOf(","));
        List authList = AuthorityUtils.commaSeparatedStringToAuthorityList(roleName + "," + sp);

        UserDetails u = new User(user.getLoginName(), user.getPassword(), authList);

        return u;
    }

    public String login(String username, String password) {

        QueryWrapper qw = new QueryWrapper();
        qw.eq("login_name", username);
        TSystemUser user = tSystemUserService.getOne(qw);

        // 这里我们还要判断密码是否正确,这里我们的密码使用BCryptPasswordEncoder进行加密的
        if (!new BCryptPasswordEncoder().matches(password, user.getPassword())) {
            throw new BadCredentialsException("密码不正确");
        }

        return jwtTokenUtil.generateToken(username);
    }

    public String refreshToken(String oldToken) {
        String token = oldToken;
        if (!jwtTokenUtil.isTokenExpired(token)) {
            return jwtTokenUtil.refreshToken(token);
        }
        return "error";
    }
}
考虑到分布式代码环境,请求大多来源于其他项目或者微服务,所以我们需要通过过滤器来处理请求,下面是过滤器的代码
package com.debug.security;

import com.debug.jwt.JwtTokenUtil;
import com.debug.service.SecurityUserService;
import org.springframework.beans.factory.annotation.Autowired;
import org.springframework.security.authentication.UsernamePasswordAuthenticationToken;
import org.springframework.security.core.context.SecurityContextHolder;
import org.springframework.security.core.userdetails.UserDetails;
import org.springframework.security.web.authentication.WebAuthenticationDetailsSource;
import org.springframework.stereotype.Component;
import org.springframework.web.filter.OncePerRequestFilter;

import javax.servlet.FilterChain;
import javax.servlet.ServletException;
import javax.servlet.http.HttpServletRequest;
import javax.servlet.http.HttpServletResponse;
import java.io.IOException;

/**
 * Token过滤器.
 */
@Component
public class JwtAuthenticationTokenFilter extends OncePerRequestFilter {

    private SecurityUserService securityUserService;

    private JwtTokenUtil jwtTokenUtil;

    @Autowired
    public JwtAuthenticationTokenFilter(SecurityUserService securityUserService, JwtTokenUtil jwtTokenUtil) {
        this.securityUserService = securityUserService;
        this.jwtTokenUtil = jwtTokenUtil;
    }

    @Override
    protected void doFilterInternal(HttpServletRequest request, HttpServletResponse response, FilterChain chain) throws ServletException, IOException {
        String authHeader = request.getHeader("Authorization");

        if (authHeader != null) {
            String authToken = authHeader;
            String username = jwtTokenUtil.getUsernameFromToken(authToken);
            if (username != null && SecurityContextHolder.getContext().getAuthentication() == null) {
                UserDetails userDetails = this.securityUserService.loadUserByUsername(username);
                if (jwtTokenUtil.validateToken(authToken, userDetails)) {

                    UsernamePasswordAuthenticationToken authentication = new UsernamePasswordAuthenticationToken(userDetails, null, userDetails.getAuthorities());
                    authentication.setDetails(new WebAuthenticationDetailsSource().buildDetails(request));
                    SecurityContextHolder.getContext().setAuthentication(authentication);

                }
            }
        }
        chain.doFilter(request, response);
    }

}
过滤器对token进行校验只有token正确才能通过过滤器
到此处为止用户虽然可以认证了,但是程序仍然不知道权限的验证逻辑,所以我们需要编写权限的验证逻辑类,如下所示
package com.debug.security;

import com.debug.service.SecurityUserService;
import org.springframework.beans.factory.annotation.Autowired;
import org.springframework.security.access.PermissionEvaluator;
import org.springframework.security.core.Authentication;
import org.springframework.security.core.GrantedAuthority;
import org.springframework.stereotype.Component;

import java.io.Serializable;
import java.util.Collection;

/**
 * 我们需要自定义对hasPermission()方法的处理,
 * 就需要自定义PermissionEvaluator,创建类CustomPermissionEvaluator,实现PermissionEvaluator接口。
 */
@Component
public class CustomPermissionEvaluator implements PermissionEvaluator {


    @Autowired
    private SecurityUserService securityUserService;

    /**
     * 自定义验证方法
     *
     * @param authentication     登录的时候存储的用户信息
     * @param targetDomainObject @PreAuthorize("hasPermission('/hello/**','r')") 中hasPermission的第一个参数
     * @param permission         @PreAuthorize("hasPermission('/hello/**','r')") 中hasPermission的第二个参数
     * @return
     */
    @Override
    public boolean hasPermission(Authentication authentication, Object targetDomainObject, Object permission) {

        System.out.println("=======" + permission);
        // 获得loadUserByUsername()方法的结果
        //TSystemUser user = (TSystemUser) authentication.getPrincipal();

        // 获得loadUserByUsername()中注入的权限
        Collection authorities = authentication.getAuthorities();

        // 遍历用户权限进行判定
        for (GrantedAuthority authority : authorities) {

            // 如果访问的Url和权限用户符合的话,返回true
            String permissionUrl = authority.getAuthority();

            if (permission.equals(permissionUrl)) {
                return true;
            }
        }

        return false;
    }

    @Override
    public boolean hasPermission(Authentication authentication, Serializable targetId, String targetType, Object permission) {
        return false;
    }
}
到此大部分功能就完成了但是登录认证并获取token的逻辑还未实现,所以我们需要一个controller来处理相关业务逻辑
package com.debug.controller;

import com.debug.service.SecurityUserService;
import org.springframework.beans.factory.annotation.Autowired;
import org.springframework.security.core.AuthenticationException;
import org.springframework.web.bind.annotation.PostMapping;
import org.springframework.web.bind.annotation.RequestMapping;
import org.springframework.web.bind.annotation.RestController;

@RestController
@RequestMapping("/auth")
public class AuthController {

    @Autowired
    private SecurityUserService securityUserService;

    /**
     * 用户登录
     *
     * @param username 用户名
     * @param password 密码
     * @return 操作结果
     * @throws AuthenticationException 错误信息
     */
    @PostMapping(value = "/login", params = {"username", "password"})
    public String getToken(String username, String password) throws AuthenticationException {
        return securityUserService.login(username, password);
    }
}
4 jwt工具类和RSA工具类
我们知道jwt由三部分组成分别是头信息、载荷、签名,最重要的部分则是签名,我们使用jwt生成token就需要这个签名,签名的方式则使用RSA非对称加密,下面先来看看RSA的加解密原理:
私钥加密:持有公钥或私钥可以解密
公钥加密:持有私钥才可以解密
从上我们可以总结出私钥可以对上述两种方式进行解密,考虑到安全性如token被篡改的可能,服务端需要使用私钥,请求端只能持有公钥;服务端用私钥加密,请求端则使用公钥解密
因此我们需要一个RSA工具类,一个jwt工具类
package com.debug.jwt;

import org.springframework.stereotype.Component;

import java.io.File;
import java.io.IOException;
import java.nio.file.Files;
import java.security.*;
import java.security.spec.PKCS8EncodedKeySpec;
import java.security.spec.X509EncodedKeySpec;

@Component
public class RsaUtils {
    /**
     * 从文件中读取公钥
     *
     * @param filename 公钥保存路径,相对于classpath
     * @return 公钥对象
     * @throws Exception
     */
    public PublicKey getPublicKey(String filename) throws Exception {
        byte[] bytes = readFile(filename);
        return getPublicKey(bytes);
    }

    /**
     * 从文件中读取密钥
     *
     * @param filename 私钥保存路径,相对于classpath
     * @return 私钥对象
     * @throws Exception
     */
    public PrivateKey getPrivateKey(String filename) throws Exception {
        byte[] bytes = readFile(filename);
        return getPrivateKey(bytes);
    }

    /**
     * 获取公钥
     *
     * @param bytes 公钥的字节形式
     * @return
     * @throws Exception
     */
    public PublicKey getPublicKey(byte[] bytes) throws Exception {
        X509EncodedKeySpec spec = new X509EncodedKeySpec(bytes);
        KeyFactory factory = KeyFactory.getInstance("RSA");
        return factory.generatePublic(spec);
    }

    /**
     * 获取密钥
     *
     * @param bytes 私钥的字节形式
     * @return
     * @throws Exception
     */
    public PrivateKey getPrivateKey(byte[] bytes) throws Exception {
        PKCS8EncodedKeySpec spec = new PKCS8EncodedKeySpec(bytes);
        KeyFactory factory = KeyFactory.getInstance("RSA");
        return factory.generatePrivate(spec);
    }

    /**
     * 根据密文,生存rsa公钥和私钥,并写入指定文件
     *
     * @param publicKeyFilename  公钥文件路径
     * @param privateKeyFilename 私钥文件路径
     * @param secret             生成密钥的密文
     * @throws IOException
     * @throws NoSuchAlgorithmException
     */
    public void generateKey(String publicKeyFilename, String privateKeyFilename, String secret) throws Exception {
        KeyPairGenerator keyPairGenerator = KeyPairGenerator.getInstance("RSA");
        SecureRandom secureRandom = new SecureRandom(secret.getBytes());
        keyPairGenerator.initialize(1024, secureRandom);
        KeyPair keyPair = keyPairGenerator.genKeyPair();
        // 获取公钥并写出
        byte[] publicKeyBytes = keyPair.getPublic().getEncoded();
        writeFile(publicKeyFilename, publicKeyBytes);
        // 获取私钥并写出
        byte[] privateKeyBytes = keyPair.getPrivate().getEncoded();
        writeFile(privateKeyFilename, privateKeyBytes);
    }

    private static byte[] readFile(String fileName) throws Exception {
        return Files.readAllBytes(new File(fileName).toPath());
    }

    private void writeFile(String destPath, byte[] bytes) throws IOException {
        File dest = new File(destPath);
        if (!dest.exists()) {
            dest.createNewFile();
        }
        Files.write(dest.toPath(), bytes);
    }

    /**
     * 测试RSAUtils工具类的使用
     *
     * @param args
     */
    /*public static void main(String[] args) throws Exception {

        String pubKeyPath = "D:\\rsa\\rsa_public_key.pem";
        String priKeyPath = "D:\\rsa\\rsa_private_key.pem";

        String secret = "sc@Login(Auth}*^31)&czxy%";

        RsaUtils util=new RsaUtils();
        util.generateKey(pubKeyPath, priKeyPath, secret);


        System.out.println("ok");


        PublicKey publicKey = util.getPublicKey(pubKeyPath);
        System.out.println("公钥:" + publicKey);


        PrivateKey privateKey = util.getPrivateKey(priKeyPath);
        System.out.println("私钥:" + privateKey);

    }*/
}
这个工具类可以生成公钥和私钥的pem文件,后面的jwt工具类需要这两个文件进行加解密
package com.debug.jwt;

import io.jsonwebtoken.Claims;
import io.jsonwebtoken.Jwts;
import io.jsonwebtoken.SignatureAlgorithm;
import org.springframework.beans.factory.annotation.Autowired;
import org.springframework.beans.factory.annotation.Value;
import org.springframework.security.core.userdetails.User;
import org.springframework.security.core.userdetails.UserDetails;
import org.springframework.stereotype.Component;

import java.io.Serializable;
import java.util.Date;
import java.util.HashMap;
import java.util.Map;

/**
 * JWT工具类
 *
 */
@Component
public class JwtTokenUtil implements Serializable {

    @Autowired
    private RsaUtils rsaUtils;

    @Value("${myjwt.pubKeyPath}")
    private String pubKeyPath;
    @Value("${myjwt.priKeyPath}")
    private String priKeyPath;

    //过期时间-单位为秒(默认30分钟)
    private Long overTime = 1800L;

    /**
     * 从数据声明生成令牌
     *
     * @param claims 数据声明
     * @return 令牌
     */
    private String generateToken(Map claims) throws Exception {
        Date expirationDate = new Date(System.currentTimeMillis() + overTime * 1000);
        return Jwts.builder().setClaims(claims).setExpiration(expirationDate).signWith(SignatureAlgorithm.RS256, rsaUtils.getPrivateKey(priKeyPath)).compact();
    }

    /**
     * 从令牌中获取数据声明
     *
     * @param token 令牌
     * @return 数据声明
     */
    private Claims getClaimsFromToken(String token) {
        Claims claims;
        try {
            claims = Jwts.parser().setSigningKey(rsaUtils.getPublicKey(pubKeyPath)).parseClaimsJws(token).getBody();
        } catch (Exception e) {
            claims = null;
        }
        return claims;
    }

    /**
     * 生成令牌
     *
     * @param userName 用户名
     * @return 令牌
     */
    public String generateToken(String userName) {
        Map claims = new HashMap<>(2);
        claims.put("sub", userName);
        claims.put("created", new Date());
        try {
            return generateToken(claims);
        } catch (Exception e) {
            return null;
        }

    }

    /**
     * 从令牌中获取用户名
     *
     * @param token 令牌
     * @return 用户名
     */
    public String getUsernameFromToken(String token) {
        String username;
        try {
            Claims claims = getClaimsFromToken(token);
            username = claims.getSubject();
        } catch (Exception e) {
            username = null;
        }
        return username;
    }

    /**
     * 判断令牌是否过期
     *
     * @param token 令牌
     * @return 是否过期
     */
    public Boolean isTokenExpired(String token) {
        try {
            Claims claims = getClaimsFromToken(token);
            Date expiration = claims.getExpiration();
            return expiration.before(new Date());
        } catch (Exception e) {
            return false;
        }
    }

    /**
     * 刷新令牌
     *
     * @param token 原令牌
     * @return 新令牌
     */
    public String refreshToken(String token) {
        String refreshedToken;
        try {
            Claims claims = getClaimsFromToken(token);
            claims.put("created", new Date());
            refreshedToken = generateToken(claims);
        } catch (Exception e) {
            refreshedToken = null;
        }
        return refreshedToken;
    }

    /**
     * 验证令牌
     *
     * @param token       令牌
     * @param userDetails 用户
     * @return 是否有效
     */
    public Boolean validateToken(String token, UserDetails userDetails) {
        User user = (User) userDetails;
        String username = getUsernameFromToken(token);
        return (username.equals(user.getUsername()) && !isTokenExpired(token));
    }

}
5 写一个测试用controller,加上权限注解可以是jsr的也可以使用spring security提供的
package com.debug.controller;

import com.debug.entity.TEducationLevel;
import com.debug.service.TEducationLevelService;
import org.springframework.beans.factory.annotation.Autowired;
import org.springframework.security.access.prepost.PreAuthorize;
import org.springframework.web.bind.annotation.RequestMapping;
import org.springframework.web.bind.annotation.ResponseBody;
import org.springframework.web.bind.annotation.RestController;

import java.util.List;

@RestController
@RequestMapping("/test")
public class TestController {

    @Autowired
    private TEducationLevelService tEducationLevelService;


    //@PreAuthorize("hasPermission('/test/list/**','r')")
    //@PreAuthorize("hasPermission('/test/list/**','ROLE_ADMIN')")
    @PreAuthorize("hasRole('ROLE_ADMIN')")
    @RequestMapping("/list")
    @ResponseBody
    public List list() {

        return tEducationLevelService.list();
    }
}
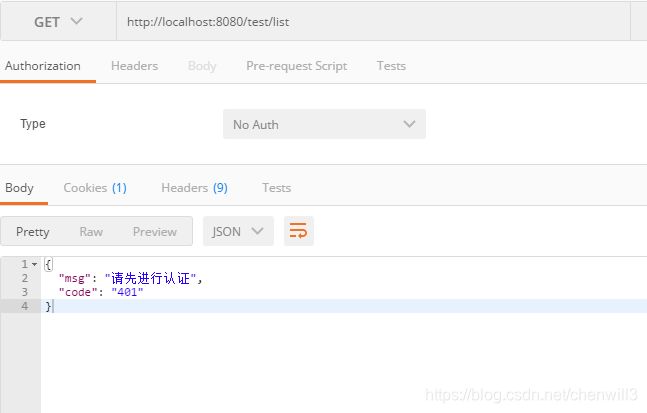
先不登录直接访问看看:
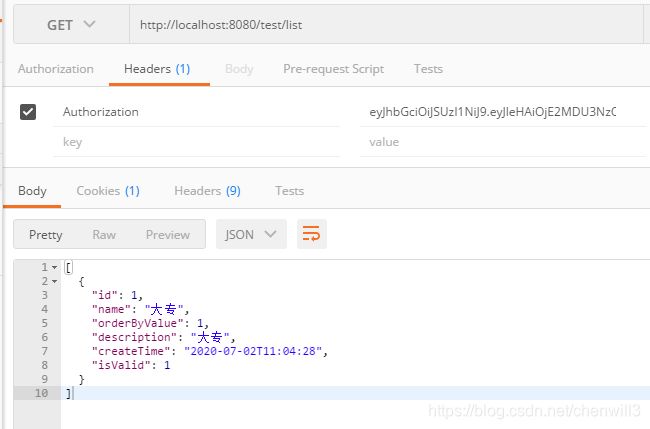
请求头加上token则可以正常访问
如果使用其他普通角色登录并带上token,访问则提示没有操作权限:
到此spring boot就完成了和spring security和jwt的整合,但如果要做成更切合实际的单点登录,还需要借助redis,例如把token持久化到redis并设置过期时间,关于单点登录大家可以自行查阅资料


