docker+idea一键部署
一、
[root@localhost ~]# systemctl disable firewalld --now
[root@localhost ~]# setenforce 0
二、
先去VMware Workstation Pro挂载镜像
[root@localhost ~]# mount /dev/sr0 /mnt/
[root@localhost ~]# mkdir /opt/centos/
[root@localhost ~]# cp -r /mnt/* /opt/centos/
[root@localhost ~]# cd /etc/yum.repos.d/
[root@localhost ~]# rm -rf *
[root@localhost ~]# vi yum.repo
摁i 键,然后粘贴下面这段进去
[centos]
name=centos
baseurl=file:///opt/centos
gpgcheck=0
enabled=1
摁 shift + : 输入wq 回车保存
[root@localhost ~]# yum repolist
[root@localhost ~]# yum install -y yum-utils device-mapper-persistent-data  lvm2 wget
[root@localhost ~]# yum-config-manager --add-repo https://download.docker.com/linux/centos/docker-ce.repo

[root@localhost ~]# wget -O /etc/yum.repos.d/CentOS-Base.repo http://mirrors.aliyun.com/repo/Centos-7.repo
三、
[root@localhost ~]# yum install epel-release docker-ce container-selinux -y
[root@localhost ~]# systemctl enable docker --now
四、
[root@localhost ~]# vi /etc/docker/daemon.json
粘贴下面这段进去
摁 i
{
  "insecure-registries" : ["0.0.0.0/0"],
"registry-mirrors": ["https://5twf62k1.mirror.aliyuncs.com"],
  "exec-opts": ["native.cgroupdriver=systemd"]
}
shift+:
输入wq,回车保存
[root@localhost ~]# systemctl restart docker
[root@localhost ~]# vi /lib/systemd/system/docker.service
粘贴下面这段然后保存
[root@localhost ~]# ExecStart=/usr/bin/dockerd -H fd:// --containerd=/run/containerd/containerd.sock -H tcp://0.0.0.0:2375
#加载配置
[root@localhost ~]# systemctl daemon-reload
#重启服务
[root@localhost ~]# systemctl restart docker.service
package com.example.testhello;

import org.springframework.web.bind.annotation.GetMapping;
import org.springframework.web.bind.annotation.RestController;

@RestController
public class testhello1 {
    @GetMapping("/test")
    public String hello(){
        return "hello test spring!";
    }
}
粘贴下面这段
<?xml version="1.0" encoding="UTF-8"?>
<project xmlns="http://maven.apache.org/POM/4.0.0" xmlns:xsi="http://www.w3.org/2001/XMLSchema-instance"
         xsi:schemaLocation="http://maven.apache.org/POM/4.0.0 https://maven.apache.org/xsd/maven-4.0.0.xsd">
    <modelVersion>4.0.0</modelVersion>
    <parent>
        <groupId>org.springframework.boot</groupId>
        <artifactId>spring-boot-starter-parent</artifactId>
        <version>2.6.7</version>
        <relativePath/> <!-- lookup parent from repository -->
    </parent>
    <groupId>com.example</groupId>
    <artifactId>demo2</artifactId>
    <version>0.0.1-SNAPSHOT</version>
    <name>demo2</name>
    <description>demo2</description>
    <properties>
        <java.version>1.8</java.version>
    </properties>
    <dependencies>
        <dependency>
            <groupId>org.springframework.boot</groupId>
            <artifactId>spring-boot-starter-web</artifactId>
        </dependency>

        <dependency>
            <groupId>org.springframework.boot</groupId>
            <artifactId>spring-boot-starter-test</artifactId>
            <scope>test</scope>
        </dependency>
    </dependencies>

    <build>
        <!-- 引用我们的项目名字 -->
        <finalName>${project.artifactId}</finalName>
        <plugins>
            <plugin>
                <groupId>org.springframework.boot</groupId>
                <artifactId>spring-boot-maven-plugin</artifactId>
            </plugin>
            <!--使用docker-maven-plugin插件-->
            <plugin>
                <groupId>com.spotify</groupId>
                <artifactId>docker-maven-plugin</artifactId>
                <version>1.2.1</version>
                <!--将插件绑定在某个phase执行-->
                <executions>
                    <execution>
                        <id>build-image</id>
                        <!--用户只需执行mvn package ,就会自动执行mvn docker:build-->
                        <phase>package</phase>
                        <goals>
                            <goal>build</goal>
                        </goals>
                    </execution>
                </executions>
                <configuration>
                    <!--指定生成的镜像名,这里是我们的作者名+项目名-->
                    <imageName>cainiao/${project.artifactId}</imageName>
                    <!--指定标签 这里指定的是镜像的版本,我们默认版本是latest-->
                    <imageTags>
                        <imageTag>latest</imageTag>
                    </imageTags>
                    <!--指定基础镜像jdk1.8-->
                    <baseImage>java</baseImage>
                    <!--
                    镜像制作人本人信息
                    ok,接下来只要先点击clean清除之前的所有打包的文件,然后再点击package打包文件即可完成镜像的
                    构建,真正的一键部署
                    <maintainer>bruceliu@email.com</maintainer>
                    -->
                    <!--切换到ROOT目录-->
                    <workdir>/ROOT</workdir>
                    <!--查看我们的java版本-->
                    <cmd>["java", "-version"]</cmd>
                    <!--${project.build.finalName}.jar是打包后生成的jar包的名字-->
                    <entryPoint>["java", "-jar", "/${project.build.finalName}.jar"]
                    </entryPoint>
                    <!--指定远程 docker api地址-->
                    <dockerHost>http://10.83.234.130:2375</dockerHost>
                    <!-- 这里是复制 jar 包到 docker 容器指定目录配置 -->
                    <resources>
                        <resource>
                            <targetPath>/</targetPath>
                            <!--jar 包所在的路径 此处配置的 即对应 target 目录-->
                            <directory>${project.build.directory}</directory>
                            <!--用于指定需要复制的文件 需要包含的 jar包 ,这里对应的是
                            Dockerfile中添加的文件名 -->
                            <include>${project.build.finalName}.jar</include>
                        </resource>
                    </resources>
                </configuration>
            </plugin>
        </plugins>
    </build>
</project>
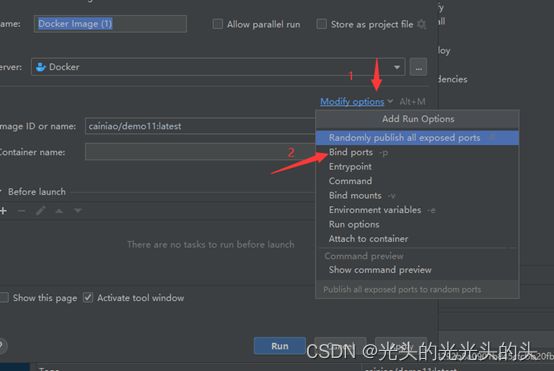
有些idea版本不同,给端口会不一样,我这是2021版本的。


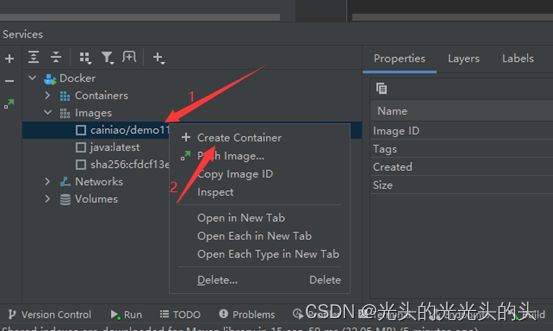
可以看到镜像和容器都构建成功了

