k8s之POD资源限制和健康监测
写在前面
本文一起看下POD的资源限制配置和健康监测的相关内容。
1:资源限制
如果是不对POD设置资源限制的话,若任由其占用系统资源,可能会造成非常严重的后果,所以我们需要根据具体情况来设置资源限制,如使用多少内存,多少CPU,多少IOPS等,实现这些限制使用的是cgroup技术,而配置这些限制使用到属性是resources。在看具体的例子之前需要先来看下cpu资源的表示方法,cpu标识的最小单位是0.001m,这里的m是milli的意思,1000m就代表使用一个cpu,500m就代表0.5cpu,具体配置cpu限制的话使用Xm,X这种,后者是直接指定使用CPU的个数。如下yaml:
apiVersion: v1
kind: Pod
metadata:
  name: ngx-pod-resources

spec:
  containers:
  - image: nginx:alpine
    name: ngx

    resources:
      requests:
        cpu: 10m
        memory: 100Mi
      limits:
        cpu: 20m
        memory: 200Mi
通过requests配置初始时需要0.01cpu,100MB内存,通过limits配置最多只能申请0.02cpu,200MB内存,如果超过最大限制则会被强制停止。配置了资源限制后,k8s会根据每个Node的剩余资源情况来将POD分配到合适的Node上,尽量的将Node的资源榨取干净。这个过程有些类似于俄罗斯方块,每个方块是分配到某Node上的POD,如下图:
如果我们申请的资源集群中所有的Node都无法满足会发生什么呢?比如定义如下申请10个CPU的yaml:
dongyunqi@mongodaddy:~/k8s$ cat appy-10-cpu.yml
apiVersion: v1
kind: Pod
metadata:
  name: ngx-pod-resources

spec:
  tolerations:
  - key: node-role.kubernetes.io/master
    effect: NoSchedule
    operator: Exists
  containers:
  - image: nginx:alpine
    name: ngx

    resources:
      requests:
        cpu: 10
        memory: 100Mi
      limits:
        cpu: 20
        memory: 200Mi
apply后查看:
dongyunqi@mongodaddy:~/k8s$ kubectl get pod | egrep 'NAME|ngx-pod-resources'
NAME                           READY   STATUS    RESTARTS   AGE
ngx-pod-resources              0/1     Pending   0          52s
可以看到其处于PENDING状态,describe查看:
dongyunqi@mongodaddy:~/k8s$ kubectl describe pod ngx-pod-resources
...
Events:
  Type     Reason            Age                From               Message
  ----     ------            ----               ----               -------
  Warning  FailedScheduling  22s                default-scheduler  0/2 nodes are available: 2 Insufficient cpu.
0/2 nodes are available: 2 Insufficient cpu.的意思是2个node中有0个可用,2个都是因为没有足够的CPU资源导致不可用。
2:健康监测
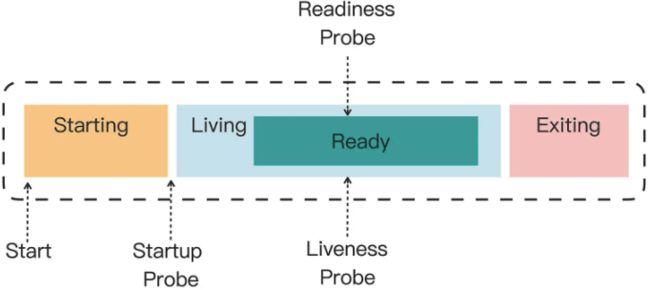
对于k8s来说,应用就像是一个黑盒子,只能知道其启动了,运行中,停止了,但是到底是不是能够正常的对外提供服务,k8s是不知道的,因此应用就不能是一个黑盒子,要是一个灰盒子,必须能够让k8s获取应用的一些信息,为此应用需要预留一些口子给k8s使用,这个过程有点类似于核酸检测,护士姐姐使用棉签从我们的口腔中蘸取唾液。这个k8s从预留的口子中获取信息的过程,我们叫做是探针 probe,或者叫做探测器,但我觉得叫做探针则更加形象准确。当前k8s定义了3中探针,如下:
startup:加载各种配置文件后启动成功,如spring加载器配置文件后启动
liveness:startup之后进入的状态,但此时可能因为一些初始化工作还没有完成,还不能对外服务,如加载MySQL中的数据到缓存中
ready:liveness之后的状态,进入该状态,则应用就可以正常的对外提供服务了
三种探针在失败时k8s的处理方式也不尽相同,如下:
startup失败:重启容器,不会启动后续的探针检测
liveness失败:重启容器,不会进行后的探针检测
ready失败:认为POD无法对外提供服务,会将其排除在集群之外
那么该如何使用探针呢?3中探针的定义都是一样的,主要的属性如下:
periodSeconds,执行探测动作的时间间隔,默认是 10 秒探测一次。
timeoutSeconds,探测动作的超时时间,如果超时就认为探测失败,默认是 1 秒。
successThreshold,连续几次探测成功才认为是正常,对于 startupProbe 和 livenessProbe 来说它只能是 1。
failureThreshold,连续探测失败几次才认为是真正发生了异常,默认是 3 次。
具体探测的方式有shell,tcp socket,http GET 三种,如下:
exec,执行一个 Linux 命令,比如 ps、cat 等等,和 container 的 command 字段很类似。
tcpSocket,使用 TCP 协议尝试连接容器的指定端口。
httpGet,连接端口并发送 HTTP GET 请求。
下面我们以Nginx为例来看具体看下,为了便于试验,先来定义ConfigMap如下:
dongyunqi@mongodaddy:~/k8s$ cat probe-cm.yml
apiVersion: v1
kind: ConfigMap
metadata:
  name: ngx-conf

data:
  default.conf: |
    server {
      listen 80;
      location = /ready {
        return 200 'I am ready';
      }
    }
然后我们定义如下pod分别使用三种探针来进行探针检测,yaml如下:
dongyunqi@mongodaddy:~/k8s$ cat probe-pod.yml
apiVersion: v1
kind: Pod
metadata:
  name: ngx-pod-probe

spec:
  volumes:
  - name: ngx-conf-vol
    configMap:
      name: ngx-conf

  containers:
  - image: nginx:alpine
    name: ngx
    ports:
    - containerPort: 80
    volumeMounts:
    - mountPath: /etc/nginx/conf.d
      name: ngx-conf-vol

    startupProbe:
      periodSeconds: 1
      exec:
        command: ["cat", "/var/run/nginx.pid"]

    livenessProbe:
      periodSeconds: 10
      tcpSocket:
        port: 80

    readinessProbe:
      periodSeconds: 5
      httpGet:
        path: /ready
        port: 80
startup probe使用了shell探针检测方式,liveness probe使用了tcp socket探针检测方式,ready probe 使用httpGet检测方式,apply后查看如下:
dongyunqi@mongodaddy:~/k8s$ kubectl get pod
NAME                           READY   STATUS    RESTARTS   AGE
ngx-pod-probe                  1/1     Running   0          18s
kubectl logs查看日志可以看到定期的调用/ready接口,如下:
dongyunqi@mongodaddy:~/k8s$ kubectl logs ngx-pod-probe
/docker-entrypoint.sh: /docker-entrypoint.d/ is not empty, will attempt to perform configuration
/docker-entrypoint.sh: Looking for shell scripts in /docker-entrypoint.d/
/docker-entrypoint.sh: Launching /docker-entrypoint.d/10-listen-on-ipv6-by-default.sh
10-listen-on-ipv6-by-default.sh: info: can not modify /etc/nginx/conf.d/default.conf (read-only file system?)
/docker-entrypoint.sh: Launching /docker-entrypoint.d/20-envsubst-on-templates.sh
/docker-entrypoint.sh: Launching /docker-entrypoint.d/30-tune-worker-processes.sh
/docker-entrypoint.sh: Configuration complete; ready for start up
2023/01/29 07:54:33 [notice] 1#1: using the "epoll" event method
2023/01/29 07:54:33 [notice] 1#1: nginx/1.21.5
2023/01/29 07:54:33 [notice] 1#1: built by gcc 10.3.1 20211027 (Alpine 10.3.1_git20211027)
2023/01/29 07:54:33 [notice] 1#1: OS: Linux 5.15.0-58-generic
2023/01/29 07:54:33 [notice] 1#1: getrlimit(RLIMIT_NOFILE): 1048576:1048576
2023/01/29 07:54:33 [notice] 1#1: start worker processes
2023/01/29 07:54:33 [notice] 1#1: start worker process 23
10.10.4.1 - - [29/Jan/2023:07:54:36 +0000] "GET /ready HTTP/1.1" 200 10 "-" "kube-probe/1.23" "-"
10.10.4.1 - - [29/Jan/2023:07:54:37 +0000] "GET /ready HTTP/1.1" 200 10 "-" "kube-probe/1.23" "-"
...
接下来我们修改startupProbe,让其获取一个不可能存在的文件,即让startup probe失败,看下POD会是什么状态,修改后如下:
apiVersion: v1
kind: Pod
metadata:
  name: ngx-pod-probe

spec:
  volumes:
  - name: ngx-conf-vol
    configMap:
      name: ngx-conf

  containers:
  - image: nginx:alpine
    name: ngx
    ports:
    - containerPort: 80
    volumeMounts:
    - mountPath: /etc/nginx/conf.d
      name: ngx-conf-vol

    startupProbe:
      periodSeconds: 1
      exec:
        command: ["cat", "/xxxx/run/nginx.pid"]

    livenessProbe:
      periodSeconds: 10
      tcpSocket:
        port: 80

    readinessProbe:
      periodSeconds: 5
      httpGet:
        path: /ready
        port: 80
apply后查看如下:
dongyunqi@mongodaddy:~/k8s$ kubectl get pod
NAME                           READY   STATUS    RESTARTS     AGE
ngx-pod-probe                  0/1     Running   2 (3s ago)   13s
dongyunqi@mongodaddy:~/k8s$ kubectl get pod
NAME                           READY   STATUS             RESTARTS     AGE
ngx-pod-probe                  0/1     CrashLoopBackOff   2 (8s ago)   22s
dongyunqi@mongodaddy:~/k8s$ kubectl get pod
NAME                           READY   STATUS             RESTARTS      AGE
ngx-pod-probe                  0/1     CrashLoopBackOff   2 (12s ago)   26s
可以看到POD在不断的重启,最后变为CrashLoopBackOff状态,我们可以通过kuectl describe来查看具体原因,如下:
dongyunqi@mongodaddy:~/k8s$ kubectl describe pod ngx-pod-probe
Name:         ngx-pod-probe
Namespace:    default
...
Events:
  Type     Reason     Age                    From               Message
  ----     ------     ----                   ----               -------
  Normal   Scheduled  4m33s                  default-scheduler  Successfully assigned default/ngx-pod-probe to mongomongo
  Normal   Pulled     4m23s (x3 over 4m32s)  kubelet            Container image "nginx:alpine" already present on machine
  Normal   Created    4m23s (x3 over 4m32s)  kubelet            Created container ngx
  Normal   Started    4m23s (x3 over 4m32s)  kubelet            Started container ngx
  Warning  Unhealthy  4m19s (x9 over 4m30s)  kubelet            Startup probe failed: cat: can't open '/xxxx/run/nginx.pid': No such file or directory
  Normal   Killing    4m19s (x3 over 4m27s)  kubelet            Container ngx failed startup probe, will be restarted
  Warning  BackOff    4m13s (x4 over 4m19s)  kubelet            Back-off restarting failed container
从Startup probe failed: cat: can't open '/xxxx/run/nginx.pid': No such file or directory可以看出来确实是因为startup probe检测失败导致的。
写在后面
小结
本文一起看了对POD的资源限制配置,以及startup,liveness,ready三种探针及其配置,并给出了一个具体的实例。希望本文能够帮助到你。


