Python-Tkinter和PyInstaller简介及定时关机程序的简易实现
欢迎转载,转载请注明出处,感谢!
- Tkinter简介
-
- Tkinter的基本概念
-
- 1. Widgets(窗口小部件)
- 2. Geometry Management(几何管理)
- 3. Event Handling(事件处理)
- 程序中的应用举例
-
- 1. 根窗口创建和布局
- 2. 小组件创建和布局示例
- 3. 事件绑定和处理示例
- Pyinstaller简介
-
- 使用PyInstaller命令
- PyInstaller命令参数列表(常用部分)
-
- 1. 常规选项
- 2. 与生成结果相关的选项
- 3. 与资源打包及搜索相关的选项
- 4. 与如何生成目标文件相关的选项
- 5. Windows和Mac特有的选项
- 6. Windows特有的选项
- PyInstaller的使用示例
- 定时关机程序的具体实现
-
- 关于Windows中的shutdown命令简述
- 实现效果
- 源代码
-
-
- 感谢相关博主先前的总结
- 内容如有错误✖,敬请指正✔
-
以前未接触过python的GUI编程,但平时有定时关机的需求。最近兴起,简单借鉴了他人的代码实现,但交互效果不佳。中文博客中相关的实践指导也不完整,于是翻阅文档,简单入门,编写了一个简易的关机小程序,本文主要是对相关内容做的总结。
涉及的包及版本(2021.4 stable):
Package Version python 3.8.8 pip 21.0.1 pyinstaller 4.3
Tkinter简介
Tkinter 是 Python 事实上的标准 GUI(图形用户界面)包(内置于Python标准库中)。它是 Tcl/Tk 之上的一个面向对象的封装库。虽然 Tkinter 并不是唯一用于Python的GUI编程工具包,但它是最常用的一种。Tkinter 可以在大多数的 Unix 平台下使用,同样可以应用于 Windows 和 Mac系统里。具体请参考相应文档,这里仅提取最基本的概念。
Refer :
- Python Wiki for Tkinter
- Python Docs for Tkinter
- Recommend:Tk Tutorial
Tkinter的基本概念
对Tk程序的外观以及为使其正常运行而需要编写的代码类型有一个基本了解,首先要熟悉几个最基本的概念:widgets(窗口小部件), geometry management(几何管理), and event handling(事件处理)
1. Widgets(窗口小部件)
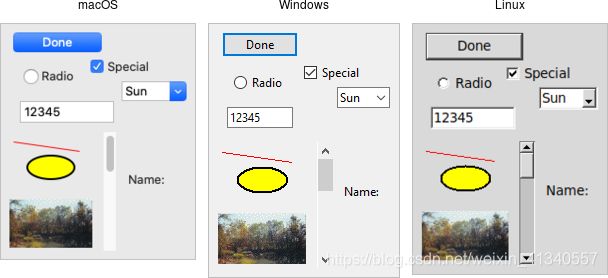
小部件是在屏幕上看到的所有部件。在图例中,包含有一个button(按钮),一个entry(条目,输入框),一些labels(标签)和一个frame(框架),其他诸如复选框、树视图、滚动条、文本区域等。以上这些widgets通常被称为controls(控件),有时也被称为windows(窗口),尤其是在Tk的文档中。
-
Widget Classes(Widget类):
窗口小部件类,要创建widgets时,首先需要确定要实例化的widgets的特定类。 -
Widget Hierarchy(Widget层次结构):
实例化widgets时,要确定其父级窗口。在Tk中,所有widgets都是widgets(或window)层次结构的一部分,在该层次结构的顶部具有单个根。如图例,有一个root window(根窗口)作为container(容器),一个单独的框架content frame作为根窗口的子级,而该框架具有其他诸如feet entry等控件作为子级组件。

-
Creating Widgets:
每个单独的小部件都是一个Python对象。实例化widget时,必须指定其父级。唯一的例外是如上图所示的root(根窗口)。顶层窗口在实例化时会自动创建该Tk对象,它没有master widget(详见下一节)。例如:root = Tk() content = ttk.Frame(root) button = ttk.Button(content) -
Configuration Options(配置选项):
所有小部件都有几个configuration options(配置选项)。这些选项控制小部件的显示或行为。小部件的可用选项取决于widget类,不同的widget类之间有很多一致性,因此功能几乎相同的选项往往被命名为相同的选项。例如,button按钮和label标签都具有text,用于调整显示的文本的选项,而scrollbar滚动条则没有text选项。同样,button具有一个command选项用于按下按钮的回调,而仅包含静态文本的label则没有。
如果不确定小部件支持哪些配置选项,则可以要求小部件对其进行描述。以下示例( interactive dialog with the interpreter)。% python >>> from tkinter import * >>> from tkinter import ttk >>> root = Tk() # create a button, passing two options: >>> button = ttk.Button(root, text="Hello", command="buttonpressed") >>> button.grid() # check the current value of the text option: >>> button['text'] 'Hello' # change the value of the text option: >>> button['text'] = 'goodbye' # another way to do the same thing: >>> button.configure(text='goodbye') # check the current value of the text option: >>> button['text'] 'goodbye' # get all information about the text option: >>> button.configure('text') ('text', 'text', 'Text', '', 'goodbye') # get information on all options for this widget: >>> button.configure() {'cursor': ('cursor', 'cursor', 'Cursor', '', ''), 'style': ('style', 'style', 'Style', '', ''), 'default': ('default', 'default', 'Default', <index object at 0x00DFFD10>, <index object at 0x00DFFD10>), 'text': ('text', 'text', 'Text', '', 'goodbye'), 'image': ('image', 'image', 'Image', '', ''), 'class': ('class', '', '', '', ''), 'padding': ('padding', 'padding', 'Pad', '', ''), 'width': ('width', 'width', 'Width', '', ''), 'state': ('state', 'state', 'State', <index object at 0x0167FA20>, <index object at 0x0167FA20>), 'command': ('command', 'command' , 'Command', '', 'buttonpressed'), 'textvariable': ('textvariable', 'textVariable', 'Variable', '', ''), 'compound': ('compound', 'compound', 'Compound', <index object at 0x0167FA08>, <index object at 0x0167FA08>), 'underline': ('underline', 'underline', 'Underline', -1, -1), 'takefocus': ('takefocus', 'takeFocus', 'TakeFocus', '', 'ttk::takefocus')}
2. Geometry Management(几何管理)
将widgets放置在屏幕上以及精确地放置它们的位置是一个单独的步骤,称为geometry management(几何管理)。只有通过几何管理,才能显示或正确显示我们的widgets。在关机程序的代码实现中,每个小部件的放置均由grid(网格)完成。grid可指定每个小部件所处的列和行,以及如何在网格内对齐等。在Tk中有多种几何管理器,grid是几何管理器的一种,也是最常用的。
-
How Grid Works:Tk中的几何管理依赖于master widget(主控件)和slave widget(从控件)的概念。主控件通常是顶层窗口或框架,其中包含称为“从控件”的其他小部件。程序通过调用告诉grid管理器在主控件中应管理哪些从控件。并且提供了有关如何显示每个从控件的参数,例如通过column和row选项指定从控件应该放置在哪一行哪一列。还可以向grid管理器提供其他内容,例如,如果窗口中有多余的可用空间,我们可以使用columnconfigure和rowconfigure表示要扩展的列和行。以下示例。
from tkinter import *
from tkinter import ttk

root = Tk()

content = ttk.Frame(root)
frame = ttk.Frame(content, borderwidth=5, relief="ridge", width=200, height=100)
namelbl = ttk.Label(content, text="Name")
name = ttk.Entry(content)

onevar = BooleanVar(value=True)
twovar = BooleanVar(value=False)
threevar = BooleanVar(value=True)

one = ttk.Checkbutton(content, text="One", variable=onevar, onvalue=True)
two = ttk.Checkbutton(content, text="Two", variable=twovar, onvalue=True)
three = ttk.Checkbutton(content, text="Three", variable=threevar, onvalue=True)
ok = ttk.Button(content, text="Okay")
cancel = ttk.Button(content, text="Cancel")

content.grid(column=0, row=0)
frame.grid(column=0, row=0, columnspan=3, rowspan=2)
namelbl.grid(column=3, row=0, columnspan=2)
name.grid(column=3, row=1, columnspan=2)
one.grid(column=0, row=3)
two.grid(column=1, row=3)
three.grid(column=2, row=3)
ok.grid(column=3, row=3)
cancel.grid(column=4, row=3)

root.mainloop()
3. Event Handling(事件处理)
与大多数其他GUI工具包一样,Tk运行一个event loop(事件循环),该循环从操作系统接收event(事件)。所谓事件是诸如按键,击键,鼠标移动,窗口大小调整之类的事情。通常,Tk会为管理event loop,它将确定事件适用于哪个小部件(用户是否单击了此按钮?如果按下了键,哪个文本框具有焦点?),并进行相应的调度。各个小部件都知道如何响应事件。例如,当鼠标移到按钮上时,按钮可能会改变颜色,而当鼠标离开时,按钮可能会变回原来的颜色。
-
Command Callbacks(命令回调):
在开发时,通常会希望程序能以自定义的方式处理某些事件,可以通过command参数来指定一个callback函数。以下示例,在按下按钮时执行calculate中的操作。
def calculate(*args): ... ttk.Button(mainframe, text="Calculate", command=calculate) -
Binding to Events(绑定事件):
对于没有与widgets特定的命令回调相关联的bind事件,可以使用Tk捕获,然后(与callback类似)执行处理函数。以下代码为示例。from tkinter import * from tkinter import ttk root = Tk() l = ttk.Label(root, text="Starting...") l.grid() #-鼠标进入widget后调用 l.bind('' , lambda e: l.configure(text='Moved mouse inside')) #-鼠标离开widget后调用 l.bind('' , lambda e: l.configure(text='Moved mouse outside')) #-响应鼠标左键(主键)点击 l.bind('' , lambda e: l.configure(text='Clicked left mouse button')) # <3>-的简写,响应鼠标右键点击 l.bind('<3>', lambda e: l.configure(text='Clicked right mouse button')) #- l.bind('的简写,响应双击鼠标左键 ' , lambda e: l.configure(text='Double clicked')) #-在按住鼠标右键(B3)时捕获鼠标移动 l.bind('' , lambda e: l.configure(text='right button drag to %d,%d' % (e.x, e.y))) root.mainloop() -
Available Events(可用的事件):
下面介绍最常用的事件以及相应的描述。注意,并不是所有事件都适用于所有平台。要完整描述所有不同的事件名称,修饰符以及每个事件可用的不同事件参数,最好的参考位置是bind。修饰符 描述 窗口已激活 窗口已被禁用 鼠标上的滚轮已移动 键盘上的键已被按下 键盘上的键已被释放 已按下鼠标按钮 释放了一个鼠标按钮 鼠标已移动 小部件已更改大小或位置 小部件被销毁 小部件已被赋予键盘焦点 小部件失去了键盘焦点 鼠标指针进入小部件 鼠标指针离开小部件
程序中的应用举例
1. 根窗口创建和布局
# get root window
windows = tkinter.Tk()
curWidth = 350
# the height the widget requests of the geometry manager
# Widget Introspection, refers: https://tcl.tk/man/tcl8.6/TkCmd/winfo.htm
curHeight = windows.winfo_reqheight()
scnWidth, scnHeight = windows.maxsize()
# set geometry to NEWGEOMETRY of the form = widthxheight+x+y
config = '%dx%d+%d+%d' % (curWidth, curHeight,
                          (scnWidth - curWidth) / 2, (scnHeight - curHeight) / 2)
windows.geometry(config)
2. 小组件创建和布局示例
以下拉框为例:
# set dropdown unit selection
unit_arr = ('hour', 'minute', 'second')
unit_chosen = ttk.Combobox(root, width=6, textvariable=unit, state='readonly')
unit_chosen['values'] = unit_arr
unit_chosen.grid(row=1, column=2)
unit_chosen.current(0)
3. 事件绑定和处理示例
以绑定输入框time_edit的键盘监听事件为例:
def int_key_listener(ev):
# if the input is not valid, return "break" and no further bound function is invoked.
if len(ev.char) == 0 or not str.isdigit(ev.char) and ord(ev.char) != 0x08:
return "break"
...
# create an entry for editing time
time_edit= tkinter.Entry(master, width=width, textvariable=textvariable)
time_edit.grid(row=row, column=column, padx=padx)
# bind Key listener to func int_key_listener
time_edit.bind('' , key_listener)
Pyinstaller简介
PyInstaller将Python应用程序及其所有依赖项捆绑到一个包中。用户无需安装Python解释器或任何模块即可运行打包的应用程序。 PyInstaller(v4.0+)支持Python 3.6或更高版本,并正确捆绑了主要的Python软件包,例如numpy,PyQt,Django,wxPython等。具体请参考相应文档。
Refer :
- Recommend:PyInstaller Manual
使用PyInstaller命令
PyInstaller安装,使用pip即可:
pip install pyinstaller
命令的语法为:
pyinstaller [options] script [script …] | specfile
在最简单的情况下,将当前目录设置为程序的位置,假设入口为main.py,则执行:
pyinstaller main.py
PyInstaller分析main.py并执行以下步骤:
-
main.spec写入与脚本相同的目录下。
-
如果build目录不存在,则在与脚本相同的目录下创建build。
-
在build目录中写入一些日志文件和工作文件。
-
如果dist目录不存在,则在与脚本相同的目录下创建dist。
-
将main.exe可执行文件文件夹写入dist目录。
对于某些特殊用途,可以编辑main.spec的内容(具体参见Using Spec Files)。运行:
pyinstaller main.spec
main.spec文件包含使用脚本文件作为参数运行pyinstaller(或pyi-makespec)时指定的选项所提供的大多数信息 。使用spec文件运行pyinstaller时,通常不需要指定任何选项 。
PyInstaller命令参数列表(常用部分)
1. 常规选项
| options | 描述 | 说明 |
|---|---|---|
| -h, --help | 显示帮助 | 无 |
| -v, --version | 显示版本信息 | 无 |
| –distpath DIR | 指定生成的目标文件的放置目录 | 默认:./dist,即当前目录下的dist文件夹中 |
| –workpath WORKPATH | 指定生成过程中的中间文件.log,.pyz等的放置目录 | 默认:./ build,即当前目录下的build文件夹中 |
| -y, --noconfirm | 如果输出目录(distpath)已存在,则覆盖该目录而不要求用户确认 | 询问用户是否覆盖 |
| –upx-dir UPX_DIR | 指定UPX工具的路径 | 默认:在execution path下搜索 |
| -a, --ascii | 不包含unicode编码支持 | 尽可能包含unicode编码(若可用则包含) |
| –clean | 在构建之前,清理PyInstaller缓存并删除临时文件 | 无 |
| –log-level LEVEL | 指定生成过程中控制台的日志输出等级,LEVEL有6个等级[TRACE,DEBUG,INFO,WARN,ERROR,CRITICAL],只打印等级<=LEVEL的日志信息 | 默认:INFO,即只打印[TRACE,DEBUG,INFO]的日志信息 |
2. 与生成结果相关的选项
| options | 描述 | 说明 |
|---|---|---|
| -D, --onedir | 生成一个包含可执行文件的one-folder捆绑包(默认) | 生成结果是一个目录,所有的第三方依赖、资源和exe同时存储在该目录 |
| -F, --onefile | 生成一个one-file可执行文件 | 生成结果是一个exe文件,所有的第三方依赖、资源和代码均被打包进该exe内 |
| –specpath DIR | 指定.spec文件的存储路径 | 默认:当前目录 |
| -n NAME, --name NAME | 指定.exe和.spec的文件名 | 默认:用户脚本的名称,即main.py和main.spec |
3. 与资源打包及搜索相关的选项
| options | 描述 | 说明 |
|---|---|---|
| –add-data |
指定添加到可执行文件的其他资源(非二进制文件或文件夹) | 区别路径分隔符“;”和“:”,在windows上使用 “;”,而在*nix上使用“:” |
| –add-binary |
指定添加到可执行文件的其他资源(二进制文件) | 参见--add-data选项,此选项可以多次使用 |
| -p DIR, --paths DIR | 指定import的搜索路径(例如使用PYTHONPATH) | 允许使用多个路径,以“:”分隔,或多次使用此选项 |
| –hidden-import MODULENAME, --hiddenimport MODULENAME | 指定在脚本代码中不可见的import模块名称 | pyi在分析过程中,有些import没有正确分析出来,运行时会报import error,这时可以使用该参数;此选项可以多次使用 |
| –additional-hooks-dir HOOKSPATH | 指定搜索hook的目录 | hook用法参见其他,系统hook在PyInstaller\hooks目录下;此选项可以多次使用 |
| –runtime-hook RUNTIME_HOOKS | 指定runtime-hook文件的目录 | runtime-hook是与可执行文件捆绑在一起的代码,该代码在执行任何其他代码或模块之前执行以设置运行时的特殊环境属性;此选项可以多次使用 |
| –exclude-module EXCLUDES | 需要排除的module | pyi会分析出很多相互关联的库,但是某些库对用户来说是没用的,可以用这个参数排除这些库,有助于减少生成文件的大小;此选项可以多次使用 |
| –key KEY | 用于加密Python字节码的密钥 | pyi会存储字节码,指定加密字节码的key;16位的字符串 |
4. 与如何生成目标文件相关的选项
| options | 描述 | 说明 |
|---|---|---|
| -d |
提供调试信息,具体请参见文档 | 默认:不输出pyi的log |
| -s, --strip | 将符号表应用于可执行文件和共享库 | 用于优化符号表,但不建议用于Windows |
| –noupx | 强制禁用upx(Windows和*NIX之间的工作方式有所不同) | 默认:尽可能使用upx |
| –upx-exclude FILE | 指定一个不含路径的二进制文件的名称FILE,防止在使用upx时压缩二进制文件 | 如果upx在压缩过程中破坏了某些二进制文件,通常使用此方法;此选项可以多次使用 |
5. Windows和Mac特有的选项
| options | 描述 | 说明 |
|---|---|---|
| -c, --console, --nowindowed | 显示控制台窗口 | 默认:含有此参数;在Windows上,如果第一个脚本是“ .pyw”文件,则此选项无效。 |
| -w, --windowed, --noconsole | 不显示控制台窗口 | 在Mac OS X上,这还会触发构建OS X .app捆绑软件。在Windows上,如果第一个脚本是“ .pyw”文件,则将设置此选项。在*NIX系统中,此选项将被忽略。 |
| -i |
- FILE.ico:将该图标应用于Windows可执行文件。 - FILE.exe,ID,从exe中提取ID为ID的图标。 - FILE.icns:将图标应用于Mac OS X上的.app捆绑包。 - “NONE”:不应用任何图标,使操作系统显示某些默认设置 |
默认:使用PyInstaller的默认图标;在Windows下测试,无默认ico, |
6. Windows特有的选项
| options | 描述 | 说明 |
|---|---|---|
| –version-file FILE | 添加exe的版本信息文件 | 无 |
| -m , --manifest | 添加manifest文件(文本或xml) | 无 |
| -r RESOURCE, --resource RESOURCE | 添加或更新exe的资源,资源含1-4项option,FILE [,TYPE [,NAME [,LANGUAGE]]],具体请参见文档 | 此选项可以多次使用 |
| –uac-admin | 使用此选项将创建一个manifest,该manifest将在应用重启时请求授权 | 此选项对于需要用户获取管理员权限的应用有用;可参见manifest中的requestedExecutionLevel选项[requireAdministrator] or [asInvoker] |
| –uac-uiaccess | 使用此选项可以使授权的应用与远程桌面一起使用 | 无 |
PyInstaller的使用示例
Tip:
- 对于小程序,特别是使用one-file方式打包成单个可执行文件时,建议不要用conda环境而是以干净的python venv替代,否则在不排除无用模块的情况下(–exclude-module),生成的文件会偏大。
- 使用 -i 指定应用图标,在windows上应当使用.ico格式的图片。另外,为了更好地适配分辨率,最好使用类似于【Axialis IconWorkshop (free for 30 days)】的专业图标制作工具,制作windows图标可参见【使用Axialis IconWorkshop创建一个新的Windows图标项目】 。
例如,打包定时关机程序exe的大小在10M左右,使用的命令是:
pyinstaller -F -w -i shutdown-fill.ico -n "Timing-Shutdown" main.py
定时关机程序的具体实现
关于Windows中的shutdown命令简述
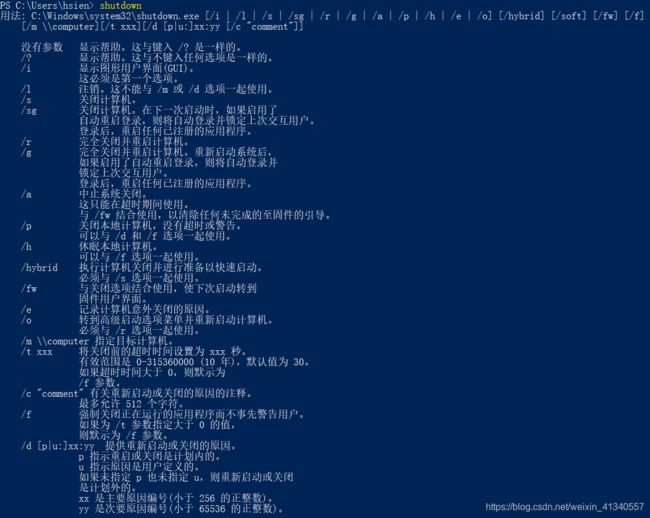
在Windows的cmd或power shell中可参见具体参数含义,如图例:

其中,使用到的命令是 shutdwon -s -t 及shutdown -a ( 连接参数使用 / 和 - 等价)。也可使用windows自带的远程关机程序,输入 shutdown -i 即可。对于具体时间点的指定可使用 at 命令(如 at 22:00 shutdown),这会比本文代码实现的方法更准确。以下示例at和shutdown命令的使用。
# example shutdown.Shut down pc in an hour
shutdown /s -t 3600
shutdown -a
# example at.Shut down pc at 22:00 every day
at 22:00 /every:M,T,W,Th,F,S,Su shutdown -s -t 0
at /delete
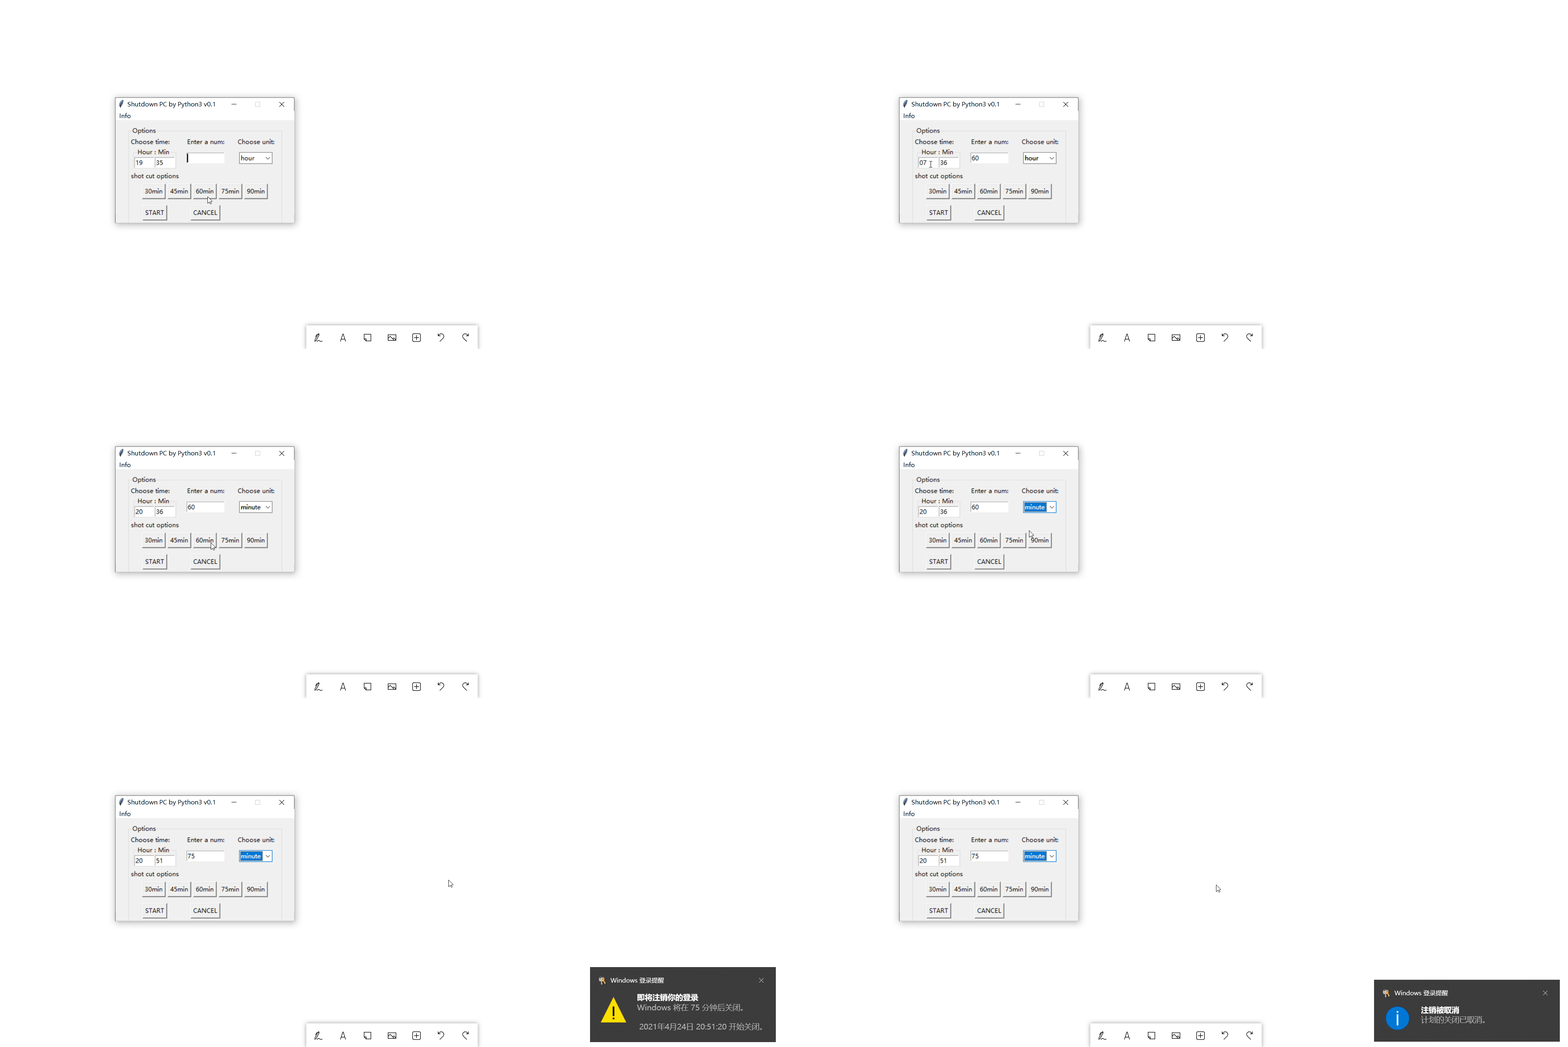
实现效果
源代码
具体实现细节不再赘述,原理均基于前面的内容。为了方便,只实现了最基础的功能,代码也难免有错误或不规范,欢迎指正。
import tkinter
from tkinter import ttk
from os import system as os_sys
import tkinter.messagebox as message_box
import time as sys_time
"""
Shutdown windows by Windows command 'shutdown -s -t '.
And, cancel schedule by Windows command 'shutdown -a'.
Test passed in [win10 python3.8].
By Hsien. Updated on 2021/4/20.
package: pyinstaller -F -w -i shutdown-fill.ico -n "Timing-Shutdown" main.py.
Note: package main.py in python venv and replace shutdown-fill.ico with your path of ico.
"""
TEST_PLATFORM = "Win10 Python3.8"
AUTHOR = "Hsien"
UPDATE_DATE = "2021/4/20"
ABOUT_INFO = "Shutdown windows by Windows command 'shutdown -s -t '.\n\
And, cancel schedule by Windows command 'shutdown -a'.\n\
Test passed in [" + TEST_PLATFORM + "].\n\
By " + AUTHOR + ". Updated on " + UPDATE_DATE + "."
def show_info():
message_box.showinfo(title="About", message=ABOUT_INFO)
# get window from tk
windows = tkinter.Tk()
curWidth = 350
curHeight = windows.winfo_reqheight() # get current height
scnWidth, scnHeight = windows.maxsize() # get screen width and height
config = '%dx%d+%d+%d' % (curWidth, curHeight,
(scnWidth - curWidth) / 2, (scnHeight - curHeight) / 2)
windows.geometry(config) # set the window to center
windows.resizable(0, 0) # set the window size to be unchangeable
windows.title("Shutdown PC by Python3 v0.1")
# windows.iconbitmap('main-frame.ico')
# windows.iconphoto(False, tkinter.PhotoImage(file='windows.png'))
windows.update() # update window
# add menu bar
menubar = tkinter.Menu(windows)
about_menu = tkinter.Menu(menubar, tearoff=0)
menubar.add_cascade(label='Info', menu=about_menu)
about_menu.add_command(label='About', command=show_info)
windows.config(menu=menubar)
# get root container from ttk.LabelFrame
root = ttk.LabelFrame(windows, text="Options")
root.grid(column=0, row=0, padx=25, pady=10)
tkinter.Label(root, text="Choose time:").grid(row=0, column=0, sticky=tkinter.W)
tkinter.Label(root, text="Enter a num:").grid(row=0, column=1, padx=10)
tkinter.Label(root, text="Choose unit:").grid(row=0, column=2, padx=10)
def int_key_listener(ev):
if len(ev.char) == 0 or not str.isdigit(ev.char) and ord(ev.char) != 0x08:
return "break"
return True
def h_key_listen(ev):
res = int_key_listener(ev)
if res is True:
if ord(ev.char) != 0x08 and len(t_hour.get()) > 1:
return "break"
else:
return res
def m_key_listen(ev):
res = int_key_listener(ev)
if res is True:
if ord(ev.char) != 0x08 and len(t_min.get()) > 1:
return "break"
else:
return res
def h_wheel_listen(ev):
h = int('0' + t_hour.get())
new_h = ((h + 1 if ev.delta > 0 else h - 1) + 24) % 24
t_hour.set("%02d" % (new_h,))
def m_wheel_listen(ev):
m = int('0' + t_min.get())
new_m = ((m + 1 if ev.delta > 0 else m - 1) + 24) % 24
t_min.set("%02d" % (new_m,))
def get_entry_instance(master, textvariable, width, row, column, padx, key_listener):
edit = tkinter.Entry(master, width=width, textvariable=textvariable)
edit.grid(row=row, column=column, padx=padx)
edit.bind('' , key_listener)
return edit
# for preventing recursive calls.
class Signal:
SET_TIME = False
SET_HM = False
SET_UNIT = False
def trace_hm(*args):
if Signal.SET_HM:
return
h = int('0' + t_hour.get())
m = int('0' + t_min.get())
if h >= 24 or m >= 60:
Signal.SET_HM = True
if h >= 24:
t_hour.set(0)
else:
t_min.set(0)
Signal.SET_HM = False
t_step = h * 3600 + m * 60
t_now_str = sys_time.strftime("%H-%M", sys_time.localtime()).split('-')
t_now = int(t_now_str[0]) * 3600 + int(t_now_str[1]) * 60
if t_step <= t_now - 59:
t_step += 24 * 3600
Signal.SET_TIME = True
Signal.SET_UNIT = True
time.set((t_step - t_now) // 60)
unit.set("minute")
Signal.SET_TIME = False
Signal.SET_UNIT = False
def trace_time(*args):
if Signal.SET_TIME:
return
t_step = int('0' + time.get())
if unit.get() == "hour":
t_step *= 3600
elif unit.get() == "minute":
t_step *= 60
t_now_str = sys_time.strftime("%H-%M", sys_time.localtime()).split('-')
t_now_h = int(t_now_str[0])
t_now_m = int(t_now_str[1])
Signal.SET_HM = True
t_hour.set("%02d" % ((t_now_h + t_step // 3600) % 24))
t_min.set("%02d" % ((t_now_m + t_step % 3600 // 60) % 60))
Signal.SET_HM = False
def trace_unit(*args):
if Signal.SET_UNIT:
return
time.set(time.get())
# stores the input value with str hook
t_hour = tkinter.StringVar()
t_min = tkinter.StringVar()
time = tkinter.StringVar()
unit = tkinter.StringVar()
# trace variable while writing
t_hour.trace('w', trace_hm)
t_min.trace('w', trace_hm)
time.trace('w', trace_time)
unit.trace('w', trace_unit)
# Set input box
time_panel = ttk.LabelFrame(root, text="Hour : Min")
time_panel.grid(row=1, column=0, padx=0, pady=0, sticky=tkinter.N)
hour_edit = get_entry_instance(time_panel, t_hour, 5, 0, 0, 0, h_key_listen)
min_edit = get_entry_instance(time_panel, t_min, 5, 0, 1, 0.5, m_key_listen)
time_edit = get_entry_instance(root, time, 10, 1, 1, 0, int_key_listener)
hour_edit.bind('' , h_wheel_listen)
min_edit.bind('' , m_wheel_listen)
time_edit.focus()
# set dropdown unit selection
unit_arr = ('hour', 'minute', 'second')
unit_chosen = ttk.Combobox(root, width=6, textvariable=unit, state='readonly')
unit_chosen['values'] = unit_arr
unit_chosen.grid(row=1, column=2)
unit_chosen.current(0)
def quick_select(to_time):
time.set(to_time)
unit_chosen.current(1)
# set schedule
def start():
if time.get() and unit.get():
count_down_second = int(time.get())
if unit.get() == 'hour':
count_down_second *= 3600
elif unit.get() == 'minute':
count_down_second *= 60
res = os_sys("shutdown -s -t %s" % count_down_second)
if res == 0:
import datetime
# shut_time is not necessarily accurate
shut_time = datetime.datetime.now() + datetime.timedelta(seconds=count_down_second)
message_box.showinfo(title="Success",
message="Your PC will shutdown at %s" % (shut_time.strftime("%Y-%m-%d %H:%M")))
else:
message_box.showerror(title="Error", message="Unknown error: Failed to set shutdown time.")
else:
message_box.showwarning(title="Warning", message="Please enter the exact time!")
# cancel schedule
def cancel():
res = os_sys("shutdown -a")
if res == 0:
message_box.showinfo(title="Success",
message="Scheduled task cancelled successfully")
else:
message_box.showwarning(title="Warning", message="There is no scheduled shutdown task currently.")
# shot cut options
tip_label = tkinter.Label(root, text="shot cut options")
tip_label.grid(row=2, column=0, pady=2)
# quick selection time
fram = tkinter.Frame(root)
fram.grid(row=3, column=0, columnspan=3)
for i in range(2, 7):
button = tkinter.Button(fram, text=str(i * 15) + "min", command=lambda x=i: quick_select(str(x * 15)))
button.grid(row=0, column=i - 2, padx=2, pady=2, sticky=tkinter.W)
# start button
start_action = tkinter.Button(root, text="START", command=start)
start_action.grid(row=4, column=0)
# cancel button
cancel_action = tkinter.Button(root, text="CANCEL", command=cancel)
cancel_action.grid(row=4, column=1, pady=10)
root.mainloop()

