Flutter笔记——handleDrawFrame帧绘制系列之一(源码学习)
Flutter系列学习笔记
- Flutter笔记——handleDrawFrame帧绘制系列之一(源码学习)
- Flutter笔记——runApp发生了什么(源码学习)
- Flutter笔记——State.setState发生了什么(源码学习)
- 用Dart写的身份证号校验代码(可用于flutter项目)
- HelloDart-构造函数特性
- HelloDart-MixIn,土话记录多继承机制
- Flutter笔记——MethodChannel(Native&Flutter数据交互)
- Flutter笔记——FlutterActivity
前言
前两篇文章Flutter笔记——runApp发生了什么(源码学习)和Flutter笔记——State.setState发生了什么学习了Flutter中runApp()、修改UI元素State.setState()过程。
这篇文章主要学习的是Flutter中实际渲染UI的过程。
1 BaseBinding
BaseBinding系列是FlutterFramework的核心类,学习Flutter的UI渲染过程会涉及到WidgetsBinding、RenderBinding、SchedulerBinding等。由于Dart的mixIn菱形继承语法,该部分比较难搞明白,只能从局部入手,抽丝剥茧般的去学习理解整体流程。
1.1 handleDrawFrame
在我的Flutter笔记——runApp发生了什么(源码学习)文章中,了解到WidgetsFlutterBinding.scheduleWarmUpFrame()函数用于调度展示一个预热帧。而WidgetsFlutterBinding.scheduleAttachRootWidget(Widget rootWidget)函数使用Timer包裹,作为一个异步执行函数,在它执行完毕之时最终会调用WidgetsBinding.handleDrawFrame()函数绘制帧。
那么handleDrawFrame()函数到底发生了什么?
mixin WidgetsBinding on BindingBase, ServicesBinding, SchedulerBinding, GestureBinding, RendererBinding, SemanticsBinding {
  void handleDrawFrame() {
    assert(_schedulerPhase == SchedulerPhase.midFrameMicrotasks);
    Timeline.finishSync(); // end the "Animate" phase
    try {
      // PERSISTENT FRAME CALLBACKS
      _schedulerPhase = SchedulerPhase.persistentCallbacks;
      for (FrameCallback callback in _persistentCallbacks)
        _invokeFrameCallback(callback, _currentFrameTimeStamp);

      // POST-FRAME CALLBACKS
      _schedulerPhase = SchedulerPhase.postFrameCallbacks;
      final List localPostFrameCallbacks =
          List.from(_postFrameCallbacks);
      _postFrameCallbacks.clear();
      for (FrameCallback callback in localPostFrameCallbacks)
        _invokeFrameCallback(callback, _currentFrameTimeStamp);
    } finally {
      _schedulerPhase = SchedulerPhase.idle;
      Timeline.finishSync(); // end the Frame
      assert(() {
        if (debugPrintEndFrameBanner)
          debugPrint('▀' * _debugBanner.length);
        _debugBanner = null;
        return true;
      }());
      _currentFrameTimeStamp = null;
    }
  }
}
首先学习WidgetsBinding类,见注释
Scheduler for running the following:
- Transient callbacks, triggered by the system’s [Window.onBeginFrame] callback, for synchronizing the application’s behavior to the system’s display. For example, [Ticker]s and [AnimationController]s trigger from these.
- Persistent callbacks, triggered by the system’s [Window.onDrawFrame] callback, for updating the system’s display after transient callbacks have executed. For example, the rendering layer uses this to drive its rendering pipeline.
- Post-frame callbacks, which are run after persistent callbacks, just before returning from the [Window.onDrawFrame] callback.
- Non-rendering tasks, to be run between frames. These are given a priority and are executed in priority order according to a [schedulingStrategy]
简单理解下,该类主要作用就是调度帧渲染任务,当然也可以运行非渲染任务。主要是瞬间渲染、持久渲染与渲染回调任务等,例如持久的帧渲染监听注册WidgetsBinding.instance.addPersistentFrameCallback(callback)就是该类的作用了。
回到handleDrawFrame()函数,这里面循环执行SchedulerBinding._persistentCallbacks与SchedulerBinding._postFrameCallbacks的注册回调之外,好像没做其他事情哦?那么线索断了吗?

1.2 initInstances
这里吐槽下mixIn菱形继承,这个语法特性真的香吗?
这里把眼光回到BaseBinding系列的初始化函数中,我们可以在RendererBinding.initInstances()函数中,找到SchedulerBinding.addPersistentFrameCallback(FrameCallback callback)函数的调用,这意味着在RendererBinding.initInstances()初始化阶段,已经注册了一个关键函数,噔噔瞪,见下面源码
mixin RendererBinding on BindingBase, ServicesBinding, SchedulerBinding, GestureBinding, SemanticsBinding, HitTestable {
  @override
  void initInstances() {
    super.initInstances();
    _instance = this;
    _pipelineOwner = PipelineOwner(
      onNeedVisualUpdate: ensureVisualUpdate,
      onSemanticsOwnerCreated: _handleSemanticsOwnerCreated,
      onSemanticsOwnerDisposed: _handleSemanticsOwnerDisposed,
    );
    window
      ..onMetricsChanged = handleMetricsChanged
      ..onTextScaleFactorChanged = handleTextScaleFactorChanged
      ..onPlatformBrightnessChanged = handlePlatformBrightnessChanged
      ..onSemanticsEnabledChanged = _handleSemanticsEnabledChanged
      ..onSemanticsAction = _handleSemanticsAction;
    initRenderView();
    _handleSemanticsEnabledChanged();
    assert(renderView != null);
    //重点
    addPersistentFrameCallback(_handlePersistentFrameCallback);
    initMouseTracker();
  }
  //重点
  void _handlePersistentFrameCallback(Duration timeStamp) {
    drawFrame();
  }
}
我们可以看到,在SchedulerBinding._persistentCallbacks已经注册了drawFrame函数回调,到了这里handleDrawFrame渲染帧的线索又接上了,接着往下看。
1.3 drawFrame
drawFrame()函数有2处实现(有一处Test环境,忽略),并且都被WidgetsFlutterBinding继承,这个mixIn真的香吗?

mixin RendererBinding on BindingBase, ServicesBinding, SchedulerBinding, GestureBinding, SemanticsBinding, HitTestable {
  void drawFrame() {
    assert(renderView != null);
    pipelineOwner.flushLayout();
    pipelineOwner.flushCompositingBits();
    pipelineOwner.flushPaint();
    renderView.compositeFrame(); // this sends the bits to the GPU
    pipelineOwner.flushSemantics(); // this also sends the semantics to the OS.
  }
}
mixin WidgetsBinding on BindingBase, ServicesBinding, SchedulerBinding, GestureBinding, RendererBinding, SemanticsBinding {
  @override
  void drawFrame() {
    assert(!debugBuildingDirtyElements);
    assert(() {
      debugBuildingDirtyElements = true;
      return true;
    }());

    if (_needToReportFirstFrame && _reportFirstFrame) {
      assert(!_firstFrameCompleter.isCompleted);

      TimingsCallback firstFrameCallback;
      firstFrameCallback = (List timings) {
        if (!kReleaseMode) {
          developer.Timeline.instantSync('Rasterized first useful frame');
          developer.postEvent('Flutter.FirstFrame', {});
        }
        SchedulerBinding.instance.removeTimingsCallback(firstFrameCallback);
        _firstFrameCompleter.complete();
      };
      SchedulerBinding.instance.addTimingsCallback(firstFrameCallback);
    }

    try {
      if (renderViewElement != null)
        buildOwner.buildScope(renderViewElement);
      super.drawFrame();
      buildOwner.finalizeTree();
    } finally {
      assert(() {
        debugBuildingDirtyElements = false;
        return true;
      }());
    }
    if (!kReleaseMode) {
      if (_needToReportFirstFrame && _reportFirstFrame) {
        developer.Timeline.instantSync('Widgets built first useful frame');
      }
    }
    _needToReportFirstFrame = false;
  }
}
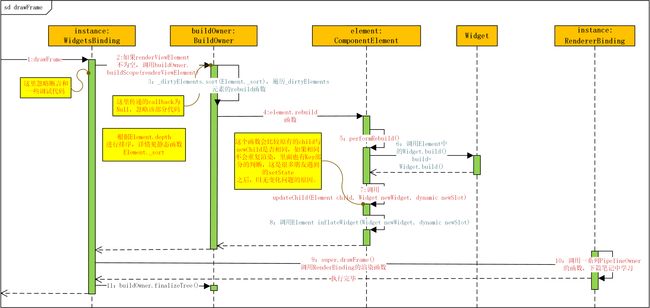
在1.2中,我们知道drawFrame在每个handleDrawFrame函数中都会被调用,我们的WidgetsFlutterBinding继承自RendererBinding和WidgetsBinding,见下图的顺序看看drawFrame到底发生了什么,再进行源码追踪

过程比较复杂,源码学习按照序列图中的顺序来
WidgetsBinding.drawFrame():该函数在每一次handleDrawFrame都会被调用,并且还会调用super.drawFrame函数///伪代码 mixin WidgetsBinding ...{ ///忽略断言和调试部分代码 @override void drawFrame() { try { ///如果renderViewElement不为空,调用BuildOwner.buildScope函数,生成WidgetTree更新域 if (renderViewElement != null){ buildOwner.buildScope(renderViewElement); } //调用RenderBinding.drawFrame函数 super.drawFrame(); // buildOwner.finalizeTree(); } finally { assert(() { debugBuildingDirtyElements = false; return true; }()); } if (!kReleaseMode) { if (_needToReportFirstFrame && _reportFirstFrame) { developer.Timeline.instantSync('Widgets built first useful frame'); } } _needToReportFirstFrame = false; } }buildOwner.buildScope(renderViewElement):这里的renderViewElement是一个RenderObjectToWidgetElement对象,在runApp(Widget app)函数中被初始化,不了解的请看我的这篇文章Flutter笔记——runApp发生了什么(源码学习)。
buildOwner.buildScope(renderViewElement)函数的作用是建立WidgetTree构建的域。///删除断言和callback相关代码 void buildScope(Element context, [ VoidCallback callback ]) { Timeline.startSync('Build', arguments: timelineWhitelistArguments); try{ _dirtyElements.sort(Element._sort); _dirtyElementsNeedsResorting = false; int dirtyCount = _dirtyElements.length; int index = 0; while (index < dirtyCount) { try { _dirtyElements[index].rebuild(); } catch (e, stack) { _debugReportException( ErrorDescription('while rebuilding dirty elements'), e, stack, informationCollector: () sync* { yield DiagnosticsDebugCreator(DebugCreator(_dirtyElements[index])); yield _dirtyElements[index].describeElement('The element being rebuilt at the time was index $index of $dirtyCount'); }, ); } index += 1; if (dirtyCount < _dirtyElements.length || _dirtyElementsNeedsResorting) { _dirtyElements.sort(Element._sort); _dirtyElementsNeedsResorting = false; dirtyCount = _dirtyElements.length; while (index > 0 && _dirtyElements[index - 1].dirty) { index -= 1; } } } } finally { for (Element element in _dirtyElements) { element._inDirtyList = false; } _dirtyElements.clear(); _scheduledFlushDirtyElements = false; _dirtyElementsNeedsResorting = null; Timeline.finishSync(); } }_dirtyElements.sort(Element._sort):排列Element,根据Element中的depth值,depth值是当期Element所在树的层次整数。每个Element的depth值都大于ParentElement的depth值static int _sort(Element a, Element b) { if (a.depth < b.depth) return -1; if (b.depth < a.depth) return 1; if (b.dirty && !a.dirty) return -1; if (a.dirty && !b.dirty) return 1; return 0; }_dirtyElements[index].rebuild():遍历_dirtyElements容器中的元素,调用它们的rebuild()函数。element.rebuild():这里以ComponentElement作为示例,rebuild()函数源码如下void rebuild() { ///删除很多断言和其他代码 performRebuild(); }ComponentElement.performRebuild():在这里我们可以看到performRebuild()函数会调用Element中的build()函数,这对于我们应该是最熟悉的Flutter代码之一了。这里面的built = build()有几个继承,StatefulWidget通过createState()函数生成State,再通过State的build():Widget函数生成Widget。@override void performRebuild() { ///删除很多断言和其他代码 Widget built; try { built = build(); debugWidgetBuilderValue(widget, built); } catch (e, stack) { built = ErrorWidget.builder( _debugReportException( ErrorDescription('building $this'), e, stack, informationCollector: () sync* { yield DiagnosticsDebugCreator(DebugCreator(this)); }, ), ); } finally { _dirty = false; } try { _child = updateChild(_child, built, slot); assert(_child != null); } catch (e, stack) { built = ErrorWidget.builder( _debugReportException( ErrorDescription('building $this'), e, stack, informationCollector: () sync* { yield DiagnosticsDebugCreator(DebugCreator(this)); }, ), ); _child = updateChild(null, built, slot); } }updateChild(Element child, Widget newWidget, dynamic newSlot):更新Element中的Widget对象,这里面有三个参数,第一个是之前的Widget对象,也就是类对象child。第二个是新生成的newWidget对象,由build()函数生成,第三个newSlot是父Element给与子Element的位置参数,如果slot位置发生了变化,即使child与newWidget相同,也会重新渲染。@protected Element updateChild(Element child, Widget newWidget, dynamic newSlot) { if (newWidget == null) { if (child != null) deactivateChild(child); return null; } if (child != null) { if (child.widget == newWidget) { if (child.slot != newSlot) updateSlotForChild(child, newSlot); return child; } if (Widget.canUpdate(child.widget, newWidget)) { if (child.slot != newSlot) updateSlotForChild(child, newSlot); child.update(newWidget); assert(child.widget == newWidget); assert(() { child.owner._debugElementWasRebuilt(child); return true; }()); return child; } deactivateChild(child); assert(child._parent == null); } return inflateWidget(newWidget, newSlot); }Element inflateWidget(Widget newWidget, dynamic newSlot):根据给定的Widget和newSlot生成一个Element,该方法通常由updateChild()函数直接调用。如果该Widget生成Element已经存在或者存在相同的GlobalKey将会复用。该函数还会调用Widget.canUpdate(Widget oldWidget, Widget newWidget)来比较Widget对象是否相同。
该部分源码较长,在之后文章看是否记录学习,这里知道其作用即可。- 如果newWidget的key是
GlobalKey,并且通过Element _retakeInactiveElement(GlobalKey key, Widget newWidget)能拿回来一个Element,那么在更新状态与slot、配置之后便返回一个Element。 - 不能从key中拿回已有的Element,会调用
Element newChild = newWidget.createElement()生成一个新的newChild,并挂载它newChild.mount(this, newSlot)并返回。
- 如果newWidget的key是
super.drawFrame():也就是RenderBinding.drawFrame()函数,该函数涉及知识点较多,下篇文章学习。它主要涉及到了RenderObject、Rect、PipelineOwner等知识点。buildOwner.finalizeTree():调用该函数来完成元素构建。
2 小结
- 本篇文章从预热帧
WidgetsFlutterBinding.scheduleWarmUpFrame()函数入手,找到FlutterFramework渲染帧的过程函数handleDrawFrame(),再通过BaseBinding系列找到drawFrame()的持久监听与回调来学习帧绘制的部分内容。 - 本文从
Element的create与update中,也找到了State.setState时,有些UI元素没有重绘的根本原因,也了解了key的作用。 BaseBinding中的WidgetsBinding、RenderBinding、SchedulerBinding等子类是FlutterFramework帧渲染的核心类。本文从drawFrame入手学习了部分内容,另外BuildOwner全局管理类也要着重了解。- 本文篇章有限,还有许多内容没有学习到,等下篇文章再着重学习
RenderBinding.drawFrame()的作用,之后再做一个阶段性总结。
谢谢阅读,如有错误劳烦指出纠正,十分感谢,新春快乐哦!