Rust Web入门(七):WebAssembly
本教程笔记来自 杨旭老师的 rust web 全栈教程,链接如下:
https://www.bilibili.com/video/BV1RP4y1G7KF?p=1&vd_source=8595fbbf160cc11a0cc07cadacf22951
学习 Rust Web 需要学习 rust 的前置知识可以学习杨旭老师的另一门教程
https://www.bilibili.com/video/BV1hp4y1k7SV/?spm_id_from=333.999.0.0&vd_source=8595fbbf160cc11a0cc07cadacf22951
项目的源代码可以查看 git:(注意作者使用的是 mysql 数据库而不是原教程的数据库)
https://github.com/aiai0603/rust_web_mysql
在之前的项目中,我们使用 rust 的模板引擎 Tera 编写一个项目,这节课我们来介绍一种 Rust 提供的更加高级的功能来编写前端应用—— WebAssembly,这是官方文档
https://rustwasm.github.io/docs/book/
WebAssembly
WebAssembly/wasm WebAssembly 或者 wasm 是一个可移植、体积小、加载快并且兼容 Web 的全新格式。
- 他是一种低级的类汇编语言
- 具有紧凑的二进制格式
- 可以以接近原生的性能运行
- 它可以为 C/C++ Rust 提供一个编译目标,以便它们可以在 Web 上运行
- 它 被设计为与 js 共存,一起工作
通过它,我们可以将我们编写的其他语言(C++,Rust)语言编译成 WebAssembly 模块,然后在 Web 应用中加载这些模块,在 JS 中调用它。
WebAssembly 的优势是:
- 快速高效可以移植,WebAssembly 代码可以在不同的平台上以接近本地的速度运行
- 可读可调试,它虽然是低级语言,但是有一种人类可读的文本格式
- 安全,限制运行在安全的沙箱中,也遵循浏览器的同源策略和授权策略
- 不破坏网络,它与其他网络技术共存并且保持向后兼容
配置环境
在开始我们的项目编写之前,我们需要先配置 rust-wasm 的环境,你可以阅读官方文档的这一章来完成环境的安装:
https://rustwasm.github.io/docs/book/game-of-life/setup.html
- 安装 wasm-pack
根据不同系统选用不一样的方式:https://rustwasm.github.io/wasm-pack/installer/
- 安装cargo-generate
cargo install cargo-generate
- 安装 node
前往官网下载: https://docs.npmjs.com/getting-started
项目搭建
- 下载 rust 模板
在安装完依赖以后,我们可以使用模板来新建一个 wasm 项目,然后为我们的项目取一个名字,这里作者取名是 stage_9 :
cargo generate --git https://github.com/rustwasm/wasm-pack-template
在命令行使用 wasm-pack 可以编译我们模板的项目,获得一个 pkg 文件夹
wasm-pack build
- 下载前端模板
同样我们要使用我们刚刚编译成功的 wasm ,我们需要一个前端页面来调用它,我们也可以使用模板,我们进入 rust 模板的项目中,输入如下的命令:
npm init wasm-app www
之后我们找到 www/package.json 这个文件,将我们刚刚的 rust 模板作为依赖引入进来。注意,这里的 stage_9 就是刚刚我们给 rust 模板的名字,它的来源是刚刚编译完成后生成的 pkg 文件夹
"dependencies": {
   "stage_9": "file:../pkg"
 },
之后我们安装这个依赖,我们进入 www 目录,使用 npm i 指令安装依赖。现在我们已经将 wasm 安装进我们的前端项目了,我们最后将它引入,我们修改 www/index.js 文件,将我们的函数引入进来。
import * as wasm from "stage_9";
wasm.greet();
最后我们在 www 目录启动我们的项目:
npm run start
如果现在你打开 localhost:8080 端口运行我们的项目,看到弹出一个对话框,那就说明我们的项目运行成功了。
业务逻辑
刚刚我们运行了一个简单的 wasm 项目,现在我们结合项目逻辑来介绍 wasm 项目的各个模块,我们首先回到我们的 stage_9 这个项目,然后实现我们的逻辑:
我们首先创建 models 文件夹,创建 models/course.rs 和 models/mod.rs 两个文件,之后创建 errors.rs 、 lib.rs 和 utils.rs 这几个文件用于编写我们的逻辑,之后我们还是首先更新我们的依赖:
这里要解释一下 wasm-bindgen 和它相关的包是用于将 rust 代码和 js 绑定用的 , js-sys 和 web-sys 则是 js 在 rust 中使用 js 和 web 开发相关函数的库,web-sys 包含大部分的包括 页面操作,DOM 操作 ,BOM 操作,js 请求收到等的函数,可以按需引入:
[package]
authors = ["zhangshuai <[email protected]>"]
edition = "2018"
name = "stage-9"
version = "0.1.0"

[lib]
crate-type = ["cdylib", "rlib"]

[features]
default = ["console_error_panic_hook"]

[dependencies]
chrono = {version = "0.4.19", features = ["serde"]}
js-sys = "0.3.56"
serde = {version = "1.0.136", features = ["derive"]}
serde_derive = "1.0.136"
serde_json = "1.0.79"
wasm-bindgen = {version = "0.2.79", features = ["serde-serialize"]}
wasm-bindgen-futures = "0.4.29"
web-sys = {version = "0.3.56", features = [
  "Headers",
  "Request",
  "RequestInit",
  "RequestMode",
  "Response",
  "Window",
  "Document",
  "Element",
  "HtmlElement",
  "Node",
  "console",
  "HtmlButtonElement",
  "HtmlElement",
  "MouseEvent",
  "Location"
]}
console_error_panic_hook = {version = "0.1.6", optional = true}
wee_alloc = {version = "0.4.5", optional = true}

[dev-dependencies]
wasm-bindgen-test = "0.3.13"

[profile.release]
# Tell `rustc` to optimize for small code size.
opt-level = "s"

[package.metadata.wasm-pack.profile.release]
wasm-opt = false
之后我们首先编写 models / course.rs ,其中我们先定义一个数据结构来操作我们的数据
use chrono::{DateTime, Utc};
use js_sys::Promise;
use serde::{Deserialize, Serialize};
use serde_json::from_str;
// use crate::models::course::Course;
use crate::errors::MyError;
use wasm_bindgen::{JsCast, JsValue, prelude::wasm_bindgen};
use wasm_bindgen_futures::JsFuture;
use web_sys::{Request, RequestInit, RequestMode, Response};

#[derive(Serialize, Deserialize, Debug)]
pub struct Course {
    pub id: i32,
    pub teacher_id: i32,
    pub name: String,
    pub time: Option<DateTime<Utc>>,

    pub description: Option<String>,
    pub format: Option<String>,
    pub structure: Option<String>,
    pub duration: Option<String>,
    pub price: Option<i32>,
    pub language: Option<String>,
    pub level: Option<String>,
}
之后我们编写一些增删改查的操作函数:
这里以查找为例子简单来说明一下:
- RequestInit::new() 可以初始化一个请求,我们可以用这个请求来调用接口,
- 因为是查找,我们设置它为 GET 方法,之后配置它为跨域,因为我们的后台在 localhost:3077 而前端在 localhost:8080,所以请求需要跨域,之后使用 Request 相关的 api 来访问指定的接口
- 之后我们为我们的请求添加请求头,之后使用 fetch_with_request 来调用 fetch 的 api 发送我们的请求,因为是 fetch 相关的 api 是在 js 的 window 对象中的,所以我们要先初始化一个 window 对象,他在 web_sys 这个库中
- 我们使用 JsFuture 接收信息,之后把它转为 Response 的形式, Response 也是 wasm 提供的一个接收请求的结构
- 最后我们使用 json 相关的 json 将我们的 json 数据转为 Vec 的数据结构,因为 Course 实现了 Serialize ,所以我们可以转化我们的 json 数据
删除的函数编写方式大同小异:
pub async fn get_course_by_teacher(teacher_id: i32) -> Result<Vec<Course>, MyError> {
    let mut opts = RequestInit::new();
    opts.method("GET");
    opts.mode(RequestMode::Cors);

    let url = format!("http://localhost:3077/courses/{}", teacher_id);

    let request = Request::new_with_str_and_init(&url, &opts)?;

    request.headers().set("Accept", "application/json")?;

    let fetch  = web_sys::window().ok_or("no window exisits".to_string())?;

    let resp_value = JsFuture::from(window.fetch_with_request(&request)).await?;

    assert!(resp_value.is_instance_of::<Response>());

    let resp: Response = resp_value.dyn_into().unwrap();

    let json = JsFuture::from(resp.json()?).await?;

    let courses: Vec<Course> = json.into_serde().unwrap();

    Ok(courses)
}

pub async fn delete_course(teacher_id: i32, course_id: i32) -> () {
    let mut opts = RequestInit::new();
    opts.method("DELETE");
    opts.mode(RequestMode::Cors);

    let url = format!("http://localhost:3077/courses/{}/{}", teacher_id, course_id);

    let request = Request::new_with_str_and_init(&url, &opts).unwrap();

    request.headers().set("Accept", "application/json").unwrap();

    let window = web_sys::window()
        .ok_or("no window exisits".to_string())
        .unwrap();

    let resp_value = JsFuture::from(window.fetch_with_request(&request))
        .await
        .unwrap();

    assert!(resp_value.is_instance_of::<Response>());

    let resp: Response = resp_value.dyn_into().unwrap();

    let json = JsFuture::from(resp.json().unwrap()).await.unwrap();

    let courses: Course = json.into_serde().unwrap();
}


#[wasm_bindgen]
pub async fn add_course(name: String, desc: String) -> Result<Promise, JsValue> {
    let mut opts = RequestInit::new();
    opts.method("POST");
    opts.mode(RequestMode::Cors);

    let str_json = format!(
        r#"{{
            "teacher_id":1,
            "name":"{}",
            "description":"{}"
        }}"#,
        name, desc
    );
    opts.body(Some(&JsValue::from_str(str_json.as_str())));

    let url = "http://localhost:3077/courses/";

    let request = Request::new_with_str_and_init(&url, &opts)?;

    request.headers().set("Accept", "application/json")?;
    request.headers().set("Content-type", "application/json")?;

    let window = web_sys::window()
        .ok_or("no window exisits".to_string())
        .unwrap();

    let resp_value = JsFuture::from(window.fetch_with_request(&request))
        .await
        .unwrap();

    assert!(resp_value.is_instance_of::<Response>());

    let resp: Response = resp_value.dyn_into().unwrap();

    Ok(resp.json()?)
}
而新增的函数因为我们后续将要在 js 中直接调用,所以我们为它加上 #[wasm_bindgen] ,加上这个标识的函数后续将会绑定到 wasm 对象上,我们可以直接在 js 代码中调用他们,新增数据的函数不同的是我们将构造一个 json 字符串,然后将它序列化后放入 body 随着 POST 方法提交,要注意,我们的函数是异步的,它需要在提交成功后能被 js 继续响应处理,所以我们返回一个 Promise 类型,使用 resp.json() 就可以返回一个 Promise 对象:
#[wasm_bindgen]
pub async fn add_course(name: String, desc: String) -> Result<Promise, JsValue> {
    let mut opts = RequestInit::new();
    opts.method("POST");
    opts.mode(RequestMode::Cors);

    let str_json = format!(
        r#"{{
            "teacher_id":1,
            "name":"{}",
            "description":"{}"
        }}"#,
        name, desc
    );
    opts.body(Some(&JsValue::from_str(str_json.as_str())));

    let url = "http://localhost:3077/courses/";

    let request = Request::new_with_str_and_init(&url, &opts)?;

    request.headers().set("Accept", "application/json")?;
    request.headers().set("Content-type", "application/json")?;

    let window = web_sys::window()
        .ok_or("no window exisits".to_string())
        .unwrap();

    let resp_value = JsFuture::from(window.fetch_with_request(&request))
        .await
        .unwrap();

    assert!(resp_value.is_instance_of::<Response>());

    let resp: Response = resp_value.dyn_into().unwrap();

    Ok(resp.json()?)
}
我们在 mod.rs 中导出我们的 course ,之后我们编写 lib.rs 作为我们的页面生成函数:
这部分是我们之后的模板中包含的部分,其中 extern “C” 模块中声明了我们需要的 js 函数,比如 alert 就是 js 的 alert 函数,可以弹出一个对话框包含一些数据,我们添加一些我们需要的函数,比如 confirm 用于弹出包含取消和确定的模态框, log 函数是 console.log 函数,用于在控制台打印数据,因为 js 中函数是 console.log ,所以我们需要用 #[wasm_bindgen(js_namespace = console)] 绑定命名空间:
mod utils;

use wasm_bindgen::prelude::*;

use wasm_bindgen_futures::spawn_local;
use web_sys::*;

// When the `wee_alloc` feature is enabled, use `wee_alloc` as the global
// allocator.
#[cfg(feature = "wee_alloc")]
#[global_allocator]
static ALLOC: wee_alloc::WeeAlloc = wee_alloc::WeeAlloc::INIT;

#[wasm_bindgen]
extern "C" {
    fn alert(s: &str);
    fn confirm(s:&str) -> bool;

    #[wasm_bindgen(js_namespace = console)]
    fn log(s: &str);
}

#[wasm_bindgen]
pub fn greet(s: &str) {
    alert(format!("Hello, {}!", s).as_str());
}
之后我们添加我们的页面生成的逻辑,它让我们在查找出课程数据后生成我们的表格结构:
这里我们使用了 document 这个对象,它和 js 中的 document 用法一致,我们可以使用它查找 DOM 元素,生成添加 DOM 元素,使用它就可以生成一个包含我们查询到数据的表格结构。
之后需要为我们的表格中添加一个 删除按钮,我们创建一个闭包 click_closure 来处理这个事件,并且使用 add_event_listener_with_callback 将它绑定到按钮上,要注意,虽然我们要将我们的数据编译成 wasm 运行,但是它的逻辑还是遵循基本的 rust 规则,在函数结束之后,我们的 click_closure 就到作用域底部了,将被销毁,此时我们的事件也会失效,所以我们使用 click_closure.forget() 来解决这个问题。
最后我们在函数头部加上 #[wasm_bindgen(start)] 这个标识,它代表当我们运行我们的项目,这个函数就会被调用,也就是我们每次进入界面,这个函数就会被自动调用了
pub mod errors;
pub mod models;

use models::course::{delete_course, Course};

click_closure.forget();
pub async fn main() -> Result<(), JsValue> {
    let window = web_sys::window().expect("no");
    let document = window.document().expect("no");

    let left_body = document.get_element_by_id("left_body").expect("no");

    let courses: Vec<Course> = models::course::get_course_by_teacher(1).await.unwrap();

    for c in courses.iter() {
        let tr = document.create_element("tr")?;
        tr.set_attribute("id", format!("tr-{}", c.id).as_str())?;
        let td = document.create_element("td")?;
        td.set_text_content(Some(format!("tr-{}", c.id).as_str()));
        tr.append_child(&td)?;

        let td = document.create_element("td")?;
        td.set_text_content(Some(c.name.as_str()));
        tr.append_child(&td)?;

        let td = document.create_element("td")?;
        if let Some(time) = c.time.clone() {
            td.set_text_content(Some(time.to_string().as_str()));
        }
        tr.append_child(&td)?;

        let td = document.create_element("td")?;
        if let Some(desc) = c.description.clone() {
            td.set_text_content(Some(desc.as_str()));
        }
        tr.append_child(&td)?;

        let td = document.create_element("td")?;
        let btn: HtmlButtonElement = document
            .create_element("button")
            .unwrap()
            .dyn_into::<HtmlButtonElement>()
            .unwrap();

        let cid = c.id;
        let click_closure = Closure::wrap(Box::new(move |_event: web_sys::MouseEvent| {
            let r = confirm(format!("确认删除 ID 为 {} 的课程?", cid).as_str());
            match r {
                true => {
                    spawn_local(delete_course(1, cid));
                    alert("删除成功");
                    web_sys::window().unwrap().location().reload().unwrap();
                }
                _ => {}
            }
        }) as Box<dyn Fn(_)>);

        btn.add_event_listener_with_callback("click", click_closure.as_ref().unchecked_ref())?;
        click_closure.forget();
        btn.set_attribute("class", "btn btn-danger btn-sm")?;
        btn.set_text_content(Some("Delete"));
        td.append_child(&btn)?;
        tr.append_child(&td)?;

        left_body.append_child(&tr)?;
    }

    Ok(())
}
我们为它加上简单的 errors.rs 处理错误,这里我们主要才处理的是 JsValue 这个类型,当我们的 js 相关的 api 代码执行中发生错误,它就会返回 JsValue ,其中包含了 js 相关的报错,我们可以如下的方式取得它然后处理我们的异常:
use serde::Serialize;

#[derive(Debug, Serialize)]
pub enum MyError {
    SomeError(String),
}

impl From<String> for MyError {
    fn from(s: String) -> Self {
        MyError::SomeError(s)
    }
}
impl From<wasm_bindgen::JsValue> for MyError {
    fn from(js_value: wasm_bindgen::JsValue) -> Self {
        MyError::SomeError(js_value.as_string().unwrap())
    }
}
现在我们完成了我们代码的编写,我们可以使用 wasm-pack build 来重新 build 我们的代码。
页面逻辑编写
我们完成了事务逻辑代码的编写后,我们就可以在前端页面调用这些逻辑代码了,我们进入 www 这个模板,编写我们的 index.html 这个页面:
DOCTYPE html>
<html>
  <head>
    <meta charset="utf-8" />
    <title>Hello wasm-pack!title>
    <script src="./bootstrap.js">script>
    <link
      href="https://cdn.staticfile.org/twitter-bootstrap/5.1.3/css/bootstrap.min.css"
      rel="stylesheet"
    />
  head>
  <body>
    <noscript
      >This page contains webassembly and javascript content, please enable
      javascript in your browser.noscript
    >
    <nav class="navbar navbar-dark bg-primary">
      <div class="container-fluid">
        <a class="navbar-brand" href="#"> WSAM 项目a>
      div>
    nav>
    <div class="m-3" style="height: 600px">
      <div class="col">
        <div class="card border-info mb-3">
          <div class="card-header">Coursediv>
          <div class="card-body">
            <form class="row g-3 needs-validation" id="form">
              <label for="name" class="form-label">课程名称label>
              <div class="mb-3">
                <input
                  type="name"
                  class="form-control"
                  id="name"
                  required
                  placeholder="课程名称"
                />
                <div class="invalid-feedback">请填写课程名称div>
              div>
              <div class="mb-3">
                <label for="description" class="form-label">课程简介label>
                <textarea
                  id="description"
                  rows="3"
                  class="form-control"
                >textarea>
              div>
              <div class="col-12">
                <button type="submit" class="btn btn-primary">提交button>
              div>
            form>

          div>
        div>
        <table class="table table-hover table-bordered table-sm">
          <thead>
            <tr>
              <th scope="col">IDth>
              <th scope="col">Nameth>
              <th scope="col">Timeth>
              <th scope="col">Descriptionth>
              <th scope="col">操作th>
            tr>
          thead>
          <tbody id="left_body">tbody>
        table>
        <div id="left">div>
      div>
    div>
  body>
html>
之后我们编写我们的 index.js 这个函数,在这个函数里,我们引入我们的 stage_9 这个项目,导出为 wasm 对象,现在在 wasm 上挂载了我们之前编写的由 #[wasm_bindgen] 标识的函数,比如我们的提交数据函数:
import * as wasm from "stage_9";

//wasm.set_panic_hook();


const myForm = document.getElementById('form');

myForm.addEventListener('submit',(e) => {
    e.preventDefault();

    const name = document.getElementById('name').value;
    const desc = document.querySelector('#description').value;

    wasm.add_course(name,desc).then((json) => {
        console.log(json)
        alert('成功!');
        window.location.reload();
    })

})
配置跨域
现在重新 npm install 然后 npm run start 就可以启动我们的 wasm 项目了,但是位了测试我们的接口,我们还需要在 3077 端口启动我们的后台项目,此时会发现报错了,原因是我们的后台项目没有配置跨域,所以跨域失败了,现在我们回到我们的后台项目,配置我们的跨域,我们还是先引入依赖:
[dependencies]
actix-cors = "0.6.0-beta.10"
之后我们在 teacher-service.rs 编写我们的逻辑:我们定义一个跨域的配置,允许 http://localhost:8080/ 来源的请求跨域进入我们的接口服务中,指定它的方法和请求头,两次配置分别是 “Accept”, “application/json” 和 “Content-type”, “application/json” 这两个请求头,对于情况和 POST 请求,最后我们在我们的项目 注入我们的跨域配置器
let app = move || {

        let cors = Cors::default()
        .allowed_origin("http://localhost:8080/")
        .allowed_origin_fn(|origin, _req_head| {
            origin.as_bytes().starts_with(b"http://localhost")
        }).allowed_methods(vec!["GET","POST","DELETE"])
        .allowed_headers(vec![http::header::AUTHORIZATION,http::header::ACCEPT])
        .allowed_header(http::header::CONTENT_TYPE)
        .max_age(3600);

        App::new()
            .app_data(shared_data.clone())
            .app_data(web::JsonConfig::default().error_handler(|_err, _req| {
                MyError::InvalidInput(" please  provide valid json input".to_string()).into()
            }))
            .configure(general_routes)
            .configure(course_routes)
            .wrap(cors)
            .configure(teacher_routes)
};
效果预览
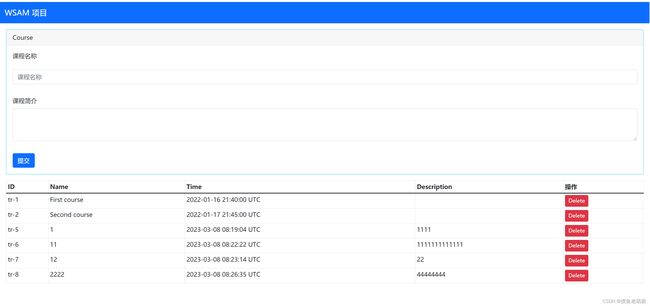
现在我们已经可以实现跨域了,我们将我们的项目启动起来,它的效果是这样的:
我们输入一门新的课程可以把它添加到项目中:
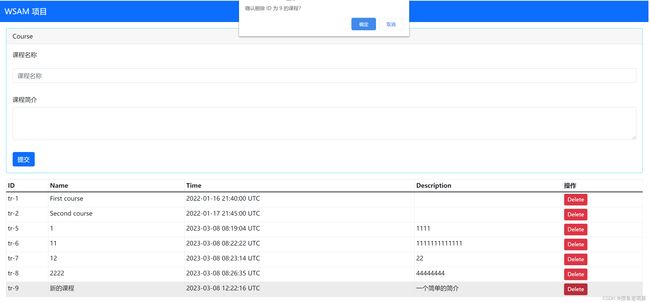
点击删除按钮可以删除指定的课程,但是你需要先进行确认:
如果你可以如上允许这个项目,说明你的项目成功了,如果你的项目运行有问题,可以查看作者的 git :https://github.com/aiai0603/rust_web_mysql


