Kafka生产者源码解析(三)——Sender
前面两篇的内容主要分析了KafkaProducer将消息数据存入RecordAccumulator的过程,需注意的是在这个过程中并没有涉及到网络I/O操作,也就是说消息还并没有真正的发出去。而本篇的主要内容就是分析Sender线程是如何将这些消息记录通过网络I/O发往Kafka broker中,这也是Spring-Kafka生产者源码解析的第三部分:Sender线程分析。
Spring-Kafka生产者源码解析(一)——KafkaProducer
Spring-Kafka生产者源码解析(二)——RecordAccumulator
Spring-Kafka生产者源码解析(三)——Sender
目录
一、Sender线程是何时被创建的
二、唤醒Sender线程的条件
三、Run方法
一、sendProducerData()
二、client.poll()
四、总结
一、Sender线程是何时被创建的
Sender线程是一个子线程,实现了Runnable接口,并运行在单独的ioThread中,主要用来实现消息在网络I/O上的发送,首先来回忆一下Sender线程是什么时候被创建的。
    KafkaProducer(Map configs,
                  Serializer keySerializer,
                  Serializer valueSerializer,
                  ProducerMetadata metadata,
                  KafkaClient kafkaClient,
                  ProducerInterceptors interceptors,
                  Time time) {
            ……………………

            //创建Sender线程
            this.sender = newSender(logContext, kafkaClient, this.metadata);
            String ioThreadName = NETWORK_THREAD_PREFIX + " | " + clientId;
            //启动Sender对应的线程
            this.ioThread = new KafkaThread(ioThreadName, this.sender, true);
            this.ioThread.start();
            ……………………
        } catch (Throwable t) {
            ……………………
        }
    }
在第一篇KafkaProducer的构造方法中我们就已经创建好了Sender线程,并将其放入了一个单独的ioThread,随后启动了这个ioThread线程。
二、唤醒Sender线程的条件
之前在讲解RecordAccumulator的时候说到,当满足了一定的条件后,将会触发唤醒Sender线程,然后Sender开始发送消息,那么需要满足什么条件呢?再来回忆一下KafkaProducer的doSend方法。
    private Future doSend(ProducerRecord record, Callback callback) {
        ………………
        //将消息追加到accumulator中
        RecordAccumulator.RecordAppendResult result = accumulator.append(tp, timestamp, serializedKey,
                    serializedValue, headers, interceptCallback, remainingWaitMs);
        //若消息存储器满了或者创建了新的消息存储器则唤醒Sender线程
        if (result.batchIsFull || result.newBatchCreated) {
            //唤醒Sender线程
            this.sender.wakeup();
        }
        ………………
} KafkaProducer虽然会根据业务需求不断地往RecordAccumulator中存放消息数据,但会返回一个RecordAppendResult对象,我们可以通过这个对象知道消息存储器是否已经满了或者是否创建了新的消息存储器(上一篇中已经分析过),若满足两者之一那么就可以唤醒Sender线程啦。
三、Run方法
分析源码可知run()方法的核心内容被放进了一个runOnce()方法中,省去前面一堆事务相关的代码,我们直接来看这个方法的核心部分:
    void runOnce() {
        ……………………
        //构造网络请求
        long pollTimeout = sendProducerData(currentTimeMs);
        //网络I/O,将上面构造的请求通过网络发送到服务端
        client.poll(pollTimeout, currentTimeMs);
}没错,run方法的核心内容就是上面两行代码,下面将详细分析sendProducerData()方法和client.poll()方法。在此之前先对run方法的核心流程做个了解:
|
一、sendProducerData()
下面是sendProducerData方法核心部分的源码和注释,它主要完成上述流程1~7的内容。
    private long sendProducerData(long now) {
        //获取元数据集群信息
        Cluster cluster = metadata.fetch();
        //筛选出可以向哪些Node节点发送消息
        RecordAccumulator.ReadyCheckResult result = this.accumulator.ready(cluster, now);

        //如果存在某些主题对应的节点找不到的情况,则标记需要更新Kafka集群信息
        if (!result.unknownLeaderTopics.isEmpty()) {

            ……………………

            this.metadata.requestUpdate();
        }

        //遍历之前筛选好的Node节点
        Iterator iter = result.readyNodes.iterator();

        while (iter.hasNext()) {
            Node node = iter.next();
            //调用client.ready()方法检查每个节点的网络I/O是否符合发送消息的条件,将不符合的节点移除
            if (!this.client.ready(node, now)) {
                iter.remove();
                notReadyTimeout = Math.min(notReadyTimeout, this.client.pollDelayMs(node, now));
            }
        }

        //把<分区, 消息队列>的映射关系转换成<节点, 消息队列>的映射关系
        Map> batches = this.accumulator.drain(cluster, result.readyNodes, this.maxRequestSize, now);

        ……………………

        //构造发送消息请求
        sendProduceRequests(batches, now);
        return pollTimeout;
    }
我们需要重点关心上面方法中的sendProduceRequests()方法,追溯其内部方法sendProduceRequest,源码如下,发现最终是调用client.newClientRequest()方法进行构造ClientRequest请求,该构造方法很简单,追踪下去只是简单的属性赋值,所以这里不再深究该构造方法。
    private void sendProduceRequest(long now, int destination, short acks, int timeout, List batches) {

        ………………
        //得到要发送的brokerId
        String nodeId = Integer.toString(destination);
        //构造ClientRequest请求
        ClientRequest clientRequest = client.newClientRequest(nodeId, requestBuilder, now, acks != 0,
                requestTimeoutMs, callback);
        //将ClientRequest请求写进KafkaChannel的send属性,并且为KafkaChannel注册写入事件
        client.send(clientRequest, now);

        ………………
    }
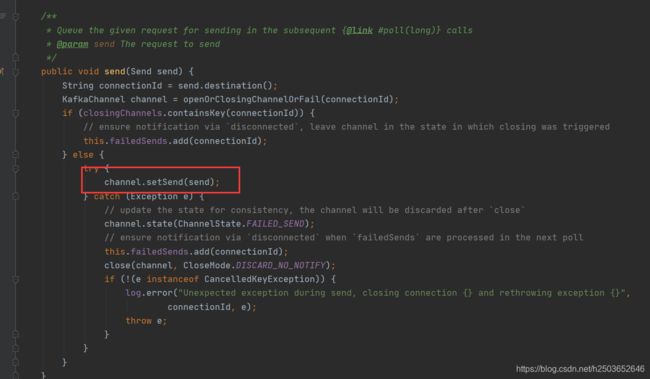
ClientRequest请求构造完成之后,我们还需要调用client.send()方法将ClientRequest请求写进KafkaChannel的send属性,并且为KafkaChannel注册写入事件,下面来看下这是怎么实现的。
    private void doSend(ClientRequest clientRequest, boolean isInternalRequest, long now, AbstractRequest request) {
        //要发送的目标brokerID
        String destination = clientRequest.destination();
        //构造请求头
        RequestHeader header = clientRequest.makeHeader(request.version());

        ………………
        //将目标brokerID和请求头构成NetworkSend
        Send send = request.toSend(destination, header);
        //构造InFlightRequest
        InFlightRequest inFlightRequest = new InFlightRequest(
                clientRequest,
                header,
                isInternalRequest,
                request,
                send,
                now);
        //追加入inFlightRequests队列
        this.inFlightRequests.add(inFlightRequest);
        //覆盖KafkaChannel的send字段,并为KafkaChannel注册写入事件
        selector.send(send);
    }
首先我们利用之前构造好的ClientRequest请求得到目标brokerId和请求头,再由它们构成一个NetworkSend对象,这个类是对ByteBuffer的封装,接着构造了InFlightRequest并放入了inFlightRequests队列中,inFlightRequests队列的作用是缓存已经发出去但没有收到响应的ClientRequest,但是到目前为止仍然没有看到我们想要看到的内容,不急,继续看 selector.send()方法。
Selector属于网络I/O层,它使用NIO异步非阻塞模式实现网络I/O操作,到这一步已经完成将ClientRequest请求写进KafkaChannel的send属性,并且为KafkaChannel注册写入事件,只有注册了写入事件,Selector才会把消息发送出去,sendProducerData方法的流程也就到此为止了。
二、client.poll()
在此之前,sendProducerData()已经完成了ClientRequest请求的构造以及请求的准备工作,那么接下来就要真正的将这些请求通过网络发送出去了。下面来看client.poll()方法源码。
    public List poll(long timeout, long now) {
        …………………
        try {
            //网络I/O
            this.selector.poll(Utils.min(timeout, metadataTimeout, defaultRequestTimeoutMs));
        } catch (IOException e) {
            log.error("Unexpected error during I/O", e);
        }

        ……………………
    }
果不其然,最终还是看到了Selector的出现!这应该是意料中的事情,因为刚刚我们就说了Selector属于网络I/O层,那么我们要将消息通过网络发送出去那一定会用到它。进入到selector.poll()方法内部会看到一句代码如下:
pollSelectionKeys(readyKeys, false, endSelect)
它是执行网络I/O操作的核心,它需要传入一个SelectionKey集合,用于后面获取KafkaChannel,下面是该方法的源码。
    void pollSelectionKeys(Set selectionKeys,
                           boolean isImmediatelyConnected,
                           long currentTimeNanos) {
        for (SelectionKey key : determineHandlingOrder(selectionKeys)) {
            //通过SelectionKey获取到KafkaChannel
            KafkaChannel channel = channel(key);
            long channelStartTimeNanos = recordTimePerConnection ? time.nanoseconds() : 0;
            boolean sendFailed = false;

            //一次性注册所有的连接
            sensors.maybeRegisterConnectionMetrics(channel.id());
            if (idleExpiryManager != null)
                idleExpiryManager.update(channel.id(), currentTimeNanos);

            try {
                //如果connect返回true或OP_CONNECT
                if (isImmediatelyConnected || key.isConnectable()) {
                    //finishConnect()先检测socketChannel是否建立成功,然后会注册读事件
                    if (channel.finishConnect()) {
                        //加入已连接的集合
                        this.connected.add(channel.id());
                        this.sensors.connectionCreated.record();
                        SocketChannel socketChannel = (SocketChannel) key.channel();
                        log.debug("Created socket with SO_RCVBUF = {}, SO_SNDBUF = {}, SO_TIMEOUT = {} to node {}",
                                socketChannel.socket().getReceiveBufferSize(),
                                socketChannel.socket().getSendBufferSize(),
                                socketChannel.socket().getSoTimeout(),
                                channel.id());
                    } else {
                        continue;
                    }
                }
                ……………………
                //处理读事件
                attemptRead(key, channel);
                //如果还有数据未读取完,把selectionKeys缓存在keysWithBufferedRead中
                if (channel.hasBytesBuffered()) {
                    keysWithBufferedRead.add(key);
                }

                if (channel.ready() && key.isWritable() && !channel.maybeBeginClientReauthentication(
                    () -> channelStartTimeNanos != 0 ? channelStartTimeNanos : currentTimeNanos)) {
                    Send send;
                    try {
                        //处理写事件
                        send = channel.write();
                    } catch (Exception e) {
                        sendFailed = true;
                        throw e;
                    }
                    if (send != null) {
                        this.completedSends.add(send);
                        this.sensors.recordBytesSent(channel.id(), send.size());
                    }
                }
                /* cancel any defunct sockets */
                if (!key.isValid())
                    close(channel, CloseMode.GRACEFUL);
            } catch (Exception e) {
                ………………
            } finally {
                maybeRecordTimePerConnection(channel, channelStartTimeNanos);
            }
        }
} 因为之前在selector.send()方法中为KafkaChannel注册了写入事件,所以这里能够通过SelectionKey获取到KafkaChannel对象。因为我们研究的是发送消息的流程,所以这里需要关注的是channel.write()方法,还记得之前在selector.send()方法中将ClientRequest请求写进KafkaChannel的send属性吗?该方法内部将会调用send.writeTo()方法,最终做channel.write(buffer)操作完成数据的写入操作,KafkaChannel就好比一根网络管道,我们发送消息数据的过程就是往这根管道中写消息数据的过程。
四、总结
Sender线程总的来说就两个主要内容:将消息数据构成ClientRequest请求;将请求进行I/O发送,这两个大的内容分别由sendProducerData()方法和client.poll()方法完成,它们的详细流程步骤已在本文第三小节给出。

