py-01-LINUX
py-01-LINUX
目录:
1、day01
2、day02
3、Linux学习笔记——今日头条
4、Linux思维导图
1、day01
Linux-01
1 Linux
2 安装
3 常用命令:
3.1 pwd
3.2 cd
3.3 ls
4 文件命令
4.1 mkdir
4.2 touch
4.3 rmdir
4.4 rm
4.5 cp
4.6 mv
5 查看文本文件
5.1 cat
5.2 tac
5.3 head
5.4 tail
5.5 more
5.6 less
Linux-01
王海涛
http://code.tarena.com.cn
用户名: tarenacode
密码: code_2013
目录: /CGBCode/cgb1712/
课程:
Linux 1.5天
MySql 6天
Java
1 Linux
Linux 是类Unix系统,由芬兰大学生出于个人兴趣编写了一个操作系统内核
Linux 已经是最大的开源社区,在服务器领域,是最常用的操作系统
Java编写的服务器端应用,就会运行在Linux服务器上
Linux服务器不会安装桌面软件,只使用命令来管理和维护系统
2 安装
Linux系统分类:
红帽子ReadHat系列
Debian / Ubuntu系列
文件系统:
/root root超级管理员的主目录
/home 用户主目录
/etc 系统配置目录
/usr 系统软件目录
/var 动态文件目录
linux分区:
必须分区:
/
swap 交换分区
可选分区:
/boot 系统引导文件
/home
/var
vmware虚拟机安装 Linux
与windows并存,双系统安装
3 常用命令:
3.1 pwd
查看所在的目录路径
pws
/root 超级用户的主目录
3.2 cd
切换目录
cd /
pwd
cd /etc
pwd
cd /usr/bin
pwd
cd .. 上一层目录,必须加空格
cd ../../../
cd ~ 用户主目录,回家
3.3 ls
目录列表 list
参数:
-l 长格式,显示详细信息
第一个字符:文件类型,-文件,d目录,l链接文件
rwxrw-r--:权限
文件:硬连接文件数,目录:目录和子目录数量
用户和用户组
文件大小
最后修改时间
文件名
如:

-a 显示全部(隐藏)文件 all ; Linux隐藏文件是以点开头的文件".xxxx"
-h 人性化显示,文件大小以Kb、Mb、Gb单位显示
如:

-d 列出目录本身,而不是目录内的列表
-i 显示文件的数字id ;硬连接文件,具有相同的id
ls :列出当前目录下的文件
ls /etc :列出/etc目录下的文件
ls -l /etc:长格式,显示详细信息
cd ~ :回到主目录
ls -l -a :显示全部(隐藏)文件 all
ls -la :
ls -lh :人性化显示,文件大小以Kb、Mb、Gb单位显示
ls -lh /etc
ls -ld /etc:列出目录本身,而不是目录内的列表
ls -li :显示文件的数字id ;硬连接文件,具有相同的id
4 文件命令
4.1 mkdir :创建目录
make directory
-p 递归创建多层目录
cd ~
mkdir d1
ls
mkdir aa/bb/cc :不能创建多层目录
mkdir -p aa/bb/cc :创建多层目录
ls -l
cd aa/bb/cc
pwd
cd ../../../
pwd
4.2 touch
创建文件
cd ~
touch f1
ls -l
touch aa/f2
touch aa/bb/f3
ls aa
ls aa/bb
4.3 rmdir
删除目录 remove
只能删除空目录
cd ~
rmdir aa/bb 删除失败,bb非空
rmdir aa/bb/cc
rmdir d1
ls aa/bb
ls
4.4 rm
删除文件和目录
-r 删除目录,可以删除非空目录
-f 无需确认
服务器上做删除操作,一定要非常小心,尽量先备份,再删除
cd ~
touch f1
rm f1
ls
rm aa 不能直接删目录
rm -r aa
ls
mkdir -p aa/bb/cc
touch aa/f1
touch aa/bb/f2
rm -rf aa 无需确认
ls
4.5 cp
复制 copy
-r 复制目录
-p 保持文件属性(修改时间)
cd ~
cp /etc/services . 文件复制到当前目录
ls -l
ls -l /etc/services
cp -p /etc/services s1 文件复制成s1文件
ls -l
mkdir -p aa/bb/cc
touch aa/f1
touch aa/bb/f2
cp -r aa aa2
ls
ls aa2
ls aa2/bb
4.6 mv
移动、剪切和改名
cd ~
mkdir d1
touch f1
ls
mv f1 d1 f1文件移动到d1目录内
ls
ls d1
touch f2
mv f2 d1/f22 移动并改名
ls
ls d1
mv d1/f1 d1/f11 改名
ls d1
5 查看文本文件
5.1 cat
显示文件内容
-n 显示行号
cd ~
cp /etc/services .
cp /etc/passwd .
ls -l
cat passwd
cat -n passwd
cat services
cat -n services
5.2 tac
按行倒序显示文件内容
tac passwd
tac services
5.3 head
显示头部几行
-n 指定显示几行,默认显示10行
head passwd
head services
head -n5 passwd
前5行添加行号
先cat加行号,把结果交给head取前5行
要使用通道: |
cat -n passwd |head -n5
5.4 tail
显示尾部几行
tail services
tail -n5 services :显示尾部5行
cat -n services |tail -n5
5.5 more
分页显示
空格或f 翻页
回车,单行
q,退出
more services
配合其他命令,将其他命令的结果,进行分页显示
ls -l /etc |cat -n
ls -l /etc |cat -n |more
5.6 less
分页显示,可以向前翻页,可以搜索内容
pgup/pgdn
上下,一行一行翻
/ 输入搜索关键字
n 继续搜索下一个配置位置
q 退出
less services
/mysql
/a 按n可以继续找下一个
ls -l /etc |less
Linux-02
目录
Linux-02
1 ln -文件连接link
1.1 -s参数:软连接
1.2 硬连接
2 文件权限
2.1 chmod
2.2 chown
2.3 chgrp
3 查找文件和查找命令
3.1 find
3.2 locate和updatedb
3.3 which
3.4 whereis
3.5 grep
4 命令的帮助
4.1 --help参数
4.2 man
4.3 whatis
4.4 apropos
4.5 info
4.6 help
5 用户管理命令
5.1 useradd
5.2 passwd
5.3 userdel
5.4 who
5.5 last
5.6 lastlog
5.7 groupadd
1 ln - 文件连接 link
1.1 -s 参数:软连接
快捷方式
ln -s 原文件 软连接文件
cd ~
ls
cp /etc/passwd .
ln -s passwd pwd.link
ls -l
cat passwd
cat pwd.link
echo rwgw24y4gwdgwyhe >> pwd.link 向源文件添加一行
cat passwd
cat pwd.link
rm passwd
ls -l
cat pwd.link
1.2 硬连接
硬连接文件,是原文件的一个副本,保存于原文件相同的数据
原文件于硬连接文件,内容自动同步,对任意文件的修改,会同时修改另一个文件
文件id相同
删除任意文件,对其他文件没有影响
cd ~
cp /etc/passwd .
ls -l
ln passwd passwd2
ln passwd passwd3
ln passwd passwd4
ls -li
echo wedgw4g4geweg3 >> passwd4
ls -l
cat passwd
cat passwd2
cat passwd4
rm passwd
ls -l
cat passwd4
2 文件权限
u - 文件所有者权限
g - 用户组权限
o - 其他人
r - 4 读 read
w - 2 写 write
x - 1 执行 execute
rwxr-xr--
目录权限
r - 列出目录
w - 创建或删除文件和目录
x - 进入目录
2.1 chmod
修改文件权限 change mode
chmod u+x,g-wx,o=r 文件或目录
+ 添加权限
- 减少权限
= 设置为指定权限
chmod 744 文件
cd ~
rm f1
touch f1
ls -l rw-r--r--
chmod u-w f1
echo wergt234te >> f1
alt + f2
alt + f1 ~ f6
Linux命令行提供了6个操作界面,
可以分别以不同的身份登录,
执行不同的命令,
alt+f1
添加新用户
useradd zhangsan
passwd zhangsan
指定123456,会提示太简单,
不理他再输一次
cat /etc/passwd
cat /etc/shadow 加密密码保存文件
alt+f2
用zhangsan登录
pwd
touch f1
ls -l rw-rw-r--
chmod 444 f1
echo 23te2twqstwet3 >> f1
echo 243tgwergt23t >> /root/f1
alt+f1
touch /tmp/f2
ls -l /tmp/f2 rw-r--r--
chmod o+w /tmp/f2
alt+f2
echo 23tg23t23t >> /tmp/f2
cat /tmp/f2
alt+f1
mkdir /tmp/d1
ls -ld /tmp/d1 rwxr-xr-x
touch /tmp/d1/f3
chmod 644 /tmp/d1/f3 rw-r--r--
alt+f2
cd /tmp/d1
ls
rm f3
alt+f1
chmod o+w /tmp/d1
alt+f2
rm f3
alt+f1
chmod o-x /tmp/d1
alt+f2
pwd
cd ~
cd /tmp/d1
2.2 chown
更改文件的所有者 change owner
chown 用户 文件
alt + f1
touch /tmp/f4
ls -l /tmp/f4
chown zhangsan /tmp/f4
ls -l /tmp/f4
2.3 chgrp
更改文件所属的用户组 change group
chgrp 组 文件
alt + f1
groupadd grp1 创建新的用户组
ls -l /tmp/f4
chgrp grp1 /tmp/f4
ls -l /tmp/f4
3 查找文件和查找命令
3.1 find
在指定的目录下,查找文件
-name 文件名,通配符 *、?
-iname 大小写
-size
按文件大小查找
+块数, 大于...
-块数,小于...
一块等于512字节
-size +20800 大于20800*512字节
-size 20800 等于20800*512字节
-user
-group
按所有者、所属组查找
find -user root
-amin minutes, 按访问时间查找
-cmin change, 属性更改
-mmin modify, 内容修改
-amin -60 60分钟内
-type f, d, l
-a and
-o or
-exec
-ok
对查找结果直接执行操作命令
... -exec ls -l {} \;
... -ok ls -l {} \;
需用户确认
alt + f1
cd ~
find /etc -name se*
3.2 locate和updatedb
Linux中有一个文件数据库,保存着所有文件地信息
locate 在文件数据库中查找,而不会在磁盘上一个文件一个文件地进行判断
新文件,不会即时的更新到数据库,可以使用 updatedb 命令,手动更新数据库
find / -name serv*
locate serv*
locate f1
locate f2
locate f3
locate f4
cd ~
touch f5
locate f5
updatedb 手动更新数据库
locate f5
3.3 which
找命令,可以显示命令的别名
别名:
可以将命令(可带参数)定义成一个别名,
之后可以使用别名来执行命令
ls -l 的别名: ll
which ls ls --color=auto
which ll
which rm
which mv
which cp
alt + f2
which ls ls --color=auto
which ll
which rm
which mv
which cp
cd ~
touch f6
rm f6
自己定义别名
alias rm="rm -i"
which rm
touch f6
rm f6
alt+f1
clear 清屏
cat .bashrc 这个文件中配置别名
/usr/bin/ls 使用命令文件保存路径执行真实命令
ls 执行别名
3.4 whereis
找命令文件,同时可以找到帮助文档
whereis ls /usr/bin/ls 普通命令
whereis mkdir
whereis chmod
whereis useradd /usr/sbin/useradd 超级管理员命令
3.5 grep
内容查找
grep 关键字 文件
-i 忽略大小写
-v 排除匹配结果
grep zhangsan /etc/passwd
grep mysql /etc/services
其他命令结果,交给grep 查找
ls -l /etc |grep serv
ps -aux 查看进程列表
ps -aux |grep mysql
4 命令的帮助
4.1 --help 参数
ls --help
chmod --help
find --help |more
4.2 man
手册 manual
命令或配置文件的手册,内核命令没有独立手册
man 命令
man 配置文件名(不含路径)
q 退出
man rm
man find
man grep
man ls
man cd
man passwd
man services
4.3 whatis
命令的简单信息
whatis mv
whatis ls
whatis ln
whatis find
4.4 apropos
配置文件简单信息
apropos passwd
apropos services
4.5 info
info 命令
4.6 help
help 命令
5 用户管理命令
5.1 useradd
添加用户
-g 指定用户组
-G 指定附加组a,b,c,d
useradd lisi -g root
cat /etc/passwd
useradd wangwu -g root -G grp1
cat /etc/passwd
5.2 passwd
设置当前用户的密码
passwd
设置其他用户密码
passwd 用户名
-l 锁定口令,禁止登录
-u 解锁
-d 无口令
alt+f3
用lisi登录
alt+f1
passwd lisi 密码设置123456
alt+f3
用lisi登录
passwd
修改自己的密码,先输当前密码,再输入新密码
alt+f1
passwd -l zhangsan 锁定不允许登录
alt+f2
exit
重新用zhangsan登录
alt+f1
passwd -u zhangsan 解锁zhangsan
alt+f2
重新用zhangsan登录
alt+f1
passwd -d wangwu 无口令
alt+f4
用wangwu登录
5.3 userdel
删除用户 user delete
-r 同时删除用户的主目录
alt+f1
cat /etc/passwd
userdel wangwu 删除已登录用户失败
alt+f4
exit wangwu退出登录
alt+f1
userdel wangwu
cat /etc/passwd
5.4 who
查看所有登录的用户
who
5.5 last
用户的登录日志
5.6 lastlog
列出所有用户最后一次登录信息
5.7 groupadd
添加用户组
groupadd 组名
6 压缩、解压缩
6.1 gzip
压缩文件
gzip 文件
生成一个 .gz 后缀的压缩文件,同时删除原文件
解压缩
gzip -d xxx.gz
解压缩,.gz压缩文件会被删除
cd ~
cp /etc/passwd .
cp /etc/services .
ls -l
gzip services
ls -l
gzip -d services.gz
ls -l
6.2 tar
tar 把目录打包成一个文件(.tar),使用gzip或其他压缩格式,可以对 tar 文件进一步压缩
可以使用参数,在打tar包的同时,对tar文件进行压缩
-c 创建打包文件
-v 显示详细信息
-f 指定文件名
-z 打包同时压缩 gz,解包时解压缩
-j 打包同时压缩 bzip2
-x 解tar包
打tar包: -cf
打包并压缩: -czf
解tar包:-xvf
先解压缩再解包:-zxvf
cd ~
mkdir d1
mkdir d2
cp /etc/passwd d1
cp /etc/services d1
cp /etc/passwd d2
cp /etc/services d2
ls d1
ls d2
d1打包成tar
tar -cf d1.tar d1
ls -l
d1.tar文件进行压缩
gzip d1.tar
ls -l
rm -rf d1
解压缩d1.tar.gz
gzip -d d1.tar.gz
对d1.tar进行拆包
tar -xf d1.tar
ls -l
rm -rf d1
tar -xvf d1.tar
ls -l
tar -czf d2.tar.gz d2
ls -l
rm -rf d2
tar -zxvf d2.tar.gz
ls -l
6.3 zip
zip压缩,不删除原文件
-r 压缩目录
cd ~
zip pwd.zip passwd
zip serv.zip services
ls -l
zip -r d1.zip d1
ls -l
6.4 unzip
zip解压缩
rm passwd
rm services
rm -rf d1
unzip pwd.zip
unzip serv.zip
unzip d1.zip
ls -l
6.5 bzip2
bzip2 原文件
-k 保留原文件
bzip2 services
ls -l
6.6 bunzip2
解压缩
bunzip2 压缩文件
-k 保留压缩文件
bunzip2 services.bz2
ls -l
7 通信和网络
7.1 write
登录的用户之间发送消息
write 用户名
who
write zhangsan
1231231
dferte
ghjgh
yui6iyu
vbv
ctrl+c结束
zhangsan看到 EOF(End Of) 表示消息结束
7.2 wall
向所有登录用户发送消息 write all
wall 消息内容
wall sgsdwefwew
wall 5
wall 4
7.3 ifconfig
查看网卡ip设置
7.4 ping
测试网络是否联通,已经网络联通的速度
ping ip地址
-c 指定ping的次数
ping xxx.xx.xxx.xx
ctrl+c结束
ping -c xxx.xx.xxx.xx
7.5 netstat
本机网络状态
一般查看哪些端口被占用
-tlun 本机监听的端口
netstat -tlun
8 进程管理
8.1 top
显示进程监控
8.2 ps
查看进程列表
一般会使用 grep 配合查找进程
ps -aux
ps -aux |more
ps -aux |grep mysql
alt+f4
超级管理员登录
ps -aux |grep top
8.3 kill
kill 进程id
kill 853 杀掉top进程
alt+f1
9 关机和重启
9.1 shutdown
服务器不能关机,只能重启
-h 关机,指定时间 -h now 或 -h 20:00
-r 重启 -r now 或 -r 20:00
-c 取消预订的关机命令
9.2 init和runlevel
运行级别:
0 关机
1 单用户(安全模式)
2 不完全多用户,不含nfs服务
3 完全多用户(正常)
4 未分配
5 图形界面
6 重启
init切换运行级别
init 1 进入安全模式
输入管理员密码登录
ps -aux |grep mysql
init 3
runlevel
10 登录和退出
10.1 login
login用其他用户登录
login zhangsan
10.2 logout或exit
退出用户登录
11 vim
编辑一个新文件
vim
编辑一个指定的文件
vim 文件
命令行的文本编辑工具,所有编辑操作,都使用命令
模式
1.命令模式
2.插入模式 i a o
3.编辑模式 :
插入模式: esc 退出
a 字符后插入
A 行尾插入
i 字符前插入
I 行首插入
o 下面插入新行
O 上面插入新行
编辑模式:
冒号进入
:set nu 显示行号
:set nonu 取消行号
gg 到第一行
G 到最后一行
nG 到第n行
:n 到第n行
$ 移到行尾
0 移到行首
x 删除字符
nx 删除后面n个字符
dd 删行
ndd 删除n行
dG 删当前行到文件末尾
D 删当前字符到行尾
:n1,n2d n1行到n2行删除
yy 复制当前行
nyy 复制当前行向下n行
dd 剪切当前行
ndd 剪切当前行向下n行
p、P 粘贴在当前行上面或下面
r 覆盖单个字符
R 持续覆盖字符,esc退出
u 回退
ctrl+r 重做
/ 搜索指定的字符串
n next
:%s/aaaa/bbbb/g 不询问
:%s/aaaa/bbbb/c 询问确认
全文替换, aaaa 替换成 bbbb
:n1,n2s/aaaa/bbbb/g 不询问
:n1,n2s/aaaa/bbbb/c 询问确认
指定行范围内替换
:set ic 不区分大小写
:set noic 区分大小写
:w 保存
:w! 保存
:w filename 另存为
:wq 保存并退出
ZZ 保存并退出,快捷方式
:q
:q! 不保存直接退出
:wq! 对只读文件强行保存并退出(所有者和root可用)
:r \aa\bb
导入bb文件内容
:!命令
不退出vim执行系统命令
:r !命令
导入命令执行结果
:map 自定义快捷键
:map [ctrl+vp] I#
:map [ctrl+vb] 0x
:n1,n2s/^/#/g 行首添加#
:n1,n2s/^#//g 行首去除#
:n1,n2s/^/\/\//g 行首添加//
:ab omg oh my god!
定义缩写,替换为完整文本
.vimrc
用户目录下 vim 命令配置文件,
可添加快捷键、缩写配置等
3、Linux学习笔记——今日头条
目 录
第1章 命令总结... 1
1.1 文件和目录操作命令... 1
1.1.1 mkdir. 1
1.1.2 cd. 2
1.1.3 pwd. 2
1.1.4 ls. 2
1.1.5 cp. 4
1.1.6 find. 4
1.1.7 mv. 6
1.1.8 rm.. 7
1.1.9 touch. 7
1.1.10 tree. 8
1.2 查看文件及内容处理命令... 9
1.2.1 Cat. 9
1.2.2 more. 9
1.2.3 head. 10
1.2.4 sed. 10
1.2.5 awk. 10
1.2.6 tail 11
1.2.7 grep/egrep. 11
1.2.8 vi/vim.. 12
1.3 文件压缩及解压缩命令... 13
1.3.1 tar. 13
1.4 信息显示命令... 14
1.4.1 uname. 14
1.4.2 hostname. 15
1.4.3 uptime. 16
1.4.4 df. 16
1.5 信息显示命令... 17
1.5.1 which. 17
1.6 用户管理命令... 17
1.6.1 useradd. 17
1.6.2 userdel 18
1.6.3 passwd. 18
1.6.4 su. 18
1.7 基础网络操作命令... 19
1.7.1 telnet. 19
1.7.2 ssh. 19
1.7.3 ping. 19
1.7.4 route. 20
1.7.5 ifconfig. 21
1.7.6 ifdown. 21
1.7.7 ifup. 22
1.8 有关磁盘与文件系统的命令... 22
1.8.1 mount. 22
1.8.2 umount. 22
1.9 查看系统用户登陆信息的命令... 23
1.9.1 Who am i 23
1.9.2 who. 23
1.9.3 w.. 24
1.10 内置命令及其它... 24
1.10.1 echo. 24
1.10.2 rpm.. 24
1.10.3 yum.. 25
1.10.4 alias. 26
1.10.5 unalias. 27
1.10.6 history. 28
1.10.7 xargs. 28
1.10.8 export. 29
1.11 关机/重启/注销和查看系统信息的命令... 29
1.11.1 shutdown. 29
1.11.2 ctrl+d. 30
1.11.3 source. 30
1.11.4 chkconfig. 30
1.11.5 reboot. 31
1.12 进程管理相关命令... 31
1.12.1 runlevel 32
1.12.2 service. 32
1.12.3 init. 33
1.12.4 getenforce. 33
1.12.5 setenforce. 34
第2章 知识点总结... 35
2.1 目录结构的特点: 一切从根开始 Linux设备不挂载无法使用... 37
2.2 如何挂载光盘... 37
2.3 Linux目录整体介绍... 38
2.4 网卡配置文件修改配置与生效... 38
2.5 DNS. 38
2)普通用户修改DNS. 38
2.6 linux无法上网排查过程... 38
2.7 总结克隆虚拟机的过程... 39
2.8 必知必会目录和文件... 39
2.9 远程连接排错流程... 41
2.10 系统优化|显示系统版本 添加 切换用户 设置密码... 42
2.11 Linux乱码排查 解决过程... 45
2.12 第1关练习题总结... 46
2.13 设置别名 及临时取消别名... 46
2.14 重定向符号总结... 47
2.15 翻译题:翻译man fstab的description部分... 47
第3章 考试题与练习题总结... 52
3.1 笔试+机试题目总结... 52
3.2 练习题总结... 54
第1章 命令总结
1.1 文件和目录操作命令
1.1.1 mkdir
【命令功能】: 创建目录
【参数说明】:
| 参数 |
参数说明 |
备注 |
| -p |
批量创建目录 |
-p或--parents 若所要建立目录的上层目录目前尚未建立,则会一并建立上层目录 |
| -m |
建立目录的同时设置目录的权限; |
创建目录时设置文件夹的读、写、执行权限。 |
【案例1】:mkdir -p
[root@oldboy004 oldboy]# pwd;mkdir -p /oldboy/a/b/c/d/;tree /oldboy/
/oldboy
/oldboy/
└── a
└── b
└── c
└── d
4 directories, 0 files
[root@oldboy004 oldboy]#
【命令功能】:pwd显示当前所在的目录,”;”可以在后面接命令,tree 以树的形式显示目录结构,由以上例子可看出 mkdir -p 命令执行成功。
【案例2】:mkdir -m
[root@oldboy004 oldboy]# mkdir -m 700 /oldboy/test;ll -d *est
drwx------. 2 root root 4096 Mar 30 05:01 test
[root@oldboy004 oldboy]#
【命令功能】:/oldboy中建立test目录,并且权限设置为文件主可读、写、执行,同组用户可读和执行,其他用户无权访问。(700权限:4读+2写+1执行=7,r 代表读,w 代表写,x 代表执行)。ll -d *est(显示est结尾的目录)。
1.1.2 cd
【命令功能】:切换目录
【参数说明】:
| 参数 |
参数说明 |
备注 |
| ~ |
进入用户目录 |
|
| - |
返回进入此目录之前所在的目录 |
当仅实用"-"一个选项时,当前工作目录将被切换到环境变量"OLDPWD"所表示的目录。 |
| . |
进入当前目录(没什么意思) |
|
| .. |
返回上级目录 |
【案例】
[root@oldboy004 etc]# cd ~;pwd
/root
[root@oldboy004 ~]# cd -
/etc
[root@oldboy004 etc]# cd .;pwd
/etc
[root@oldboy004 etc]# cd ..;pwd
/
[root@oldboy004 /]#
1.1.3 pwd
【命令功能】:显示当前所在位置
【案例】
[root@oldboy004 sysconfig]# pwd
/etc/sysconfig
[root@oldboy004 sysconfig]#
1.1.4 ls
【命令功能】:显示列出目录以及文件的属性信息
【参数说明】:
| 参数 |
参数说明 |
备注 |
| -l |
列出文件详细信息 |
小写字母l,显示详细信息 |
| -a |
L列出当前目录下所有文件及目录,包括隐藏的。 |
|
| -d |
仅显示目录名,而不显示目录下的内容列表 |
|
| -F |
给不同的文件加上不同的标记 |
具体含义:“*”表示具有可执行权限的普通文件,“/”表示目录 |
| -r |
逆顺序排序 |
|
| -t |
按照文件的修改时间进行排序 |
|
| -l --time-style=long-iso |
--time-style=long-iso 指定日期格式 |
【案例1】ls -alrd
[root@oldboy004 test]# ls -al
total 24
drwx------. 6 root root 4096 Mar 30 06:50 .
drwxr-xr-x. 3 root root 4096 Mar 30 05:01 ..
-rw-r--r--. 1 root root 0 Mar 30 06:49 1.txt
-rw-r--r--. 1 root root 0 Mar 30 06:49 2213.txt
-rw-r--r--. 1 root root 0 Mar 30 06:49 2.txt
drwxr-xr-x. 2 root root 4096 Mar 30 06:50 a
drwxr-xr-x. 2 root root 4096 Mar 30 06:50 b
drwxr-xr-x. 2 root root 4096 Mar 30 06:50 c
drwxr-xr-x. 2 root root 4096 Mar 30 06:50 d
[root@oldboy004 test]# ls -d /oldboy/test/
/oldboy/test/
[root@oldboy004 test]#
[root@oldboy004 test]# ls -alr
total 24
drwxr-xr-x. 2 root root 4096 Mar 30 06:50 d
drwxr-xr-x. 2 root root 4096 Mar 30 06:50 c
drwxr-xr-x. 2 root root 4096 Mar 30 06:50 b
drwxr-xr-x. 2 root root 4096 Mar 30 06:50 a
-rw-r--r--. 1 root root 0 Mar 30 06:49 2.txt
-rw-r--r--. 1 root root 0 Mar 30 06:49 2213.txt
-rw-r--r--. 1 root root 0 Mar 30 06:49 1.txt
drwxr-xr-x. 3 root root 4096 Mar 30 05:01 ..
drwx------. 6 root root 4096 Mar 30 06:50 .
[root@oldboy004 test]#
1.1.5 cp
【命令功能】: 复制文件或目录
【参数说明】: cp-a
| 参数 |
参数说明 |
备注 |
| -a |
相当于-pdr参数的组合效果 |
|
| -p |
复制文件或目录时确保属性信息不变 |
|
| -r |
递归复制 |
复制目录以及目录里面的内容 |
【案例】
[root@oldboy004 test]# ll 1.txt
-rw-r--r--. 1 root root 0 Mar 30 06:49 1.txt
[root@oldboy004 test]# cp -a 1.txt 1.txt.bak;ll *.bak
-rw-r--r--. 1 root root 0 Mar 30 06:49 1.txt.bak
[root@oldboy004 test]#
[root@oldboy004 oldboy]# cp -a /oldboy/test/ test.bak
[root@oldboy004 oldboy]# ls
test test.bak
[root@oldboy004 oldboy]#
1.1.6 find
【命令功能】: 查找目录以及目录下的文件
【参数说明】:
| 参数 |
参数说明 |
备注 |
| -maxdepth |
最大深度查找 |
可以指定查找到几层目录 |
| -type |
查找的类型 |
例如 是查文件f还是目录d |
| -f |
文件 |
文件类型 |
| -d |
目录 |
目录类型 |
| -name |
名字 |
需要查找的目标文件或者目录名称(搭配*使用更佳) |
| -i |
取反 |
感叹号 |
| -exec |
<执行指令>后面跟需要执行的命令 |
命令结束后 加上 {} ; |
find-type-name f d-tail -exec-maxdepth
【案例1】:查找指定文件夹的指定类型指定后缀的文件并且批量删除/显示
[root@oldboy004 oldboy]# find /oldboy/test.bak/ -type f -name "*.txt"
/oldboy/test.bak/test/2.txt
/oldboy/test.bak/test/1.txt
/oldboy/test.bak/test/2213.txt
[root@oldboy004 oldboy]#
[root@oldboy004 oldboy]# find /oldboy/test.bak/ -type f -name "*.txt" -exec rm -rf {} ;
[root@oldboy004 oldboy]# find /oldboy/test.bak/ -type f -name "*.txt"
[root@oldboy004 oldboy]#
find+ls组合使用 ,查找出结果并以ls 命令显示出来
[root@localhost data]#
[root@oldboy004 oldboy]# find /oldboy/ -type d -name "*" | tail -3
/oldboy/test/b
/oldboy/test/c
/oldboy/test/d
[root@oldboy004 oldboy]#
【案例2】:取反、限制查找目录深度
[root@oldboy004 ~]# find /etc/ -maxdepth 1 -type d | tail -3
/etc/rdma
/etc/pkcs11
/etc/libreport
[root@oldboy004 ~]# find /etc/ -maxdepth 2 -type d | tail -3
/etc/libreport/events.d
/etc/libreport/events
/etc/libreport/plugins
[root@oldboy004 ~]#
[root@oldboy004 ~]# find /etc -maxdepth 2 -type f -name "*.sh"
/etc/bash_completion.d/gdbus-bash-completion.sh
/etc/profile.d/vim.sh
/etc/profile.d/colorls.sh
/etc/profile.d/glib2.sh
/etc/profile.d/cvs.sh
/etc/profile.d/which2.sh
/etc/profile.d/lang.sh
/etc/profile.d/less.sh
[root@oldboy004 ~]#
1.1.7 mv
【命令功能】:移动或者重命名文件或目录
【参数说明】:
| 参数 |
参数说明 |
备注 |
| -b |
备份作用 |
当文件存在时,覆盖前,为其创建一个备份 |
| -f |
覆盖 |
若目标文件或目录与现有的文件或目录重复,则直接覆盖现有的文件或目录; |
| -i |
操作前询问用户 |
覆盖前先行询问用户 |
【案例】
[root@oldboy004 test]# ls
1.txt 1.txt.bak 2213.txt 2.txt a b c d
[root@oldboy004 test]# mv -b 1.txt 2.txt
mv: overwrite `2.txt'? y
[root@oldboy004 test]# ll
total 16
-rw-r--r--. 1 root root 0 Mar 30 06:49 1.txt.bak
-rw-r--r--. 1 root root 0 Mar 30 06:49 2213.txt
-rw-r--r--. 1 root root 0 Mar 30 06:49 2.txt
-rw-r--r--. 1 root root 0 Mar 30 06:49 2.txt~
drwxr-xr-x. 2 root root 4096 Mar 30 06:50 a
drwxr-xr-x. 2 root root 4096 Mar 30 06:50 b
drwxr-xr-x. 2 root root 4096 Mar 30 06:50 c
drwxr-xr-x. 2 root root 4096 Mar 30 06:50 d
[root@oldboy004 test]#
[root@oldboy004 test]# mv 1.txt.bak 1AAA.txt.bak;ll 1*
-rw-r--r--. 1 root root 0 Mar 30 06:49 1AAA.txt.bak
[root@oldboy004 test]#
1.1.8 rm
【命令功能】: 其功能是删除一个或多个文件或目录
【参数说明】:
| 参数 |
参数说明 |
备注 |
| -r |
强制删除 |
没有任何提示(生产环境慎用) |
| -f |
递归删除 |
删除目录以及目录里面的内容 |
【案例】rm -rf
[root@oldboy004 test.bak]# tree test/
test/
├── 1AAA.txt.bak
├── 2213.txt
├── 2.txt
├── 2.txt~
├── a
├── b
├── c
└── d
4 directories, 4 files
[root@oldboy004 test.bak]# rm -rf test/;ll
total 16
-rw-r--r--. 1 root root 0 Mar 30 06:49 1.txt.bak
drwxr-xr-x. 2 root root 4096 Mar 30 06:50 a
drwxr-xr-x. 2 root root 4096 Mar 30 06:50 b
drwxr-xr-x. 2 root root 4096 Mar 30 06:50 c
drwxr-xr-x. 2 root root 4096 Mar 30 06:50 d
[root@oldboy004 test.bak]#
1.1.9 touch
【命令功能】:创建新的空文件
【参数说明】:
| 参数 |
参数说明 |
备注 |
| -m |
只更该变动时间 |
|
| -d |
<时间日期> 使用指定的日期时间,而非现在的时间 |
【案例】
[root@oldboy004 test.bak]# touch hehe.txt;ll he*
-rw-r--r--. 1 root root 0 Mar 30 08:06 hehe.txt
[root@oldboy004 test.bak]#
1.1.10 tree
【命令功能】:以树形结构显示目录下的内容
【参数说明】:
| 参数 |
参数说明 |
备注 |
| -a |
显示所有文件目录 |
系统没有自动需要手动安装(一般不加参数直接使用) |
【案例】
[root@oldboy004 test.bak]# tree -a
.
├── 1.txt.bak
├── a
├── b
├── c
├── d
└── hehe.txt
4 directories, 2 files
[root@oldboy004 test.bak]#
1.2 查看文件及内容处理命令
1.2.1 Cat
【命令功能】:查看文件内容,显示文件内容
【参数说明】:
| 参数 |
参数说明 |
备注 |
| -n |
对输出的行数进行编号 |
【案例】cat -n
[root@oldboy004 test.bak]# cat -n /etc/sysconfig/network-scripts/ifcfg-eth0
1 DEVICE=eth0
2 TYPE=Ethernet
3 ONBOOT=yes
4 NM_CONTROLLED=yes
5 BOOTPROTO=none
6 USERCTL=no
7 PEERDNS=yes
8 IPV6INIT=no
9 DNS1=223.5.5.5
10 DNS2=114.114.114.114
11 IPADDR=10.0.0.222
12 NETMASK=255.255.255.0
13 GATEWAY=10.0.0.2
14 HWADDR=00:0c:29:30:2c:7b
[root@oldboy004 test.bak]#
1.2.2 more
【命令功能】:分页显示文件内容
【参数说明】:
| 快捷键 |
说明 |
备注 |
| H |
获取帮助信息 |
|
| 回车键 |
向下翻一行 |
|
| 空格 |
向下滚动一屏 |
|
| Q |
退出 |
【案例】
[root@oldboy004 test.bak]# more /var/log/messages
1.2.3 head
【命令功能】:显示文件内容的头部
【参数说明】:
| 参数 |
参数说明 |
备注 |
| -n |
显示前几行 |
默认前十行 |
【案例】head-n
[root@oldboy004 test.bak]# head -3 /etc/passwd
root:x:0:0:root:/root:/bin/bash
bin:x:1:1:bin:/bin:/sbin/nologin
daemon:x:2:2:daemon:/sbin:/sbin/nologin
[root@oldboy004 test.bak]#
1.2.4 sed
【命令功能】:
【参数说明】:
| 参数 |
参数说明 |
备注 |
【案例】
1.2.5 awk
【命令功能】:
【参数说明】:
| 参数 |
参数说明 |
备注 |
【案例】
1.2.6 tail
【命令功能】:显示文件内容的尾部
【参数说明】:
| 参数 |
参数说明 |
备注 |
| -n |
显示最后几行 |
默认后十行 |
【案例】tail -n
[root@oldboy004 test.bak]# tail -3 /etc/passwd
sshd:x:74:74:Privilege-separated SSH:/var/empty/sshd:/sbin/nologin
tcpdump:x:72:72::/:/sbin/nologin
oldboy:x:500:500::/home/oldboy:/bin/bash
1.2.7 grep/egrep
【命令功能】:过滤字符串,三剑客老三
【参数说明】:
| 参数/规则表达式 |
参数说明 |
备注 |
| -i |
忽略字符大小写的差别 |
|
| -v |
翻转查找 |
|
| [^] |
查找以什么开头的内容 |
例:^a |
| $ |
查找以什么结尾的内容 |
例:sh$ |
【案例】grep ^ $ -v -i
[root@oldboy004 test.bak]# grep "h$" /etc/passwd
root:x:0:0:root:/root:/bin/bash
oldboy:x:500:500::/home/oldboy:/bin/bash
[root@oldboy004 test.bak]#
[root@oldboy004 test.bak]# grep "^root" /etc/passwd
root:x:0:0:root:/root:/bin/bash
[root@oldboy004 test.bak]# grep -v root /etc/passwd | tail -3
sshd:x:74:74:Privilege-separated SSH:/var/empty/sshd:/sbin/nologin
tcpdump:x:72:72::/:/sbin/nologin
oldboy:x:500:500::/home/oldboy:/bin/bash
[root@oldboy004 test.bak]#
1.2.8 vi/vim
【命令功能】:命令行文本编辑器
【参数说明】:
| 参数 |
参数说明 |
备注 |
| h |
光标左移一个字符 |
|
| l |
光标右移一个字符 |
|
| K |
光标上移一行 |
|
| J |
光标下移一行 |
|
| 回车键 |
光标下移一行 |
|
| G |
末行 |
|
| gg |
光标移动到首行 |
|
| dd |
删除当前行 |
|
| 3dd |
删除当前下3行 |
|
| yy |
复制 |
|
| pp |
粘贴 |
|
| i |
当前光标输入 |
|
| I |
在当前行首插入 |
|
| a |
在当前光标后插入 |
|
| A |
在当前尾行插入 |
|
| :g/p1/s//p2/g |
当前文件所有p1替换成p2 |
|
| :w |
保存当前文件 |
|
| :x |
保存当前文件并退出 |
|
| :q |
退出 |
|
| :q! |
强制退出 |
【案例】
1.3 文件压缩及解压缩命令
1.3.1 tar
【命令功能】:打包压缩
【参数说明】:
| 参数 |
参数说明 |
备注 |
| zcvf |
创建压缩包 |
-z通过gzip指令处理备份文件 -f指定备份文件; -v显示指令执行过程; -x从备份文件中还原文件; -c建立新的备份文件; -C指定特定目录解压缩 -r:添加文件到已经压缩的文件; |
| tar |
查看压缩包 |
|
| zxvf |
解压 |
|
| --exclude |
排除指定文件 |
例tar --exclude /etc -czvf 包名 目录 |
【案例】tar -zcvf tar --execlue
[root@oldboy004 oldboy]# tar -czvf etc.tar.gz /etc
[root@oldboy004 oldboy]# tar -xzvf etc.tar.gz
[root@oldboy004 oldboy]# ll -d etc
drwxr-xr-x. 79 root root 4096 Mar 30 08:48 etc
[root@oldboy004 oldboy]#
[root@oldboy004 oldboy]# tar -xzvf etc.tar.gz -C /home/
[root@oldboy004 oldboy]# ls /home/
etc oldboy zheng
[root@oldboy004 oldboy]#
[root@oldboy004 oldboy]# tar --exclude test/2213.txt -czvf test.tar.gz test/
test/
test/2.txt
test/1.txt.bak
test/1.txt
test/a/
test/b/
test/c/
test/d/
[root@oldboy004 oldboy]# tar -tf /oldboy/test.tar.gz
test/
test/2.txt
test/1.txt.bak
test/1.txt
test/a/
test/b/
test/c/
test/d/
[root@oldboy004 oldboy]#
1.4 信息显示命令
1.4.1
uname
【命令功能】:显示操作系统相关信息
【参数说明】:
| 参数 |
参数说明 |
备注 |
| -a |
显示全部信息 |
|
| -m |
显示系统架构 |
|
| -r |
显示内核版本 |
|
| -p |
显示cpu类型 |
|
| -n |
显示主机名 |
【案例】
[root@oldboy004 oldboy]# uname -m
x86_64
[root@oldboy004 oldboy]# uname -r
2.6.32-696.el6.x86_64
[root@oldboy004 oldboy]# uname -p
x86_64
[root@oldboy004 oldboy]# uname -n
oldboy004
[root@oldboy004 oldboy]# uname -a
Linux oldboy004 2.6.32-696.el6.x86_64 #1 SMP Tue Mar 21 19:29:05 UTC 2017 x86_64 x86_64 x86_64 GNU/Linux
[root@oldboy004 oldboy]#
1.4.2 hostname
【命令功能】:显示当前主机名
【参数说明】:
| 参数 |
参数说明 |
备注 |
| hostname +需要修改的主机名 |
临时修改主机名 |
即时生效(需要断开当前链接重新链接生效) |
【案例】
[root@oldboy004 oldboy]# hostname
y
[root@oldboy004 oldboy]# hostname test
[root@oldboy004 oldboy]#
Connecting to 10.0.0.222:22...
Connection established.
To escape to local shell, press 'Ctrl+Alt+]'.
Last login: Fri Mar 30 04:15:26 2018 from 10.0.0.1
[root@test ~]#
1.4.3 uptime
【命令功能】:显示系统运行时间及负载
【参数说明】:
| 参数 |
参数说明 |
备注 |
| -V |
显示指令的版本信息 |
一般不用 |
【案例】
[root@test ~]# uptime -V
procps version 3.2.8
[root@test ~]#
[root@test ~]# uptime
11:05:42 up 7:27, 1 user, load average: 0.00, 0.00, 0.00
[root@test ~]#
当前系统时间 系统运行时间 远程连接的用户量 系统负载信息 分别表示为系统再1、5、15分钟的平均load
1.4.4 df
【命令功能】:报告文件系统磁盘空间的使用情况
【参数说明】:
| 参数 |
参数说明 |
备注 |
| -h |
以可读性较高的方式来显示信息 |
【案例】
[root@test ~]# df -h
Filesystem Size Used Avail Use% Mounted on
/dev/mapper/VolGroup-lv_root
18G 1.9G 15G 12% /
tmpfs 1003M 0 1003M 0% /dev/shm
/dev/sda1 477M 41M 411M 9% /boot
[root@test ~]#
1.5 信息显示命令
1.5.1 which
【命令功能】:显示命令位置
【参数说明】:
【案例】
[root@test ~]# which cp
alias cp='cp -i'
/bin/cp
[root@test ~]# which mv
alias mv='mv -i'
/bin/mv
[root@test ~]# which tree
/usr/bin/tree
[root@test ~]#
1.6 用户管理命令
1.6.1 useradd
【命令功能】:添加用户
【参数说明】:
| 参数 |
参数说明 |
备注 |
| -d |
指定家目录 |
【案例】
[root@test ~]# useradd kk
1.6.2 userdel
【命令功能】:删除用户
【参数说明】:
| 参数 |
参数说明 |
备注 |
| -r |
递归删除用户的家目录 |
【案例】
1.6.3 passwd
【命令功能】:为用户配置密码
【参数说明】:
【案例】
[root@test ~]# passwd kk
Changing password for user kk.
New password:
BAD PASSWORD: it is too simplistic/systematic
BAD PASSWORD: is too simple
Retype new password:
passwd: all authentication tokens updated successfully.
[root@test ~]#
1.6.4 su
【命令功能】:切换用户
【参数说明】:
| 参数 |
参数说明 |
备注 |
| - |
su - root |
直接切换到该用户的家目录 |
【案例】
[root@test ~]# su - kk
[kk@test ~]$
1.7 基础网络操作命令
1.7.1 telnet
【命令功能】:使用TELNET协议远程登录
【参数说明】:
| 注释 |
||
| 用来处理远程连接服务器故障的排查手段之一 |
【案例】
[D:~]$ telnet 10.0.0.222 22
1.7.2 ssh
【命令功能】:
【参数说明】:
| 注释 |
| sshd服务 远程连接服务 22(默认) |
【案例】
[D:~]$ ssh 10.0.0.222
Connecting to 10.0.0.222:22...
Connection established.
To escape to local shell, press 'Ctrl+Alt+]'.
Last login: Fri Mar 30 11:03:51 2018 from 10.0.0.1
[root@test ~]#
ssh 主机名
1.7.3 ping
【命令功能】:测试主机之间网络的连通性
【参数说明】:
| 参数 |
参数说明 |
备注 |
| -c |
Ping的次数 |
自动结束 |
| -i |
间隔秒数 |
指定收发信息的间隔时间 |
| -s |
设置数据包的大小 |
|
| -v |
显示详细指令执行的过程 |
|
| -I |
指定网卡发送数据包 |
【案例】
[root@test ~]# ping www.baidu.com -I eth0
PING www.a.shifen.com (61.135.169.125) from 10.0.0.222 eth0: 56(84) bytes of data.
64 bytes from 61.135.169.125: icmp_seq=1 ttl=128 time=25.2 ms
64 bytes from 61.135.169.125: icmp_seq=2 ttl=128 time=26.2 ms
^Z
[5]+ Stopped ping www.baidu.com -I eth0
[root@test ~]#
[root@test ~]# ping -c 3 -i 2 qq.com
PING qq.com (125.39.240.113) 56(84) bytes of data.
64 bytes from no-data (125.39.240.113): icmp_seq=1 ttl=128 time=23.4 ms
64 bytes from no-data (125.39.240.113): icmp_seq=2 ttl=128 time=23.2 ms
64 bytes from no-data (125.39.240.113): icmp_seq=3 ttl=128 time=23.3 ms
--- qq.com ping statistics ---
3 packets transmitted, 3 received, 0% packet loss, time 4029ms
rtt min/avg/max/mdev = 23.281/23.364/23.488/0.197 ms
[root@test ~]#
备注:一般用来排查网络故障
1.7.4 route
【命令功能】:查看路由表
【参数说明】:排查网络故障
【案例】
[root@test ~]# route
Kernel IP routing table
Destination Gateway Genmask Flags Metric Ref Use Iface
10.0.0.0 * 255.255.255.0 U 0 0 0 eth0
link-local * 255.255.0.0 U 1002 0 0 eth0
default 10.0.0.2 0.0.0.0 UG 0 0 0 eth0
[root@test ~]#
1.7.5 ifconfig
【命令功能】:查看网卡ip信息
【参数说明】:
| 参数 |
参数说明 |
备注 |
| -down |
关闭指定网卡 |
简写ifdown eth0 |
| -up |
启动指定网卡 |
简写ifup eth0 |
【案例】
[root@test ~]# ifconfig
eth0 Link encap:Ethernet HWaddr 00:0C:29:30:2C:7B
inet addr:10.0.0.222 Bcast:10.0.0.255 Mask:255.255.255.0
inet6 addr: fe80::20c:29ff:fe30:2c7b/64 Scope:Link
UP BROADCAST RUNNING MULTICAST MTU:1500 Metric:1
RX packets:19143 errors:0 dropped:0 overruns:0 frame:0
TX packets:16461 errors:0 dropped:0 overruns:0 carrier:0
collisions:0 txqueuelen:1000
RX bytes:1667320 (1.5 MiB) TX bytes:3464958 (3.3 MiB)
lo Link encap:Local Loopback
inet addr:127.0.0.1 Mask:255.0.0.0
inet6 addr: ::1/128 Scope:Host
UP LOOPBACK RUNNING MTU:65536 Metric:1
RX packets:0 errors:0 dropped:0 overruns:0 frame:0
TX packets:0 errors:0 dropped:0 overruns:0 carrier:0
collisions:0 txqueuelen:0
RX bytes:0 (0.0 b) TX bytes:0 (0.0 b)
[root@test ~]#
1.7.6 ifdown
【命令功能】:关闭指定网卡设备
【参数说明】:网络接口:要激活的网络接口。
【案例】
[root@test ~]# ifdown eth0
1.7.7 ifup
【命令功能】:启动指定网卡设备
【参数说明】:网络接口:要激活的网络接口。
【案例】
[root@test ~]# ifup eth0
1.8 有关磁盘与文件系统的命令
1.8.1 mount
【命令功能】:挂载文件系统
【参数说明】:
| 参数 |
参数说明 |
备注 |
| -l |
显示已加载的文件系统列表 |
设备文件名:指定要加载的文件系统对应的设备名; |
| -r |
以只读的模式加载 |
加载点:指定加载点目录 |
【案例】
[root@oldboy004 ~]# mount /dev/cdrom /mnt/
mount: block device /dev/sr0 is write-protected, mounting read-only
[root@oldboy004 ~]# ls /mnt/
CentOS_BuildTag images repodata RPM-GPG-KEY-CentOS-Testing-6
EFI isolinux RPM-GPG-KEY-CentOS-6 TRANS.TBL
EULA Packages RPM-GPG-KEY-CentOS-Debug-6
GPL RELEASE-NOTES-en-US.html RPM-GPG-KEY-CentOS-Security-6
[root@oldboy004 ~]#
1.8.2 umount
【命令功能】:卸载文件系统
【参数说明】:
| 参数 |
参数说明 |
备注 |
| -a |
卸除/etc/mtab中记录的所有文件系统 |
【案例】
[root@oldboy004 ~]# umount /mnt/
[root@oldboy004 ~]# ls /mnt/
[root@oldboy004 ~]#
1.9 查看系统用户登陆信息的命令
1.9.1 Who am i
【命令功能】:whoami命令用于打印当前有效的用户名称,相当于执行id -un命令
【参数说明】:
【案例】
[root@oldboy004 ~]# who am i
root pts/0 2018-03-30 14:10 (10.0.0.1)
[root@oldboy004 ~]#
1.9.2 who
【命令功能】:显示目前登录系统的用户信息,执行who命令可得知目前有那些用户登入系统,单独执行who命令会列出登入帐号,使用的终端机,登入时间以及从何处登入或正在使用哪个X显示器
【参数说明】:
| 参数 |
参数说明 |
备注 |
| -m |
与who am i 命令一样的输出结果 |
|
| -q |
只显示登入系统的账户和总人数 |
【案例】
[root@oldboy004 ~]# who -m
root pts/0 2018-03-30 14:10 (10.0.0.1)
[root@oldboy004 ~]# who -q
root
# users=1
[root@oldboy004 ~]#
1.9.3 w
【命令功能】:显示已经登陆系统的用户列表,并显示用户正在执行的指令
【参数说明】:
【案例】
[root@oldboy004 ~]# w
14:22:07 up 12 min, 1 user, load average: 0.00, 0.00, 0.00
USER TTY FROM LOGIN@ IDLE JCPU PCPU WHAT
root pts/0 10.0.0.1 14:10 0.00s 0.08s 0.00s w
[root@oldboy004 ~]#
1.10 内置命令及其它
1.10.1 echo
【命令功能】:打印变量,或直接输出指定的字符串
【参数说明】:
【案例】
[root@oldboy004 ~]# echo $PATH
/usr/local/sbin:/usr/local/bin:/sbin:/bin:/usr/sbin:/usr/bin:/root/bin
[root@oldboy004 ~]# echo "who am is?"
who am is?
[root@oldboy004 ~]# echo "$LANG"
en_US.UTF-8
[root@oldboy004 ~]#
1.10.2 rpm
【命令功能】:安装软件包, rpm命令是RPM软件包的管理工具
【参数说明】:
| 参数 |
参数说明 |
备注 |
| -i |
显示软件的相关信息 |
优点:可断网安装,安装快 缺点:不能自动解决软件依赖问题需要用户自己解决 |
| -v |
显示执行过程 |
|
| -h |
软件安装时列出标记 |
|
| -ivh |
常见安装方式 |
例 rpm ivh xxxx.rpm |
| -aq |
查询软件是否安装 |
|
| -ql |
查询软件包中的内容装到哪了 |
|
| -e |
卸载软件包 |
【案例】
[root@oldboy004 Packages]# rpm -ivh tree-1.5.3-3.el6.x86_64.rpm
Preparing... ########################################### [100%]
1:tree ########################################### [100%]
[root@oldboy004 Packages]# rpm -qa tree
tree-1.5.3-3.el6.x86_64
[root@oldboy004 Packages]#
[root@oldboy004 Packages]# rpm -ql tree
/usr/bin/tree
/usr/share/doc/tree-1.5.3
/usr/share/doc/tree-1.5.3/LICENSE
/usr/share/doc/tree-1.5.3/README
/usr/share/man/man1/tree.1.gz
[root@oldboy004 Packages]#
[root@oldboy004 Packages]# rpm -e tree
[root@oldboy004 Packages]# rpm -aq tree
[root@oldboy004 Packages]#
1.10.3 yum
【命令功能】:自动化简单化地管理rpm包的命令
【参数说明】:
| 参数 |
参数说明 |
备注 |
| -install |
安装软件包 |
优点:自动处理依赖性关系,并且一次安装所有依赖的软体包,无须繁琐地一次次下载、安装。 |
| -update |
更新软件包 |
|
| -remove |
卸载软件包 |
|
| -list |
显示软件包的信息 |
|
| -search |
查询软件包的信息 |
|
| -clean |
清理Yum过期的缓存 |
|
| -localinstall |
安装本地的rpm软件包 |
|
| -localupdate |
显示本地的rpm软件包进行更新 |
|
| -deplist |
显示rpm软件包的所有依赖关系 |
|
| -y |
自动确定静默安装 |
【案例】
[root@oldboy004 Packages]# yum install tree -y
Loaded plugins: fastestmirror, security
Setting up Install Process
Loading mirror speeds from cached hostfile
* base: mirrors.nju.edu.cn
* extras: mirrors.nju.edu.cn
* updates: mirrors.nju.edu.cn
base | 3.7 kB 00:00
Resolving Dependencies
--> Running transaction check
---> Package tree.x86_64 0:1.5.3-3.el6 will be installed
--> Finished Dependency Resolution
………………………………
Installed:
tree.x86_64 0:1.5.3-3.el6
Complete!
[root@oldboy004 Packages]#
[root@oldboy004 Packages]# yum upda
[root@oldboy004 Packages]# yum remove tree -y
1.10.4 alias
【命令功能】:设置系统别名
【参数说明】:例如:alias l=‘ls -lsh'将重新定义ls命令,alias命令的作用只局限于该次登入的操作,若需要永久生效需要将命令放到文件/etc/bashrc中!
【案例】
[root@oldboy004 Packages]# alias net="cat /etc/sysconfig/network-scripts/ifcfg-eth0"
[root@oldboy004 Packages]# net
DEVICE=eth0
TYPE=Ethernet
ONBOOT=yes
NM_CONTROLLED=yes
BOOTPROTO=none
USERCTL=no
PEERDNS=yes
IPV6INIT=no
DNS1=223.5.5.5
DNS2=114.114.114.114
IPADDR=10.0.0.222
NETMASK=255.255.255.0
GATEWAY=10.0.0.2
HWADDR=00:0c:29:30:2c:7b
[root@oldboy004 Packages]# [root@oldboy004 Packages]# alias | grep net
alias net='cat /etc/sysconfig/network-scripts/ifcfg-eth0'
[root@oldboy004 Packages]#
1.10.5 unalias
【命令功能】:取消系统别名
【参数说明】:
| 参数 |
参数说明 |
备注 |
| -a |
取消所有别名 |
|
| 接别名 |
取消指定的别名 |
【案例】
[root@oldboy004 Packages]# unalias net
[root@oldboy004 Packages]# alias | grep net
[root@oldboy004 Packages]# net
-bash: net: command not found
[root@oldboy004 Packages]#
[root@oldboy004 Packages]# unalias -a
[root@oldboy004 Packages]# alias
[root@oldboy004 Packages]#
1.10.6 history
【命令功能】:查看命令执行的历史纪录
【参数说明】:
| 参数 |
参数说明 |
备注 |
| -c |
清空当前历史命令 |
export HISTSIZE=10 设置最大保存历史记录10条 |
| n |
查看最近的n条命令 |
【案例】
[root@oldboy004 ~]# history | head -3
1 cat >datafile< 2 Steve Blenheim:238-923-7366:95 Latham Lane, Easton, PA 83755:11/12/56:20300 3 Betty Boop:245-836-8357:635 Cutesy Lane, Hollywood, CA 91464:6/23/23:14500 [root@oldboy004 ~]# [root@oldboy004 ~]# history 4 999 history -5 1000 history -n 5 1001 history -n 22 1002 history 4 [root@oldboy004 ~]# history -c [root@oldboy004 ~]# history 4 history [root@oldboy004 ~]# 1.10.7 xargs 【命令功能】:将标准输入转换成命令行参数 【参数说明】: 参数 参数说明 备注 -n 多行输入单行输出 cat oldboy.txt xargs -n3 【案例】xargs结合find使用 [root@oldboy004 ~]# find /root/ -type f -name "*txt" | xargs ls -al -rw-r--r--. 1 root root 1222 Mar 22 04:07 /root/ett.txt -rw-r--r--. 1 root root 8332 Mar 28 22:00 /root/test.txt [root@oldboy004 ~]# 1.10.8 export 【命令功能】:设置或者显示环境变量 【参数说明】: 参数 参数说明 备注 -f 函数名称 -n 删除指定的变量 -p 列出所有的shell赋予程序的环境变量 【案例】3秒未操作自动断开连接 [root@oldboy004 ~]# export TMOUT=3 [root@oldboy004 ~]# export HISTSIZE=100 [root@oldboy004 ~]# 1.11 关机/重启/注销和查看系统信息的命令 1.11.1 shutdown 【命令功能】:关机 【参数说明】: 参数 参数说明 备注 -r 关机后重启 -t 延迟多少秒关机 -h 立即关机 【案例】 [root@oldboy004 ~]# shutdown -h now [root@oldboy004 ~]# shutdown +10 Broadcast message from root@oldboy004 (/dev/pts/1) at 15:35 ... The system is going down for maintenance in 10 minutes! ^Z^Cshutdown: Shutdown cancelled [root@oldboy004 ~]# 1.11.2 ctrl+d 【命令功能】:退出当前登录的Shell的快捷键 【参数说明】: 【案例】 快捷键1.11.2 ctrl+d #退出登录 1.11.3 source 【命令功能】:命令使配置生效(系统重启后生效) 【参数说明】: 【案例】 [root@oldboy004 ~]# cat /etc/sysconfig/i18n LANG="en_US.UTF-8" root@oldboy004 ~]# source /etc/sysconfig/i18n [root@oldboy004 ~]# 1.11.4 chkconfig 【命令功能】:chkconfig命令管理开机自启动软件|让一个软件开机自启动 【参数说明】: 选项 参数说明 备注 --add 增加所指定的系统服务 --del 删除所指定的系统服务 --level 显示系统执行等级 等级代号列表: 等级0表示:表示关机 等级1表示:单用户模式 等级2表示:无网络连接的多用户命令行模式 等级3表示:有网络连接的多用户命令行模式 等级4表示:不可用 等级5表示:带图形界面的多用户模式 等级6表示:重新启动 【案例】 3) 永久关闭 4) 让防火墙禁止开启自启动 [root@oldboy-sh02 ~]# chkconfig | grep ipta iptables 0:off 1:off 2:on 3:on 4:on 5:on 6:off [root@oldboy-sh02 ~]# [root@oldboy-sh02 ~]# chkconfig iptables off [root@oldboy-sh02 ~]# chkconfig | grep iptables iptables 0:off 1:off 2:off 3:off 4:off 5:off 6:off [root@oldboy-sh02 ~]# /etc/init.d/iptables status iptables: Firewall is not running. [root@oldboy-sh02 ~]# 1.11.5 reboot 【命令功能】:重启 【参数说明】: 参数 参数说明 备注 -f 强制重启 -n 重启前检查是否有未结束的程序 【案例】 [root@oldboy004 ~]# reboot -f [root@oldboy004 ~]# reboot -n Broadcast message from root@oldboy004 (/dev/pts/1) at 15:48 ... The system is going down for reboot NOW! [root@oldboy004 ~]# Connection closing...Socket close. Connection closed by foreign host. Disconnected from remote host(oldboy-202_10.0.0.222) at 23:51:02. Type `help' to learn how to use Xshell prompt. 1.12 进程管理相关命令 1.12.1 runlevel 【命令功能】:查看系统运行级别 【等级说明】: 0 关机状态 (不要把运行级别永久设置为0) 1 单用户模式 root 密码忘记 故障 2 多用户模式 不能使用NFS软件 3 完全的多用户模式 文本模式命令行模式 4 没有使用 5 桌面模式 x11 6 重启 (不要把运行级别永久设置为0) 【案例】 [root@oldboy004 ~]# runlevel N 3 [root@oldboy004 ~]# 1.12.2 service 【命令功能】:启动、停止、重新启动和关闭系统服务,还可以显示所有系统服务的当前状态。 【案例】 [root@oldboy004 ~]# service network restart Shutting down interface eth0: [ OK ] Shutting down loopback interface: [ OK ] Bringing up loopback interface: [ OK ] Bringing up interface eth0: Determining if ip address 10.0.0.222 is already in use for device eth0... [ OK ] [root@oldboy004 ~]# service network start Bringing up loopback interface: [ OK ] Bringing up interface eth0: RTNETLINK answers: File exists [ OK ] RTNETLINK answers: File exists RTNETLINK answers: File exists RTNETLINK answers: File exists RTNETLINK answers: File exists RTNETLINK answers: File exists RTNETLINK answers: File exists RTNETLINK answers: File exists RTNETLINK answers: File exists RTNETLINK answers: File exists [root@oldboy004 ~]# service network status Configured devices: lo eth0 Currently active devices: lo eth0 [root@oldboy004 ~]# 1.12.3 init 【命令功能】:init命令是Linux下的进程初始化工具 【参数说明】: 参数 参数说明 备注 -b 不执行相关脚本而直接进入单用户模式 -s切换到单用户模式 【案例】 [root@localhost ~]# init 5 #切换运行级别 [root@localhost ~]# runlevel 3 5 [root@localhost ~]# 1.12.4 getenforce 【命令功能】:查看当前SELinux的应用模式 【参数说明】: 【案例】 [root@oldboy004 ~]# getenforce Enforcing [root@oldboy004 ~]# 1.12.5 setenforce 【命令功能】:临时关闭selinux模式 setenforce 0 【参数说明】: 参数 参数说明 备注 0 临时关闭 1 临时开启 【案例】 [root@oldboy004 ~]# setenforce 0 [root@oldboy004 ~]# getenforce Permissive [root@oldboy004 ~]# 第2章 知识点总结 find命令三种方法 find命令找出.log结尾的文件 复制到/tmp目录 [root@oldboy004 ~]# find / -type f -name "*.log" -exec cp -a {} /tmp ; [root@oldboy004 ~]# ll /tmp/ total 1072 -rw-------. 1 root root 2368 Mar 22 02:17 anaconda.ifcfg.log -rw-------. 1 root root 21732 Mar 22 02:17 anaconda.log -rw-------. 1 root root 34169 Mar 22 02:17 anaconda.program.log -rw-------. 1 root root 109680 Mar 22 02:17 anaconda.storage.log -rw-------. 1 root root 53998 Mar 22 02:17 anaconda.yum.log -rw-------. 1 root root 574536 Mar 31 01:40 audit.log -rw-r--r--. 1 root root 2628 Mar 29 07:46 boot.log -rw-r--r--. 1 root root 11315 Jun 30 2012 change.log -rw-r--r--. 1 root root 202586 Mar 22 02:17 dracut.log -rw-r--r--. 1 root root 21736 Mar 22 02:17 install.log -rw-r--r--. 1 root root 4599 Mar 29 06:25 log.log -rw-r--r--. 1 root root 21399 Mar 29 03:32 prelink.log -rw-r--r--. 1 root root 61 May 11 2016 rpm.log -rw-------. 1 root root 160 Mar 30 14:47 yum.log [root@oldboy004 tmp]# ll;pwd total 0 /tmp [root@oldboy004 ~]# [root@oldboy004 tmp]# find / -type f -name "*.log" | xargs -i cp {} /tmp/ [root@oldboy004 tmp]# ls /tmp/ anaconda.ifcfg.log anaconda.storage.log boot.log install.log rpm.log anaconda.log anaconda.yum.log change.log log.log yum.log anaconda.program.log audit.log dracut.log prelink.log [root@oldboy004 tmp]# [root@oldboy004 tmp]# rm -rf *;pwd;ll /tmp total 0 [root@oldboy004 tmp]# cp -af $(find / -type f -name "*.log") /tmp/ cp: overwrite `/tmp/boot.log'? [root@oldboy004 tmp]# ll total 1072 -rw-------. 1 root root 2368 Mar 22 02:17 anaconda.ifcfg.log -rw-------. 1 root root 21732 Mar 22 02:17 anaconda.log -rw-------. 1 root root 34169 Mar 22 02:17 anaconda.program.log -rw-------. 1 root root 109680 Mar 22 02:17 anaconda.storage.log -rw-------. 1 root root 53998 Mar 22 02:17 anaconda.yum.log -rw-------. 1 root root 575862 Mar 31 01:50 audit.log -rw-r--r--. 1 root root 2064 Mar 31 01:28 boot.log -rw-r--r--. 1 root root 11315 Jun 30 2012 change.log -rw-r--r--. 1 root root 202586 Mar 22 02:17 dracut.log -rw-r--r--. 1 root root 21736 Mar 22 02:17 install.log -rw-r--r--. 1 root root 4599 Mar 29 06:25 log.log -rw-r--r--. 1 root root 21399 Mar 29 03:32 prelink.log -rw-r--r--. 1 root root 61 May 11 2016 rpm.log -rw-------. 1 root root 160 Mar 30 14:47 yum.log [root@oldboy004 tmp]# 查找指定深度目录内的指定文件并且复制到指定目录 [root@oldboy004 tmp]# find / -maxdepth 1 -type f -name "*.log" -exec cp {} /tmp/ ; [root@oldboy004 tmp]# ls log.log [root@oldboy004 tmp]# 查找出指定文件,并且忽略个别文件,拷贝到指定目录 [root@oldboy004 tmp]# cp -a `find / -type f -name "*.log" ! -name "a*.log"` /tmp/ cp: overwrite `/tmp/boot.log'? [root@oldboy004 tmp]# ll total 280 -rw-r--r--. 1 root root 2064 Mar 31 01:28 boot.log -rw-r--r--. 1 root root 11315 Jun 30 2012 change.log -rw-r--r--. 1 root root 202586 Mar 22 02:17 dracut.log -rw-r--r--. 1 root root 21736 Mar 22 02:17 install.log -rw-r--r--. 1 root root 4599 Mar 29 06:25 log.log -rw-r--r--. 1 root root 21399 Mar 29 03:32 prelink.log -rw-r--r--. 1 root root 61 May 11 2016 rpm.log -rw-------. 1 root root 160 Mar 30 14:47 yum.log [root@oldboy004 tmp]# 小结: ! 为反向选择过滤不需要的文件或者目录 `命令` $(命令) 会优先执行里面的命令 使用 -exec参数 后接cp 复制打指定目录,目录一定要放在 {} 后面 否则会报错 -maxdepth限制查找目录层次 放在需要查找的目录后面 使用管道复制到指定目录时候 必须加上xargs 并且加上 -i参数 ,后面接着 cp {} 目录 2.1 目录结构的特点: 一切从根开始 Linux设备不挂载无法使用 Linux系统目录:一切从根开始 “/”是所有目录的起点(顶点);相对路径(目录)和绝对路径(目录) Linux根下面的目录是一个有层次的树状结构 倒挂的一棵树 Linux每个目录可以挂在在不同 的设备(磁盘上)。Windows不容易做到。 nLinux下面设备(磁盘)挂载是看不到入口的,没有窗口没门的监狱, n挂载给设备创建入口 开了一个入口 n入口===挂载点 挂载点实质就是目录 n 如果要被设备访问就必须有一个入口 这个入口就是挂载点 挂载点实质就是目录。 2.2 如何挂载光盘 1)把光盘插入光驱 2)挂载和卸载光盘 [root@oldboy004 tmp]# mount /dev/cdrom /media/ mount: block device /dev/sr0 is write-protected, mounting read-only [root@oldboy004 tmp]# umount /media/ [root@oldboy004 tmp]# 2.3 Linux目录整体介绍 2.4 网卡配置文件修改配置与生效 DEVICE=eth0 #网卡名 BOOTPROTO=none #网卡获取ip的方式 IPADDR=10.0.0.200 #ip address网卡的ip地址 NETMASK=255.255.255.0 #子网掩码 GATEWAY=10.0.0.2 #网关 ONBOOT=yes #是否开启自启 DNS1=223.5.5.5 #公共DNS DNS2=223.6.6.6 #备用公共DNS 2.5 DNS 1)Root用户修改DNS [root@oldboy004 tmp]# vim /etc/sysconfig/network-scripts/ifcfg-eth0 #修改网卡配置文件,只有root账户可以修改配置 2)普通用户修改DNS [root@oldboy004 tmp]# cat /etc/resolv.co [root@oldboy004 tmp]# cat /etc/resolv.conf nameserver 223.5.5.5 nameserver 114.114.114.114 [root@oldboy004 tmp]# #普通用户可以配置的DNS文件 2.6 linux无法上网排查过程 1)ifconfig查看网卡是否正确获取ip地址 2)ping外网、网关 3)检查网卡配置文件 4)检查DNS (a.在网卡配置文件中 修改DNS b.网卡配置文件中的DNS优先于/etc/resolv.conf) 2.7 总结克隆虚拟机的过程 1)清空网卡信息 [root@oldboy004 tmp]# > /etc/udev/rules.d/70-persistent-net.rules [root@oldboy004 tmp]# 2)删除网卡配置文件的UUID的行和HWADDR的行 [root@oldboy004 tmp]# vim /etc/sysconfig/network-scripts/ifcfg-eth0 UUID=550e8400-e29b-41d4-a716-446655440000 HWADDR=00:0c:29:30:2c:7b dd删除光标所在当前行 Wq!保存退出 2.8 必知必会目录和文件 2.9 远程连接排错流程 大概步骤: a)道路是否通畅 b)ip地址是否正确 c)网卡是否启动 是否有ip地址 d)Windows VMware服务 (win+r services.msc) e)虚拟网络编辑器 f)我的电脑/此电脑/计算机 g)输入 网络连接 h)防火墙 i)服务是否开启 1)检查网卡配置 【案例】: [root@oldboy004 tmp]# ifconfig 2)Ping ip [root@oldboy004 tmp]# ping 10.0.0.2 PING 10.0.0.2 (10.0.0.2) 56(84) bytes of data. 64 bytes from 10.0.0.2: icmp_seq=1 ttl=128 time=0.106 ms 64 bytes from 10.0.0.2: icmp_seq=2 ttl=128 time=0.228 ms ^Z [7]+ Stopped ping 10.0.0.2 [root@oldboy004 tmp]# 3)telnet ip 端口号 [D:~]$ telnet 10.0.0.222 22 Connecting to 10.0.0.222:22... Connection established. 4)检查sshd服务是否启动 [root@oldboy004 ~]# netstat | grep ssh tcp 0 0 10.0.0.222:ssh 10.0.0.1:12661 ESTABLISHED tcp 0 0 10.0.0.222:ssh 10.0.0.1:12659 TIME_WAIT [root@oldboy004 ~]# netstat | grep 22 tcp 0 0 10.0.0.222:ssh 10.0.0.1:12661 ESTABLISHED tcp 0 0 10.0.0.222:ssh 10.0.0.1:12659 TIME_WAIT unix 2 [ ] DGRAM 13822 [root@oldboy004 ~]# 2.10 系统优化|显示系统版本 添加 切换用户 设置密码 a)显示系统版本 添加切换用户 设置密码 [root@oldboy-sh02 ~]# cat /etc/redhat-release #查看系统版本 CentOS release 6.9 (Final) [root@oldboy-sh02 ~]# uname -m # 查看系统是多少位的 x86_64 [root@oldboy-sh02 ~]# uname -r # 查看系统内核版本 2.6.32-696.el6.x86_64 [root@oldboy-sh02 ~]# 2)添加切换用户 设置密码 [root@oldboy-sh02 ~]# [root@oldboy-sh02 ~]# useradd oldboy #添加普通用户 [root@oldboy-sh02 ~]# passwd oldboy #为新用户设置密码 Changing password for user oldboy. New password: BAD PASSWORD: it is too simplistic/systematic BAD PASSWORD: is too simple Retype new password: passwd: all authentication tokens updated successfully. [root@oldboy-sh02 ~]# [root@oldboy-sh02 ~]# su - oldboy # 切换用户 [oldboy@oldboy-sh02 ~]$ who am is #当前登陆用户是谁 root pts/0 2018-03-27 06:24 (10.0.0.1) [oldboy@oldboy-sh02 ~]$ a)关闭SElinux和 iptables (临时 永久 检查) 临时关闭SElinux : ps enforcing:强制模式,代表 SELinux 运作中,且已经正确的开始限制 domain/type 了; permissive:宽容模式:代表 SELinux 运作中,不过仅会有警告讯息并不会实际限制 [root@oldboy-sh02 ~]# setenforce 0 (连续回车俩次 弹出参数提示) usage: setenforce [ Enforcing | Permissive | 1 | 0 ] [root@oldboy-kangzhuang ~]# getenforce #查看selinux的运行状态 Enforcing [root@oldboy-kangzhuang ~]# setenforce 0 #临时关闭 [root@oldboy-kangzhuang ~]# getenforce #查看selinux的运行状态 Permissive #宽容模式:代表 SELinux 运作中,不过仅会有警告讯息并不会实际限制 [root@oldboy-kangzhuang ~]# [root@oldboy-kangzhuang ~]# setenforce 1 #临时开启防火墙 [root@oldboy-kangzhuang ~]# getenforce #查看防火墙状态 Enforcing [root@oldboy-kangzhuang ~]# 永久关闭SElinux : [root@oldboy-kangzhuang ~]# sed 's#SELINUX=enforcing#SELINUX=disabled#g' /etc/selinux/config -i [root@oldboy-kangzhuang ~]# [root@oldboy-kangzhuang ~]# grep SELINUX= /etc/selinux/config #查看是否修改成功 # SELINUX= can take one of these three values: SELINUX=disabled [root@oldboy-kangzhuang ~]# 3)IP table s 防火墙 关闭 1) 生产环境防火墙使用 1. 服务器有公网ip地址 :开启防火墙 2. 服务器没有公网ip的 不需要开启防火墙 3. 网站高并发的时候 不要开启防火墙 2) 如何关闭防火墙 临时关闭---重启服务器失效 [root@oldboy-sh02 ~]# /etc/init.d/iptables stop iptables: Setting chains to policy ACCEPT: filter [ OK ] iptables: Flushing firewall rules: [ OK ] iptables: Unloading modules: [ OK ] [root@oldboy-sh02 ~]# /etc/init.d/ip ip6tables iptables [root@oldboy-sh02 ~]# /etc/init.d/iptables status iptables: Firewall is not running. [root@oldboy-sh02 ~]# 4)永久关闭 让防火墙禁止开启自启动 [root@oldboy-sh02 ~]# chkconfig | grep ipta iptables 0:off 1:off 2:on 3:on 4:on 5:on 6:off [root@oldboy-sh02 ~]# [root@oldboy-sh02 ~]# chkconfig iptables off [root@oldboy-sh02 ~]# chkconfig | grep iptables iptables 0:off 1:off 2:off 3:off 4:off 5:off 6:off [root@oldboy-sh02 ~]# /etc/init.d/iptables status iptables: Firewall is not running. [root@oldboy-sh02 ~]# 5)面试题 :防火墙当前正在运行 ,hckconfig iptables off 可以关闭么? 不能! a)环境变量 PS1 (控制命令行) LANG (控制字符集 语言) 临时修改字符变量 [root@oldboy-kangzhuang ~]# echo $LANG #查看当前字符 en_US.UTF-8 [root@oldboy-kangzhuang ~]# export.UTF-8 #修改字符为中文,临时生效 [root@oldboy-kangzhuang ~]# echo $LANG #验证是否生效 zh_CN.UTF-8 [root@oldboy-kangzhuang ~]# setup 6)修改字符变量 永久生效(全局生效) [root@oldboy-kangzhuang ~]# cat /etc/sysconfig/i18n LANG=en_US.UTF-8 SYSFONT="latarcyrheb-sun16" [root@oldboy-kangzhuang ~]# sed -i.bak 's#LANG=en_US.UTF-8#LANG=zh_CN.UTF-8#g' /etc/sysconfig/i18n #(-i.bak -i参数后加 . 加后缀 可在修改文件之前自动备份一个文件到当前目录) [root@oldboy-kangzhuang ~]# cat /etc/sysconfig/i18n #验证是否修改成功 LANG=zh_CN.UTF-8 [root@oldboy-kangzhuang ~]# ll /etc/sysconfig/ | grep "i18n*" #ls + grep命令组合 查看是否备份成功 -rw-r--r--. 1 root root 2.11 Linux乱码排查 解决过程 排查过程: echo $LANG 查看系统的字符集 [root@oldboy-sh02 ~]# echo $LANG en_US.UTF-8 [root@oldboy-sh02 ~]# 解决方案: 1.修改xhell字符集 2.修改系统的字符集 【案例】 [root@oldboy004 ~]# echo $LANG en_US.UTF-8 [root@oldboy004 ~]# export.UTF-8 #临时修改 [root@oldboy004 ~]# echo $LANG en_US.UTF-8 [root@oldboy004 ~]# [root@oldboy004 ~]# [root@oldboy004 ~]# [root@oldboy004 ~]# cat /etc/sysconfig/i18n #永久修改 LANG="en_US.UTF-8" SYSFONT="latarcyrheb-sun16" [root@oldboy004 ~]# [root@oldboy004 ~]# source /etc/sysconfig/i18n #永久修改后的即时生效命令 [root@oldboy004 ~]# 2.12 第1关练习题总结 1)创建目录用mkdir命令 2)绝对路径:一切从根开始 相对路径:不是从根开始 3)创建文件用 touch 命令 4)复制文件/目录 用cp命令 (-r表示递归复制,-a相当于-pdr参数,-p保持属性不变复制) 5)移动文件/目录/改 用mv目录 6)删除文件/目录 用rm 命令 (-rf为强制删除) 7)为文件追加内容用vim/vi编辑器或者 echo >>追加重定向(把内容追加到文件的结尾,>表示清空文件的原先内容再写入) 8)Vim编辑器的常用按键: uesc按键退出编辑模式 u:wq write quit 保存并退出 u:wq! write quit 强制保存并退出 u:q! 强制退出不保存 u:q quit 退出 9)重定向符号: l>> 或 1>> 追加重定向 把内容追加到文件的结尾 l> 或 1> 重定向 先把文件内容清空,把内容追加到文件的结尾 l2>> 错误追加重定向 把内容追加到文件的结尾 l2> 错误重定向 先把文件内容清空,把内容追加到文件的结尾 2.13 设置别名 及临时取消别名 1)临时设置别名:lias 设置或显示别名 [root@oldboy004 ~]# alias net="cat /etc/sysconfig/network-scripts/ifcfg-eth0" 2)取消别名: [root@oldboy004 ~]# unalias net 3)别名永久生效 | 让source 让配置文件生效 /etc/.bashrc [root@oldboy004 ~]# tail -1 /etc/profile alias net='cat /etc/sysconfig/network-scripts/ifcfg-eth0' [root@oldboy004 ~]# [root@oldboy004 ~]# source /etc/profile [root@oldboy004 ~]# 2.14 重定向符号总结 标准输入 0 ← 标准输出 1(默认) → 标准错误 2 重定向 标准输入重定向 0<或< 重定向到文件如果有内容则清空 ← 追加输入重定向 0<<或<< 追加到文件底部 右到左 标准输出重定向 1>或> 重定向到文件如果有内容则清空,清空后再往文件追加内容 ← 追加输入重定向 0<<或<< 追加到文件底部 右到左 标准输出重定向 1>或> 重定向到文件,如果有内容则清空 清空后再往文件中追加内容 → 标准输出追加重定向 1>>或>|> 重定向追加到文件底部 左到右 标准错误输出重定向 2> 标准错误重定向到文件 如果文件存在内容则清空 追加标准错误输出重定向 2>> 标准错误重定向到标准输出(正确的错误的都要输出) >>/data/123.txt 2>&1 标准错误和标准输出同时重定向到文件 2>>/data/123.txt &>>/data/123.txt >>/data/123/txt 2.15 翻译题:翻译man fstab的description部分 DESCRIPTION The file fstab contains descriptive information about the various file systems. fstab is only read by programs, and not written; it is the duty of the system administrator to properly create and maintain this file. Each filesystem is described on a separate line; fields on each line are separated by tabs or spaces. Lines starting with ’#’ are comments. blank lines are ignored. The order of records in fstab is important because fsck(8), mount(8), and umount(8) sequentially iterate through fstab doing their thing. The first field, (fs_spec), describes the block special device or remote filesystem to be mounted. For ordinary mounts it will hold (a link to) a block special device node (as created by mknod(8)) for the device to be mounted, like ‘/dev/cdrom’ or ‘/dev/sdb7’. For NFS mounts one will have Instead of giving the device explicitly, one may indicate the (ext2 or xfs) filesystem that is to be mounted by its UUID or volume label (cf. e2label(8) or xfs_admin(8)), writing LABEL= adding or removing a SCSI disk changes the disk device name but not the filesystem volume label. The second field, (fs_file), describes the mount point for the filesystem. For swap partitions, this field should be specified as ‘none’. If the name of the mount point contains spaces these can be escaped as ‘ ’. The third field, (fs_vfstype), describes the type of the filesystem. Linux supports lots of filesystem types, such as adfs, affs, autofs, coda, coherent, cramfs, devpts, efs, ext2, ext3, hfs, hpfs, iso9660, jfs, minix, msdos, ncpfs, nfs, ntfs, proc, qnx4, reiserfs, romfs, smbfs, sysv, tmpfs, udf, ufs, umsdos, vfat, xenix, xfs, and possibly others. For more details, see mount(8). For the filesystems currently supported by the running kernel, see /proc/filesystems. An entry swap denotes a file or partition to be used for swapping, cf. swapon(8). An entry ignore causes the line to be ignored. This is useful to show disk partitions which are currently unused. An entry none is useful for bind or move mounts. mount(8) and umount(8) support filesystem subtypes. The subtype is defined by ’.subtype’ suffix. For example ’fuse.sshfs’. It’s recommended to use subtype nota- tion rather than add any prefix to the first fstab field (for example ’sshfs#example.com’ is depreacated). The fourth field, (fs_mntops), describes the mount options associated with the filesystem. It is formatted as a comma separated list of options. It contains at least the type of mount plus any additional options appropriate to the filesystem type. For documentation on the available options for non-nfs file systems, see mount(8). For documentation on all nfs-specific options have a look at nfs(5). Common for all types of file system are the options ‘‘noauto’’ (do not mount when "mount -a" is given, e.g., at boot time), ‘‘user’’ (allow a user to mount), and ‘‘owner’’ (allow device owner to mount), and ‘‘comment’’ (e.g., for use by fstab-maintaining programs). The ‘‘owner’’ and ‘‘comment’’ options are Linux-specific. For more details, see mount(8). The fifth field, (fs_freq), is used for these filesystems by the dump(8) command to determine which filesystems need to be dumped. If the fifth field is not present, a value of zero is returned and dump will assume that the filesystem does not need to be dumped. The sixth field, (fs_passno), is used by the fsck(8) program to determine the order in which filesystem checks are done at reboot time. The root filesystem should be specified with a fs_passno of 1, and other filesystems should have a fs_passno of 2. Filesystems within a drive will be checked sequentially, but filesystems on different drives will be checked at the same time to utilize parallelism available in the hardware. If the sixth field is not present or zero, a value of zero is returned and fsck will assume that the filesystem does not need to be checked. The proper way to read records from fstab is to use the routines getmntent(3). 译文: 描述 文件fstab包含有关各种文件系统的描述性信息。fstab只能通过程序读取,而不能写入; 这是系统的责任 管理员正确创建和维护此文件。每个文件系统在单独一行中描述; 每行上的字段由制表符或空格分隔。 以'#'开头的行是注释。空白行被忽略。fstab中的记录顺序很重要,因为fsck(8),mount(8)和umount(8)会按顺序 通过fstab重复做他们的事情。 第一个字段(fs_spec)描述了要挂载的块特殊设备或远程文件系统。 对于普通装载,它将持有(链接到)一个块特殊设备节点(由mknod(8)创建)用于要装入的设备,如'/ dev / cdrom'或'/ dev / sdb7'。 对于NFS挂载,有一个 除了明确指定设备之外,还可以指示要通过其UUID或卷标进行装入的(ext2或xfs)文件系统(参见e2label(8)或 写入LABEL = 添加或删除SCSI磁盘会更改磁盘设备名称,但不会更改文件系统卷标。 第二个字段(fs_file)描述了文件系统的挂载点。对于交换分区,此字段应指定为“无”。如果挂载的名字 点包含的空格可以作为' 040'转义。 第三个字段(fs_vfstype)描述了文件系统的类型。Linux支持许多文件系统类型,例如adfs,affs,autofs,coda,coherent,cramfs, devfs,exfs2,ext3,hfs,hpfs,iso9660,jfs,minix,msdos,ncpfs,nfs,ntfs,proc,qnx4,reiserfs,romfs,smbfs,sysv,tmpfs,udf,ufs,umsdos,vfat,xenix, xfs和其他可能的。有关更多详细信息,请参阅安装(8)。对于当前运行的内核支持的文件系统,请参阅/ proc / filesystems。入口交换 表示要用于交换的文件或分区,请参阅参考资料。swapon命令(8)。忽略条目会导致该行被忽略。这对于显示哪个磁盘分区很有用 目前尚未使用。一个条目无用于绑定或移动坐骑。 mount(8)和umount(8)支持文件系统子类型。子类型由'.subtype'后缀定义。例如'fuse.sshfs'。建议使用子类型nota- 而不是为第一个fstab字段添加任何前缀(例如'sshfs#example.com'被取消)。 第四个字段(fs_mntops)描述了与文件系统相关的挂载选项。 它被格式化为逗号分隔的选项列表。它至少包含mount的类型以及适用于文件系统类型的其他选项。对于 有关非nfs文件系统的可用选项的文档,请参阅mount(8)。有关所有nfs特定选项的文档,请查看nfs(5)。通用的 所有类型的文件系统都是选项'noauto''(例如,在启动时给出“mount -a”),''user''(允许用户挂载)和''owner “” (允许设备所有者挂载)和“评论”(例如,供fstab维护程序使用)。“所有者”和“评论”选项是Linux专用的。更多 细节,请参阅mount(8)。 第五个字段(fs_freq)由dump(8)命令用于这些文件系统,以确定哪些文件系统需要转储。如果第五个字段不是 目前,返回零值并且转储将假定文件系统不需要转储。 fsck(8)程序使用第六个字段(fs_passno)来确定在重新引导时完成文件系统检查的顺序。根文件系统应该 用fs_passno指定为1,其他文件系统的fs_passno应为2.驱动器中的文件系统将按顺序检查,但文件系统 在不同的驱动器上将被同时检查以利用硬件中可用的并行性。如果第六个字段不存在或为零,则值为零 被返回并且fsck将假定文件系统不需要被检查。 从fstab读取记录的正确方法是使用例程getmntent(3)。 第3章 考试题与练习题总结 3.1 笔试+机试题目总结 笔试: 1.说明常见raid级别和特点 raid级别 管理硬盘的方式 raid 0 raid 1 最少几块硬盘 容量 性能 冗余 raid 0 1 所有硬盘容量总和 接近单块硬盘的n倍 0 raid 1 2 所哟硬盘容量总和的一半 写入比较慢,读取接近于一块硬盘的速度 100% 2.说明GPL GNU含义 GPL:(通用公共许可)协议 开发源代码 如果你修改了源代码,必须要把修改后的内容发出来 GNU软件 bash,gawk,emacs,gcc GNU=GNU is not unix 一个开源项目GNU GNU目前没有内核 3.用一条命令创建 /oldboy/test/shl01 目录 mkdir -p /a/b/v/d 4.向文件/oldboy/test/shl01/oldboy.txt中增加 "I am studying linux at oldboyedu.com" 使用追加重定向 >> 5.把/etc/passwd文件中的第5到第15行的内容 保存到/oldboy/test/shl01/lidao.txt中 [root@oldboy004 ~]# sed -n '5,15p' /etc/passwd | xargs -n 1 >/oldboy/text.txt [root@oldboy004 ~]# cat /oldboy/text.txt lp:x:4:7:lp:/var/spool/lpd:/sbin/nologin sync:x:5:0:sync:/sbin:/bin/sync shutdown:x:6:0:shutdown:/sbin:/sbin/shutdown halt:x:7:0:halt:/sbin:/sbin/halt mail:x:8:12:mail:/var/spool/mail:/sbin/nologin uucp:x:10:14:uucp:/var/spool/uucp:/sbin/nologin operator:x:11:0:operator:/root:/sbin/nologin games:x:12:100:games:/usr/games:/sbin/nologin gopher:x:13:30:gopher:/var/gopher:/sbin/nologin ftp:x:14:50:FTP User:/var/ftp:/sbin/nologin nobody:x:99:99:Nobody:/:/sbin/nologin [root@oldboy004 ~]# 6.说出下面几个特殊符号的含义 * > >> 2> 2>> # .. . Ø任意字符 Ø标准输出重定向 Ø>>.标准追加输出重定向 Ø2>错误输出重定向 Ø2>>错误输出追加重定向 Ø# 注释符号 root账户的命令行标识 Ø.. 上一层目录 Ø. 当前目录 6.把/oldboy/oldboy.txt文件中的oldboy替换为oldgirl,给出命令 /oldboy/test.txt 的内容如下 oldboy oldgirl alex [root@oldboy004 ~]# [root@oldboy004 ~]# sed -i 's#oldboy#oldgirl#g' /oldboy/oldboy.txt 要求过滤出不包含alex的行 [root@oldboy004 ~]# grep -v alex /oldboy/oldboy.txt 9.找出/oldboy目录中以.log结尾的文件 find /oldboy -type f -name “*.log” 10.无法远程连接你的服务器请问如何排查? 大概步骤: a)道路是否通畅 b)ip地址是否正确 c)网卡是否启动 是否有ip地址 d)Windows VMware服务 (win+r services.msc)#生产环境 忽略此项 e)虚拟网络编辑器 # 生产环境 忽略此项 f)我的电脑/此电脑/计算机 g)输入 网络连接 h)防火墙 i)服务是否开启 j)检查网卡配置 3.2 练习题总结 命令的一些高级组合用法总结 设置别名永久生效: 把alias别名放到 /etc/profile文件里面 设置别名临时生效:alias 命令="执行的命令" 取消别名:unalias 别名 利用三剑客 排除 oldboy 过滤文件取20-30行: sed,grep,awk,head+tail find命+rm/sed/awk 查找与替换文件内容:find查找出文件 用管道符隔开后面接上xargs -n 1 /sed/awk/grep 命令总结:grep,sed,awk,which, tail,head grep 文本搜索/过滤工具,它能使用正则表达式搜索文本,并把匹配的行打印出来,配好三剑客使用,能够更好的查找修改文件内容。 eg : grep -v liming text sed: 替换文本 awk 把find命令找出的文件交给sed [root@oldboy-sh01 data]# find /root/ -type f -name "ak.txt" |xargs sed 's#bbb#BBB#g' HHHHHHHH BBB ccc ddd [root@oldboy-sh01 data]# find /root/ -type f -name "ak.txt" |xargs sed 's#bbb#BBB#g' -i [root@oldboy-sh01 data]# cat ak.txt HHHHHHHH BBB ccc ddd [root@oldboy-sh01 data]# 显示系统版本 添加切换用户 设置密码 [root@oldboy-sh02 ~]# cat /etc/redhat-release #查看系统版本 CentOS release 6.9 (Final) [root@oldboy-sh02 ~]# uname -m # 查看系统是多少位的 x86_64 [root@oldboy-sh02 ~]# uname -r # 查看系统内核版本 2.6.32-696.el6.x86_64 [root@oldboy-sh02 ~]# 添加切换用户 设置密码 [root@oldboy-sh02 ~]# [root@oldboy-sh02 ~]# useradd oldboy #添加普通用户 [root@oldboy-sh02 ~]# passwd oldboy #为新用户设置密码 Changing password for user oldboy. New password: BAD PASSWORD: it is too simplistic/systematic BAD PASSWORD: is too simple Retype new password: passwd: all authentication tokens updated successfully. [root@oldboy-sh02 ~]# [root@oldboy-sh02 ~]# su - oldboy #切换用户 [oldboy@oldboy-sh02 ~]$ who am is #当前登陆用户是谁 root pts/0 2018-03-27 06:24 (10.0.0.1) [oldboy@oldboy-sh02 ~]$ 关闭SElinux和 iptables (临时 永久 检查) 临时关闭SElinux : ps enforcing:强制模式,代表 SELinux 运作中,且已经正确的开始限制 domain/type 了; permissive:宽容模式:代表 SELinux 运作中,不过仅会有警告讯息并不会实际限制 [root@oldboy-sh02 ~]# setenforce 0 (连续回车俩次 弹出参数提示) usage: setenforce [ Enforcing | Permissive | 1 | 0 ] [root@oldboy-kangzhuang ~]# getenforce #查看selinux的运行状态 Enforcing [root@oldboy-kangzhuang ~]# setenforce 0 #临时关闭 [root@oldboy-kangzhuang ~]# getenforce #查看selinux的运行状态 Permissive #宽容模式:代表 SELinux 运作中,不过仅会有警告讯息并不会实际限制 [root@oldboy-kangzhuang ~]# [root@oldboy-kangzhuang ~]# setenforce 1 #临时开启防火墙 [root@oldboy-kangzhuang ~]# getenforce #查看防火墙状态 Enforcing [root@oldboy-kangzhuang ~]# 永久关闭SElinux : [root@oldboy-kangzhuang ~]# sed 's#SELINUX=enforcing#SELINUX=disabled#g' /etc/selinux/config -i [root@oldboy-kangzhuang ~]# [root@oldboy-kangzhuang ~]# grep SELINUX= /etc/selinux/config #查看是否修改成功 # SELINUX= can take one of these three values: SELINUX=disabled [root@oldboy-kangzhuang ~]# IP table s 防火墙 关闭 生产环境防火墙使用 服务器有公网ip地址 :开启防火墙 服务器没有公网ip的 不需要开启防火墙 网站高并发的时候 不要开启防火墙 如何关闭防火墙 临时关闭---重启服务器失效 [root@oldboy-sh02 ~]# /etc/init.d/iptables stop iptables: Setting chains to policy ACCEPT: filter [ OK ] iptables: Flushing firewall rules: [ OK ] iptables: Unloading modules: [ OK ] [root@oldboy-sh02 ~]# /etc/init.d/ip ip6tables iptables [root@oldboy-sh02 ~]# /etc/init.d/iptables status iptables: Firewall is not running. [root@oldboy-sh02 ~]# 永久关闭 让防火墙禁止开启自启动 [root@oldboy-sh02 ~]# chkconfig | grep ipta iptables 0:off 1:off 2:on 3:on 4:on 5:on 6:off [root@oldboy-sh02 ~]# [root@oldboy-sh02 ~]# chkconfig iptables off [root@oldboy-sh02 ~]# chkconfig | grep iptables iptables 0:off 1:off 2:off 3:off 4:off 5:off 6:off [root@oldboy-sh02 ~]# /etc/init.d/iptables status iptables: Firewall is not running. [root@oldboy-sh02 ~]# 面试题 :防火墙当前正在运行 ,hckconfig iptables off 可以关闭么? 不能! 小结: 如何关闭 iptables 临时 /etc/initt.d/iptables restart/status/stop 环境变量 PS1 (控制命令行) LANG (控制字符集 语言) 临时修改字符变量 [root@oldboy-kangzhuang ~]# echo $LANG #查看当前字符 en_US.UTF-8[root@oldboy-kangzhuang ~]# export.UTF-8 #修改字符为中文,临时生效[root@oldboy-kangzhuang ~]# echo $LANG #验证是否生效 zh_CN.UTF-8 [root@oldboy-kangzhuang ~]# setu 修改字符变量 永久生效(全局生效) [root@oldboy-kangzhuang ~]# cat /etc/sysconfig/i18n LANG=en_US.UTF-8 SYSFONT="latarcyrheb-sun16" [root@oldboy-kangzhuang ~]# sed -i.bak 's#LANG=en_US.UTF-8#LANG=zh_CN.UTF-8#g' /etc/sysconfig/i18n #(-i.bak -i参数后加 . 加后缀 可在修改文件之前自动备份一个文件到当前目录) [root@oldboy-kangzhuang ~]# cat /etc/sysconfig/i18n #验证是否修改成功 LANG=zh_CN.UTF-8 [root@oldboy-kangzhuang ~]# ll /etc/sysconfig/ | grep "i18n*" #ls + grep命令组合 查看是否备份成功 -rw-r--r--. 1 root root 45 3月 27 08:05 i18n -rw-r--r--. 1 root root 45 3月 27 06:42 i18n.bak [root@oldboy-kangzhuang ~]# [root@oldboy-kangzhuang ~]# source /etc/sysconfig/i18n [root@oldboy-kangzhuang ~]# arch 显示机器的处理器架构(1) uname -m 显示机器的处理器架构(2) uname -r 显示正在使用的内核版本 dmidecode -q 显示硬件系统部件 - (SMBIOS / DMI) hdparm -i /dev/hda 罗列一个磁盘的架构特性 hdparm -tT /dev/sda 在磁盘上执行测试性读取操作 cat /proc/cpuinfo 显示CPU info的信息 cat /proc/interrupts 显示中断 cat /proc/meminfo 校验内存使用 cat /proc/swaps 显示哪些swap被使用 cat /proc/version 显示内核的版本 cat /proc/net/dev 显示网络适配器及统计 cat /proc/mounts 显示已加载的文件系统 lspci -tv 罗列 PCI 设备 lsusb -tv 显示 USB 设备 date 显示系统日期 cal 2007 显示2007年的日历表 date 041217002007.00 设置日期和时间 - 月日时分年.秒 clock -w 将时间修改保存到 BIOS shutdown -h now 关闭系统(1) init 0 关闭系统(2) telinit 0 关闭系统(3) shutdown -h hours:minutes & 按预定时间关闭系统 shutdown -c 取消按预定时间关闭系统 shutdown -r now 重启(1) reboot 重启(2) logout 注销 cd /home 进入 '/ home' 目录' cd .. 返回上一级目录 cd ../.. 返回上两级目录 cd 进入个人的主目录 cd ~user1 进入个人的主目录 cd - 返回上次所在的目录 pwd 显示工作路径 ls 查看目录中的文件 ls -F 查看目录中的文件 ls -l 显示文件和目录的详细资料 ls -a 显示隐藏文件 ls *[0-9]* 显示包含数字的文件名和目录名 tree 显示文件和目录由根目录开始的树形结构(1) lstree 显示文件和目录由根目录开始的树形结构(2) mkdir dir1 创建一个叫做 'dir1' 的目录' mkdir dir1 dir2 同时创建两个目录 mkdir -p /tmp/dir1/dir2 创建一个目录树 rm -f file1 删除一个叫做 'file1' 的文件' rmdir dir1 删除一个叫做 'dir1' 的目录' rm -rf dir1 删除一个叫做 'dir1' 的目录并同时删除其内容 rm -rf dir1 dir2 同时删除两个目录及它们的内容 mv dir1 new_dir 重命名/移动 一个目录 cp file1 file2 复制一个文件 cp dir/* . 复制一个目录下的所有文件到当前工作目录 cp -a /tmp/dir1 . 复制一个目录到当前工作目录 cp -a dir1 dir2 复制一个目录 ln -s file1 lnk1 创建一个指向文件或目录的软链接 ln file1 lnk1 创建一个指向文件或目录的物理链接 touch -t 0712250000 file1 修改一个文件或目录的时间戳 - (YYMMDDhhmm) file file1 outputs the mime type of the file as text iconv -l 列出已知的编码 iconv -f fromEncoding -t toEncoding inputFile > outputFile creates anew from the given input file by assuming it is encoded in fromEncodingand converting it to toEncoding. find . -maxdepth 1 -name *.jpg -print -exec convert "{}" -resize 80x60"thumbs/{}" ; batch resize files in the current directory and send themto a thumbnails directory (requires convert from Imagemagick) find / -name file1 从 '/' 开始进入根文件系统搜索文件和目录 find / -user user1 搜索属于用户 'user1' 的文件和目录 find /home/user1 -name *.bin 在目录 '/ home/user1' 中搜索带有'.bin' 结尾的文件 find /usr/bin -type f -atime 100 搜索在过去100天内未被使用过的执行文件 find /usr/bin -type f -mtime -10 搜索在10天内被创建或者修改过的文件 find / -name *.rpm -exec chmod 755 '{}' ; 搜索以 '.rpm' 结尾的文件并定义其权限 find / -xdev -name *.rpm 搜索以 '.rpm' 结尾的文件,忽略光驱、捷盘等可移动设备 locate *.ps 寻找以 '.ps' 结尾的文件 - 先运行 'updatedb' 命令 whereis halt 显示一个二进制文件、源码或man的位置 which halt 显示一个二进制文件或可执行文件的完整路径 mount /dev/hda2 /mnt/hda2 挂载一个叫做hda2的盘 - 确定目录 '/ mnt/hda2' 已经存在 umount /dev/hda2 卸载一个叫做hda2的盘 - 先从挂载点 '/ mnt/hda2' 退出 fuser -km /mnt/hda2 当设备繁忙时强制卸载 umount -n /mnt/hda2 运行卸载操作而不写入 /etc/mtab 文件- 当文件为只读或当磁盘写满时非常有用 mount /dev/fd0 /mnt/floppy 挂载一个软盘 mount /dev/cdrom /mnt/cdrom 挂载一个cdrom或dvdrom mount /dev/hdc /mnt/cdrecorder 挂载一个cdrw或dvdrom mount /dev/hdb /mnt/cdrecorder 挂载一个cdrw或dvdrom mount -o loop file.iso /mnt/cdrom 挂载一个文件或ISO镜像文件 mount -t vfat /dev/hda5 /mnt/hda5 挂载一个Windows FAT32文件系统 mount /dev/sda1 /mnt/usbdisk 挂载一个usb 捷盘或闪存设备 mount -t smbfs -o username=user,password=pass //WinClient/share /mnt/share 挂载一个windows网络共享 磁盘空间 df -h 显示已经挂载的分区列表 ls -lSr |more 以尺寸大小排列文件和目录 du -sh dir1 估算目录 'dir1' 已经使用的磁盘空间' du -sk * | sort -rn 以容量大小为依据依次显示文件和目录的大小 rpm -q -a --qf '{SIZE}t%{NAME}n' | sort -k1,1n 以大小为依据依次显示已安装的rpm包所使用的空间 (fedora, redhat类系统) dpkg-query -W -f='${Installed-Size;10}t${Package}n' | sort -k1,1n 以大小为依据显示已安装的deb包所使用的空间 (ubuntu, debian类系统) groupadd group_name 创建一个新用户组 groupdel group_name 删除一个用户组 groupmod -n new_group_name old_group_name 重命名一个用户组 useradd -c "Name Surname " -g admin -d /home/user1 -s /bin/bash user1 创建一个属于 "admin" 用户组的用户 useradd user1 创建一个新用户 userdel -r user1 删除一个用户 ( '-r' 排除主目录) usermod -c "User FTP" -g system -d /ftp/user1 -s /bin/nologin user1 修改用户属性 passwd 修改口令 passwd user1 修改一个用户的口令 (只允许root执行) chage -E 2005-12-31 user1 设置用户口令的失效期限 pwck 检查 '/etc/passwd' 的文件格式和语法修正以及存在的用户 grpck 检查 '/etc/passwd' 的文件格式和语法修正以及存在的群组 newgrp group_name 登陆进一个新的群组以改变新创建文件的预设群组 ls -lh 显示权限 ls /tmp | pr -T5 -W$COLUMNS 将终端划分成5栏显示 chmod ugo rwx directory1 设置目录的所有人(u)、群组(g)以及其他人(o)以读(r )、写(w)和执行(x)的权限 chmod go-rwx directory1 删除群组(g)与其他人(o)对目录的读写执行权限 chown user1 file1 改变一个文件的所有人属性 chown -R user1 directory1 改变一个目录的所有人属性并同时改变改目录下所有文件的属性 chgrp group1 file1 改变文件的群组 chown user1:group1 file1 改变一个文件的所有人和群组属性 find / -perm -u s 罗列一个系统中所有使用了SUID控制的文件 chmod u s /bin/file1 设置一个二进制文件的 SUID 位 - 运行该文件的用户也被赋予和所有者同样的权限 chmod u-s /bin/file1 禁用一个二进制文件的 SUID位 chmod g s /home/public 设置一个目录的SGID 位 - 类似SUID ,不过这是针对目录的 chmod g-s /home/public 禁用一个目录的 SGID 位 chmod o t /home/public 设置一个文件的 STIKY 位 - 只允许合法所有人删除文件 chmod o-t /home/public 禁用一个目录的 STIKY 位 chattr a file1 只允许以追加方式读写文件 chattr c file1 允许这个文件能被内核自动压缩/解压 chattr d file1 在进行文件系统备份时,dump程序将忽略这个文件 chattr i file1 设置成不可变的文件,不能被删除、修改、重命名或者链接 chattr s file1 允许一个文件被安全地删除 chattr S file1 一旦应用程序对这个文件执行了写操作,使系统立刻把修改的结果写到磁盘 chattr u file1 若文件被删除,系统会允许你在以后恢复这个被删除的文件 lsattr 显示特殊的属性 bunzip2 file1.bz2 解压一个叫做 'file1.bz2'的文件 bzip2 file1 压缩一个叫做 'file1' 的文件 gunzip file1.gz 解压一个叫做 'file1.gz'的文件 gzip file1 压缩一个叫做 'file1'的文件 gzip -9 file1 最大程度压缩 rar a file1.rar test_file 创建一个叫做 'file1.rar' 的包 rar a file1.rar file1 file2 dir1 同时压缩 'file1', 'file2' 以及目录 'dir1' rar x file1.rar 解压rar包 unrar x file1.rar 解压rar包 tar -cvf archive.tar file1 创建一个非压缩的 tarball tar -cvf archive.tar file1 file2 dir1 创建一个包含了 'file1', 'file2' 以及 'dir1'的档案文件 tar -tf archive.tar 显示一个包中的内容 tar -xvf archive.tar 释放一个包 tar -xvf archive.tar -C /tmp 将压缩包释放到 /tmp目录下 tar -cvfj archive.tar.bz2 dir1 创建一个bzip2格式的压缩包 tar -xvfj archive.tar.bz2 解压一个bzip2格式的压缩包 tar -cvfz archive.tar.gz dir1 创建一个gzip格式的压缩包 tar -xvfz archive.tar.gz 解压一个gzip格式的压缩包 zip file1.zip file1 创建一个zip格式的压缩包 zip -r file1.zip file1 file2 dir1 将几个文件和目录同时压缩成一个zip格式的压缩包 unzip file1.zip 解压一个zip格式压缩包 rpm -ivh package.rpm 安装一个rpm包 rpm -ivh --nodeeps package.rpm 安装一个rpm包而忽略依赖关系警告 rpm -U package.rpm 更新一个rpm包但不改变其配置文件 rpm -F package.rpm 更新一个确定已经安装的rpm包 rpm -e package_name.rpm 删除一个rpm包 rpm -qa 显示系统中所有已经安装的rpm包 rpm -qa | grep httpd 显示所有名称中包含 "httpd" 字样的rpm包 rpm -qi package_name 获取一个已安装包的特殊信息 rpm -qg "System Environment/Daemons" 显示一个组件的rpm包 rpm -ql package_name 显示一个已经安装的rpm包提供的文件列表 rpm -qc package_name 显示一个已经安装的rpm包提供的配置文件列表 rpm -q package_name --whatrequires 显示与一个rpm包存在依赖关系的列表 rpm -q package_name --whatprovides 显示一个rpm包所占的体积 rpm -q package_name --scripts 显示在安装/删除期间所执行的脚本l rpm -q package_name --changelog 显示一个rpm包的修改历史 rpm -qf /etc/httpd/conf/httpd.conf 确认所给的文件由哪个rpm包所提供 rpm -qp package.rpm -l 显示由一个尚未安装的rpm包提供的文件列表 rpm --import /media/cdrom/RPM-GPG-KEY 导入公钥数字证书 rpm --checksig package.rpm 确认一个rpm包的完整性 rpm -qa gpg-pubkey 确认已安装的所有rpm包的完整性 rpm -V package_name 检查文件尺寸、 许可、类型、所有者、群组、MD5检查以及最后修改时间 rpm -Va 检查系统中所有已安装的rpm包- 小心使用 rpm -Vp package.rpm 确认一个rpm包还未安装 rpm2cpio package.rpm | cpio --extract --make-directories *bin* 从一个rpm包运行可执行文件 rpm -ivh /usr/src/redhat/RPMS/`arch`/package.rpm 从一个rpm源码安装一个构建好的包 rpmbuild --rebuild package_name.src.rpm 从一个rpm源码构建一个 rpm 包 yum install package_name 下载并安装一个rpm包 yum localinstall package_name.rpm 将安装一个rpm包,使用你自己的软件仓库为你解决所有依赖关系 yum update package_name.rpm 更新当前系统中所有安装的rpm包 yum update package_name 更新一个rpm包 yum remove package_name 删除一个rpm包 yum list 列出当前系统中安装的所有包 yum search package_name 在rpm仓库中搜寻软件包 yum clean packages 清理rpm缓存删除下载的包 yum clean headers 删除所有头文件 yum clean all 删除所有缓存的包和头文件 dpkg -i package.deb 安装/更新一个 deb 包 dpkg -r package_name 从系统删除一个 deb 包 dpkg -l 显示系统中所有已经安装的 deb 包 dpkg -l | grep httpd 显示所有名称中包含 "httpd" 字样的deb包 dpkg -s package_name 获得已经安装在系统中一个特殊包的信息 dpkg -L package_name 显示系统中已经安装的一个deb包所提供的文件列表 dpkg --contents package.deb 显示尚未安装的一个包所提供的文件列表 dpkg -S /bin/ping 确认所给的文件由哪个deb包提供 apt-get install package_name 安装/更新一个 deb 包 apt-cdrom install package_name 从光盘安装/更新一个 deb 包 apt-get update 升级列表中的软件包 apt-get upgrade 升级所有已安装的软件 apt-get remove package_name 从系统删除一个deb包 apt-get check 确认依赖的软件仓库正确 apt-get clean 从下载的软件包中清理缓存 apt-cache search searched-package 返回包含所要搜索字符串的软件包名称 cat file1 从第一个字节开始正向查看文件的内容 tac file1 从最后一行开始反向查看一个文件的内容 more file1 查看一个长文件的内容 less file1 类似于 'more' 命令,但是它允许在文件中和正向操作一样的反向操作 head -2 file1 查看一个文件的前两行 tail -2 file1 查看一个文件的最后两行 tail -f /var/log/messages 实时查看被添加到一个文件中的内容 cat file1 file2 ... | command <> file1_in.txt_or_file1_out.txtgeneral syntax for text manipulation using PIPE, STDIN and STDOUT cat file1 | command( sed, grep, awk, grep, etc...) > result.txt 合并一个文件的详细说明文本,并将简介写入一个新文件中 cat file1 | command( sed, grep, awk, grep, etc...) >> result.txt 合并一个文件的详细说明文本,并将简介写入一个已有的文件中 grep Aug /var/log/messages 在文件 '/var/log/messages'中查找关键词"Aug" grep ^Aug /var/log/messages 在文件 '/var/log/messages'中查找以"Aug"开始的词汇 grep [0-9] /var/log/messages 选择 '/var/log/messages' 文件中所有包含数字的行 grep Aug -R /var/log/* 在目录 '/var/log' 及随后的目录中搜索字符串"Aug" sed 's/stringa1/stringa2/g' server110.txt 将server110.txt文件中的 "string1" 替换成 "string2" sed '/^$/d' server110.txt 从server110.txt文件中删除所有空白行 sed '/ *#/d; /^$/d' server110.txt 从server110.txt文件中删除所有注释和空白行 echo 'esempio' | tr '[:lower:]' '[:upper:]' 合并上下单元格内容 sed -e '1d' result.txt 从文件server110.txt 中排除第一行 sed -n '/stringa1/p' 查看只包含词汇 "string1"的行 sed -e 's/ *$//' server110.txt 删除每一行最后的空白字符 sed -e 's/stringa1//g' server110.txt 从文档中只删除词汇 "string1" 并保留剩余全部 sed -n '1,5p;5q' server110.txt 查看从第一行到第5行内容 sed -n '5p;5q' server110.txt 查看第5行 sed -e 's/00*/0/g' server110.txt 用单个零替换多个零 cat -n file1 标示文件的行数 cat server110.txt | awk 'NR%2==1' 删除server110.txt文件中的所有偶数行 echo a b c | awk '{print $1}' 查看一行第一栏 echo a b c | awk '{print $1,$3}' 查看一行的第一和第三栏 paste file1 file2 合并两个文件或两栏的内容 paste -d ' ' file1 file2 合并两个文件或两栏的内容,中间用" "区分 sort file1 file2 排序两个文件的内容 sort file1 file2 | uniq 取出两个文件的并集(重复的行只保留一份) sort file1 file2 | uniq -u 删除交集,留下其他的行 sort file1 file2 | uniq -d 取出两个文件的交集(只留下同时存在于两个文件中的文件) comm -1 file1 file2 比较两个文件的内容只删除 'file1' 所包含的内容 comm -2 file1 file2 比较两个文件的内容只删除 'file2' 所包含的内容 comm -3 file1 file2 比较两个文件的内容只删除两个文件共有的部分 dos2unix filedos.txt fileunix.txt 将一个文本文件的格式从MSDOS转换成UNIX unix2dos fileunix.txt filedos.txt 将一个文本文件的格式从UNIX转换成MSDOS recode ..HTML < page.txt > page.html 将一个文本文件转换成html recode -l | more 显示所有允许的转换格式 badblocks -v /dev/hda1 检查磁盘hda1上的坏磁块 fsck /dev/hda1 修复/检查hda1磁盘上linux文件系统的完整性 fsck.ext2 /dev/hda1 修复/检查hda1磁盘上ext2文件系统的完整性 e2fsck /dev/hda1 修复/检查hda1磁盘上ext2文件系统的完整性 e2fsck -j /dev/hda1 修复/检查hda1磁盘上ext3文件系统的完整性 fsck.ext3 /dev/hda1 修复/检查hda1磁盘上ext3文件系统的完整性 fsck.vfat /dev/hda1 修复/检查hda1磁盘上fat文件系统的完整性 fsck.msdos /dev/hda1 修复/检查hda1磁盘上dos文件系统的完整性 dosfsck /dev/hda1 修复/检查hda1磁盘上dos文件系统的完整性 mkfs /dev/hda1 在hda1分区创建一个文件系统 mke2fs /dev/hda1 在hda1分区创建一个linux ext2的文件系统 mke2fs -j /dev/hda1 在hda1分区创建一个linux ext3(日志型)的文件系统 mkfs -t vfat 32 -F /dev/hda1 创建一个 FAT32 文件系统 fdformat -n /dev/fd0 格式化一个软盘 mkswap /dev/hda3 创建一个swap文件系统 mkswap /dev/hda3 创建一个swap文件系统 swapon /dev/hda3 启用一个新的swap文件系统 swapon /dev/hda2 /dev/hdb3 启用两个swap分区 dump -0aj -f /tmp/home0.bak /home 制作一个 '/home' 目录的完整备份 dump -1aj -f /tmp/home0.bak /home 制作一个 '/home' 目录的交互式备份 restore -if /tmp/home0.bak 还原一个交互式备份 rsync -rogpav --delete /home /tmp 同步两边的目录 rsync -rogpav -e ssh --delete /home ip_address:/tmp 通过SSH通道rsync rsync -az -e ssh --delete ip_addr:/home/public /home/local 通过ssh和压缩将一个远程目录同步到本地目录 rsync -az -e ssh --delete /home/local ip_addr:/home/public 通过ssh和压缩将本地目录同步到远程目录 dd bs=1M if=/dev/hda | gzip | ssh user@ip_addr 'dd of=hda.gz' 通过ssh在远程主机上执行一次备份本地磁盘的操作 dd if=/dev/sda of=/tmp/file1 备份磁盘内容到一个文件 tar -Puf backup.tar /home/user 执行一次对 '/home/user' 目录的交互式备份操作 ( cd /tmp/local/ && tar c . ) | ssh -C user@ip_addr 'cd /home/share/ && tar x -p' 通过ssh在远程目录中复制一个目录内容 ( tar c /home ) | ssh -C user@ip_addr 'cd /home/backup-home && tar x -p' 通过ssh在远程目录中复制一个本地目录 tar cf - . | (cd /tmp/backup ; tar xf - ) 本地将一个目录复制到另一个地方,保留原有权限及链接 find /home/user1 -name '*.txt' | xargs cp -av --target-directory=/home/backup/ --parents 从一个目录查找并复制所有以 '.txt' 结尾的文件到另一个目录 find /var/log -name '*.log' | tar cv --files-from=- | bzip2 > log.tar.bz2 查找所有以 '.log' 结尾的文件并做成一个bzip包 dd if=/dev/hda of=/dev/fd0 bs=512 count=1 做一个将 MBR (Master Boot Record)内容复制到软盘的动作 dd if=/dev/fd0 of=/dev/hda bs=512 count=1 从已经保存到软盘的备份中恢复MBR内容 cdrecord -v gracetime=2 dev=/dev/cdrom -eject blank=fast -force 清空一个可复写的光盘内容 mkisofs /dev/cdrom > cd.iso 在磁盘上创建一个光盘的iso镜像文件 mkisofs /dev/cdrom | gzip > cd_iso.gz 在磁盘上创建一个压缩了的光盘iso镜像文件 mkisofs -J -allow-leading-dots -R -V "Label CD" -iso-level 4 -o ./cd.iso data_cd 创建一个目录的iso镜像文件 cdrecord -v dev=/dev/cdrom cd.iso 刻录一个ISO镜像文件 gzip -dc cd_iso.gz | cdrecord dev=/dev/cdrom - 刻录一个压缩了的ISO镜像文件 mount -o loop cd.iso /mnt/iso 挂载一个ISO镜像文件 cd-paranoia -B 从一个CD光盘转录音轨到 wav 文件中 cd-paranoia -- "-3" 从一个CD光盘转录音轨到 wav 文件中(参数-3) cdrecord --scanbus 扫描总线以识别scsi通道 dd if=/dev/hdc | md5sum 校验一个设备的md5sum编码,例如一张 CD ifconfig eth0 显示一个以太网卡的配置 ifup eth0 启用一个 'eth0' 网络设备 ifdown eth0 禁用一个 'eth0' 网络设备 ifconfig eth0 192.168.1.1 netmask 255.255.255.0 控制IP地址 ifconfig eth0 promisc 设置 'eth0' 成混杂模式以嗅探数据包 (sniffing) dhclient eth0 以dhcp模式启用 'eth0' route -n show routing table
Linux大全
系统信息
关机 (系统的关机、重启以及登出 )
文件和目录
文件搜索
挂载一个文件系统
用户和群组
文件的权限 - 使用 " " 设置权限,使用 "-" 用于取消
文件的特殊属性 - 使用 " " 设置权限,使用 "-" 用于取消
打包和压缩文件
RPM 包 - (Fedora, Redhat及类似系统)
YUM 软件包升级器 - (Fedora, RedHat及类似系统)
DEB 包 (Debian, Ubuntu 以及类似系统)
APT 软件工具 (Debian, Ubuntu 以及类似系统)
查看文件内容
文本处理
字符设置和文件格式转换
文件系统分析
初始化一个文件系统
SWAP文件系统
备份
光盘
网络 - (以太网和WIFI无线)
3、Linux思维导图

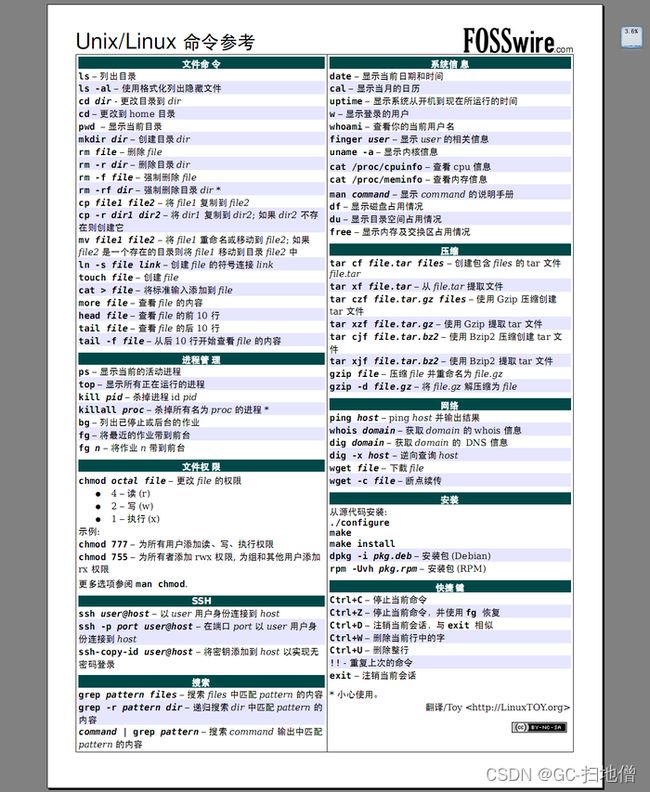
作者:Darren
QQ:603026148
以上内容归Darren所有,如果有什么错误或者不足的地方请联系我,希望我们共同进步。