elk+kafka日志分析系统搭建
目录
一、elk引入
二、认识elk+kafka+filebeat
Elasticsearch
Logstash
Kibana
kafka
三、elk+kafka架构图
四、elasticsearch部署
1、服务器情况
2、添加环境变量
3、系统性能优化
4、node1节点部署
5、启动集群
6、查看集群状态
五、kibana
1、部署环境
2、安装kibana
3、启动kibana
六、部署kafka
1、部署环境
2、安装kafka
3、启动zookeeper
4、启动kafka
5、验证kafka
七、logstash部署
1、环境部署
2、安装lostash
3、启动logstash
八、filebeat部署
1、环境部署
2、安装filebeat
3、启动filebeat
九、启动nginx验证kibana是否正常展示数据
1、启动nginx
2、登录kibana验证
一、elk引入
如果在实际生产情况下,查看日志大都通过SSH客户端登服务器去看,使用较多的命令就是 less 、cat、head、tail。如果服务部署了几十台甚至上百台服务器,就要分别登录到这些台机器上看,这样大大的降低了我们的工作效率,等到了分布式和微服务架构流行时代,一个从APP或H5发起的请求除了需要登陆服务器去排查日志,往往还会经过远程软件远程到了别的主机继续处理,开发人员定位问题可能还需要根据TraceID或者业务唯一主键去跟踪服务的链路日志,基于传统SSH方式登陆主机查看日志的方式就像图中排查线路的工人一样困难,线上服务器几十上百之多,出了问题难以快速响应,因此需要高效、实时的日志存储和检索平台,ELK就提供这样一套解决方案。
二、认识elk+kafka+filebeat
ELK是三个开源软件的缩写,分别表示:Elasticsearch , Logstash, Kibana , 它们都是开源软件。Filebeat是用于转发和集中日志数据的轻量级传送工具。Filebeat监视您指定的日志文件或位置,收集日志事件,并将它们转发到Elasticsearch或 Logstash进行索引。
首先,elk作为日志分析架构,主要使用这几个组合:filebeat(采集)+logstash(管道)+elasticsearch(存储和搜索)+kibana(日志应用)的这种组合比较常见。
kafka作为适合大吞吐数据的临时队列,比较适合放置在filebeat和logstash之间
Elasticsearch
Elasticsearch 是一个实时的分布式存储、搜索、分析的引擎。
Elasticsearch 是一个分布式的、开源的搜索分析引擎,支持各种数据类型,包括文本、数字、地理、结构化、非结构化。
Elasticsearch 因其简单的 REST API、分布式特性、告诉、可扩展而闻名。
Elasticsearch 是 Elastic 产品栈的核心,Elastic 产品栈是个开源工具集合,用于数据接收、存储、分析、可视化。
Logstash
Logstash是具有实时流水线能力的开源的数据收集引擎。Logstash可以动态统一不同来源的数据,并将数据标准化到您选择的目标输出。它提供了大量插件,可帮助我们解析,丰富,转换和缓冲任何类型的数据
Kibana
Kibana是一个开源的分析与可视化平台,设计出来用于和Elasticsearch一起使用的。你可以用kibana搜索、查看存放在Elasticsearch中的数据。Kibana与Elasticsearch的交互方式是各种不同的图表、表格、地图等,直观的展示数据,从而达到高级的数据分析与可视化的目的。
kafka
Kafka是Apache旗下的一款分布式流媒体平台,Kafka是一种高吞吐量、持久性、分布式的发布订阅的消息队列系统。 它最初由LinkedIn(领英)公司发布,使用Scala语言编写,与2010年12月份开源,成为Apache的顶级子项目。 它主要用于处理消费者规模网站中的所有动作流数据。动作指(网页浏览、搜索和其它用户行动所产生的数据)。
三、elk+kafka架构图
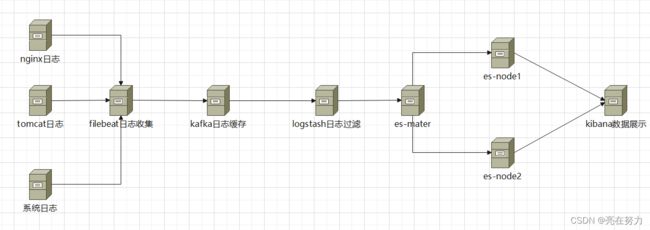
上图是本次搭建elk+kafka的部署流程图,但是存在单点故障问题,
--比如我的kafka量过大,会造成把kafka打满,导致无法接收数据,建议在生产情况下根据自己的实际使用情况考虑是否使用集群的方式
--es-master 如果master挂掉后,整个集群将不可用,所以在正常的生产环境下,es-maser应部署奇数节点 比如三台、五台等等、当然node节点也可以随之扩容
还有一个问题就是在分部署日志架构中我们使用elk部署即可为什么还要使用kafka了?
原因是:
ELK架构优点是搭建简单,易于上手。缺点是Logstash消耗系统资源比较大,运行时占用CPU和内存资源较高。另外,由于没有消息队列缓存,可能存在数据丢失的风险,适合于数据量小的环境使用。
而引入Kafka的典型ELK架构是
为保证日志传输数据的可靠性和稳定性,先将数据传递给消息队列,接着、将格式化的数据传递给Elasticsearch进行存储、最后,由Kibana将日志和数据呈现给用户。由于引入了Kafka缓冲机制,即使远端Logstash server因故障停止运行,数据也不会丢失,可靠性得到了大大的提升。
四、elasticsearch部署
1、服务器情况
| 服务器ip | 部署应用 | 软件版本 |
| 192.168.12.11 | es-mater、fiebeat、nginx | elasticsearch-7.13.0、filebeat-7.12.0、nginx-1.22.1 |
| 192.168.12.12 | es-node1 | elasticsearch-7.13.0 |
| 192.168.12.13 | es-node2 | elasticsearch-7.13.0 |
| 192.168.12.14 | kafka | kafka_2.12-2.8.0 |
| 192.168.12.15 | kibana | kibana-7.13.0 |
| 192.168.12.16 | logstash | logstash-7.12.0 |
2、添加环境变量
[root@control ~]# vim /etc/profile
[root@control ~]#
export JAVA_HOME=/usr/java/jdk18
export PATH=$PATH:$JAVA_HOME/bin
3、系统性能优化
es节点服务器均需要使用管理员root权限解除打开文件数的限制和调大普通用户虚拟内存。保存后执行sysctl -p
cat /etc/security/limits.conf
* soft nofile 655360
* hard nofile 655360

cat /etc/sysctl.conf
vm.max_map_count = 655360
sysctl -p
master节点部署
master节点主要功能是维护元数据,管理集群各个节点的状态,数据的导入和查询都不会走master节点,所以master节点的压力相对较小,因此master节点的内存分配也可以相对少些;但是master节点是最重要的,如果master节点挂了或者发生脑裂了,你的元数据就会发生混乱,那样你集群里的全部数据可能会发生丢失,所以一定要保证master节点的稳定性。
192.168.12.11节点部署
[www@control es-master]$ ll
总用量 319484
drwxr-xr-x 3 www www        19 9月  19 10:01 data
-rw-r--r-- 1 www www 327145839 9月  18 16:37 elasticsearch-7.13.0-linux-x86_64.tar.gz
drwxr-xr-x 9 www www       155 5月  20 2021 elasticsearch-master
drwxr-xr-x 2 www www      4096 9月  23 19:33 logs
[www@control es-master]$
[www@control es-master]$
[www@control es-master]$ pwd   #这是master的安装目录
/data01/elk/es-master
[www@control es-master]$
[www@control es-master]$ cd /data01/elk/es-master

[www@control es-master]$
[www@control es-master]$tar -xf elasticsearch-7.13.0-linux-x86_64.tar.gz
[www@control es-master]$
[www@control es-master]$
[www@control es-master]$mv elasticsearch-7.13.0  elasticsearch-master
[www@control es-master]$
[www@control es-master]$mkdir data  && mkdir logs
编辑elasticsearch的配置文件
vim /data01/elk/es-master/elasticsearch-master/config/elasticsearch.yml
#集群名称
cluster.name: "cs-ES"
##节点名称
node.name: es-master
##是否可以成为master
node.master: true
#cluster.initial_master_nodes: ["es-master"]
##是否允许该节点存储数据
node.data: false
##网络绑定
network.host: ["0.0.0.0"]
##设置对外服务的http端口,默认为9200
http.port: 9200
##支持跨域访问-head插件支持
http.cors.enabled: true
http.cors.allow-origin: "*"
http.cors.allow-headers: Authorization,X-Requested-With,Content-Type,Content-Length
##设置节点间交互的tcp端口,默认是9300
transport.tcp.port: 9300
##集群发现的节点ip
discovery.seed_hosts: ["192.168.12.12:9300","192.168.12.13:9300","192.168.12.11:9300"]
##可以成为 master的节点ip
#icluster.initial_master_nodes:["192.168.12.12:9300","192.168.12.13:9300","192.168.12.11:9300"]
##数据存储路径
path.data: /data01/elk/es-master/data
##日志存储路径
path.logs: /data01/elk/es-master/logs
##组成集群所需要的最少主节点候选节点数
discovery.zen.minimum_master_nodes: 1
##开启x-pack功能,并指定证书位置
xpack.security.enabled: true
xpack.security.transport.ssl.enabled: true
xpack.security.transport.ssl.verification_mode: certificate
xpack.security.transport.ssl.keystore.path: elastic-certificates.p12
xpack.security.transport.ssl.truststore.path: elastic-certificates.p12
修改es内存使用的最大值和最小值
-Xms1g
-Xmx1g

因为我是模拟生产环境使用虚拟机搭建 所用这里 大小我给的1g 如果是在正常的生产环境下 根据服务器的内存大小进行设置即可使用任意节点生成证书
证书会生成在config目录下,证书名为:elastic-certificates.p12
[www@control es-master]$ cd elasticsearch-master/config/
[www@control config]$ ll
总用量 48
-rw------- 1 www www  3443 9月  19 08:30 elastic-certificates.p12
-rw-rw---- 1 www www   199 9月  19 09:53 elasticsearch.keystore
-rw-rw---- 1 www www  4082 9月  20 08:41 elasticsearch.yml
-rw-r----- 1 www www  2739 9月  19 08:20 elasticsearch.yml.bak
-rw-rw---- 1 www www  3104 9月  19 08:20 jvm.options
drwxr-x--- 2 www www     6 5月  20 2021 jvm.options.d
-rw-rw---- 1 www www 18626 5月  20 2021 log4j2.properties
-rw-rw---- 1 www www   473 5月  20 2021 role_mapping.yml
-rw-rw---- 1 www www   197 5月  20 2021 roles.yml
-rw-rw---- 1 www www     0 5月  20 2021 users
-rw-rw---- 1 www www     0 5月  20 2021 users_roles
[www@control config]$
将生成的证书拷贝到其他的节点
 scp elastic-certificates.p12 [email protected]:/data01/elk/es-node1/elasticsearch-node1/config/
 scp elastic-certificates.p12 [email protected]:/data01/elk/es-node2/elasticsearch-node1/config/
4、node1节点部署
当node.data为true时,这个节点作为一个数据节点,数据节点主要是存储索引数据的节点,主要对文档进行增删改查操作,聚合操作等。数据节点对cpu,内存,io要求较高, 在优化的时候需要监控数据节点的状态,当资源不够的时候,需要在集群中添加新的节点。
拷贝master节点到node节点
然后修改配置文件
jvm启动内存修改
[www@node2 config]$ cat jvm.options
-Xms1g
-Xmx1g
es-node节点配置文件修改
[www@node2 config]$ cat elasticsearch.yml
#集群名称
cluster.name: "cs-ES"
###节点名称
node.name: es-node1
###是否可以成为master
node.master: false
###是否允许该节点存储数据
node.data: true
###网络绑定
network.host: ["0.0.0.0"]
###设置对外服务的http端口,默认为9200
http.port: 9200
###支持跨域访问-head插件支持
http.cors.enabled: true
http.cors.allow-origin: "*"
#http.cors.allow-headers: Authorization,X-Requested-With,Content-Type,Content-Length
###设置节点间交互的tcp端口,默认是9300
transport.tcp.port: 9300
###集群发现的节点ip
discovery.seed_hosts: ["192.168.12.12:9300","192.168.12.13:9300","192.168.12.11:9300"]
###可以成为 master的节点ip
##icluster.initial_master_nodes:["133.38.37.221:9300","133.38.37.222:9300","133.38.37.223:9300"]
###数据存储路径
path.data: /data01/elk/es-node1/data
###日志存储路径
path.logs: /data01/elk/es-node1/logs
###组成集群所需要的最少主节点候选节点数
discovery.zen.minimum_master_nodes: 1
###开启x-pack功能,并指定证书位置
xpack.security.enabled: true
xpack.security.transport.ssl.enabled: true
xpack.security.transport.ssl.verification_mode: certificate
xpack.security.transport.ssl.keystore.path: elastic-certificates.p12
xpack.security.transport.ssl.truststore.path: elastic-certificates.p12
node2的部署方式同上
5、启动集群
集群启动的方式为先启动master,再启动node节点。观察日志是否集群启动成功,
启动命令如下:
[www@control root]$ cd /data01/elk/es-master/elasticsearch-master/bin/
[www@control bin]$ ll
总用量 21532
-rwxr-xr-x 1 www www 2896 5月 20 2021 elasticsearch
-rwxr-xr-x 1 www www 501 5月 20 2021 elasticsearch-certgen
-rwxr-xr-x 1 www www 493 5月 20 2021 elasticsearch-certutil
-rwxr-xr-x 1 www www 996 5月 20 2021 elasticsearch-cli
-rwxr-xr-x 1 www www 443 5月 20 2021 elasticsearch-croneval
-rwxr-xr-x 1 www www 4856 5月 20 2021 elasticsearch-env
-rwxr-xr-x 1 www www 1828 5月 20 2021 elasticsearch-env-from-file
-rwxr-xr-x 1 www www 168 5月 20 2021 elasticsearch-geoip
-rwxr-xr-x 1 www www 184 5月 20 2021 elasticsearch-keystore
-rwxr-xr-x 1 www www 450 5月 20 2021 elasticsearch-migrate
-rwxr-xr-x 1 www www 126 5月 20 2021 elasticsearch-node
-rwxr-xr-x 1 www www 172 5月 20 2021 elasticsearch-plugin
-rwxr-xr-x 1 www www 441 5月 20 2021 elasticsearch-saml-metadata
-rwxr-xr-x 1 www www 439 5月 20 2021 elasticsearch-service-tokens
-rwxr-xr-x 1 www www 448 5月 20 2021 elasticsearch-setup-passwords
-rwxr-xr-x 1 www www 118 5月 20 2021 elasticsearch-shard
-rwxr-xr-x 1 www www 483 5月 20 2021 elasticsearch-sql-cli
-rwxr-xr-x 1 www www 21951112 5月 20 2021 elasticsearch-sql-cli-7.13.0.jar
-rwxr-xr-x 1 www www 436 5月 20 2021 elasticsearch-syskeygen
-rwxr-xr-x 1 www www 436 5月 20 2021 elasticsearch-users
-rwxr-xr-x 1 www www 356 5月 20 2021 x-pack-env
-rwxr-xr-x 1 www www 364 5月 20 2021 x-pack-security-env
-rwxr-xr-x 1 www www 363 5月 20 2021 x-pack-watcher-env
[www@control bin]$
[www@control bin]$ ./elasticsearch -d #后台启动es-master
warning: usage of JAVA_HOME is deprecated, use ES_JAVA_HOME
Future versions of Elasticsearch will require Java 11; your Java version from [/usr/java/jdk18/jre] does not meet this requirement. Consider switching to a distribution of Elasticsearch with a bundled JDK. If you are already using a distribution with a bundled JDK, ensure the JAVA_HOME environment variable is not set.
[www@control bin]$
查看日志
[www@control bin]$ tail -f /data01/elk/es-master/logs/cs-ES.log
[2023-09-24T16:14:46,409][INFO ][o.e.t.TransportService ] [es-master] publish_address {172.17.0.1:9300}, bound_addresses {[::]:9300}
[2023-09-24T16:14:46,938][INFO ][o.e.b.BootstrapChecks ] [es-master] bound or publishing to a non-loopback address, enforcing bootstrap checks
[2023-09-24T16:14:46,941][INFO ][o.e.c.c.Coordinator ] [es-master] cluster UUID [bvD-MVnPQaKht_VRyiUrjQ]
[2023-09-24T16:14:47,156][INFO ][o.e.c.s.MasterService ] [es-master] elected-as-master ([1] nodes joined)[{es-master}{LcRDDrhxQLu0N7FskDX-Jg}{4mLq7txaRM2UbbD9G9VKIQ}{172.17.0.1}{172.17.0.1:9300}{ilmr} elect leader, _BECOME_MASTER_TASK_, _FINISH_ELECTION_], term: 9, version: 392, delta: master node changed {previous [], current [{es-master}{LcRDDrhxQLu0N7FskDX-Jg}{4mLq7txaRM2UbbD9G9VKIQ}{172.17.0.1}{172.17.0.1:9300}{ilmr}]}
[2023-09-24T16:14:47,343][INFO ][o.e.c.s.ClusterApplierService] [es-master] master node changed {previous [], current [{es-master}{LcRDDrhxQLu0N7FskDX-Jg}{4mLq7txaRM2UbbD9G9VKIQ}{172.17.0.1}{172.17.0.1:9300}{ilmr}]}, term: 9, version: 392, reason: Publication{term=9, version=392}
[2023-09-24T16:14:47,446][INFO ][o.e.h.AbstractHttpServerTransport] [es-master] publish_address {172.17.0.1:9200}, bound_addresses {[::]:9200}
[2023-09-24T16:14:47,446][INFO ][o.e.n.Node ] [es-master] started
[2023-09-24T16:14:48,436][INFO ][o.e.l.LicenseService ] [es-master] license [47e693d1-1baf-4abf-880d-2b7df859bbaf] mode [basic] - valid
[2023-09-24T16:14:48,438][INFO ][o.e.x.s.s.SecurityStatusChangeListener] [es-master] Active license is now [BASIC]; Security is enabled
[2023-09-24T16:14:48,444][INFO ][o.e.g.GatewayService ] [es-master] recovered [14] indices into cluster_state
查看端口
[www@control bin]$ ss -ntl
State Recv-Q Send-Q Local Address:Port Peer Address:Port
LISTEN 0 128 *:22 *:*
LISTEN 0 100 127.0.0.1:25 *:*
LISTEN 0 128 [::]:9200 [::]:*
LISTEN 0 128 [::]:9300 [::]:*
LISTEN 0 128 [::]:22 [::]:*
LISTEN 0 100 [::1]:25 [::]:*
[www@control bin]$
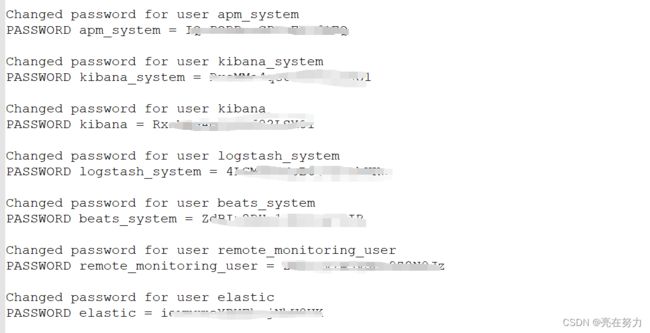
自动生成认证密码
在其中任意一个主节点设置密码即可,设置完之后,数据会自动同步到其他节点。不需要进行拷贝,扩充节点只要把认证文件拷贝到该节点上,启动扩容节点,集群会自动同步密码,不需要重启整个集群。
到主节点/bin目录下执行
./elasticsearch-setup-passwords auto
自动生成的密码切勿改动!!!!!牢记
node节点和master节点的启动方式相同 这里就不在演示
注意启动es一律使用普通用户启动 如果使用root启动会报错 切记切记 重点!!!!!!!!!!!
还是说一下:
[www@node3 root]$ cd /data01/elk/es-node2/elasticsearch-node2/bin/
[www@node3 bin]$ ll
总用量 21532
-rwxr-xr-x. 1 www www 2896 5月 20 2021 elasticsearch
-rwxr-xr-x. 1 www www 501 5月 20 2021 elasticsearch-certgen
-rwxr-xr-x. 1 www www 493 5月 20 2021 elasticsearch-certutil
-rwxr-xr-x. 1 www www 996 5月 20 2021 elasticsearch-cli
-rwxr-xr-x. 1 www www 443 5月 20 2021 elasticsearch-croneval
-rwxr-xr-x. 1 www www 4856 5月 20 2021 elasticsearch-env
-rwxr-xr-x. 1 www www 1828 5月 20 2021 elasticsearch-env-from-file
-rwxr-xr-x. 1 www www 168 5月 20 2021 elasticsearch-geoip
-rwxr-xr-x. 1 www www 184 5月 20 2021 elasticsearch-keystore
-rwxr-xr-x. 1 www www 450 5月 20 2021 elasticsearch-migrate
-rwxr-xr-x. 1 www www 126 5月 20 2021 elasticsearch-node
-rwxr-xr-x. 1 www www 172 5月 20 2021 elasticsearch-plugin
-rwxr-xr-x. 1 www www 441 5月 20 2021 elasticsearch-saml-metadata
-rwxr-xr-x. 1 www www 439 5月 20 2021 elasticsearch-service-tokens
-rwxr-xr-x. 1 www www 448 5月 20 2021 elasticsearch-setup-passwords
-rwxr-xr-x. 1 www www 118 5月 20 2021 elasticsearch-shard
-rwxr-xr-x. 1 www www 483 5月 20 2021 elasticsearch-sql-cli
-rwxr-xr-x. 1 www www 21951112 5月 20 2021 elasticsearch-sql-cli-7.13.0.jar
-rwxr-xr-x. 1 www www 436 5月 20 2021 elasticsearch-syskeygen
-rwxr-xr-x. 1 www www 436 5月 20 2021 elasticsearch-users
-rwxr-xr-x. 1 www www 356 5月 20 2021 x-pack-env
-rwxr-xr-x. 1 www www 364 5月 20 2021 x-pack-security-env
-rwxr-xr-x. 1 www www 363 5月 20 2021 x-pack-watcher-env
[www@node3 bin]$ ./elasticsearch -d
warning: usage of JAVA_HOME is deprecated, use ES_JAVA_HOME
Future versions of Elasticsearch will require Java 11; your Java version from [/home/jdk1.8.0_191/jre] does not meet this requirement. Consider switching to a distribution of Elasticsearch with a bundled JDK. If you are already using a distribution with a bundled JDK, ensure the JAVA_HOME environment variable is not set.
[www@node3 bin]$
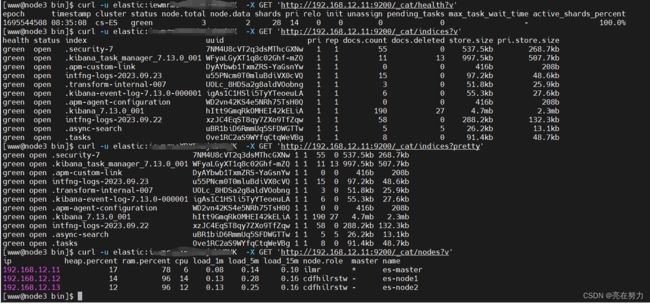
6、查看集群状态
命令用法:
[www@control bin]$ curl -u 用户名:密码 -X GET 'http://192.168.12.11:9200/_cluster/health?pretty'
{
"cluster_name" : "cs-ES",
"status" : "green",
"timed_out" : false,
"number_of_nodes" : 3,
"number_of_data_nodes" : 2,
"active_primary_shards" : 1,
"active_shards" : 2,
"relocating_shards" : 0,
"initializing_shards" : 0,
"unassigned_shards" : 0,
"delayed_unassigned_shards" : 0,
"number_of_pending_tasks" : 0,
"number_of_in_flight_fetch" : 0,
"task_max_waiting_in_queue_millis" : 0,
"active_shards_percent_as_number" : 100.0
"cluster_name":"cs-ES",#集群名称
"status":"green",为 green 则代表健康没问题,如果是 yellow 或者 red 则是集群有问题
"timed_out":false,#是否有超时
"number_of_nodes": 3,#集群中的节点数量
"number_of_data_nodes": 2,
"active_primary_shards": 2234,
"active_shards": 4468,
"relocating_shards": 0,
"initializing_shards": 0,
"unassigned_shards": 0,
"delayed_unassigned_shards": 0,
"number_of_pending_tasks": 0,
"number_of_in_flight_fetch": 0,
"task_max_waiting_in_queue_millis": 0,
"active_shards_percent_as_number": 100.0#集群分片的可用性百分比,如果为0则表示不可用
[www@control bin]$
health: green代表健康;yellow代表分配了所有主分片,但至少缺少一个副本,此时集群数据仍旧完整;red代表部分主分片不可用,可能已经丢失数据。
pri:primary缩写,主分片数量
rep:副分片数量
docs.count: Lucene 级别的文档数量
docs.deleted: 删除的文档
store.size:全部分片大小(包含副本)
pri.store.size:主分片大小
五、kibana
1、部署环境
| 服务器ip | 应用 | 安装目录 | 端口 |
| 192.168.12.15 | kibana | /data01/kibana | 15601 |
2、安装kibana
[root@node5 kibana]# tar -xf kibana-7.13.0-linux-x86_64.tar.gz #解压kibana
[root@node5 kibana]# cd kibana-7.13
[root@node5 kibana-7.13]# ls
bin config data LICENSE.txt node node_modules NOTICE.txt package.json plugins README.txt src x-pack
[root@node5 kibana-7.13]# cd config/
[root@node5 config]#
[root@node5 config]#
[root@node5 config]# pwd
/data01/kibana/kibana-7.13/config[root@node5 config]# vim kibana.yml #添加以下配置
[root@node5 config]#
server.port: 15601
server.host: "0.0.0.0"
elasticsearch.hosts: ["http://192.168.12.12:9200","http://192.168.12.11:9200","http://192.168.12.13:9200"]
elasticsearch.username: "kibana_system"
elasticsearch.password: "密码"
i18n.locale: "zh-CN"
3、启动kibana
[root@node5 config]# cd ../bin/
[root@node5 bin]# ll
总用量 2396
-rwxr-xr-x 1 www www 850 5月 20 2021 kibana
-rwxr-xr-x 1 www www 783 5月 20 2021 kibana-encryption-keys
-rwxr-xr-x 1 www www 776 5月 20 2021 kibana-keystore
-rwxr-xr-x 1 www www 813 5月 20 2021 kibana-plugin
-rw------- 1 www www 2434587 9月 24 00:00 nohup.out
[root@node5 bin]# nohup ./kibana &
[1] 1415
[root@node5 bin]# nohup: 忽略输入并把输出追加到"nohup.out"
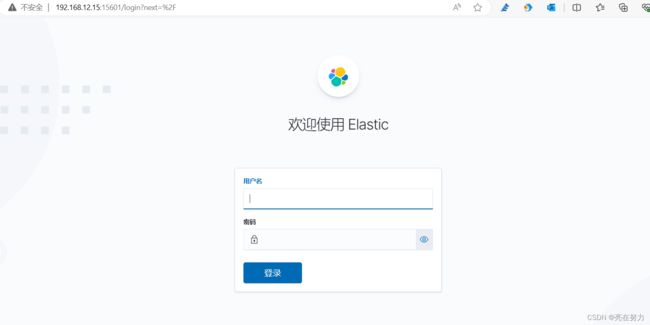
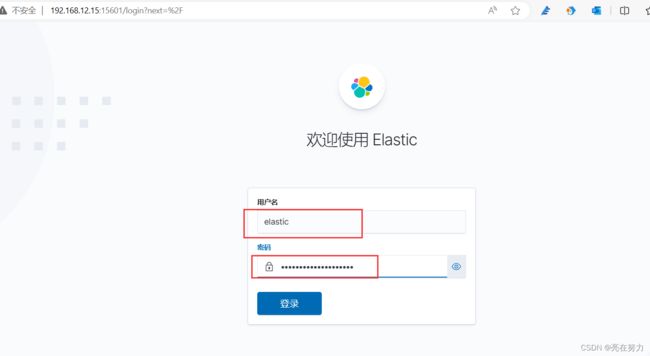
4、使用浏览器访问kibana
http://192.168.12.15:15601
输入es账号密码登录即可
六、部署kafka
1、部署环境
| 服务器ip | 应用 | 安装目录 | 端口 |
| 192.168.12.14 | kafka | /data01/kafka | 9092 |
2、安装kafka
mkdir -p /data01kafka
cd /data01/kafka
mkdir /data01/kafka/zookeeper_data
mkdir data01/kafka/kafka-logs
tar -xzvf kafka_2.12-2.8.0.tgz
修改自带zookeeper配置文件zookeeper.properties
[root@node4 config]# vim zookeeper.properties
[root@node4 config]#
dataDir=/data01/kafka/zookeeper_data
# the port at which the clients will connect
clientPort=2181
# disable the per-ip limit on the number of connections since this is a non-production config
maxClientCnxns=0
# Disable the adminserver by default to avoid port conflicts.
# Set the port to something non-conflicting if choosing to enable this
admin.enableServer=false
# admin.serverPort=8080
修改kafka配置文件server.properties
[root@node4 config]# vim server.properties
[root@node4 config]#
broker.id=0listeners=PLAINTEXT://0.0.0.0:9092
advertised.listeners=PLAINTEXT://192.168.12.14:9092#数据存储目录和时效
log.dirs=/data01/kafka/kafka-logs
log.retention.hours=12
#是否允许删除主题
delete.topic.enable=true#broker处理消息的最大线程数,一般情况下数量为cpu核数
num.network.threads=1
#broker处理磁盘IO的线程数,数值为cpu核数2倍
num.io.threads=2
#每个topic的分区个数,若是在topic创建时候没有指定的话会被topic创建时的指定参数覆盖
num.partitions =1
3、启动zookeeper
[root@node4 bin]# nohup ./zookeeper-server-start.sh ../config/zookeeper.properties &
[1] 1319
[root@node4 bin]# nohup: 忽略输入并把输出追加到"nohup.out"
[root@node4 bin]#
4、启动kafka
[root@node4 bin]# nohup ./kafka-server-start.sh ../config/server.properties &
[2] 1676
[root@node4 bin]# nohup: 忽略输入并把输出追加到"nohup.out"[root@node4 bin]#
5、验证kafka
创建一个test主题(topic)
[root@node4 bin]# ./kafka-topics.sh --create --zookeeper localhost:2181 --replication-factor 1 --partitions 1 --topic test
Created topic test.
[root@node4 bin]#
查看主题列表
[root@node4 bin]# ./kafka-topics.sh --list --zookeeper localhost:2181
test
[root@node4 bin]#
删除一个主题(并删除对应文件夹)
./kafka-topics.sh --delete --zookeeper localhost:2181 --topic test
生产消息
[root@node4 bin]# ./kafka-console-producer.sh --broker-list localhost:9092 --topic test
>12312313131
>12313131313216
>1222nksnananklnfkanfa
>jslknflkan
>mnslnalnf
>snkoann##################################################################
消费消息
[root@node4 bin]# ./kafka-console-consumer.sh --bootstrap-server localhost:9092 --topic test --from-beginning
12312313131
12313131313216
1222nksnananklnfkanfa
jslknflkan
mnslnalnf
snkoann看到输入的信息则消费成功
00000000000000000000.index
-rw-r--r--. 1 root root 4.0K 9月 21 10:18 00000000000000000000.log
-rw-r--r--. 1 root root 10M 9月 21 09:21 00000000000000000000.timeindex
-rw-r--r--. 1 root root 8 9月 21 09:21 leader-epoch-checkpoint
七、logstash部署
1、环境部署
| 服务器ip | 应用 | 安装目录 | 端口 |
| 192.168.12.16 | logstash | /data01/logstash | 9600 |
2、安装lostash
cd /data01/logstash
tar -xf logstash-7.12.0-linux-x86_64.tar.gz
cd logstash-7.12.0/config/
vim jvm.options
#根据主机本配置进行调整
-Xms512g
-Xmx512g
vim logstash.yml
# pipeline线程数,官方建议是等于CPU内核数
pipeline.workers: 1
# 实际output时的线程数
pipeline.output.workers: 2
# 每次发送的事件数
pipeline.batch.size: 5000
# 发送延时pipeline.batch.delay: 10
配置logstash过滤规则
#这里没有配置filter 过滤的原因是我的nginx日志已经是json格式了 没必要在进行过滤了
[root@node6 config]# cat logstash-nginx.conf
input{
kafka {
bootstrap_servers => ["192.168.12.14:9092"]
auto_offset_reset => "latest"
consumer_threads => 1
decorate_events => true
topics => ["intfng-logs"]
codec => "json"}
}output {
elasticsearch {
hosts => ["192.168.12.11:9200"]
user => "elastic"
password => "iewmrmeXBXEhmjNbW8UK"
index => "intfng-logs-%{+YYYY.MM.dd}"
}
}
3、启动logstash
[root@node6 bin]# pwd
/data01/logstash/logstash-7.12.0/bin
[root@node6 bin]#
[root@node6 bin]#
[root@node6 bin]# nohup ./logstash -f ../config/logstash-nginx.conf &
[1] 1450
[root@node6 bin]# nohup: 忽略输入并把输出追加到"nohup.out"[root@node6 bin]#
#查看端口
[root@node6 bin]# ss -ntl
State Recv-Q Send-Q Local Address:Port Peer Address:Port
LISTEN 0 128 *:22 *:*
LISTEN 0 100 127.0.0.1:25 *:*
LISTEN 0 128 [::]:22 [::]:*
LISTEN 0 100 [::1]:25 [::]:*
LISTEN 0 50 [::ffff:127.0.0.1]:9600 [::]:*
[root@node6 bin]#
#这里logstash端口我是使用默认的端口 如果你要使用其他端口 可以修改logstash.ym配置文件
八、filebeat部署
1、环境部署
| 服务器ip | 应用 | 安装目录 | 端口 |
| 192.168.12.11 | filebeat | /data01/filebeat | 无 |
2、安装filebeat
[root@control filebeat]# ls
filebeat-7.12 filebeat-7.12.0-linux-x86_64.tar.gz
[root@control filebeat]#
[root@control filebeat]#tar -xf filebeat-7.12.0-linux-x86_64.tar.gz
#配置filebeat.yml
[root@control filebeat-7.12]# cat filebeat.yml
filebeat.inputs:
- type: log
enabled: true
paths:
- /data01/nginx/logs/access.log
fields:
type: "nglog"
output.kafka:
hosts: ["192.168.12.14:9092"]
topic: "intfng-logs"
# version: "2.8.0"
partition.round_robin:
reachable_only: false
required_acks: 1
#processors:
# - drop_fields:
# fields: ["log","host","input","agent","ecs"]][root@control filebeat-7.12]#
3、启动filebeat
[root@control filebeat-7.12]# pwd
/data01/filebeat/filebeat-7.12
[root@control filebeat-7.12]# nohup ./filebeat -e -c filebeat.yml > filebeat.log &
[1] 3597
[root@control filebeat-7.12]# nohup: 忽略输入重定向错误到标准输出端
#查看filebeat是否启动
[www@control filebeat-7.12]$ tail -f filebeat.log
2023-09-24T17:56:32.108+0800 INFO instance/beat.go:468 filebeat start running.
2023-09-24T17:56:32.108+0800 INFO [monitoring] log/log.go:117 Starting metrics logging every 30s
2023-09-24T17:56:32.109+0800 INFO memlog/store.go:119 Loading data file of '/data01/filebeat/filebeat-7.12/data/registry/filebeat' succeeded. Active transaction id=0
2023-09-24T17:56:32.110+0800 INFO memlog/store.go:124 Finished loading transaction log file for '/data01/filebeat/filebeat-7.12/data/registry/filebeat'. Active transaction id=100
2023-09-24T17:56:32.110+0800 WARN beater/filebeat.go:381 Filebeat is unable to load the Ingest Node pipelines for the configured modules because the Elasticsearch output is not configured/enabled. If you have already loaded the Ingest Node pipelines or are using Logstash pipelines, you can ignore this warning.
2023-09-24T17:56:32.111+0800 INFO [registrar] registrar/registrar.go:109 States Loaded from registrar: 1
2023-09-24T17:56:32.111+0800 INFO [crawler] beater/crawler.go:71 Loading Inputs: 1
2023-09-24T17:56:32.111+0800 INFO log/input.go:157 Configured paths: [/data01/nginx/logs/access.log]
2023-09-24T17:56:32.111+0800 INFO [crawler] beater/crawler.go:141 Starting input (ID: 15608654469098508912)
2023-09-24T17:56:32.111+0800 INFO [crawler] beater/crawler.go:108 Loading and starting Inputs completed. Enabled inputs: 1
^C
[www@control filebeat-7.12]$ ^C
[www@control filebeat-7.12]$ ps -ef | grep filebeat
www 3623 3607 0 17:56 pts/0 00:00:00 ./filebeat -e -c filebeat.yml
www 3633 3607 0 17:57 pts/0 00:00:00 grep --color=auto filebeat
[www@control filebeat-7.12]$
九、启动nginx验证kibana是否正常展示数据
1、启动nginx
[www@control data01]$ cd nginx/sbin/
[www@control sbin]$ pwd
/data01/nginx/sbin
[www@control sbin]$
[www@control sbin]$
[www@control sbin]$ l
bash: l: 未找到命令
[www@control sbin]$ ll
总用量 5980
-rwxr-xr-x 1 www www 6122600 7月 8 09:44 nginx
[www@control sbin]$[www@control sbin]$ sudo ./nginx #启动nginx
[www@control sbin]$
访问nginx生成日志filebeat采集
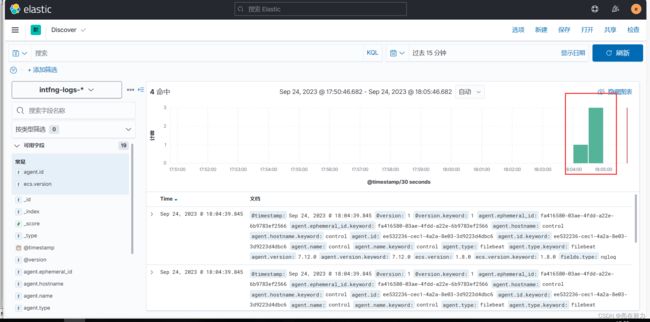
2、登录kibana验证
我们可以看到kibana上数据已经正常展示了,关于elk+kafka的搭建到这里就结束了,如果有不足之处欢迎评论区留言
