【深度学习】pytorch——Tensor(张量)详解
笔记为自我总结整理的学习笔记,若有错误欢迎指出哟~
pytorch——Tensor
- 简介
- 创建Tensor
-
- torch.Tensor( )和torch.tensor( )的区别
-
- torch.Tensor( )
- torch.tensor( )
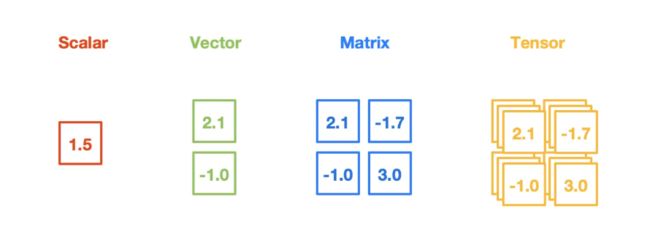
- tensor可以是一个数(标量)、一维数组(向量)、二维数组(矩阵)和更高维的数组(高阶数据)。
-
- 标量(scalar )
- 向量(vector)
- 矩阵(matrix)
- 常用Tensor操作
-
- 调整tensor的形状
-
- tensor.view
- tensor.squeeze与tensor.unsqueeze
-
- tensor.squeeze(dim)
- tensor.unsqueeze(dim)
- None 可以为张量添加一个新的轴(维度)
- 索引操作
-
- 切片索引
- gather( )
- 高级索引
- Tensor数据类型
- Tensor逐元素
- Tensor归并操作
- Tensor比较操作
- Tensor线性代数
- Tensor和Numpy
- Tensor的数据结构
简介
Tensor,又名张量。它可以是一个数(标量)、一维数组(向量)、二维数组(矩阵)和更高维的数组(高阶数据)。Tensor和Numpy的ndarrays类似,但PyTorch的tensor支持GPU加速。

官方文档:
https://pytorch.org/docs/stable/tensors.html
import torch  as t
t.__version__		# '2.1.0+cpu'
创建Tensor
| 创建方法 | 示例 | 输出 |
|---|---|---|
| 通过给定数据创建张量 | torch.Tensor([1, 2, 3]) |
tensor([1., 2., 3.]) |
| 通过指定tensor的形状 | torch.Tensor(2, 3) |
tensor([[1.1395e+23, 1.6844e-42, 0.0000e+00],[0.0000e+00, 0.0000e+00, 0.0000e+00]]) |
使用torch.arange()创建连续的张量 |
torch.arange(0, 10, 2) |
tensor([0, 2, 4, 6, 8]) |
使用torch.zeros()创建全零张量 |
torch.zeros((3, 4)) |
tensor([[0., 0., 0., 0.], [0., 0., 0., 0.], [0., 0., 0., 0.]]) |
使用torch.ones()创建全一张量 |
torch.ones((2, 2)) |
tensor([[1., 1.], [1., 1.]]) |
使用torch.randn()创建随机张量 |
torch.randn((3, 3)) |
tensor([[ 1.0553, -0.4815, 0.6344], [-0.7507, 1.3891, 1.0460], [-0.5625, 1.9531, -0.5468]]) |
使用torch.rand()创建在0到1之间均匀分布的随机张量 |
torch.rand((3, 3)) |
tensor([[1, 6, 5], [2, 0, 4], [8, 5, 7]]) |
使用torch.randint()创建在给定范围内的整数随机张量 |
torch.randint(low=0, high=10, size=(3, 3)) |
tensor([[0, 8, 9], [1, 8, 7], [4, 4, 4]]) |
使用torch.eye()创建单位矩阵 |
torch.eye(5) |
tensor([[1., 0., 0., 0., 0.], [0., 1., 0., 0., 0.], [0., 0., 1., 0., 0.], [0., 0., 0., 1., 0.], [0., 0., 0., 0., 1.]]) |
| 从Python列表或Numpy数组创建张量 | torch.tensor([1, 2, 3]) 或 torch.tensor(np.array([1, 2, 3])) |
tensor([1, 2, 3])或tensor([1, 2, 3], dtype=torch.int32) |
| 将整个张量填充为常数值 | torch.full((3, 3), 3.14) |
tensor([[3.1400, 3.1400, 3.1400], [3.1400, 3.1400, 3.1400], [3.1400, 3.1400, 3.1400]]) |
| 创建指定大小的空张量 | torch.empty((3, 3)) |
tensor([[0., 0., 0.], [0., 0., 0.], [0., 0., 0.]]) |
| 创建长度为5的随机排列张量 | torch.randperm(5) |
tensor([1, 2, 0, 3, 4]) |
torch.Tensor( )和torch.tensor( )的区别
torch.Tensor( )
torch.Tensor([1, 2, 3]) 的创建方式会根据输入的数据类型来确定张量的数据类型。
例如,如果输入的是整数列表,那么创建的张量将使用默认的数据类型 torch.float32。这意味着即使输入的数据是整数,张的数据类型也会被转换为浮点数类型。
a = t.Tensor([1, 2, 3])
a
# tensor([1., 2., 3.])
torch.Tensor(1,2) 通过指定tensor的形状创建张量
a= t.Tensor(1,2) # 注意和t.tensor([1, 2])的区别
a.shape
# torch.Size([1, 2])
torch.tensor( )
torch.tensor([1, 2, 3]) 的创建方式会根据输入的数据类型灵活地选择张量的数据类型。它可以接受各种数据类型的输入,包括整数、浮点数、布尔值等,并根据输入的数据类型自动确定创建张量使用的数据类型。
a = t.tensor([1, 2, 3])
a
# tensor([1, 2, 3])
tensor可以是一个数(标量)、一维数组(向量)、二维数组(矩阵)和更高维的数组(高阶数据)。
标量(scalar )
scalar = t.tensor(3.14)
print('scalar: %s, shape of sclar: %s' %(scalar, scalar.shape))
输出为:
scalar: tensor(3.1400), shape of sclar: torch.Size([])
向量(vector)
vector = t.tensor([1, 2, 3])
print('vector: %s, shape of vector: %s' %(vector, vector.shape))
输出为:
vector: tensor([1, 2, 3]), shape of vector: torch.Size([3])
矩阵(matrix)
matrix = t.tensor([[0.1, 1.2], [2.2, 3.1], [4.9, 5.2]])
matrix,matrix.shape
输出为:
(tensor([[0.1000, 1.2000],
         [2.2000, 3.1000],
         [4.9000, 5.2000]]), torch.Size([3, 2]))
常用Tensor操作
| 方法 | 描述 |
|---|---|
tensor.view(*args) |
改变张量形状 |
tensor.reshape(*args) |
改变张量形状 |
tensor.size() |
返回张量形状 |
tensor.dim() |
返回张量维度 |
tensor.unsqueeze(dim) |
在指定维度上添加一个新的维度 |
tensor.squeeze(dim) |
压缩指定维度的大小为1的维度 |
tensor.transpose(dim0, dim1) |
交换两个维度 |
tensor.permute(*dims) |
重新排列张量的维度 |
tensor.flatten() |
展平所有维度 |
tensor.mean(dim) |
沿指定维度计算张量的平均值 |
tensor.sum(dim) |
沿指定维度计算张量的和 |
tensor.max(dim) |
沿指定维度返回张量的最大值 |
tensor.min(dim) |
沿指定维度返回张量的最小值 |
tensor.argmax(dim) |
沿指定维度返回张量最大元素的索引 |
tensor.argmin(dim) |
沿指定维度返回张量最小元素的索引 |
tensor.add(value) |
将标量加到张量中的每个元素 |
tensor.add(tensor) |
将另一个张量加到该张量 |
tensor.sub(value) |
将标量从张量中的每个元素减去 |
tensor.sub(tensor) |
从该张量中减去另一个张量 |
tensor.mul(value) |
将张量中的每个元素乘以标量 |
tensor.mul(tensor) |
将该张量与另一个张量相乘 |
tensor.div(value) |
将张量中的每个元素除以标量 |
tensor.div(tensor) |
将该张量除以另一个张量 |
调整tensor的形状
tensor.view
通过tensor.view方法可以调整tensor的形状,但必须保证调整前后元素总数一致。view不会修改自身的数据,返回的新tensor与原tensor共享内存,也即更改其中的一个,另外一个也会跟着改变。
a = t.arange(0, 6)
a.view(2, 3)
输出结果为:
tensor([[0, 1, 2],
        [3, 4, 5]])
- 案例1
b = a.view(-1, 2) # 当某一维为-1的时候,会自动计算它的大小
b.shape		# torch.Size([3, 2])
- 案例2
b = a.view(-1, 3) # 当某一维为-1的时候,会自动计算它的大小
b.shape		# torch.Size([2,3])
tensor.squeeze与tensor.unsqueeze
tensor.squeeze(dim)
tensor.squeeze(dim) 方法用于压缩张量中指定维度大小为1的维度,即将大小为1的维度去除。如果未指定 dim 参数,则会去除所有大小为1的维度。
# 创建一个形状为 (1, 3, 1, 4) 的张量
x = torch.arange(12).reshape(1, 3, 1, 4)
print(x.shape)  # 输出: torch.Size([1, 3, 1, 4])

# 使用 squeeze 去除大小为1的维度
y = x.squeeze()
print(y.shape)  # 输出: torch.Size([3, 4])

# 指定 dim 参数去除指定维度大小为1的维度
z = x.squeeze(0)
print(z.shape)  # 输出: torch.Size([3, 1, 4])
tensor.unsqueeze(dim)
tensor.unsqueeze(dim) 方法用于在指定维度上添加一个新的维度,新的维度大小为1。
# 创建一个形状为 (3, 4) 的张量
x = t.randn(3, 4)
print(x.shape)  # 输出: torch.Size([3, 4])

# 使用 unsqueeze 在维度0上添加新维度
y = x.unsqueeze(0)
print(y.shape)  # 输出: torch.Size([1, 3, 4])

# 使用 unsqueeze 在维度2上添加新维度
z = x.unsqueeze(2)
print(z.shape)  # 输出: torch.Size([3, 4, 1])
None 可以为张量添加一个新的轴(维度)
在 PyTorch 中,使用 None 可以为张量添加一个新的轴(维度)。这个新的轴可以在任何位置添加,从而改变张量的形状。以下是一个示例:
# 创建一个形状为 (3, 4) 的二维张量
a = t.tensor([[1, 2, 3, 4],
                  [5, 6, 7, 8],
                  [9, 10, 11, 12]])

# 使用 None 在第一维度上新增一个轴
b = a[None, :, :]

print(b.shape)  # 输出: torch.Size([1, 3, 4])
在上面的例子中,使用 None 将张量 a 在第一维度上扩展,结果得到了一个形状为 [1, 3, 4] 的三维张量 b。通过为 a 添加新的轴,我们可以改变张量的维度和形状,从而为其提供更多的灵活性。
索引操作
索引出来的结果与原tensor共享内存,也即修改一个,另一个会跟着修改。
切片索引
# 创建一个形状为 (3, 4) 的二维张量
a = t.tensor([[1, 2, 3, 4],
            [5, 6, 7, 8],
            [9, 10, 11, 12]])

# 使用切片操作访问其中的元素
b = a[:, 1:3]
print(b)
# tensor([[ 2,  3],
#         [ 6,  7],
#         [10, 11]])


# 可以使用 step 参数控制步长
c = a[::2, ::2]
print(c)
# tensor([[ 1,  3],
#         [ 9, 11]])


# 可以使用负数索引从后往前访问元素
d = a[:, -2:]
print(d)
# tensor([[ 3,  4],
#         [ 7,  8],
#         [11, 12]])
gather( )
gather() 是 PyTorch 中的一个张量索引函数,可以用于按照给定的索引从输入张量中检索数据。它的语法如下:
torch.gather(input, dim, index, out=None, sparse_grad=False) -> Tensor
其中,参数含义如下:
input:输入张量,形状为 (N*,*C) 或 (N,C,d1,d2,…,dk)。dim:要检索的维度。index:用于检索的索引张量,形状为 (M,) 或(M,d1,d2,…,dk)。out:输出张量,形状与index相同。sparse_grad:是否在反向传播时启用稀疏梯度计算。
gather() 函数主要用于按照给定的索引从输入张量中检索数据。具体来说,对于二维输入张量 input 和一维索引张量 index,gather() 函数会返回一个一维张量,其中每个元素是 input 中相应行和 index 中相应列的交点处的数值。对于更高维度的输入,索引张量 index 可以选择任何维度的元素。
示例1
# 创建一个形状为 (3, 4) 的二维张量
input = t.tensor([[1, 2, 3, 4],
                  [5, 6, 7, 8],
                  [9, 10, 11, 12]])

# 创建一个索引张量,用于按列检索元素
index = t.tensor([[0, 2, 3],
                  [1, 3, 2]])

# 使用 gather 函数按列检索元素,返回一个二维张量
output = t.gather(input, dim=1, index=index)

print(output)
# 输出:
# tensor([[ 1,  3,  4],
#         [ 6,  8,  7]])
在上面的示例中:
- 创建了一个形状为 (3, 4) 的二维输入张量
input, - 创建了一个形状为 (2, 3) 的索引张量
index,用于检索元素。 - 使用
gather()函数按列检索元素,并将结果存储到输出张量output中。
示例2
# 创建一个形状为 (2, 3, 4) 的三维张量
input = t.tensor([[[1, 2, 3, 4],
                       [5, 6, 7, 8],
                       [9, 10, 11, 12]],

                      [[13, 14, 15, 16],
                       [17, 18, 19, 20],
                       [21, 22, 23, 24]]])

# 创建一个形状为 (2, 3) 的索引张量
index = t.tensor([[0, 2, 1],
                      [2, 1, 0]])

# 添加一个维度到索引张量
index = index.unsqueeze(2)

# 使用 gather 函数按第二个维度检索元素
output_dim_1 = t.gather(input, dim=1, index=index)

# 使用 gather 函数按第三个维度检索元素
output_dim_2 = t.gather(input, dim=2, index=index)

print(output_dim_1)
print(output_dim_2)
'''
输出:
tensor([[[ 1],
         [ 9],
         [ 5]],

        [[21],
         [17],
         [13]]])
tensor([[[ 1],
         [ 7],
         [10]],

        [[15],
         [18],
         [21]]])
'''
高级索引
高级索引可以看成是普通索引操作的扩展,但是高级索引操作的结果一般不和原始的Tensor共享内存。
x = t.arange(0,27).view(3,3,3)
print(x)

a = x[[1, 2], [1, 2], [2, 0]] # x[1,1,2]和x[2,2,0]
print(a)

b = x[[2, 1, 0], [0], [1]] # x[2,0,1],x[1,0,1],x[0,0,1]
print(b)

c = x[[0, 2], ...] # x[0] 和 x[2]
print(c)
输出结果为:
tensor([[[ 0,  1,  2],
         [ 3,  4,  5],
         [ 6,  7,  8]],

        [[ 9, 10, 11],
         [12, 13, 14],
         [15, 16, 17]],

        [[18, 19, 20],
         [21, 22, 23],
         [24, 25, 26]]])

tensor([14, 24])

tensor([19, 10,  1])

tensor([[[ 0,  1,  2],
         [ 3,  4,  5],
         [ 6,  7,  8]],

        [[18, 19, 20],
         [21, 22, 23],
         [24, 25, 26]]])
Tensor数据类型
以下是常见的 Tensor 数据类型及其相应的字符串表示:
| 数据类型 | 字符串表示 |
|---|---|
| 32 位浮点数 | ‘torch.float32’ 或 ‘torch.float’ |
| 64 位浮点数 | ‘torch.float64’ 或 ‘torch.double’ |
| 16 位浮点数(半精度) | ‘torch.float16’ 或 ‘torch.half’ |
| 8 位整数(无符号) | ‘torch.uint8’ |
| 8 位整数(有符号) | ‘torch.int8’ |
| 16 位整数 | ‘torch.int16’ 或 ‘torch.short’ |
| 32 位整数 | ‘torch.int32’ 或 ‘torch.int’ |
| 64 位整数 | ‘torch.int64’ 或 ‘torch.long’ |
| 布尔型 | ‘torch.bool’ |
使用 PyTorch 中的 dtype 属性可以获取 Tensor 的数据类型。例如:
x = t.randn(3, 4) # 创建一个随机的 FloatTensor

print(x.dtype) # 输出 torch.float32
Tensor逐元素
以下是 PyTorch 支持的逐元素操作及其相应的函数名:
| 操作 | 函数名 |
|---|---|
| 加法 | torch.add()、torch.add_() |
| 减法 | torch.sub()、torch.sub_() |
| 乘法 | torch.mul()、torch.mul_() |
| 除法 | torch.div()、torch.div_() |
| 幂运算 | torch.pow()、torch.pow_() |
| 取整 | torch.floor()、torch.floor_() |
| 取整(向上) | torch.ceil()、torch.ceil_() |
| 取整(四舍五入) | torch.round()、torch.round_() |
| 指数函数 | torch.exp()、torch.exp_() |
| 对数函数 | torch.log()、torch.log_() |
| 平方根函数 | torch.sqrt()、torch.sqrt_() |
| 绝对值 | torch.abs()、torch.abs_() |
| 正弦函数 | torch.sin()、torch.sin_() |
| 余弦函数 | torch.cos()、torch.cos_() |
| 正切函数 | torch.tan()、torch.tan_() |
| 反正弦函数 | torch.asin()、torch.asin_() |
| 反余弦函数 | torch.acos()、torch.acos_() |
| 反正切函数 | torch.atan()、torch.atan_() |
下面是三个逐元素操作的示例:
- 加法操作:
x = t.tensor([1, 2, 3])
y = t.tensor([4, 5, 6])

result = t.add(x, y)

print(result)  # 输出 tensor([5, 7, 9])
- 平方根函数操作:
x = t.tensor([4.0, 9.0, 16.0])

result = t.sqrt(x)

print(result)  # 输出 tensor([2., 3., 4.])
- 绝对值操作:
x = t.tensor([-1, -2, 3, -4])

result = t.abs(x)

print(result)  # 输出 tensor([1, 2, 3, 4])
Tensor归并操作
以下是 PyTorch 支持的归并操作及其相应的函数名:
| 操作 | 函数名 |
|---|---|
| 求和 | torch.sum() |
| 平均值 | torch.mean() |
| 方差 | torch.var() |
| 标准差 | torch.std() |
| 最小值 | torch.min() |
| 最大值 | torch.max() |
| 中位数 | torch.median() |
| 排序 | torch.sort() |
下面是三个归并操作的示例:
- 求和操作:
x = t.tensor([[1, 2], [3, 4]])

result = t.sum(x)

print(result)  # 输出 tensor(10)
- 平均值操作:
x = t.tensor([[1, 2], [3, 4]], dtype=t.float)

result = t.mean(x)

print(result)  # 输出 tensor(2.5000)
- 最小值操作:
x = t.tensor([[1, 2], [3, 4]])

result = t.min(x)

print(result)  # 输出 tensor(1)
Tensor比较操作
以下是 PyTorch 支持的比较、排序和取最大/最小值的操作及其相应的函数名:
| 操作 | 函数名 | 功能 |
|---|---|---|
| 大于/小于/大于等于/小于等于/等于/不等于 | torch.gt()/torch.lt()/torch.ge()/ torch.le()/torch.eq()/torch.ne() |
对两个张量进行比较,返回一个布尔型张量。 |
| 最大的k个数 | torch.topk() |
返回输入张量中最大的 k 个元素及其对应的索引。 |
| 排序 | torch.sort() |
对输入张量进行排序。 |
| 比较两个 tensor 最大/最小值 | torch.max()/torch.min() |
比较两个张量之间的最大值或最小值,返回一个张量。 |
下面是三个操作的示例:
- topk 操作:
x = t.tensor([1, 3, 2, 4, 5])
result = t.topk(x, k=3)

print(result)
'''输出:
torch.return_types.topk(
values=tensor([5, 4, 3]),
indices=tensor([4, 3, 1]))
'''
上述代码中,使用 topk() 函数获取张量 x 中的前三个最大值及其索引。
- sort 操作:
x = t.tensor([1, 3, 2, 4, 5])
result = t.sort(x)

print(result)
'''输出:
torch.return_types.sort(
values=tensor([1, 2, 3, 4, 5]),
indices=tensor([0, 2, 1, 3, 4]))
'''
上述代码中,使用 sort() 函数对张量 x 进行排序,并返回排好序的张量及其索引。
- max 操作:
x = t.tensor([1, 3, 2, 4, 5])
y = t.tensor([2, 3, 1, 5, 4])

result = t.max(x, y)

print(result)  # 输出 tensor([2, 3, 2, 5, 5])
上述代码中,使用 max() 函数比较张量 x 和 y 中的最大值,并返回一个新的张量。
Tensor线性代数
| 函数名 | 功能 |
|---|---|
torch.trace() |
计算矩阵的迹 |
torch.diag() |
提取矩阵的对角线元素 |
torch.triu() |
提取矩阵的上三角部分,可指定偏移量 |
torch.tril() |
提取矩阵的下三角部分,可指定偏移量 |
torch.mm() |
计算两个2维张量的矩阵乘法 |
torch.bmm() |
计算两个3维张量的批量矩阵乘法 |
torch.addmm() |
将两个矩阵相乘并加上一个矩阵 |
torch.addbmm() |
批量矩阵相乘并加上一个矩阵 |
torch.addmv() |
矩阵和向量相乘并加上一个向量 |
torch.addr() |
计算两个向量的外积 |
torch.badbmm() |
批量进行矩阵乘法操作的累积和 |
torch.t() |
转置张量或矩阵 |
torch.dot() |
计算两个1维张量的点积 |
torch.cross() |
计算两个3维张量的叉积 |
torch.inverse() |
计算方阵的逆矩阵 |
torch.svd() |
计算矩阵的奇异值分解 |
以下是几个线性代数操作的示例:
torch.trace()计算矩阵的迹:
x = t.tensor([[1, 2, 3], [4, 5, 6], [7, 8, 9]])

result = t.trace(x)

print(result)  # 输出 tensor(15)
上述代码中,我们使用 trace() 函数计算矩阵 x 的迹。
torch.diag()提取矩阵的对角线元素:
x = t.tensor([[1, 2, 3], [4, 5, 6], [7, 8, 9]])

result = t.diag(x)

print(result)  # 输出 tensor([1, 5, 9])
上述代码中,我们使用 diag() 函数提取矩阵 x 的对角线元素。
torch.mm()计算两个2维张量的矩阵乘法:
x = t.tensor([[1, 2], [3, 4]])
y = t.tensor([[5, 6], [7, 8]])

result = t.mm(x, y)

print(result)  # 输出 tensor([[19, 22], [43, 50]])
上述代码中,我们使用 mm() 函数计算张量 x 和 y 的矩阵乘法。
Tensor和Numpy
Tensor和Numpy数组之间具有很高的相似性,彼此之间的互操作也非常简单高效。需要注意的是,Numpy和Tensor共享内存。
当遇到Tensor不支持的操作时,可先转成Numpy数组,处理后再转回tensor,其转换开销很小。
Numpy和Tensor共享内存
import numpy as np
a = np.ones([2, 3],dtype=np.float32)
print("\na:\n",a)

# Tensor——>Numpy
b = t.from_numpy(a)
print("\nb:\n",b)

a[0, 1]=100
print("\n改变后的b:\n",b)

# Numpy——>Tensor
c = b.numpy() # a, b, c三个对象共享内存
print("\nc:\n",c)
输出结果为:
a:
 [[1. 1. 1.]
 [1. 1. 1.]]

b:
 tensor([[1., 1., 1.],
        [1., 1., 1.]])

改变后的b:
 tensor([[  1., 100.,   1.],
        [  1.,   1.,   1.]])

c:
 [[  1. 100.   1.]
 [  1.   1.   1.]]
注意:numpy的数据类型和Tensor的类型不一样的时候,数据会被复制,不会共享内存
import numpy as np
a = np.ones([2, 3])
print("\na:\n",a)

# Tensor——>Numpy
b = t.Tensor(a)
print("\nb:\n",b)

# Tensor——>Numpy
c = t.from_numpy(a)
print("\nc:\n",c)

a[0, 1]=100
print("\n改变后的b:\n",b,"\n\n改变后的c:\n",c)
输出结果为:
a:
 [[1. 1. 1.]
 [1. 1. 1.]]

b:
 tensor([[1., 1., 1.],
        [1., 1., 1.]])

c:
 tensor([[1., 1., 1.],
        [1., 1., 1.]], dtype=torch.float64)

改变后的b:
 tensor([[1., 1., 1.],
        [1., 1., 1.]])

改变后的c:
 tensor([[  1., 100.,   1.],
        [  1.,   1.,   1.]], dtype=torch.float64)
Tensor的数据结构
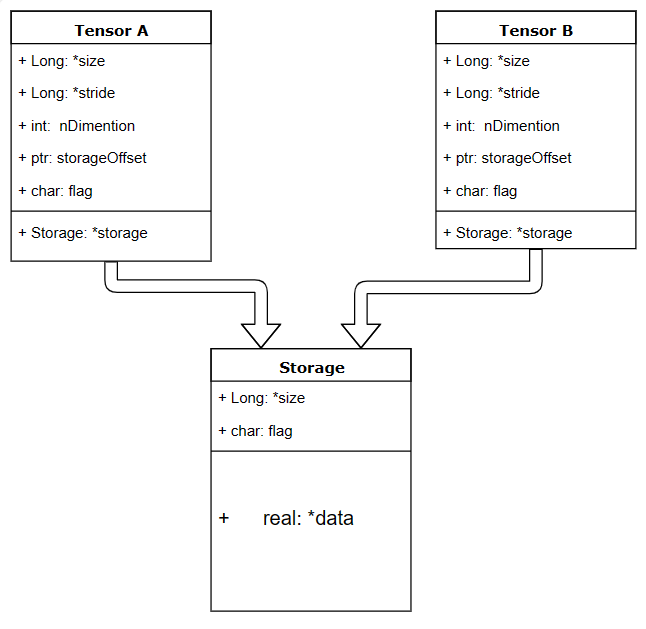
tensor分为头信息区(Tensor)和存储区(Storage),信息区主要保存着tensor的形状(size)、步长(stride)、数据类型(type)等信息,而真正的数据则保存成连续数组。由于数据动辄成千上万,因此信息区元素占用内存较少,主要内存占用则取决于tensor中元素的数目,也即存储区的大小。

一个tensor有着与之相对应的storage, storage是在data之上封装的接口,不同tensor的头信息一般不同,但却可能使用相同的数据。
a = t.arange(0, 6)
print(a.storage())

b = a.view(2, 3)
print(b.storage())

# 一个对象的id值可以看作它在内存中的地址
# storage的内存地址一样,即是同一个storage
id(b.storage()) == id(a.storage())
输出结果为:
0
 1
 2
 3
 4
 5
[torch.storage.TypedStorage(dtype=torch.int64, device=cpu) of size 6]

 0
 1
 2
 3
 4
 5
[torch.storage.TypedStorage(dtype=torch.int64, device=cpu) of size 6]

True
绝大多数操作并不修改tensor的数据,而只是修改了tensor的头信息。这种做法更节省内存,同时提升了处理速度。在使用中需要注意。 此外有些操作会导致tensor不连续,这时需调用tensor.contiguous方法将它们变成连续的数据,该方法会使数据复制一份,不再与原来的数据共享storage。
思考:高级索引一般不共享stroage,而普通索引共享storage,为什么?
在 PyTorch 中,高级索引(advanced indexing)和普通索引(basic indexing)的行为是不同的,这导致了对存储(storage)共享的处理方式也不同。
普通索引是指使用整数、切片或布尔掩码进行索引,例如 tensor[0]、tensor[1:3] 或 tensor[mask]。在这种情况下,返回的索引结果与原来的 Tensor 共享相同的存储空间。这意味着对返回的索引结果进行修改会影响到原来的 Tensor,因为它们实际上指向相同的内存位置。
示例代码:
import torch

x = torch.tensor([1, 2, 3, 4, 5])
y = x[1:3]

y[0] = 10

print(x)  # 输出 tensor([ 1, 10,  3,  4,  5])
在上述代码中,对索引结果 y 进行修改后,原始 Tensor x 也被修改了,这是因为它们共享了相同的存储空间。
而对于高级索引,情况不同。高级索引是指使用整数数组或布尔数组进行索引,例如 tensor[[0, 2]] 或 tensor[mask]。在这种情况下,返回的索引结果与原来的 Tensor 不再共享相同的存储空间。返回的索引结果将会创建一个新的 Tensor,其存储空间是独立的。
示例代码:
import torch

x = torch.tensor([1, 2, 3, 4, 5])
indices = torch.tensor([0, 2])
y = x[indices]

y[0] = 10

print(x)  # 输出 tensor([1, 2, 3, 4, 5])
在上述代码中,对索引结果 y 进行修改后,原始 Tensor x 并没有被修改,因为它们不再共享相同的存储空间。
这种差异是由于普通索引和高级索引的底层机制不同所导致的。普通索引可以通过在存储中使用偏移量和步长来定位对应的元素,因此共享存储;而高级索引需要创建一个新的 Tensor 来存储索引结果,因此不共享存储。
了解这种差异很重要,因为它会影响到对原始 Tensor 和索引结果进行操作时是否会相互影响。