RESTful接口实现与测试
目录标题
- 是什么?
- 设计风格
- HTTP协议四种传参方式
- 常用注解
-
-
- @RequestBody与@ResponseBody
- @RequestMapping注解
- @RestController与@Controller
- @PathVariable 与@RequestParam
-
- 接受复杂嵌套对象参数
- Http数据转换的原理
- 自定义HttpMessageConverter
- 统一规划接口响应的数据格式
- 实战:使用注解开发一个REST接口
-
- 一、定义pojo对象
- 二、定义HTTP方法和Controller
- 测试一下:
- 配合前端axios传参总结
-
- 一、`@RequestParam`注解对应的axios传参方法
-
- params传参(推荐)
- FormData传参
- qs.stringfy传参
- 二、`@RequestBody`的axios传参方法
- FastJSON、Gson和Jackson对比
- 在Spring中注解方法使用Jackson
-
- 常用注解
- 手写数据转换
- Postman测试
-
- bug
- Jackson全局配置
- 编码实现接口测试
-
- junit测试框架
- Mockito测试框架
- 真实servlet容器环境下的测试
-
- @SpringBootTest 注解
- @ExtendWith(@RunWith注解)
- @Transactional
- Mock测试
-
- 什么是Mock?
- 场景实践
- @MockBean
- 轻量级测试
-
-
- 使用@WebMvcTest替换@SpringBootTest
-
- MockMvc更多的用法总结
- 使用Swagger2构建API文档
-
- 为什么需要API接口文档?
- 整合swagger2生成文档
-
- bug
- 书写swagger注解
- 生产环境下如何禁用swagger2
- 总结
是什么?
RESTful是基于http方法的API设计风格,而不是一种新的技术
- 看Url就知道要什么资源
- 看http method就知道针对资源干什么
- 看http status code就知道结果如何
REST 通过 URI 暴露资源时,会强调不要在 URI 中出现动词
设计风格
关于HTTP RESTful风格API设计的更多例子,参考:http://httpbin.org/
HTTP协议四种传参方式
| HTTP协议组成 | 协议内容示例 | 对应Spring注解 |
|---|---|---|
| path info传参 | /articles/12 (查询id为12的文章,12是参数) | @PathVariable |
| URL Query String传参 | /articles?id=12 | @RequestParam |
| Body 传参 | Content-Type: multipart/form-data | @RequestParam |
| Body 传参 | Content-Type: application/json,或其他自定义格式 | @RequestBody |
| Headers 传参 | @RequestHeader |
常用注解
@RequestBody与@ResponseBody
//注意并不要求@RequestBody与@ResponseBody成对使用。
public @ResponseBody  AjaxResponse saveArticle(@RequestBody ArticleVO article)
如上代码所示:
- @RequestBody修饰请求参数,注解用于接收HTTP的body,默认是使用JSON的格式
- @ResponseBody修饰返回值,注解用于在HTTP的body中携带响应数据,默认是使用JSON的格式。如果不加该注解,spring响应字符串类型,是跳转到模板页面或jsp页面的开发模式。说白了:加上这个注解你开发的是一个数据接口,不加这个注解你开发的是一个页面跳转控制器。
在使用@ResponseBody注解之后程序不会再走视图解析器,也就不再做html视图渲染,而是直接将对象以数据的形式(默认JSON)返回给请求发送者。那么我们有一个问题:如果我们想接收或XML数据该怎么办?我们想响应excel的数据格式该怎么办?
@RequestMapping注解
用于标注HTTP服务端点。它的很多属性对于丰富我们的应用开发方式方法,都有很重要的作用。如:
- value: 应用请求端点,最核心的属性,用于标志请求处理方法的唯一性;
- method: HTTP协议的method类型, 如:GET、POST、PUT、DELETE等;
- consumes: HTTP协议请求内容的数据类型(Content-Type),例如application/json, text/html;
- produces: HTTP协议响应内容的数据类型。下文会详细讲解。
- params: HTTP请求中必须包含某些参数值的时候,才允许被注解标注的方法处理请求。
- headers: HTTP请求中必须包含某些指定的header值,才允许被注解标注的方法处理请求。
@RestController与@Controller
@Controller注解是开发中最常使用的注解,它的作用有两层含义:
- 一是告诉Spring,被该注解标注的类是一个Spring的Bean,需要被注入到Spring的上下文环境中。
- 二是该类里面所有被RequestMapping标注的注解都是HTTP服务端点。
@RestController相当于 @Controller和@ResponseBody结合。它有两层含义:
- 一是作为Controller的作用,将控制器类注入到Spring上下文环境,该类RequestMapping标注方法为HTTP服务端点。
- 二是作为ResponseBody的作用,请求响应默认使用的序列化方式是JSON,而不是跳转到jsp或模板页面。
@PathVariable 与@RequestParam
- PathVariable用于URI上的{参数},如下方法用于删除一篇文章,其中id为文章id。如:我们的请求URL为“/article/1”,那么将匹配DeleteMapping并且PathVariable接收参数id=1。
- RequestParam用于**接收普通表单方式或者ajax模拟表单提交的参数数据。**如果使用了这个注解,但是前端没有传入参数,就会报错
@DeleteMapping("/article/{id}")
public @ResponseBody AjaxResponse deleteArticle(@PathVariable Long id) {}

@PostMapping("/article")
public @ResponseBody AjaxResponse deleteArticle(@RequestParam Long id) {}
接受复杂嵌套对象参数
RequestBody注解的真正意义在于能够使用对象或者嵌套对象接收前端数据。
一个paramData对象里面包含了一个bestFriend对象。这种数据结构使用RequestParam就无法接收了,RequestParam只能接收平面的、一对一的参数。像上文中这种数据结构的参数,就需要我们在java服务端定义两个类,一个类是ParamData,一个类是BestFriend
public class ParamData {
    private String name;
    private int id;
    private String phone;
    private BestFriend bestFriend;

    public static class BestFriend {
        private String address;
        private String sex;
    }
}
- 注意上面代码中省略了GET、SET方法等必要的java plain model元素。
- 注意成员变量名称一定要和JSON属性名称对应上。
- 注意接收不同类型的参数,使用不同的成员变量类型
完成以上动作,我们就可以使用@RequestBody ParamData paramData,一次性的接收以上所有的复杂嵌套对象参数了,参数对象的所有属性都将被赋值。
Http数据转换的原理
使用JSON都比较普遍了,其方便易用、表达能力强,是绝大部分数据接口式应用的首选。那么如何响应其他的类型的数据?其中的判别原理又是什么?下面就来给大家介绍一下:
- 当一个HTTP请求到达时是一个InputStream,通过HttpMessageConverter转换为java对象,从而进行参数接收。
- 当对一个HTTP请求进行响应时,我们首先输出的是一个java对象,然后由HttpMessageConverter转换为OutputStream输出。
当我们在Spring Boot应用中集成了jackson的类库之后,如下的一些HttpMessageConverter将会被加载。
根据HTTP协议的Accept和Content-Type属性,以及参数数据类型来判别使用哪一种HttpMessageConverter。**当使用RequestBody或ResponseBody时,再结合前端发送的Accept数据类型,会自动判定优先使用MappingJacksonHttpMessageConverter作为数据转换器。**但是,不仅JSON可以表达对象数据类型,XML也可以。如果我们希望使用XML格式该怎么告知Spring呢,那就要使用到produces属性了。
@GetMapping(value ="/demo",produces = MediaType.APPLICATION_XML_VALUE)
这里我们明确的告知了返回的数据类型是xml,就会使用Jaxb2RootElementHttpMessageConverter作为默认的数据转换器。当然实现XML数据响应比JSON还会更复杂一些,还需要结合@XmlRootElement、@XmlElement等注解实体类来使用。
自定义HttpMessageConverter
其实绝大多数的数据格式都不需要我们自定义HttpMessageConverter,都有第三方类库可以帮助我们实现(包括下文代码中的Excel格式)。但有的时候,有些数据的输出格式并没有类似于Jackson这种类库帮助我们处理,需要我们自定义数据格式。该怎么做?
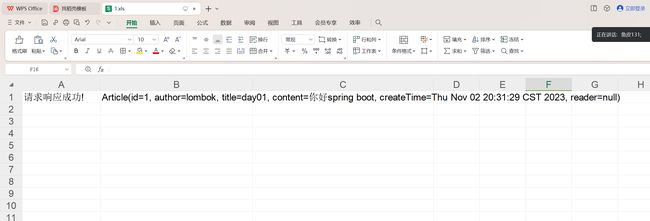
下面我们就以Excel数据格式为例,写一个自定义的HTTP类型转换器。实现的效果就是,当我们返回AjaxResponse这种数据类型的话,就自动将AjaxResponse转成Excel数据响应给客户端。
引入依赖
<dependency>
   <groupId>org.apache.poigroupId>
   <artifactId>poi-ooxmlartifactId>
   <version>3.9version>
dependency>
@Service
public class ResponseToXlsConverter extends AbstractHttpMessageConverter<AjaxResponse> {

    private static final MediaType EXCEL_TYPE = MediaType.valueOf("application/vnd.ms-excel");

    ResponseToXlsConverter() {
        super(EXCEL_TYPE);
    }

    @Override
    protected AjaxResponse readInternal(final Class<? extends AjaxResponse> clazz,
                                final HttpInputMessage inputMessage)
            throws IOException, HttpMessageNotReadableException {
        return null;
    }

    //针对AjaxResponse类型返回值,使用下面的writeInternal方法进行消息类型转换
    @Override
    protected boolean supports(final Class<?> clazz) {
        return (AjaxResponse.class == clazz);
    }

    @Override
    protected void writeInternal(final AjaxResponse ajaxResponse, final HttpOutputMessage outputMessage)
            throws IOException, HttpMessageNotWritableException {

        final Workbook workbook = new HSSFWorkbook();
        final Sheet sheet = workbook.createSheet();

        final Row row = sheet.createRow(0);
        row.createCell(0).setCellValue(ajaxResponse.getMessage());
        row.createCell(1).setCellValue(ajaxResponse.getData().toString());

        workbook.write(outputMessage.getBody());
    }
}
- 实现AbstractHttpMessageConverter接口
- 指定该转换器是针对哪种数据格式的?如上文代码中的"application/vnd.ms-excel"
- 指定该转换器针对那些对象数据类型?如上文代码中的supports函数
- 使用writeInternal对数据进行输出处理,上例中是输出为Excel格式。
注意这是要把自定义的Http转换器加上@Service注解
@Service注解是Spring框架中的一个注解,用于标识一个类作为服务组件。当类被标记为@Service时,Spring会自动将其识别为一个服务,并进行相关的依赖注入和管理。
统一规划接口响应的数据格式
下面这个类是用于统一数据响应接口标准的。它的作用是:统一所有开发人员响应前端请求的返回结果格式,减少前后端开发人员沟通成本,是一种RESTful接口标准化的开发约定。
@Data
public class AjaxResponse {

  private boolean isok;  //请求是否处理成功
  private int code; //请求响应状态码(200、400、500)
  private String message;  //请求结果描述信息
  private Object data; //请求结果数据(通常用于查询操作)

  private AjaxResponse(){}

  //请求成功的响应,不带查询数据(用于删除、修改、新增接口)
  public static AjaxResponse success(){
    AjaxResponse ajaxResponse = new AjaxResponse();
    ajaxResponse.setIsok(true);
    ajaxResponse.setCode(200);
    ajaxResponse.setMessage("请求响应成功!");
    return ajaxResponse;
  }

  //请求成功的响应,带有查询数据(用于数据查询接口)
  public static AjaxResponse success(Object obj){
    AjaxResponse ajaxResponse = new AjaxResponse();
    ajaxResponse.setIsok(true);
    ajaxResponse.setCode(200);
    ajaxResponse.setMessage("请求响应成功!");
    ajaxResponse.setData(obj);
    return ajaxResponse;
  }

  //请求成功的响应,带有查询数据(用于数据查询接口)
  public static AjaxResponse success(Object obj,String message){
    AjaxResponse ajaxResponse = new AjaxResponse();
    ajaxResponse.setIsok(true);
    ajaxResponse.setCode(200);
    ajaxResponse.setMessage(message);
    ajaxResponse.setData(obj);
    return ajaxResponse;
  }


}
实战:使用注解开发一个REST接口
一、定义pojo对象
@Data
@Builder
public class Article {
    private Long id;
    private String author;
    private String title;
    private String content;
    private Data createTime;

    private List<Reader> reader;
}
@Data
public class Reader {
    private String name;
    private Integer age;
}
- @Builder为我们提供了通过对象属性的链式赋值构建对象的方法
- @Data注解帮我们定义了一系列常用方法,如:getters、setters、hashcode、equals等
二、定义HTTP方法和Controller
- 增加一篇Article ,使用POST方法
- 删除一篇Article,使用DELETE方法,参数是id
- 更新一篇Article,使用PUT方法,以id为主键进行更新
- 获取一篇Article,使用GET方法
@Slf4j
@RestController
@RequestMapping("/rest")
public class ArticleController {
    //根据文章的Id查询一篇文章
    @GetMapping("/article/{id}")
    public AjaxResponse getArticleById(@PathVariable Long id) {
        //使用Lombok提供的buidler构建对象(构造一些假数据)
        Article article = Article.builder()
                .id(id)
                .author("lombok")
                .content("你好spring boot")
                .createTime(new Date())
                .title("day01").build();
        return AjaxResponse.success(article);
    }

    //增加一篇Article ,使用POST方法(RequestBody方式接收参数)
    //@RequestMapping(value = "/articles",method = RequestMethod.POST)
    @PostMapping("/articles")
    public AjaxResponse saveArticle(@RequestBody Article article,
                                    @RequestHeader String aaa){

        //因为使用了lombok的Slf4j注解,这里可以直接使用log变量打印日志
        log.info("saveArticle:" + article);
        return AjaxResponse.success();
    }

    //增加一篇Article ,使用POST方法(RequestParam方式接收参数)
  /*@PostMapping("/articles")
  public AjaxResponse saveArticle(@RequestParam  String author,
                                  @RequestParam  String title,
                                  @RequestParam  String content,
                                  @DateTimeFormat(pattern = "yyyy-MM-dd HH:mm:ss")
                                  @RequestParam  Date createTime){

    log.info("saveArticle:" + createTime);
    return AjaxResponse.success();
  }*/


    //更新一篇Article,使用PUT方法,以id为主键进行更新
    //@RequestMapping(value = "/articles",method = RequestMethod.PUT)
    @PutMapping("/articles")
    public AjaxResponse updateArticle(@RequestBody Article article){
        if(article.getId() == null){
            //article.id是必传参数,因为通常根据id去修改数据
            //TODO 抛出一个自定义的异常
        }

        log.info("updateArticle:" + article);
        return AjaxResponse.success();
    }

    //删除一篇Article,使用DELETE方法,参数是id
    //@RequestMapping(value = "/articles/{id}",method = RequestMethod.DELETE)
    @DeleteMapping("/articles/{id}")
    public AjaxResponse deleteArticle(@PathVariable("id") Long id){

        log.info("deleteArticle:" + id);
        return AjaxResponse.success();
    }
}
测试一下:
配合前端axios传参总结
@RequestParam注解,默认接收Content-Type: application/x-www-form-urlencoded编码格式的数据@RequestBody注解,默认接收JSON类型格式的数据。
一、@RequestParam注解对应的axios传参方法
以下面的这段Spring java代码为例,接口使用POST协议,需要接受的参数分别是tsCode、indexCols、table。针对这个Spring的HTTP接口,axios该如何传参?有几种方法?我们来一一介绍。
@PostMapping("/line")
public List<? extends BaseEntity> commonEChart(@RequestParam String tsCode,
                                     @RequestParam String indexCols,
                                     @RequestParam String table){
params传参(推荐)
使用axios实例的params进行传参,就会将params参数格式化为x-www-form-urlencoded的格式,与后端参数一一对应即可传参成功。
return request({
    url: '/chart/line',
    method: 'post',
    params: {   //注意这里的key是params
        tsCode,
        indexCols,
        table
    }
})
FormData传参
还可以使用js的FormData对象进行参数格式化,同样可以在Spring后端正确的使用@RequestParam注解进行参数接收。
let params = new FormData();
params.append('tsCode', tsCode);
params.append('indexCols', indexCols);
params.append('table', table);
return request({
    url: '/chart/line',
    method: 'post',
    data: params   //注意这里的key是data
})
qs.stringfy传参
还可以使用qs.stringfy进行参数格式化,同样可以在Spring后端正确的使用@RequestParam注解进行参数接收。
import qs from "qs";

return request({
    url: '/chart/line',
    method: 'post',
    data: qs.stringify({    //注意这里的key是data
        tsCode,
        indexCols,
        table
    })
})
需要注意的是使用这种方法,需要手动设置header(Content-Type)
const service = axios.create({
    headers: {
        "Content-Type": "application/x-www-form-urlencoded"
    }
});
二、@RequestBody的axios传参方法
DemoModel类是一个实体类,包含名称tsCode,indexCols,table三个字符串成员变量。接收到的JSON格式参数会自动为demo对象的成员变量赋值。
@PostMapping("/line")
public List<? extends BaseEntity> commonEChart(@RequestBody DemoModel demo){
@RequestBody注解,默认接收JSON类型格式的数据。在axios中默认data传参就会默认使用JSON数据格式,所以不用额外的特殊处理。
return request({
    url: '/chart/line',
    method: 'post',
    data: {    //注意这里的key是data
        tsCode,
        indexCols,
        table
    }
})
FastJSON、Gson和Jackson对比
开源的Jackson:SpringBoot默认是使用Jackson作为JSON数据格式处理的类库,Jackson在各方面都比较优秀,所以不建议将Jackson替换为Gson或fastjson。
Google的Gson:Gson是Google为满足内部需求开发的JSON数据处理类库,其核心结构非常简单,toJson与fromJson两个转换函数实现对象与JSON数据的转换,
阿里巴巴的FastJson:Fastjson是阿里巴巴开源的JSON数据处理类库,其主要特点是序列化速度快。当并发数据量越大的时候,越能体现出fastjson的优势。但是笔者觉得选择JSON处理类库,快并不是唯一需要考虑的因素,与数据库或磁盘IO相比,JSON数据序列化与反序列化的这点时间还不足以对软件性能产生比较大的影响。而且这个库会有一些版本安全问题,代码质量不高,在国外几乎没人使用。
在Spring中注解方法使用Jackson
jackson的主要作用就是序列化与反序列化。
什么叫序列化与反序列化?说白了就是把对象转成可传输、可存储的格式(json、xml、二进制、甚至自定义格式)叫做序列化。反序列化顾名思义。
- 反序列化:在客户端将请求数据上传到服务端的时候,自动的处理JSON数据对象中的字符串、数字,将其转换为包含Date类型、Integer等类型的对象。
- 序列化:按照指定的格式、顺序等将实体类对象转换为JSON字符串
下面就给大家介绍一下jackson的常用注解的使用方法,帮助我们进行序列化和反序列化工作。
常用注解
这些注解通常用于标注java实体类或实体类的属性。
- @JsonPropertyOrder(value={“pname1”,“pname2”}) 改变子属性在JSON序列化中的默认定义的顺序。如:param1在先,param2在后。
- @JsonIgnore 加在属性上面,排除某个属性不做序列化与反序列化
- @JsonIgnoreProperties(ignoreUnknown = true),将这个注解写在类上之后,就会忽略JSON字符串中存在,但实体类不存在的属性,不予赋值,也不会出现异常。
- @JsonIgnoreProperties({ “xxx”, “yyyy” }) 忽略某些属性不进行序列化
- @JsonProperty(anotherName) 为某个属性换一个名称,体现在JSON数据里面
- @JsonInclude(JsonInclude.Include.NON_NULL) 排除为空的元素不做序列化反序列化
- @JsonFormat(pattern = “yyyy-MM-dd HH:mm:ss”, timezone = “GMT+8”) 指定日期类型的属性格式
@JsonPropertyOrder(value={"content","title"})
public class Article {

    @JsonIgnore
    private Long id;

    @JsonProperty("auther")
    private String author;
    private String title;
    private String content;

    @JsonInclude(JsonInclude.Include.NON_NULL)
    @JsonFormat(pattern = "yyyy-MM-dd HH:mm:ss", timezone = "GMT+8")
    private Date createTime;
    private List<Reader> reader;

}
上文代码中对应的JSON数据格式可以为:
{
    auther :"",
    content:"",
    title:"",
    createTime:"2013-11-3 12:12:12",
    reader:[{"name":"xhl","age":18},{"name":"jng","age":19}]
}
- 因为定义了JsonPropertyOrder,content在先,title在后
- 因为定义了JsonIgnore,id属性被忽略
- 因为定义了JsonProperty,author属性变为auther
- 因为定义了JsonInclude和JsonFormat,createTime不要为空,并且格式为 “yyyy-MM-dd HH:mm:ss”
通常会对日期类型转换,进行全局配置,而不是在每一个java bean里面配置
spring:
    jackson:
        date-format: yyyy-MM-dd HH:mm:ss
        time-zone: GMT+8
调试成功:
手写数据转换
除了在spring框架内实现自动的前后端JSON数据与java对象的转换,我们还可以使用jackson自己写代码进行转换。
//jackson的ObjectMapper 转换对象
ObjectMapper mapper = new ObjectMapper();
//将某个java对象转换为JSON字符串
String jsonStr = mapper.writeValueAsString(javaObj);
//将jsonStr转换为Ademo类的对象
Ademo ademo = mapper.readValue(jsonStr, Ademo.class);
当JSON字符串代表的对象的字段多于类定义的字段时,使用readValue会抛出UnrecognizedPropertyException异常,在类的定义处加上@JsonIgnoreProperties(ignoreUnknown = true)可以解决这个问题。
Postman测试
下面让我们结合postman对REST接口和Jackson做一下测试吧。Postman是接口测试过程中经常使用到的工具。
测试使用数据:
{
    "id": 1,
    "author": "xhl",
    "title": "手把手教你spring boot",
    "content": "hello world",
    "createTime": "",
    "reader":[{"name":"xhl","age":18},{"name":"jng","age":19}]
}
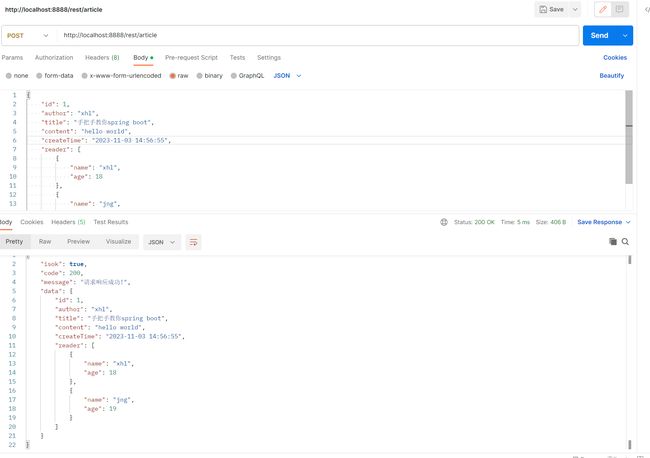
下面以测试新增文章的接口为例:
- 测试的接口服务端点为“/rest/article”
- 服务端点支持的HTTP方法为POST
- 使用Http协议的body传输JSON数据,对应Controller应该使用@RequestBody进行数据参数接收
- 点击Send进行接口数据的发送
bug
既然和 DispatcherServlet 有关,那无非就是MVC的映射出了问题,通俗的理解,就是:JVM编译期有个 servlet 加载/调用失败了。
我画了一张图,和大家一起复习下 DispatcherServlet :
整个流程可以被大致描述为:
- 一个http请求到达服务器,被DispatcherServlet接收。
- DispatcherServlet将请求委派给合适的处理器Controller,此时处理控制权到达Controller对象。
- Controller内部完成请求的数据模型的创建和业务逻辑的处理,然后再将填充了数据后的模型即model和控制权一并交还给DispatcherServlet,委派DispatcherServlet来渲染响应。
- DispatcherServlet再将这些数据和适当的数据模版视图结合,向Response输出响应。
解决:在实体类加上两个注解@AllArgsConstructor 和 @NoArgsConstructor
Jackson全局配置
在Spring框架内使用Jackson的时候,通常需要一些特殊的全局配置,来应对我们JSON序列化与反序列化中出现的各种问题。
Spring Boot 提供了两种配置方式,一是配置文件的方式
spring:
  jackson:
    #日期类型格式化
    date-format: yyyy-MM-dd HH:mm:ss
    serialization:
      #格式化输出,通常为了节省网络流量设置为false。因为格式化之后会带有缩进,方便阅读。
      indent_output: false
      #某些类对象无法序列化的时候,是否报错
      fail_on_empty_beans: false
    #设置空如何序列化,见下文代码方式详解
    defaultPropertyInclusion: NON_EMPTY
    deserialization:
      #json对象中有不存在的属性时候,是否报错
      fail_on_unknown_properties: false
    parser:
      #允许出现特殊字符和转义符
      allow_unquoted_control_chars: true
      #允许出现单引号
      allow_single_quotes: true
二是通过代码的方式,方式一更容易,方式二更灵活。方式一无法解决的问题,尝试使用方式二。
@Bean
@Primary
@ConditionalOnMissingBean(ObjectMapper.class)
public ObjectMapper jacksonObjectMapper(Jackson2ObjectMapperBuilder builder)
{
        ObjectMapper objectMapper = builder.createXmlMapper(false).build();

        // 通过该方法对mapper对象进行设置,所有序列化的对象都将按改规则进行系列化
        // Include.Include.ALWAYS 默认
        // Include.NON_DEFAULT 属性为默认值不序列化
        // Include.NON_EMPTY 属性为 空("") 或者为 NULL 都不序列化,则返回的json是没有这个字段的。这样对移动端会更省流量
        // Include.NON_NULL 属性为NULL 不序列化
        objectMapper.setSerializationInclusion(JsonInclude.Include.NON_EMPTY);
        objectMapper.configure(DeserializationFeature.FAIL_ON_UNKNOWN_PROPERTIES, false);
        // 允许出现特殊字符和转义符
        objectMapper.configure(JsonParser.Feature.ALLOW_UNQUOTED_CONTROL_CHARS, true);
        // 允许出现单引号
        objectMapper.configure(JsonParser.Feature.ALLOW_SINGLE_QUOTES, true);
        // 字段保留,将null值转为""
        objectMapper.getSerializerProvider().setNullValueSerializer(new JsonSerializer<Object>()
        {
            @Override
            public void serialize(Object o, JsonGenerator jsonGenerator,
                                  SerializerProvider serializerProvider)
                    throws IOException
            {
                jsonGenerator.writeString("");
            }
        });
        return objectMapper;
}
编码实现接口测试
为什么要写代码做测试?
使用maven在打包之前将所有的测试用例执行一遍。这里重点是自动化,所以postman这种工具很难插入到持续集成的自动化流程中去。
junit测试框架
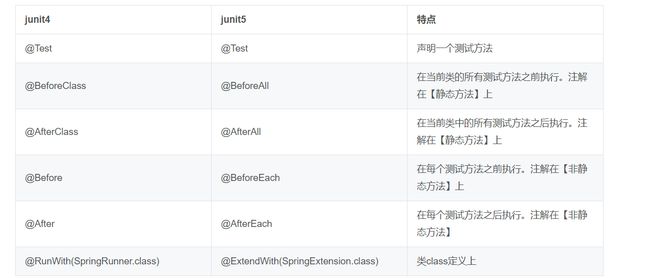
在junit4和junit5中,注解的写法有些许变化。
Mockito测试框架
Mockito是GitHub上使用最广泛的Mock框架,并与JUnit结合使用.Mockito框架可以创建和配置mock对象.使用Mockito简化了具有外部依赖的类的测试开发。Mockito测试框架可以帮助我们模拟HTTP请求,从而达到在服务端测试目的。因为其不会真的去发送HTTP请求,而是模拟HTTP请求内容,从而节省了HTTP请求的网络传输,测试速度更快。
spring-boot-starter-test(Spring Boot 2.3.0.RELEASE)自动包含Junit 5 和Mockito框架
@Slf4j
public class ArticleRestControllerTest {

    //mock对象
    private static MockMvc mockMvc;

    //在所有测试方法执行之前进行mock对象初始化
    @BeforeAll
    static void setUp() {
        mockMvc = MockMvcBuilders.standaloneSetup(new ArticleController()).build();
    }

    //测试方法
    @Test
    public void saveArticle() throws Exception {

        String article = "{\n" +
                "    \"id\": 1,\n" +
                "    \"author\": \"xhl\",\n" +
                "    \"title\": \"手把手教你开发spring boot\",\n" +
                "    \"content\": \"c\",\n" +
                "    \"createTime\": \"2023-11-03 15:56:55\",\n" +
                "    \"reader\":[{\"name\":\"xhl\",\"age\":18},{\"name\":\"jng\",\"age\":19}]\n" +
                "}";
        MvcResult result = mockMvc.perform(
            MockMvcRequestBuilders
                .request(HttpMethod.POST, "/rest/article")
                .contentType("application/json")
                .content(article)
        )
        .andExpect(MockMvcResultMatchers.status().isOk())  //HTTP:status 200
        .andExpect(MockMvcResultMatchers.jsonPath("$.data.author").value("xhl"))
        .andExpect(MockMvcResultMatchers.jsonPath("$.data.reader[0].age").value(18))
        .andDo(print())
        .andReturn();
        result.getResponse().setCharacterEncoding("UTF-8");
        log.info(result.getResponse().getContentAsString());

    }
}
MockMvc对象有以下几个基本的方法:
- perform : 模拟执行一个RequestBuilder构建的HTTP请求,会执行SpringMVC的流程并映射到相应的控制器Controller执行。
- contentType:发送请求内容的序列化的格式,"application/json"表示JSON数据格式
- andExpect: 添加RequsetMatcher验证规则,验证控制器执行完成后结果是否正确,或者说是结果是否与我们期望(Expect)的一致。
- andDo: 添加ResultHandler结果处理器,比如调试时打印结果到控制台
- andReturn: 最后返回相应的MvcResult,然后进行自定义验证/进行下一步的异步处理
上面的整个过程,我们都没有使用到Spring Context依赖注入、也没有启动tomcat web容器。整个测试的过程十分的轻量级,速度很快。
真实servlet容器环境下的测试
上面的测试执行速度非常快,但是有一个问题:它没有启动servlet容器和Spring 上下文,自然也就无法实现依赖注入(不支持@Resource和@AutoWired注解)。这就导致它在从控制层到持久层全流程测试中有很大的局限性。
测试类上面额外加上这样两个注解,并且mockMvc对象使用@Resource自动注入,删掉Before注解及setUp函数。
@AutoConfigureMockMvc
@SpringBootTest
@ExtendWith(SpringExtension.class)
该测试方法真实的启动了一个tomcat容器、以及Spring 上下文,所以我们可以进行依赖注入(@Resource)。实现的效果和使用MockMvcBuilders构建MockMVC对象的效果是一样的,但是有一个非常明显的缺点:每次做一个接口测试,都会真实的启动一次servlet容器,Spring上下文加载项目里面定义的所有的Bean,导致执行过程很缓慢。
@SpringBootTest 注解
是用来创建Spring的上下文ApplicationContext,保证测试在上下文环境里运行。单独使用@SpringBootTest不会启动servlet容器。所以只是使用SpringBootTest 注解,不可以使用@Resource和@Autowired等注解进行bean的依赖注入。
@ExtendWith(@RunWith注解)
- RunWith方法为我们构造了一个的Servlet容器运行运行环境,并在此环境下测试。然而为什么要构建servlet容器?因为使用了依赖注入,注入了MockMvc对象,而在上一个例子里面是我们自己new的。
- 而@AutoConfigureMockMvc注解,该注解表示mockMvc对象由spring 依赖注入构建,你只负责使用就可以了。这种写法是为了让测试在servlet容器环境下执行。
实际上@SpringBootTest 注解注解已经包含了 @ExtendWith注解,如果使用了前者,可以忽略后者!
@Transactional
该注解加在方法上可以使单元测试进行事务回滚,以保证数据库表中没有因测试造成的垃圾数据,因此保证单元测试可以反复执行;但是使用该注解会破坏测试真实性。
Mock测试
什么是Mock?
在面向对象程序设计中,模拟对象是以可控的方式模拟真实对象行为的假的对象
在单元测试中,模拟对象可以模拟复杂的、真实的对象的行为, 如果真实的对象无法放入单元测试中,使用模拟对象就很有帮助。
在下面的情形,可能需要使用 “模拟对象行为” 来代替真实对象:
- 真实对象的行为是不确定的(例如,当前的时间或当前的温度);
- 真实对象很难搭建起来;
- 真实对象的行为很难触发(例如,网络错误);
- 真实对象速度很慢(例如,一个完整的数据库,在测试之前可能需要初始化);
- 真实的对象是用户界面,或包括用户界面在内;
- 真实的对象使用了回调机制;
- 真实对象可能还不存在(例如,其他程序员还为完成工作);
- 真实对象可能包含不能用作测试的信息(高度保密信息等)和方法。
场景实践
我们的保存文章的Controller方法,调用ArticleService的saveArticle进行文章的保存。
但是因为种种原因,这个接口目前没能实现(只有接口)
public interface ArticleService {
  public String saveArticle(Article article);
}
我们就可以使用Mock的方法,先Mock一个假的ArticleService,把接口验证完成。
@Slf4j
@AutoConfigureMockMvc
@SpringBootTest
//@ExtendWith(SpringExtension.class)
public class ArticleRestControllerTest {

//    //mock对象
//    private static MockMvc mockMvc;

    @Resource
    private MockMvc mockMvc;

    @MockBean
    private ArticleService articleService;

//    //在所有测试方法执行之前进行mock对象初始化
//    @BeforeAll
//    static void setUp() {
//        mockMvc = MockMvcBuilders.standaloneSetup(new ArticleController()).build();
//    }

    //测试方法
    @Test
    public void saveArticle() throws Exception {

        String article = "{\n" +
                "    \"id\": 1,\n" +
                "    \"author\": \"xhl\",\n" +
                "    \"title\": \"手把手教你开发spring boot\",\n" +
                "    \"content\": \"c\",\n" +
                "    \"createTime\": \"2023-11-03 15:56:55\",\n" +
                "    \"reader\":[{\"name\":\"xhl\",\"age\":18},{\"name\":\"jng\",\"age\":19}]\n" +
                "}";

        //反序列化
        ObjectMapper objectMapper = new ObjectMapper();
        Article articleObj = objectMapper.readValue(article, Article.class);

        //打桩
        when(articleService.saveArticle(articleObj)).thenReturn("ok");


        MvcResult result = mockMvc.perform(
                        MockMvcRequestBuilders
                                .request(HttpMethod.POST, "/rest/article")
                                .contentType("application/json")
                                .content(article)
                )
                .andExpect(MockMvcResultMatchers.jsonPath("$.data").value("ok"))
//        .andExpect(MockMvcResultMatchers.status().isOk())  //HTTP:status 200
//        .andExpect(MockMvcResultMatchers.jsonPath("$.data.author").value("xhl"))
//        .andExpect(MockMvcResultMatchers.jsonPath("$.data.reader[0].age").value(18))
                .andDo(print())
                .andReturn();
        result.getResponse().setCharacterEncoding("UTF-8");
        log.info(result.getResponse().getContentAsString());

    }
}
@MockBean
可以用MockBean伪造模拟一个Service ,如代码中的MockBean。
大家注意上文代码中,打了一个桩
when(articleService.saveArticle(articleObj)).thenReturn("ok");
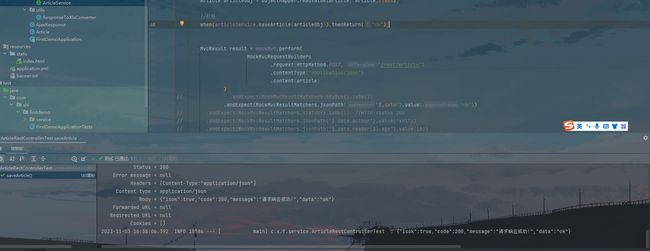
也就是告诉测试用例程序,当你调用articleService.saveArticle(articleObj)方法的时候,不要去真的调用这个方法,直接返回一个结果(“ok”)就好了。
.andExpect(MockMvcResultMatchers.jsonPath("$.data").value("ok"))
测试用例跑通了,期望结果andExpect:ok与实际结果thenReturn(“ok”)一致。表示程序真正的去执行了MockBean的模拟行为,而不是调用真实对象的方法。
注意这里要在Controller层调用service方法
轻量级测试
在ExtendWith的AutoConfigureMockMvc注解的共同作用下,启动了SpringMVC的运行容器,并且把项目中所有的@Bean全部都注入进来。把所有的bean都注入进来是不是很臃肿?这样会拖慢单元测试的效率。如果我只是想测试一下控制层Controller,怎么办?
@ExtendWith(SpringExtension.class)
@WebMvcTest(ArticleController.class)
//@SpringBootTest
使用@WebMvcTest替换@SpringBootTest
- @SpringBootTest注解告诉SpringBoot去寻找一个主配置类(例如带有@SpringBootApplication的配置类),并使用它来启动Spring应用程序上下文。SpringBootTest加载完整的应用程序并注入所有可能的bean,因此速度会很慢。
- @WebMvcTest注解主要用于controller层测试,只覆盖应用程序的controller层,@WebMvcTest(ArticleController.class)只加载ArticleController这一个Bean用作测试。所以WebMvcTest要快得多,因为我们只加载了应用程序的一小部分。
MockMvc更多的用法总结
//模拟GET请求:
mockMvc.perform(MockMvcRequestBuilders.get("/user/{id}", userId));

//模拟Post请求:
mockMvc.perform(MockMvcRequestBuilders.post("uri", parameters));

//模拟文件上传:
mockMvc.perform(MockMvcRequestBuilders.multipart("uri").file("fileName", "file".getBytes("UTF-8")));


//模拟session和cookie:
mockMvc.perform(MockMvcRequestBuilders.get("uri").sessionAttr("name", "value"));
mockMvc.perform(MockMvcRequestBuilders.get("uri").cookie(new Cookie("name", "value")));

//设置HTTP Header:
mockMvc.perform(MockMvcRequestBuilders
                        .get("uri", parameters)
                        .contentType("application/x-www-form-urlencoded")
                        .accept("application/json")
                        .header("", ""));
使用Swagger2构建API文档
为什么需要API接口文档?
当下很多公司都采取前后端分离的开发模式,前端和后端的工作由不同的工程师完成。在这种开发模式下,维护一份及时更新且完整的API 文档将会极大的提高我们的工作效率。传统意义上的文档都是后端开发人员使用word编写的,相信大家也都知道这种方式很难保证文档的及时性,这种文档久而久之也就会失去其参考意义,反而还会加大我们的沟通成本。而 Swagger 给我们提供了一个全新的维护 API 文档的方式,下面我们就来了解一下它的优点:
- 代码变,文档变。只需要少量的注解,Swagger 就可以根据代码自动生成 API 文档,很好的保证了文档的时效性。
- 跨语言性,支持 40 多种语言。
- Swagger UI 呈现出来的是一份可交互式的 API 文档,我们可以直接在文档页面尝试 API 的调用,省去了准备复杂的调用参数的过程。
- 还可以将文档规范导入相关的工具(例如 SoapUI), 这些工具将会为我们自动地创建自动化测试。
整合swagger2生成文档
- 引入依赖
<dependency>
  <groupId>io.springfoxgroupId>
  <artifactId>springfox-swagger2artifactId>
  <version>2.6.1version>
dependency>

<dependency>
  <groupId>io.springfoxgroupId>
  <artifactId>springfox-swagger-uiartifactId>
  <version>2.6.1version>
dependency>
- Config配置
@Configuration
@EnableSwagger2
public class Swagger2{

    private ApiInfo apiInfo() {
        return new ApiInfoBuilder()
                .title("springboot利用swagger构建api文档")
                .description("简单优雅的restfun风格")
                .termsOfServiceUrl("https://blog.csdn.net/m0_60496161?spm=1010.2135.3001.5343")
                .version("1.0")
                .build();
    }

    @Bean
    public Docket createRestApi() {
        return new Docket(DocumentationType.SWAGGER_2)
                .apiInfo(apiInfo())
                .select()
                //扫描basePackage包下面的“/rest/”路径下的内容作为接口文档构建的目标
                .apis(RequestHandlerSelectors.basePackage("com.xhl.firstdemo.Controller"))
                .paths(PathSelectors.any())
                .build();
    }


}
- @EnableSwagger2 注解表示开启SwaggerAPI文档相关的功能
- 在apiInfo方法中配置接口文档的title(标题)、描述、termsOfServiceUrl(服务协议)、版本等相关信息
- 在createRestApi方法中,basePackage表示扫描哪个package下面的Controller类作为API接口文档内容范围
- 在createRestApi方法中,paths表示哪一个请求路径下控制器映射方法,作为API接口文档内容范围
bug
- Failed to start bean ‘documentationPluginsBootstrapper’; nested exception is java.lang.NullPointerException
解决办法:在启动类加一个注解:@EnableWebMvc
- mvc报错
解决方法:https://blog.csdn.net/qq_39508627/article/details/104490268
添加一个配置类
@Configuration
public class WebMvcConfigurer extends WebMvcConfigurationSupport {

    /**
     * 发现如果继承了WebMvcConfigurationSupport,则在yml中配置的相关内容会失效。 需要重新指定静态资源
     *
     * @param registry
     */
    @Override
    public void addResourceHandlers(ResourceHandlerRegistry registry) {
        registry.addResourceHandler("/**").addResourceLocations(
                "classpath:/static/");
        registry.addResourceHandler("swagger-ui.html").addResourceLocations(
                "classpath:/META-INF/resources/");
        registry.addResourceHandler("/webjars/**").addResourceLocations(
                "classpath:/META-INF/resources/webjars/");
        super.addResourceHandlers(registry);
    }
}
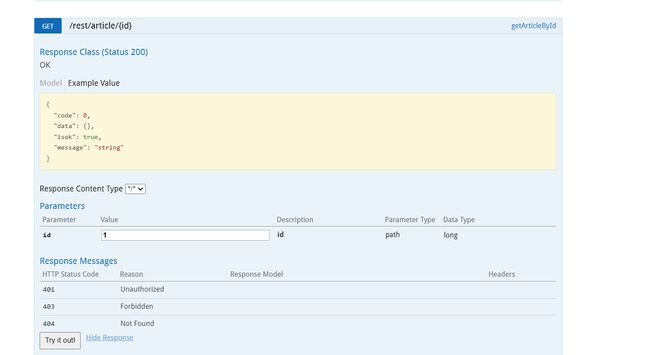
swagger不仅提供了静态的接口文档的展示,还提供了执行接口方法测试的功能。在下图中填入接口对应的参数,点击“try it out"就可以实现接口请求的发送与响应结果的展示。
书写swagger注解
为接口功能添加注释
@ApiOperation(value = "添加文章", notes = "添加新的文章", tags = "Article",httpMethod = "POST")
@ApiImplicitParams({
        @ApiImplicitParam(name = "title", value = "文章标题", required = true, dataType = "String"),
        @ApiImplicitParam(name = "content", value = "文章内容", required = true, dataType = "String"),
        @ApiImplicitParam(name = "author", value = "文章作者", required = true, dataType = "String")
})
@ApiResponses({
        @ApiResponse(code=200,message="成功",response=AjaxResponse.class),
})
@PostMapping("/article")
public @ResponseBody  AjaxResponse saveArticle(
        @RequestParam(value="title") String title,  //参数1
        @RequestParam(value="content") String content,//参数2
        @RequestParam(value="author") String author,//参数3
) {
生产环境下如何禁用swagger2
使用注解@Profile({“dev”,“test”}) 表示在开发或测试环境开启,而在生产关闭。
spring:
  profiles:
    actice:dev
总结
希望大家在学习的过程中多敲代码,多去感觉代码变化带来的程序变化,你会理解的更深刻的,一天进步一点点,less is more.


