ElasticSearch集群的搭建
上一章:《IK分词器和Elasticsearch集成使用》
文章目录
-
- 7.1 集群节点
- 7.2 集群的搭建
-
- 7.2.1 windows环境下es集群的搭建
-
- 1.准备三台elasticsearch服务器
- 2.修改每台服务器的配置
- 7.2.2 linux环境下搭建es集群
- 7.3 集群测试
- 7.4 springboot集成客户端使用
-
- 7.4.1 配置文件增加配置项
- 7.4.2 新增config配置
- 7.4.3 编写接口
ES集群是一个P2P类型(使用 gossip 协议)的分布式系统,除了集群状态管理以外,其他所有的请求都可以发送到集群内任意一台节点上,这个节点可以自己找到需要转发给哪些节点,并且直接跟这些节点通信。
所以,从网络架构及服务配置上来说,构建集群所需要的配置极其简单。在 Elasticsearch 2.0 之前,无阻碍的网络下,所有配置了相同 cluster.name 的节点都自动归属到一个集群中。
2.0 版本之后,基于安全的考虑避免开发环境过于随便造成的麻烦,从 2.0 版本开始,默认的自动发现方式改为了单播(unicast)方式。
配置里提供几台节点的地址,ES 将其视作gossip router 角色,借以完成集群的发现。
由于这只是 ES 内一个很小的功能,所以 gossip router 角色并不需要单独配置,每个 ES 节点都可以担任。所以,采用单播方式的集群,各节点都配置相同的几个节点列表作为 router即可。
7.1 集群节点
ELasticsearch的集群是由多个节点组成的,通过cluster.name设置集群名称,并且用于区分其它的集群,每个节点通过node.name指定节点的名称。
在Elasticsearch中,节点的类型主要有4种:
-
master节点
配置文件中node.master属性为true(默认为true),就有资格被选为master节点。master节点用于控制整个集群的操作。比如创建或删除索引,管理其它非master节点等。 -
data节点
配置文件中node.data属性为true(默认为true),就有资格被设置成data节点。data节点主要用于执行数据相关的操作。比如文档的CRUD。 -
客户端节点
- 配置文件中node.master属性和node.data属性均为false。
- 该节点不能作为master节点,也不能作为data节点。
- 可以作为客户端节点,用于响应用户的请求,把请求转发到其他节点
-
部落节点
当一个节点配置tribe.*的时候,它是一个特殊的客户端,它可以连接多个集群,在所有连接的集群上执行 搜索和其他操作。
7.2 集群的搭建
7.2.1 windows环境下es集群的搭建
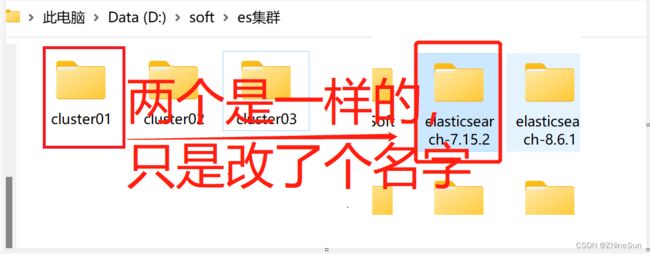
1.准备三台elasticsearch服务器
2.修改每台服务器的配置
修改\conf\elasticsearch.yml配置文件:
# Node节点1:

http.cors.enabled: true
http.cors.allow-origin: "*"
#节点1的配置信息:
#集群名称,保证唯一
cluster.name: my-elasticsearch
#节点名称,必须不一样
node.name: node-1
#必须为本机的ip地址
network.host: 127.0.0.1
#服务端口号,在同一机器下必须不一样
http.port: 9201
#集群间通信端口号,在同一机器下必须不一样
transport.tcp.port: 9301
#设置集群自动发现机器ip集合
discovery.zen.ping.unicast.hosts: ["127.0.0.1:9301","127.0.0.1:9302","127.0.0.1:9303"]
# 默认先以node-1作为master结点
cluster.initial_master_nodes: ["node-1"]


#Node节点2:

http.cors.enabled: true
http.cors.allow-origin: "*"
#节点2的配置信息:
#集群名称,保证唯一
cluster.name: my-elasticsearch
#节点名称,必须不一样
node.name: node-2
#必须为本机的ip地址
network.host: 127.0.0.1
#服务端口号,在同一机器下必须不一样
http.port: 9202
#集群间通信端口号,在同一机器下必须不一样
transport.tcp.port: 9302
#设置集群自动发现机器ip集合
discovery.zen.ping.unicast.hosts: ["127.0.0.1:9301","127.0.0.1:9302","127.0.0.1:9303"]

#Node节点3:

http.cors.enabled: true
http.cors.allow-origin: "*"
#节点3的配置信息:
#集群名称,保证唯一
cluster.name: my-elasticsearch
#节点名称,必须不一样
node.name: node-3
#必须为本机的ip地址
network.host: 127.0.0.1
#服务端口号,在同一机器下必须不一样
http.port: 9203
#集群间通信端口号,在同一机器下必须不一样
transport.tcp.port: 9303
#设置集群自动发现机器ip集合
discovery.zen.ping.unicast.hosts: ["127.0.0.1:9301","127.0.0.1:9302","127.0.0.1:9303"]
在启动之前,请确保将data目录下的内容清空
可以分别启动每个服务器下的elasticsearch.bat
也可以使用批处理指令,新建一个elasticsearch_cluster_start.bat文件,然后添加下面内容:
start "elasticsearch.bat" "D:\soft\es集群\cluster01\bin\elasticsearch.bat" &
start "elasticsearch.bat" "D:\soft\es集群\cluster02\bin\elasticsearch.bat" &
start "elasticsearch.bat" "D:\soft\es集群\cluster03\bin\elasticsearch.bat"
7.2.2 linux环境下搭建es集群
目前手上没有linux相关的环境,后面会同步
7.3 集群测试
只要连接集群中的任意节点,其操作方式与单机版本基本相同,改变的仅仅是存储的结构。
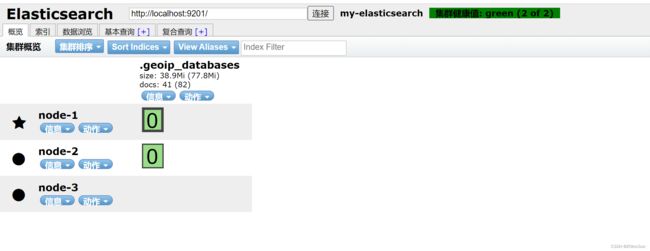
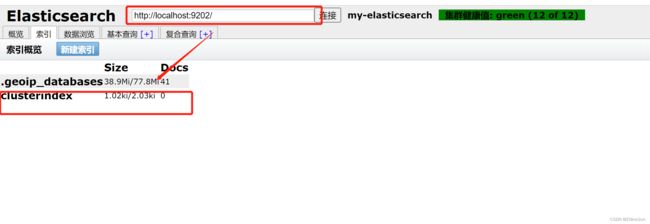
如果在图形化界面上连接其中一个结点,显示出以上信息则表示你的集群创建成功,你也可以通过访问:http://127.0.0.1:9201/_cluster/health?pretty进行查看

我们直接在Head图形化界面上新建一个索引,看看是否会同步至其他节点上
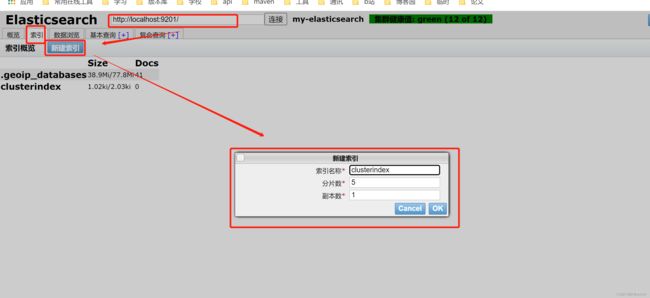
可以看到数据已经同步过来
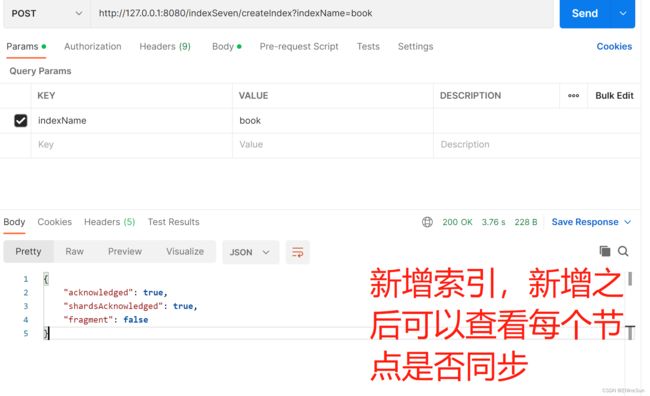
下面我们和SpringBoot集成一下看看集群中数据会不会同步
7.4 springboot集成客户端使用
7.4.1 配置文件增加配置项
elasticSearch.hosts=127.0.0.1:9201,127.0.0.1:9202,127.0.0.1:9203
elasticSearch.userName=
elasticSearch.password=
用户名和密码有就写,没有就空着
7.4.2 新增config配置
import org.apache.http.HttpHost;
import org.apache.http.auth.AuthScope;
import org.apache.http.auth.UsernamePasswordCredentials;
import org.apache.http.client.CredentialsProvider;
import org.apache.http.client.config.RequestConfig;
import org.apache.http.impl.client.BasicCredentialsProvider;
import org.apache.http.impl.nio.client.HttpAsyncClientBuilder;
import org.elasticsearch.client.RestClient;
import org.elasticsearch.client.RestClientBuilder;
import org.elasticsearch.client.RestHighLevelClient;
import org.springframework.beans.factory.annotation.Autowired;
import org.springframework.beans.factory.annotation.Value;
import org.springframework.context.annotation.Bean;
import org.springframework.context.annotation.Configuration;

@Configuration
public class EsConfiguration {

    @Value("${elasticSearch.hosts}")
    String hosts;

    @Value("${elasticSearch.userName}")
    private String userName;

    @Value("${elasticSearch.password}")
    private String password;

    @Bean(name = "highLevelClient")
    public RestHighLevelClient highLevelClient(@Autowired RestClientBuilder restClientBuilder) {
        String[] hosts = this.hosts.split(",");
        HttpHost[] httpHosts = new HttpHost[hosts.length];
        for (int i = 0; i < hosts.length; i++) {
            String host = hosts[i].split(":")[0];
            int port = Integer.parseInt(hosts[i].split(":")[1]);
            httpHosts[i] = new HttpHost(host, port, "http");
        }

        final CredentialsProvider credentialsProvider = new BasicCredentialsProvider();
        credentialsProvider.setCredentials(AuthScope.ANY, new UsernamePasswordCredentials(userName, password));

        RestClientBuilder builder = RestClient.builder(httpHosts).setRequestConfigCallback(new RestClientBuilder.RequestConfigCallback() {
            @Override
            public RequestConfig.Builder customizeRequestConfig(RequestConfig.Builder requestConfigBuilder) {
                requestConfigBuilder.setConnectTimeout(-1);
                requestConfigBuilder.setSocketTimeout(-1);
                requestConfigBuilder.setConnectionRequestTimeout(-1);
                return requestConfigBuilder;
            }
        }).setHttpClientConfigCallback(new RestClientBuilder.HttpClientConfigCallback() {

            @Override
            public HttpAsyncClientBuilder customizeHttpClient(HttpAsyncClientBuilder httpClientBuilder) {
                httpClientBuilder.disableAuthCaching();
                return httpClientBuilder.setDefaultCredentialsProvider(credentialsProvider);
            }
        });
        RestHighLevelClient client = new RestHighLevelClient(builder);
        return client;
    }

}
如果之前有过其他的配置文件记得注释或者直接删除
7.4.3 编写接口
import org.elasticsearch.action.admin.indices.create.CreateIndexRequest;
import org.elasticsearch.action.admin.indices.create.CreateIndexResponse;
import org.elasticsearch.action.admin.indices.delete.DeleteIndexRequest;
import org.elasticsearch.action.support.master.AcknowledgedResponse;
import org.elasticsearch.client.RequestOptions;
import org.elasticsearch.client.RestHighLevelClient;
import org.elasticsearch.client.indices.GetIndexRequest;
import org.springframework.beans.factory.annotation.Autowired;
import org.springframework.web.bind.annotation.GetMapping;
import org.springframework.web.bind.annotation.PostMapping;
import org.springframework.web.bind.annotation.RequestParam;
import org.springframework.web.bind.annotation.RestController;

import java.io.IOException;

@RestController
public class IndexOperationController7 {
    @Autowired
    private RestHighLevelClient restHighLevelClient;

    /**
     * 创建索引
     *
     * @return
     * @throws IOException
     */
    @PostMapping("/indexSeven/createIndex")
    public Object createIndex(@RequestParam(value = "indexName") String indexName) throws IOException {
        //1.创建索引请求
        CreateIndexRequest request = new CreateIndexRequest(indexName);
        //2.客户端执行请求IndicesClient,执行create方法创建索引,请求后获得响应
        CreateIndexResponse response =
                restHighLevelClient.indices().create(request, RequestOptions.DEFAULT);
        return response;
    }

    /**
     * 查询索引
     *
     * @return
     * @throws IOException
     */
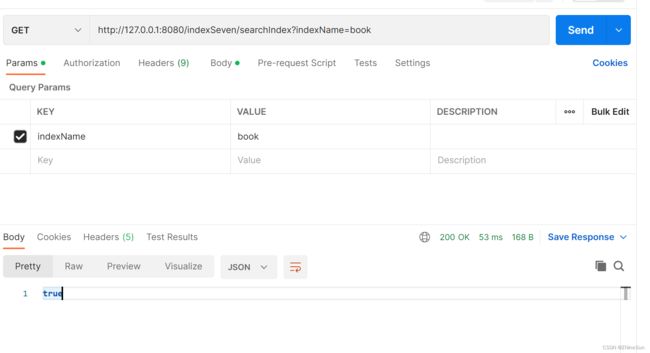
    @GetMapping("/indexSeven/searchIndex")
    public Object searchIndex(@RequestParam(value = "indexName") String indexName) throws IOException {
        //1.查询索引请求
        GetIndexRequest request = new GetIndexRequest(indexName);
        //2.执行exists方法判断是否存在
        boolean exists = restHighLevelClient.indices().exists(request, RequestOptions.DEFAULT);
        return exists;
    }
}
然后我们将node-1服务停止,然后查询索引,看看是否能成功
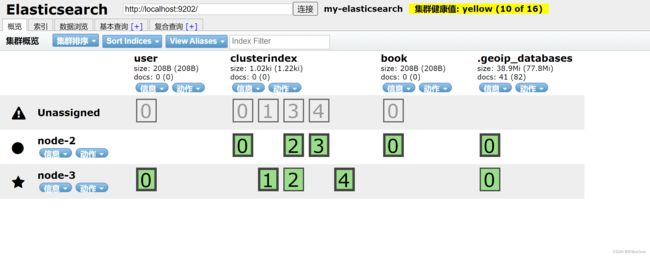
可以发现目前还有两个节点提供服务
我们的es仍然能够正常运行,说明我们的高可用集群已经搭建成功
git地址:https://gitee.com/ninesuntec/es-better.git
PS:本章git上的代码如果有被注释掉的,只是为了防止和后面的章节不冲突,并无错误,大家自行解注查看即可
下一章:《SpringBoot 整合 ES 进行各种高级查询搜索》
